

6.1 Spiral Abyss Overview: November 2025 Meta Shift
Honestly? This rotation feels like miHoYo finally remembered Dendro exists. The November 16, 2025 update creates some genuinely unprecedented opportunities for Bloom-based compositions. That Abundant Moon blessing isn't just window dressing—it triggers True DMG shockwaves every 3 seconds on Dendro reactions with zero cooldown. And yes, that affects all Bloom variants, including Hyperbloom and Nilou's Bountiful Cores.
Floor 12's Ley Line Disorder is where things get spicy. First Half gives you Bloom DMG +200% and Lunar-Bloom +75%. Second Half offers Electro-Charged DMG +200% and Lunar-Charged +75%. These bonuses stack multiplicatively with the blessing's True DMG component, which means your damage ceiling just got blown wide open.
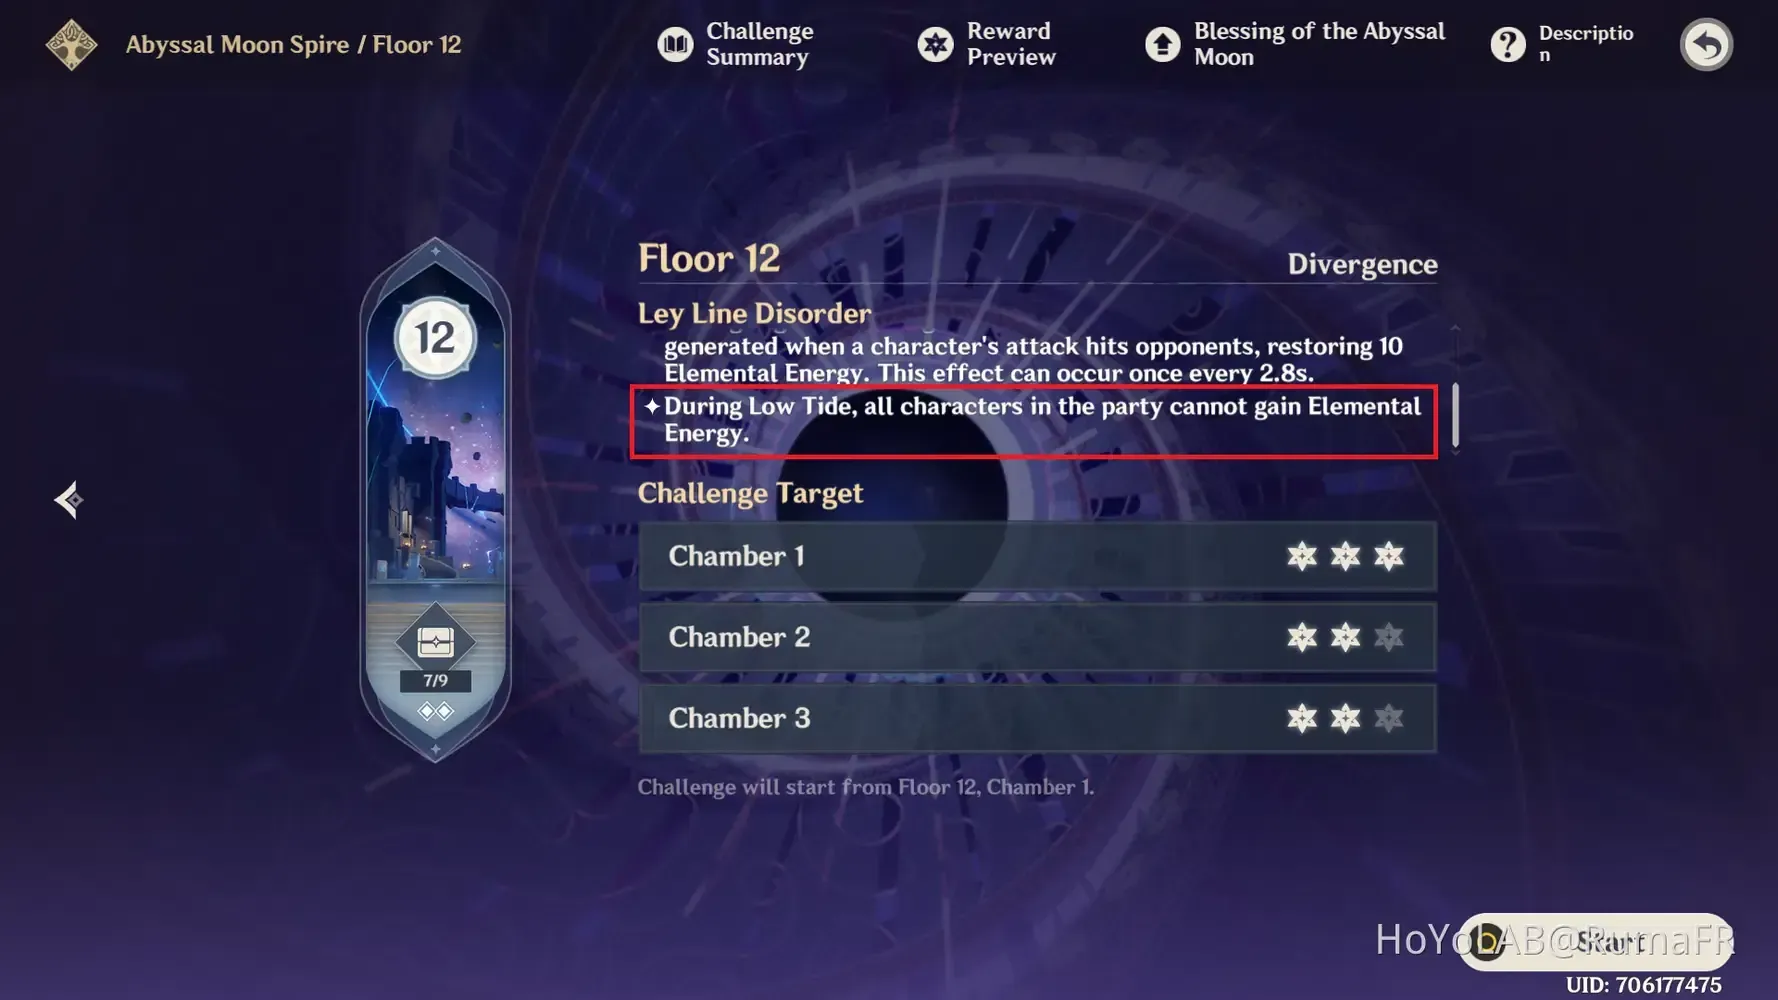
But here's the catch—enemies received a brutal 375% HP increase with levels 95-100 on Floor 12. You're looking at threats like the Battle-Scarred Rock Crab (4,409,072 HP) that requires Bloom reactions for seed conversion, a Primordial Bathysmal Vishap (2,085,774 HP) with 16U Hydro Armor that drains 10 Energy per 0.5 seconds, and the Battle-Hardened Fireblade Shock Trooper (4,765,990 HP) sporting three shield layers vulnerable to Electro-Charged.
DPS requirements have scaled accordingly: Floor 9 needs 15,000+ DPS, Floor 10 wants 25,000+, Floor 11 demands 35,000+, and Floor 12 requires 40,000+ DPS. Your successful teams better feature 800+ Elemental Mastery on triggers, 180%+ Energy Recharge on Burst-dependent characters, and 70-80% CRIT Rate on main DPS units.
For players looking to optimize their Primogem efficiency, BitTopup offers cheap Genshin top up services with competitive rates and instant delivery—because let's be real, you'll need those essential character and weapon pulls for optimal Abyss performance.
Top Tier Hyperbloom Teams for 6.1 Abyss
Nahida-Raiden Core Teams
This is the premium composition that makes other teams jealous: Nahida + Raiden Shogun + Yelan + Kazuha. It delivers exceptional single-target and AoE performance without breaking a sweat.

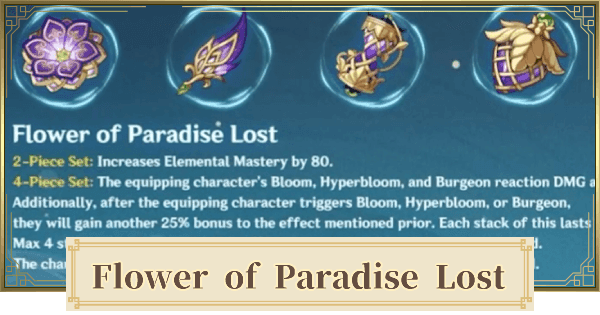
Nahida provides 25-second Dendro application plus that juicy 250 Elemental Mastery buff via Burst. Raiden triggers Hyperbloom with 800+ EM using Flower of Paradise Lost 4-piece (+80 EM, +60% Bloom damage), creating Electro application every 0.9 seconds. It's like clockwork, but deadlier.
The rotation flows beautifully: Nahida Burst/Skill → Yelan Burst (15-second Hydro) → Raiden Skill → Kazuha EM sharing/VV shred. Those 15-20 second cycles maintain constant reaction uptime while maximizing blessing procs. (Editor's note: I've been running this comp for weeks, and it still feels overpowered.)
Kokomi Hyperbloom Variations
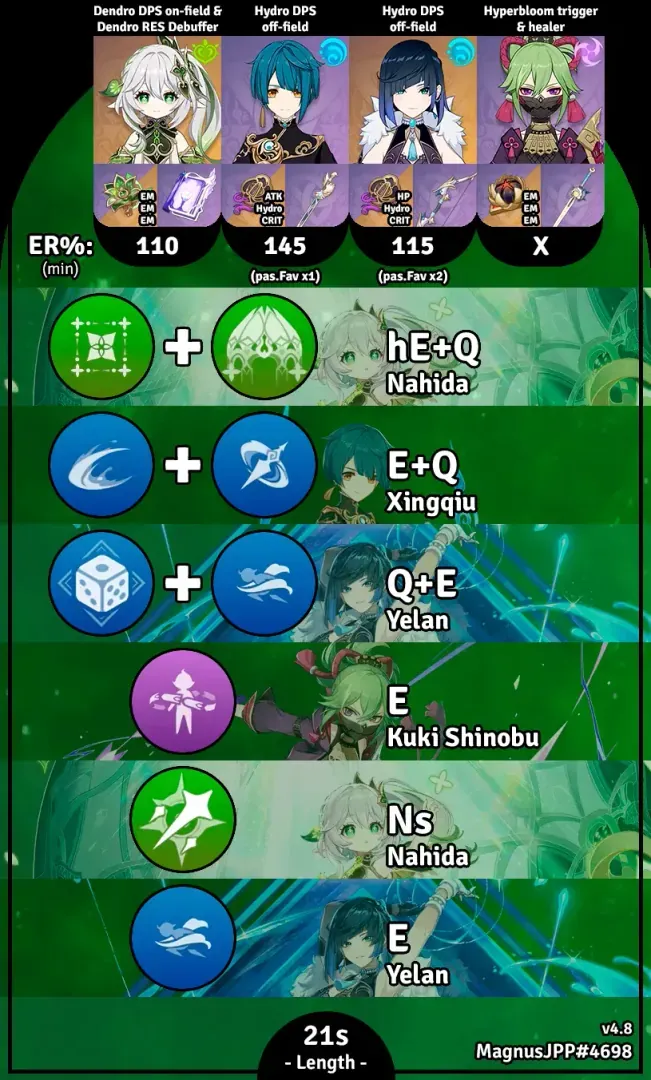
If survivability's your concern, Nahida + Kokomi + Kuki Shinobu + Kazuha prioritizes staying alive while dealing respectable damage. Kokomi's Burst enables 10-second on-field Hydro driving, creating abundant cores with Nahida's persistent Dendro. Kuki triggers Hyperbloom while keeping everyone healthy.
This setup absolutely excels against high interrupt enemies like that energy-draining Primordial Bathysmal Vishap. Dual healing ensures survival through sustained damage while maintaining reaction consistency—because what's the point of big numbers if you're dead?
Budget Hyperbloom Options
F2P players, don't despair. The composition Dendro Traveler + Xingqiu + Kuki Shinobu + Fischl can achieve 36-star clears with higher investment. You'll need 800+ EM on Kuki, 180%+ ER across the team, R5 4-star weapons, and level 90 ascension. Clear times run 8:30-10:00 minutes for full Floor 12—not lightning fast, but totally doable.
Pure Bloom Team Compositions and Strategies
Kokomi Bloom Driver Teams
Kokomi + Nahida + Collei + Baizhu gives you dual Dendro resonance (+50 EM) with excellent survivability. Kokomi's Burst creates 10-second on-field Hydro application, generating cores with Nahida's seeds. Collei extends reaction duration +1 second (max 3), while Baizhu adds Dendro application plus healing and shields.
It's a more methodical approach than Hyperbloom's burst damage, but the consistency pays off in longer fights.
Nilou Bloom Specialists
Here's where things get interesting. Nilou + Nahida + Kokomi + Collei maximizes Bountiful Core generation through Nilou's unique mechanics. Her Skill creates a 12-second enhancement window converting all Bloom to Bountiful Cores.
Build priorities: 40,000+ HP on Nilou, 200+ EM substats, 150-180% ER. Key of Khaj-Nisut is optimal, but Iron Sting works as an F2P alternative.
For monthly Primogem optimization, BitTopup's Welkin Moon top up service provides excellent value for securing constellations and signature weapons through consistent daily rewards and competitive pricing.
Hydro-Dendro Core Setups
Yelan + Nahida + Baizhu + Collei maximizes single-target through Yelan's 15-second coordinated attacks. For complete F2P accessibility, Barbara + Nahida + Yaoyao + Dendro Traveler offers 3-star potential on Floors 9-11, requiring 400+ EM distribution and 180%+ ER.
Floor 9-10 Strategies: Early Abyss Optimization
Floor 9 features a Lunar reaction DMG +50% bonus that makes AoE Bloom reactions shine through core chain explosions with Anemo grouping. Target clear times: Chamber 1 under 300s, Chamber 2 under 180s, Chamber 3 under 60s.
Energy requirements become crucial here—180%+ ER on Burst-dependent DPS, 160%+ on supports. Favonius weapons provide that essential energy support, and Dendro Traveler improves energy economy through Burst particle generation.
Optimization techniques that actually matter: Pre-cast Bursts during invincibility frames, maintain reaction uptime religiously, use Kazuha's 6-second grouping windows effectively, and animation cancel through dash/jump inputs.
Floor 11 Deep Dive: Mid-Tier Challenge Solutions
Chamber 1 throws a Radiant Lunapod (852,422 HP) at you that requires Lunar-Charged teams. Prioritize those Hailstorm Canoneers for ranged threat elimination first. Chamber 2 demands timing Bursts before absorption phases while maintaining healing for Bond of Life mechanics.
Shield counters become a puzzle game: Hydro shields require Dendro application, Electro shields need Hydro (Kokomi/Yelan optimal), Cryo shields require Pyro (consider Burgeon variants). Those 20-second rotation cycles balance damage output with resource sustainability.
Floor 12 Mastery: End-Game Bloom Strategies
First Half Optimization
That 200% Bloom bonus makes this half optimal for Bloom/Hyperbloom teams. Here's a neat trick—heal the Radiant Antelope (1,873,932 HP) to full for +15% CRIT Rate and +50% damage for 15 seconds. The Primordial Bathysmal Vishap requires 16U Dendro through Bloom reactions within 30s to break that annoying Hydro Armor.
Second Half Team Selection
The 200% Electro-Charged bonus favors Hyperbloom variants here. That Battle-Hardened Fireblade Shock Trooper has three shield layers (285,959 HP each) with +200% resistance except to Electro-Charged, which deals 600% damage. Breaking all layers within 30s triggers a -50% resistance weakness state.
Hyperbloom teams adapt by using Electro application for shields while maintaining core generation. Kuki Shinobu at 800+ EM provides optimal trigger efficiency—she's basically built for this.
Character Builds and Artifact Optimization
Elemental Mastery vs Crit Priority
EM breakpoints matter: 200/400/600/800, with 800+ being optimal for triggers. Dendro Resonance provides +50 EM party-wide, which is basically free stats. Nahida requires 60-80% CRIT Rate, 160-200% CRIT DMG, and 180%+ ER. Her C2 enables CRIT scaling on Bloom (20% CRIT Rate, 100% CRIT DMG), which changes everything.
Kuki prioritizes pure EM (800+ target) with no CRIT needed. Level 90 ascension is mandatory, talents 8/8/8 are sufficient.
Set Bonuses for Bloom Teams
- Flower of Paradise Lost 4pc: +80 EM, +60% Bloom damage (optimal for Hyperbloom triggers)
- Deepwood Memories 4pc: -30% Dendro resistance (typically on Nahida)
- Gilded Dreams 4pc: EM sharing in multi-element teams
Weapon Selection Guide
Nahida wants A Thousand Floating Dreams (optimal) or Sacrificial Fragments (F2P). Kuki loves Freedom-Sworn (optimal) or Xiphos' Moonlight (F2P). Kokomi prefers Everlasting Moonglow (optimal) or Prototype Amber (F2P support).
Advanced Rotation Guides and Timing
Optimal Skill Sequences
Hyperbloom: Nahida Burst/Skill → Yelan Burst → Kuki Skill → Kazuha (15-20s cycle)
Pure Bloom: Nahida Skill → Kokomi Burst → core maintenance → Burst timing (20s cycle)
Nilou: Nahida Dendro → Nilou triple Skill → Kokomi Hydro → core management (12s enhancement window)
Energy Funnel Techniques
Swap immediately after Skill usage for particle absorption—timing matters here. Favonius weapons require minimum CRIT Rate on supports, which means substats actually matter. ER thresholds: 180%+ for Burst-dependent characters in extended rotations, 160%+ for supports with particle access.
Reaction Trigger Optimization
Always apply Dendro before Hydro to establish proper aura. Maintain 2-meter distance for 2-second standard Bloom or 1.2-second Lunar-Bloom detonation. The blessing procs every 3 seconds regardless of reaction type—it's surprisingly consistent.
Common Mistakes and Troubleshooting
Elemental Application Errors: Applying Electro before Dendro prevents Quicken aura formation. Over-swapping drains energy particles faster than you think. That minimum 800 EM on Hyperbloom triggers isn't a suggestion—it's essential.
Positioning Mistakes: Maintain 2-meter core proximity for proper detonation timing. Use Anemo grouping for core overlap optimization. Learn attack patterns for consistent damage uptime instead of panic dodging.
Investment Priority Missteps: Don't waste resources on CRIT investment for reaction triggers. Prioritize ER requirements for Burst uptime over flashy damage stats. Level 90 ascension is mandatory for reaction scaling—no shortcuts here.
Alternative Teams and Adaptation Strategies
Missing Character Solutions
No Nahida? Use Dendro Traveler + Collei for dual Dendro resonance. No Kokomi? Barbara provides budget healing, or Yelan handles single-target Hydro application. No Kazuha? Sucrose offers 200+ EM sharing, while Venti provides superior grouping.
Constellation Impact Analysis
Nahida C2 enables CRIT scaling on Bloom (20% CRIT Rate, 100% CRIT DMG), completely transforming team building toward CRIT investment. Raiden C2's 60% DEF ignore improves Burst DPS while maintaining her trigger role. Kokomi C1's extended Burst duration reduces ER requirements significantly.
Future-Proofing Your Investment
Dendro reaction teams maintain relevance due to fundamental mechanics that won't change. Core characters like Nahida and Kazuha provide long-term value across multiple team archetypes. Artifact sets (Flower of Paradise Lost, Deepwood Memories) and EM weapons (Freedom-Sworn, A Thousand Floating Dreams) remain optimal across updates.
FAQ
What are the best Hyperbloom teams for Genshin 6.1 Spiral Abyss? Nahida + Raiden/Kuki + Yelan + Kazuha dominates with 800+ EM triggers and proper rotation timing. Budget F2P alternative: Dendro Traveler + Xingqiu + Kuki + Fischl works perfectly fine.
How much Elemental Mastery do I need for optimal Bloom damage? 800+ EM for Hyperbloom triggers, with diminishing returns beyond 1,000. Dendro Resonance adds +50 EM party-wide, Nahida Burst provides +250 EM to the active character.
Can F2P players clear 6.1 Abyss with Bloom teams? Absolutely. Use Dendro Traveler + Xingqiu + Kuki + Fischl with level 90 characters, 800+ EM on Kuki, 180%+ ER, and R5 4-star weapons. It's totally doable.
What's the rotation for Nahida Hyperbloom teams? Nahida Burst/Skill → Yelan Burst → Kuki Skill → Kazuha. Maintain 15-20 second cycles with 2-meter core distance for optimal timing. Practice makes perfect.
How does the November 2025 Abyss blessing affect Bloom reactions? Abundant Moon triggers True DMG shockwaves every 3 seconds on Dendro reactions. Combined with that 200% Bloom damage bonus, this reduces DPS requirements by 65-90%. It's genuinely broken.
Should I use Bloom or Hyperbloom for Floor 12? Hyperbloom excels for single-target damage against those 4.4M+ HP bosses. Pure Bloom works better for multi-target Floors 9-11. Hyperbloom provides better survival through Kuki's healing for Floor 12's brutal mechanics.


