

Understanding the Four-Star Problem in Luna IV
The four-star problem: getting specific 4-stars is harder than rate-up 5-stars. While guaranteed 4-star drops occur every 10 pulls, featured characters aren't guaranteed. For F2P managing tight budgets through genshin nod krai four star banner top up, this creates unpredictable acquisition.
Luna IV introduces Nod-Krai characters designed for Lunar Reaction mechanics. Three critical issues emerge:
- Banner dilution: You might get the 5-star before your desired 4-star
- Constellation dependency: C0 4-stars often underperform invested alternatives
- Opportunity cost: Each pull = 160 primogems that could fund future 5-stars
For Nod-Krai characters, this intensifies because Lunar Reaction optimization requires specific team synergy.
How Luna IV Changed 4-Star Viability
Luna IV introduced the Moonsign system. Ascendant Gleam activates with 2 Nod-Krai characters, granting:
- +120 Elemental Mastery
- +10% CRIT Rate
- +20% CRIT DMG
- 36% total Lunar Reaction damage boost
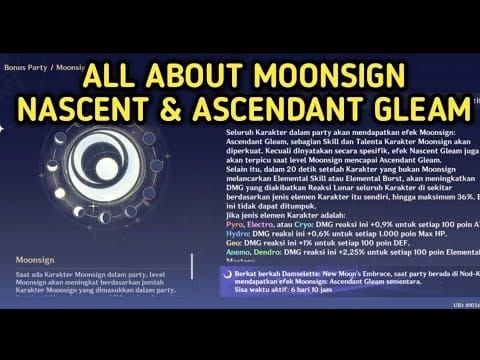
Nascent Gleam (1 Nod-Krai character) provides +15% CRIT Rate and +100% CRIT DMG for Lunar-Bloom reactions only.
Lunar-Bloom reactions deal 1.7x standard Bloom damage while ignoring enemy DEF. Base core damage: 5,632 + 4,608 at 1,000 EM. Cores detonate after 1.2 seconds in 3.5-meter radius.
Lunar Reaction System Requirements
Lunar Reactions convert standard reactions into enhanced versions. Columbina's kit converts Electro-Charged, Bloom, and Crystallize. Lauma upgrades Dendro Cores to Lunar Cores with +460.8% EM-based flat damage.
Requires precise elemental sequencing. Lunar-Bloom needs Dendro + Hydro application followed by triggering mechanics. Aino's Hydro Claymore with EM ascension stat directly supports this. Illuga's Geo Polearm enables Lunar-Crystallize shield generation.
Energy requirements escalate: DPS characters need 160-180% ER, Sub-DPS require 180%+ ER for rotation consistency.
Nod-Krai 4-Star Character Overview
Version 6.3 introduces three characters across two phases (January 14 - February 24, 2026).
Character Roster and Roles
Illuga (4★ Geo Polearm)
- Lightkeepers member, EM-based Geo damage amplification

- +60-200% Geo damage amplification through EM buffs
- Nightingale's Nocturne burst: 15s cooldown, 20s uptime (near-permanent coverage)
- Appears both Phase 1 (with Columbina/Neuvillette) and Phase 2 (with ZiBai/Ineffa)
Jahoda (4★ Anemo Bow)
- SS Tier Sub-DPS Support (as of Dec 3, 2025)
- Level 90: 580 ATK, 18% Healing Bonus ascension
- Hybrid damage-support option
- Previously on Version 6.2 Durin banner (Dec 3-23, 2025)
Aino (4★ Hydro Claymore)
- Lunar Reaction specialist, EM ascension stat
- C6: 35% Lunar Reaction DMG bonus for 15s with 2+ Nod-Krai teammates
- Synergizes directly with Ascendant Gleam requirements
Elemental Application Capabilities
Aino: Consistent Hydro Claymore application for Lunar-Bloom. Pairs with Dendro Traveler for reliable core generation. EM scaling ensures reaction damage scales with budget artifacts.
Jahoda: Anemo enables Viridescent Venerer resistance shred while grouping enemies for AoE Lunar-Bloom detonations. The 3.5m explosion radius benefits from clustering.
Illuga: Geo triggers Lunar-Crystallize with characters like ZiBai. Shield generation provides survivability for F2P teams lacking healers. EM buffs amplify Crystallize shield strength and team reaction damage.
Base Stats vs Existing 4-Stars
Compared to SS Tier supports like Sucrose and Fischl, Nod-Krai 4-stars offer specialized Lunar Reaction optimization vs universal applicability.
Jahoda's 580 ATK at level 90 positions her competitively for Sub-DPS, but true value comes from healing utility that frees team slots.
Aino's EM ascension stat addresses Lunar-Bloom's EM scaling. At 1,000 EM, Lunar-Bloom cores deal 10,240 damage before CRIT. Ascendant Gleam's +120 EM adds ~553 damage per core.
F2P Pull Decision Framework
Strategic pulling requires systematic evaluation. F2P players averaging 5,000+ primogems monthly must allocate across character acquisition, weapons, and emergency reserves.
Account Progression Assessment
Early-game (AR 1-45): Prioritize versatile characters over specialized Lunar Reaction units. Without level 90 ascensions and artifact domains, Nod-Krai 4-stars underperform vs broadly applicable supports like Sucrose/Fischl.
Mid-game (AR 45-55): Best value window. If you've built Dendro Traveler and Barbara, adding Aino and Sucrose creates functional F2P Lunar-Bloom team with minimal 5-star investment.
End-game (AR 55+): Targeting Spiral Abyss Floor 12 requires constellation-invested Nod-Krai characters. Without C6 Aino's 35% Lunar Reaction DMG bonus, damage may fall short of DPS checks.
Current Roster Gap Analysis
Evaluate existing coverage:
- Hydro Application: Have Xingqiu/Yelan/Kokomi? Aino's value decreases unless building secondary teams
- Anemo Support: Sucrose/Kazuha/Venti ownership reduces Jahoda's priority
- Geo Utility: Zhongli/Albedo coverage diminishes Illuga's defensive value (EM buffing remains unique)
- Lunar Reaction Enablers: Owning Columbina makes Nod-Krai 4-stars significantly more valuable
If lacking characters in 3+ categories, targeted Nod-Krai pulling addresses multiple gaps. For genshin lightkeepers oath lantern quest top up, BitTopup offers competitive pricing and fast delivery.
Primogem Budget Calculation
Statistical analysis:
- Average 80 pulls (12,800 primogems) yields 8 total 4-stars
- Featured 4-star rate: ~50% per 4-star drop
- Expected featured copies: ~4 per 80 pulls across three rate-ups
Budget 12,800 primogems for C0 acquisition with reasonable confidence. Constellation chasing requires 28,800+ primogems, competing with 5-star pity.
Version 6.2 provided 10,240 primogems over 42 days (71 total pulls). F2P can afford one 80-pull investment per patch while maintaining 5-star pity progress.
Risk vs Reward Analysis
Illuga: Highest long-term value through unique EM buffing that scales with future Lunar Reaction releases. Dual-phase availability reduces risk of missing rate-up windows.
Jahoda: Moderate value for players lacking Anemo supports. SS Tier confirms meta viability, but overlaps with free Anemo Traveler and common Sucrose.
Aino: Specialized Lunar-Bloom optimization requiring C6 for max effectiveness. Only invest if committing to long-term Lunar Reaction team building.
Nod-Krai 4-Stars vs Existing Alternatives
Lunar Reaction Trigger Efficiency
Aino's Hydro Claymore application rate matches Barbara's skill tick rate (every 2.5s at C0). Barbara provides healing without constellation investment, while Aino requires C6 for comparable team value. Barbara's Thrilling Tales R5 provides 48% ATK buffing with zero gacha investment.
Jahoda's Anemo application trails Sucrose's catalyst attacks and skill-based Swirls. Sucrose's C6 provides 20% elemental DMG bonus for absorbed element, creating broader applications beyond Lunar Reactions.
C0 Performance Benchmarks
C0 Illuga: Baseline +60% Geo damage amplification, scaling to +200% with full optimization. Functional value without constellations—safest F2P pull.
C0 Jahoda: Competent Sub-DPS with 580 ATK and healing, but lacks burst damage or utility spikes defining meta supports. Serviceable, not exceptional.
C0 Aino: Standard Hydro application without Lunar Reaction DMG bonus. F2P players should commit to eventual C6 through future banners or Starglitter exchange.
Team Flexibility
Illuga: Geo enables flexible slotting into Crystallize teams, mono-Geo comps, and Lunar Reaction setups. EM buffing benefits any reaction team beyond specialized Nod-Krai synergies.
Jahoda: Healing allows dual-role coverage, eliminating dedicated healer requirements. Valuable in Spiral Abyss where team slot efficiency determines clear potential.
Aino: Hydro Claymore creates anti-synergy with Freeze teams requiring ranged Hydro application. Value concentrates in Bloom/Lunar-Bloom compositions only.
Long-Term Investment Value
Future Nod-Krai releases will likely synergize with Ascendant Gleam, increasing existing 4-star value over time. Investing now establishes foundations for expanded team options.
Constellation acquisition through Starglitter exchange provides gradual progression. Each 4-star costs 34 Starglitter. F2P players averaging 8 four-stars per 80 pulls generate ~40 Starglitter monthly, enabling one targeted constellation every 5-6 weeks.
Rerun frequency for 4-stars remains unpredictable. Missing current rate-ups may delay acquisition 6+ months.
Constellation Priority Guide
Critical Breakpoints
Illuga:
- C1: Likely enhances EM buff uptime/magnitude
- C2: Potential energy generation improvements
- C6: Maximum +200% Geo damage amplification
Jahoda:
- C1: Enhanced healing/energy particles
- C4: Typical 4-star power spike for skill improvements
- C6: Complete SS Tier Sub-DPS optimization
Aino:
- C6: Critical—35% Lunar Reaction DMG bonus with 2+ Nod-Krai teammates (transforms her from standard applicator to specialized amplifier)
C0 vs C1 vs C6 Performance
C0 Nod-Krai characters provide 60-70% max potential, sufficient for overworld and early Abyss floors. Ascendant Gleam activates regardless of constellation levels.
C1 typically improves quality-of-life (energy generation, cooldown reduction) rather than raw damage. Evaluate whether improvements justify 12,800+ primogem investment vs saving for guaranteed 5-stars.
C6 completion represents 15-25% performance improvement over C0. Aino's C6 specifically provides 35% multiplicative damage bonus = ~26% DPS increase for Lunar Reaction teams. Expensive upgrade requiring 6 copies across multiple banners.
Starglitter Exchange Strategy
Starglitter shop rotations feature specific 4-stars monthly. Nod-Krai characters enter rotation ~3-6 months post-introduction.
F2P generating 40 Starglitter monthly can acquire one constellation every 5-6 weeks through shop purchases. Most reliable method for patient players.
Prioritize Starglitter on critical breakpoints (C1 for QoL, C6 for damage spikes) vs incremental progress. Saving 204 Starglitter for C6 requires ~30 weeks.
Optimal Lunar Reaction Team Compositions
Budget Team #1: Pure F2P Core
Composition:
- Dendro Traveler (Dendro application, free)
- Barbara (Hydro + healing, free)
- Aino (Hydro Claymore + Lunar bonus, 4★ pull)
- Sucrose (Anemo + EM sharing, common 4★)
Achieves Nascent Gleam (+15% CRIT Rate, +100% CRIT DMG for Lunar-Bloom). Total investment: 12,800 primogems for Aino, assuming Sucrose ownership.
Rotation:
- Dendro Traveler skill for Dendro
- Barbara skill for Hydro aura + healing
- Aino normals for Hydro + core generation
- Sucrose skill/burst for Swirl grouping + EM sharing
- Repeat
Energy requirements: Dendro Traveler 180% ER, Barbara 160% ER, Aino 160% ER, Sucrose 180% ER. Achievable through ER sands and weapon substats.
Budget Team #2: Hybrid 4★/5★
Composition:
- Columbina (Lunar converter, 5★ limited)
- Illuga (Geo + EM buffs, 4★ pull)
- Aino (Hydro + Lunar bonus, 4★ pull)
- Dendro Traveler (Dendro, free)
Achieves Ascendant Gleam (+120 EM, +10% CRIT Rate, +20% CRIT DMG, 36% total Lunar boost). Requires one 5★ + two 4★ pulls.
Columbina converts reactions to Lunar variants. Illuga's Geo triggers Lunar-Crystallize for shields. EM buffs amplify reaction damage and shield strength.
Rotation Optimization
Lunar-Bloom's 1.2s detonation timer requires precise sequencing. Maintain continuous Dendro aura while pulsing Hydro every 2-3s.
Energy Funneling:
- Generate particles with lowest-cooldown skills first
- Switch to energy-hungry characters before particles arrive
- Particles grant 3x energy to active vs 1x to off-field
- Prioritize funneling to burst-dependent supports
Artifact main stats: Prioritize ER until rotation thresholds met (160-180% DPS, 180%+ Sub-DPS). After ER requirements: EM > CRIT Rate > CRIT DMG for reaction characters.
Elemental Application Timing
Dendro aura persists ~9.5s from Dendro Traveler burst. Aino's normals apply Hydro every 2.5s, generating 3-4 Bloom cores per Dendro cycle.
Sucrose Swirl timing determines grouping effectiveness. Activate burst after initial core generation to cluster enemies within 3.5m explosion radius.
Standard ICD allows application every 3 hits or 2.5s. Aino's Claymore normals follow standard ICD—plan rotations around this.
Real Gameplay Performance
Floor 12 Clear Times
Pure F2P teams (Template #1): 90-120s chamber clears with proper artifacts and rotation execution. Meets 3-star requirements for most chambers, though high-HP bosses may extend beyond optimal times.
Hybrid compositions (Template #2) with Columbina: 60-90s clears through enhanced Lunar conversion and higher base damage. 5★ investment provides ~30-40% DPS improvement over pure 4★.
Constellation levels impact clear consistency. C0 teams experience energy issues requiring additional rotations. C6 Aino teams maintain burst uptime for continuous pressure.
Boss DPS Comparison
Against single-target bosses (Perpetual Mechanical Array), Lunar-Bloom underperforms vs optimized Vaporize/Melt due to reaction frequency limits. Bloom cores generate every 2.5s maximum, capping output.
Multi-target scenarios favor Lunar-Bloom's AoE detonations. Against grouped enemies in chambers 12-1/12-3, Nod-Krai teams achieve competitive DPS through simultaneous core detonations.
1.7x Bloom multiplier and DEF-ignore provide consistent damage scaling regardless of enemy resistance. Performance stability across varying Abyss rotations vs element-dependent teams.
Combat Event Performance
Time-trial events favoring burst windows disadvantage Lunar-Bloom's sustained approach. Teams require 6-8s setup before max core generation rates, losing efficiency in 30s challenges.
Survival events benefit from Lunar-Crystallize shield generation (Illuga + ZiBai). Defensive utility enables aggressive positioning for optimal damage uptime.
EM-scaling events directly amplify Nod-Krai performance through Ascendant Gleam's +120 EM and Illuga's additional buffing. Event modifiers providing +200 EM create multiplicative scaling.
Practical Limitations
Lunar-Bloom's fixed detonation timer creates vulnerability to enemy displacement. Mobile bosses (Ruin Serpent) or teleporting enemies reduce effective hit rates.
Workaround: Position cores along predicted movement paths vs current locations. Sucrose grouping mitigates mobility issues.
Energy generation inconsistency plagues 4★ teams lacking premium ER weapons. Favonius series provides particle generation through CRIT hits, requiring 20-30% CRIT Rate on supports.
Workaround: Equip Favonius Codex (Sucrose), Favonius Warbow (Jahoda), or Prototype Amber (Barbara) for supplemental energy. Sacrifice personal damage for team consistency.
F2P Resource Management
Banner Schedule and Pity Planning
Version 6.3 Phase 1 (Jan 14 - Feb 3, 2026): Columbina, Neuvillette, Illuga. Evaluate 5★ priorities—pulling for Columbina/Neuvillette risks depleting primogems before securing desired 4★s.
Phase 2 (Feb 3 - Feb 24, 2026): ZiBai, Ineffa, Illuga. Dual-phase Illuga availability provides safety net for Phase 1 misses.
Pity carries between same-banner-type rotations. Event banner pity from Phase 1 transfers to Phase 2. F2P at 70+ pity should avoid pulling unless willing to receive featured 5★.
When to Skip
Skip if:
- Existing roster covers Hydro/Anemo/Geo adequately
- No interest in featured 5★s and pity exceeds 50 pulls
- Upcoming patches feature higher-priority releases
- Current reserves below 28,800 primogems (guaranteed 5★ threshold)
Players owning Sucrose, Xingqiu, Zhongli gain minimal value unless building secondary Abyss teams. Overlapping functionality doesn't justify expenditure.
Primogem Income Optimization
Version 6.2 provided 10,240 primogems over 42 days:
- Daily Commissions: 60 × 42 = 2,520
- Spiral Abyss: 600 × 2 resets = 1,200
- Events: ~4,000
- Maintenance: 600
- Codes/mail: 920
- Exploration/quests: 1,000
F2P optimization requires:
- 100% Daily Commission completion (2,520 monthly)
- Spiral Abyss Floor 9-12 clears (1,200 bi-weekly)
- Event participation prioritizing primogem rewards
- Exploration completion for one-time sources
Emergency Resource Acquisition
Starglitter Conversion: Each 4★ pull grants 2 Starglitter (5 for duplicates). Converting 160 Starglitter purchases 1 Intertwined Fate.
Achievement Hunting: Uncompleted achievements provide 5-20 primogems each. Systematic completion yields 500-1,000 primogems.
Hangout Events: Each route completion grants 20 primogems. Five hangout characters with 5-6 routes = 500-600 total.
Teapot Currency: Realm Depot exchanges Realm Currency for Transient Resin, accelerating artifact farming without primogem expenditure.
Common F2P Mistakes
Misconception #1: All 4-Stars Are Equal
Nod-Krai 4★s serve specialized Lunar Reaction roles vs universal applications. Pulling Aino without Lunar team foundations wastes her niche optimization—standard Bloom teams function with free alternatives.
Correction: Evaluate synergy with existing roster. Aino requires Dendro applicators and Lunar converters. Illuga needs reaction teams for EM buffing. Jahoda competes with free Anemo Traveler unless providing specific healing.
Misconception #2: Constellations Always Necessary
C0 Illuga provides functional EM buffing without constellations. C0 Aino lacks the defining 35% Lunar DMG bonus justifying her slot over established Hydro applicators.
Correction: Research constellation breakpoints before pulling. Characters with front-loaded C0 power (Illuga) offer better F2P value than C6-dependent ones (Aino).
Misconception #3: New Always Outperforms Old
Power creep exists but doesn't invalidate established characters. Sucrose's EM sharing and crowd control remain competitive with Jahoda despite release dates. Fischl's SS Tier persists across patches.
Correction: Compare new capabilities against existing roster objectively. Nod-Krai 4★s provide Lunar specialization, not universal superiority.
Testing Characters Effectively
Trial events provide temporary access. Effective testing requires systematic assessment:
- Rotation Execution: Practice full sequences 5-10 times to assess energy/cooldowns
- Damage Comparison: Note trial damage vs your built characters in identical scenarios
- Team Integration: Test with your roster vs pre-built trial teams
- Artifact Inspection: Review trial artifacts to understand stat requirements
Trial characters typically feature C0 builds with 4★ weapons, representing realistic F2P investment.
Alternative Strategies: When NOT to Pull
Building Lunar Reactions with Existing Characters
F2P alternatives construct functional teams without Nod-Krai investment:
Alternative Composition:
- Dendro Traveler (free Dendro)
- Barbara (free Hydro + healing)
- Sucrose (common 4★ Anemo)
- Fischl (common 4★ Electro Sub-DPS)
Lacks Ascendant Gleam but functions through standard Bloom. Sucrose provides EM sharing compensating for missing Nod-Krai bonuses. Fischl adds off-field damage.
Performance reaches ~70-80% of optimized Nod-Krai teams, sufficient for Floor 11 and most events. Zero-primogem investment preserves resources for future 5★s.
Future Banner Considerations
Upcoming patches may introduce enhanced Lunar characters or meta shifts devaluing current investments. Major meta changes occur every 3-4 patches through new reactions or mechanics.
Saving Targets:
- 28,800 primogems: Guaranteed featured 5★
- 57,600 primogems: Guaranteed featured 5★ weapon
- 40,000+ primogems: Comfortable buffer for flexibility
F2P maintaining 28,800+ reserves ensure ability to acquire meta-defining 5★s regardless of timing. This security outweighs speculative 4★ investments.
Character Rerun Predictions
Nod-Krai 4★s reappear on future banners. Historical data shows 4★s return every 3-6 months across rate-up rotations.
Rerun Strategy:
- Skip initial releases unless featured 5★ provides value
- Wait for reruns featuring desirable 5★ + Nod-Krai 4★ combinations
- Accumulate Starglitter for guaranteed shop purchases
Patient F2P optimize efficiency by pulling only when both 4★ and 5★ rate-ups provide roster value.
Weapon and Artifact Optimization
Best F2P Weapons
Illuga (Geo Polearm):
- Favonius Lance: ER substat + particle generation through CRIT
- Prototype Starglitter: Craftable ER with skill damage bonus
- Kitain Cross Spear: Craftable EM amplifying her Geo damage buffs
Jahoda (Anemo Bow):
- Favonius Warbow: ER + particle generation for team energy
- Sacrificial Bow: Skill reset for increased Anemo application
- Windblume Ode: Event-exclusive EM weapon (if obtained)
Aino (Hydro Claymore):
- Makhaira Aquamarine: Craftable EM optimizing Bloom damage
- Rainslasher: Gacha 4★ EM with damage bonus vs Hydro/Electro-affected enemies
- Sacrificial Greatsword: Skill reset for increased Hydro application
All avoid 5★ gacha dependency, ensuring F2P accessibility.
Artifact Set Priorities
Illuga:
- Archaic Petra 4pc: +35% Geo DMG, +35% elemental DMG for picked-up Crystallize shards
- Noblesse Oblige 4pc: +20% burst DMG, +20% ATK team buff for 12s
- Instructor 4pc: +120 EM team buff for 8s after reactions
Jahoda:
- Viridescent Venerer 4pc: +60% Swirl DMG, -40% elemental RES shred for 10s
- Noblesse Oblige 4pc: Team ATK buffing if VV on another Anemo
- Ocean-Hued Clam 4pc: Converts healing to damage
Aino:
- Flower of Paradise Lost 4pc: +80 EM, +40% Bloom/Hyperbloom/Burgeon DMG, +25% at 1000 EM
- Gilded Dreams 4pc: +180 EM with mixed-element teams, +14% ATK alternative
- Instructor 4pc: Budget +120 EM team buff
Farming priority: Viridescent Venerer first (universal Anemo value), then Flower of Paradise Lost for Bloom specialists, then Noblesse for team buffing.
Stat Priority for Budget Builds
Main Stats:
- Sands: ER until thresholds met (160-180% DPS, 180%+ Sub-DPS), then EM
- Goblet: Elemental DMG% for damage dealers, EM for reaction triggers
- Circlet: CRIT Rate/DMG for damage dealers, EM for reaction triggers
Substat Thresholds:
- ER: 160-180% minimum for consistent burst uptime
- CRIT Rate: 20-30% on Favonius users for particle generation
- EM: 800-1000 for Bloom optimization
- ATK%: Secondary after ER and EM met
F2P farming should accept good enough pieces vs pursuing perfect substats. A +20 artifact with correct main stat and 2-3 useful substats outperforms unleveled perfect pieces.
FAQ
What is the four-star problem in Lunar Reaction teams?
Difficulty obtaining specific rate-up 4★s vs featured 5★s, combined with constellation dependency making many 4★s underperform at C0. For Lunar Reaction teams, specialized Nod-Krai characters require investment but aren't guaranteed within reasonable pull counts.
Are Nod-Krai 4-stars worth pulling for F2P?
Depends on your roster and goals. Illuga offers best F2P value through C0-viable EM buffing and dual-phase availability. Aino requires C6 for optimal performance (long-term investment). Jahoda competes with free alternatives unless providing specific healing. Pull only if building dedicated Lunar Reaction teams or lacking Hydro/Anemo/Geo coverage.
How do Lunar Reactions work?
Convert standard reactions (Bloom, Crystallize, Electro-Charged) into enhanced versions. Lunar-Bloom deals 1.7x standard Bloom damage while ignoring DEF, with cores detonating after 1.2s in 3.5m radius. Ascendant Gleam (2 Nod-Krai characters) grants +120 EM, +10% CRIT Rate, +20% CRIT DMG, 36% total Lunar boost.
Which Nod-Krai 4-star is best for F2P?
Illuga provides highest F2P value: functional C0 performance, dual-phase banner availability, unique EM buffing scaling with future releases. Geo enables Lunar-Crystallize shields while buffing team reactions. Aino serves specialized Lunar-Bloom but requires C6. Jahoda offers hybrid damage-healing but competes with established Anemo supports.
How many primogems should F2P save for Luna IV?
Budget 12,800 primogems for reasonable 4★ acquisition (80 pulls yielding ~4 featured copies across three rate-ups). Maintain 28,800 reserves for guaranteed 5★ if targeting limited characters. F2P averaging 5,000+ monthly can afford one 80-pull per patch while preserving 5★ pity.
Can you clear Spiral Abyss with only Nod-Krai 4-stars?
Floor 12 clears achievable with proper investment, though clear times extend to 90-120s vs 60-90s for optimized 5★ comps. Pure F2P teams (Dendro Traveler, Barbara, Aino, Sucrose) meet 3-star requirements for most chambers with correct artifacts and rotation execution. High-HP bosses may require additional rotations.


