

Let’s be honest - when fishing first dropped in Genshin, half the community wrote it off as just another mini-game. Fast-forward to today, and everyone’s scrambling to figure out why their catch rates are terrible while watching streamers practically auto-fish their way to weapon refinements.
The difference? Understanding the mechanics that actually matter.
Getting Started: Prerequisites That Actually Make Sense
You’ll need Adventure Rank 28 and completion of the Exploding Population World Quest from Katheryne in Mondstadt. Pretty straightforward stuff. This quest hands you the Wilderness Rod and your first bait recipe - Fruit Paste Bait, which becomes your bread and butter for early fishing.
Here’s something most guides skip: the system ties directly into your Serenitea Pot. Grab the Pool of Sapphire Grace blueprint for 10 Medaka from Liyue’s Fishing Association if you want to show off those ornamental fish. Not essential for progression, but hey - bragging rights matter.
The Fishing Line Stabilizer: Why Everyone Gets This Wrong

Cost: 3 Medaka from any Fishing Association rep (Nantuck in Mondstadt, Jiawei in Liyue, Kujirai Momiji in Inazuma, Loumelat in Sumeru).
But here’s the kicker most players miss - this thing scales based on your catch history per individual fish species. Not total fish caught. Per species.
No Power (0-3 fish of that species): You’re on your own.
Low Power (4-15 fish): Slightly faster progress, less punishment when you drift outside the Ideal Tension Zone.
Full Power (16+ fish): This is where the magic happens. Moderately faster fishing, plus progress continues even when you’re outside the zone. Near-automatic fishing for species you’ve grinded.
The stabilizer works everywhere and stacks with regional rod bonuses. At 3 Medaka, it’s probably the best investment you’ll make in the entire fishing system.
Bait Crafting: The Complete Recipe Breakdown
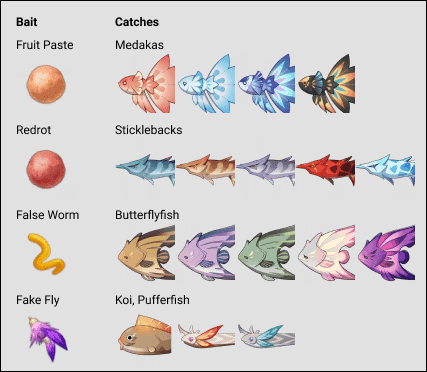
Fruit Paste Bait - Your starter and Medaka farmer 1 Sunsettia + 1 Wheat = 10 bait units Attracts: Medaka, Glaze Medaka, Sweet-Flower Medaka, Aizen Medaka, Dawncatcher, Crystalfish
This stays relevant throughout your entire fishing journey. Medaka = currency for everything else.
Redrot Bait - Blueprint: 3 Medaka from Nantuck 1 Dendrobium + 1 Fowl = 10 bait units Attracts: Lunged Stickleback, Betta, Venomspine Fish, Akai Maou, Snowstrider
False Worm Bait - Blueprint: 3 Medaka (essential for The Catch) 1 Slime Condensate + 1 Berry = 10 bait units Attracts: Brown/Purple/Tea-Colored Shirakodai, Abiding Angelfish, Raimei Angelfish
Fake Fly Bait - Blueprint: 3 Medaka (also needed for The Catch) 1 Sakura Bloom + 1 Horsetail = 10 bait units Attracts: Golden/Rusty Koi, Pufferfish, Bitter Pufferfish, Divda Ray, Formalo Ray
Sugardew Bait - Blueprint: 3 Medaka from Loumelat at Port Ormos 1 Harra Fruit + 1 Sumeru Rose = 10 bait units Attracts: All Sumeru species including the notorious Peach of the Deep Waves
Pro tip: Grab False Worm and Fake Fly first if you’re gunning for The Catch. Sugardew can wait unless you’re specifically after End of the Line.
Sumeru Fish: Where Things Get Spicy
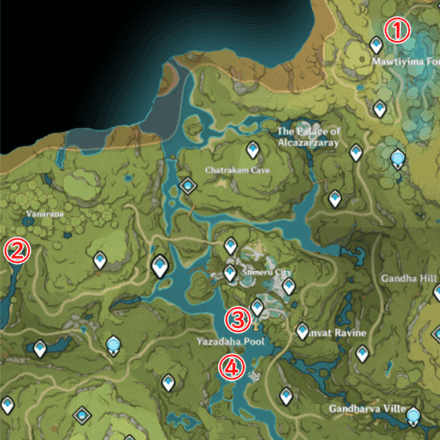
Sumeru brought 10 fishing spots with day/night mechanics that actually matter. The standout? Peach of the Deep Waves - a Very Hard difficulty fish that only spawns at Mawtiyima Forest during daytime (06:00-18:00).
This little guy is the bottleneck for End of the Line crafting, and frankly, it’s designed to test your patience.
Key Sumeru Species:
Peach of the Deep Waves: Daytime only, Mawtiyima Forest exclusive, requires Sugardew Bait
Halcyon Jade/Lazurite Axe Marlin: Easy difficulty, commonly found together
True Fruit Angler: Your reliable grind fish, available day/night at multiple spots
Sunset Cloud Angler: Nighttime exclusive (18:00-06:00)
Best farming spots: Mawtiyima Forest for unique spawns, Port Ormos for convenience (right next to the Fishing Association), Vanarana for variety.
For players looking to speed up their progression, Genshin Impact Top Up through BitTopup offers competitive rates and fast delivery for Genesis Crystals.
The Catch Strategy: Your First Real Fishing Challenge

Cost from Kujirai Momiji: 6 Raimei Angelfish, 20 Golden Koi, 20 Rusty Koi.
Raimei Angelfish is your pain point here. Single spawn location east of Tatarasuna shipwreck, nighttime only, Very Hard difficulty with False Worm Bait. One spawn every three days unless you hop into co-op.
Golden/Rusty Koi are more forgiving. Hit up Stormbearer Mountains, Wangshu Inn, Guili Plains, Luhua Pool, or Koseki Village where both species hang out together.
Refinement materials (Ako’s Sake Vessel) cost 3 Raimei Angelfish, 10 Pufferfish, 10 Bitter Pufferfish per level. Four refinement levels available - do the math on whether it’s worth your sanity.
End of the Line Bow: Sumeru’s Fishing Endgame
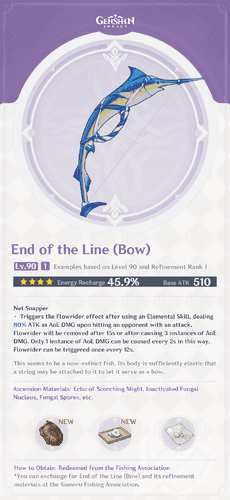
From Loumelat: 4 Peach of the Deep Waves, 16 Lazurite Axe Marlin, 16 Halcyon Jade Axe Marlin.
Stats: 42 Base Attack, 10% Energy Recharge, Net Snapper passive.
The Peach farming is brutal - daytime only at Mawtiyima Forest. Your best bet is establishing a co-op rotation with friends or finding public worlds that’ll let you fish.
Refinement (Original Fish Ointment): 2 Peach, 8 Lazurite Marlin, 8 Halcyon Marlin per level.
Regional Rods: Worth the Investment?
These stack with your Fishing Line Stabilizer, so yeah - they’re worth it once you’ve got steady Medaka income.
Windtangler (Mondstadt): 20 Medaka, 20 Aizen Medaka, 20 Venomspine Fish, 20 Tea-Colored Shirakodai
Wishmaker (Liyue): 20 Medaka, 20 Sweet-Flower Medaka, 20 Betta, 20 Brown Shirakodai
Narukawa Ukai (Inazuma): 20 Medaka, 20 Glaze Medaka, 20 Lunged Stickleback, 20 Purple Shirakodai
Serendipity (Sumeru): 20 Medaka, 20 True Fruit Angler, 20 Sunset Cloud Angler, 20 Sandstorm Angler
Advanced Mechanics That Matter
Fish respawn every 72 hours after you clear a spot. Day/night cycles run 06:00-18:00 (day) and 18:00-06:00 (night) - manipulate your in-game clock for time-sensitive species.
Difficulty breakdown:
Very Easy/Easy: Medaka varieties, Brown Shirakodai, Axe Marlins (your bread and butter)
Medium: Golden/Rusty Koi (manageable with practice)
Hard: Dawncatcher, Crystalfish, Pufferfish (patience required)
Very Hard: Snowstrider, Raimei Angelfish, Peach of the Deep Waves (bring snacks)
Co-op is king for rare fish farming. Join other worlds to bypass respawn timers - just ask permission first. Most players are cool with it if you’re polite.
For enhanced progression, consider Buy Genesis Crystals Online through BitTopup for secure transactions and competitive pricing.
Ornamental Fish & Easy Achievements
Ornamental fish spawn with blue light pillars and use the same bait as regular species. Display them in your Pool of Sapphire Grace (10 Medaka from Liyue Fishing Association).
Quick achievement grabs:
That’s What They Call a Getaway! - 5 Primogems for letting a fish escape (just… let one go)
Oh, so That’s How You Fish… - 5 Primogems for scaring fish by casting too close
Free Primogems are free Primogems.
When looking for Genshin Top Up Deals, BitTopup delivers solid value with fast processing and reliable service.
FAQ: The Questions Everyone Actually Asks
How does the Fishing Line Stabilizer scaling actually work? It tracks each fish species individually. Catch 16+ of any specific fish type, and the stabilizer goes full power for that species only. This is why veteran fishers can auto-catch Medaka but still struggle with new Sumeru fish.
Which bait should I craft first? Start with Fruit Paste for Medaka farming. Then grab False Worm and Fake Fly blueprints (3 Medaka each) if you want The Catch. Sugardew comes later for Sumeru content.
Where exactly is this Raimei Angelfish spot? East of the Tatarasuna shipwreck - there’s only one spawn point. Nighttime only, Very Hard difficulty, False Worm Bait required. Co-op worlds are your friend here.
How do I bypass the 3-day respawn timer? Co-op mode. Join other players’ worlds for fresh fish populations. Always ask permission - most players don’t mind if you’re respectful about it.
Best route for End of the Line farming? Camp Mawtiyima Forest during daytime for Peach of the Deep Waves. Supplement with Vanarana, Vimara Village, and Yazadaha Pool for the marlins. Set up a routine and stick to it.
Do regional rods actually stack with the stabilizer? Yes - regional rods provide location-specific bonuses that work alongside stabilizer effects. Essential for tackling Very Hard difficulty fish efficiently.
The fishing system in Genshin isn’t just about patience - it’s about understanding the mechanics that let you work smarter, not harder. Master these systems, and you’ll wonder why everyone else is still struggling with basic catches.


