

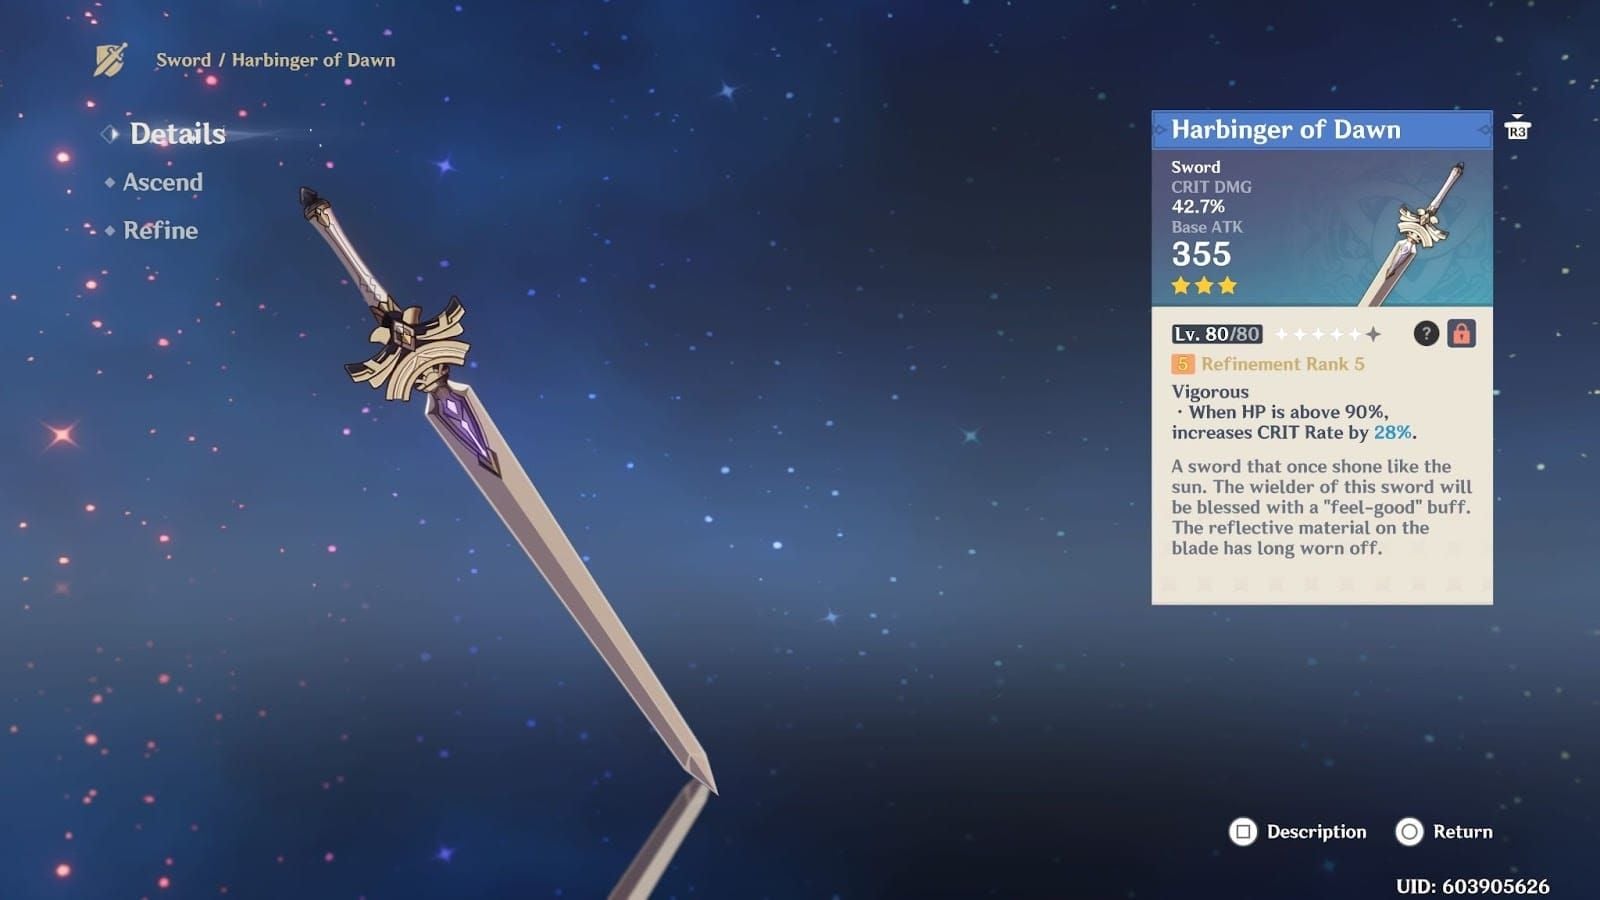
Harbinger of Dawn: Mechanics & Requirements
At Level 90, this 3-star sword provides 401 Base ATK and 46.9% CRIT DMG. The R5 passive grants 28% CRIT Rate when HP remains above 90%—creating offensive stats that rival gacha weapons.
The 90% HP threshold is critical. For Zibai's 12,919 base HP at Level 90, you need approximately 11,627 HP or higher. The passive checks HP in real-time, deactivating immediately if you drop below this threshold.
Secure resources efficiently through genshin impact primogems top up at BitTopup for constellation upgrades on F2P supports.
Weapon Stats and Refinement
Total investment requires 105,000 Mora plus materials:
- Boreal Wolf Series: 2 Milk Tooth, 6 Cracked Tooth, 6 Broken Fang, 3 Nostalgia
- Dead Ley Line: 10 Branch, 12 Leaves, 18 Sprout
- Slime: 6 Condensate, 10 Secretions, 12 Concentrate
Refinement scaling is crucial. R1 provides only 14% CRIT Rate, but R5 doubles this to 28%. Since Harbinger drops frequently from wishes, reaching R5 is achievable within a few months.
Why It's Meta in 6.3
Version 6.3 (until March 3, 2026) features Spiral Abyss blessings rewarding consistent damage over burst strategies. Enemy patterns remain predictable enough for skilled players to maintain 90% HP through dodging and shields. The weapon's effectiveness scales with player skill rather than investment.
Zibai's Kit Synergy with Harbinger of Dawn
Zibai's kit demonstrates exceptional synergy. As a 5-star Geo Sword DPS with CRIT DMG ascension stat, she reaches 38.4% CRIT DMG at Level 90 before weapon and artifacts. This creates an ideal foundation for Harbinger's massive CRIT Rate injection.
Her damage scales on DEF conversion:
- Normal Attack 1-Hit: 134.3756% DEF
- Normal Attack 4-Hit: 207.0496% DEF
- Elemental Skill 1-Hit: 409.754% DEF
- Elemental Skill 2-Hit: 334.799% DEF
Skill operates on 18s cooldown with 15s duration—near-permanent uptime. Her Burst costs only 60 energy with 15s cooldown, enabling frequent CRIT windows.
CRIT Rate Value for Damage
The 28% CRIT Rate represents approximately 56% CRIT DMG value when considering optimal 1:2 ratio. Combined with weapon's 46.9% CRIT DMG and Zibai's 38.4% ascension stat, you start with 85.3% CRIT DMG and 28% CRIT Rate before artifacts. This lets artifact farming focus on CRIT DMG substats, drastically reducing RNG requirements.
Her A4 passive converts Hydro Crystallize shields into Lunar-Crystallize, granting 0.7% base DMG per 100 DEF with maximum 14% at 2,000 DEF.
vs Other F2P Weapons
Harbinger consistently outperforms in pure damage when passive stays active. Amenoma Kageuchi provides ATK% and energy refund but lacks concentrated CRIT stats. Iron Sting offers Elemental Mastery with minimal value for Geo DPS.
A fully built Harbinger user with 90%+ HP uptime gains 74.9% total CRIT stats (28% Rate + 46.9% DMG) from weapon alone. Achieving equivalent stats through artifacts would require multiple perfect rolls.
F2P Healing Options
Barbara: Free Character
Barbara is the most accessible healer, guaranteed free during early progression. Her Skill applies continuous Hydro aura with periodic healing ticks off-field, maintaining 90% HP without disrupting Zibai's field time.
Hydro application synergizes with Zibai's A4 passive, creating Lunar-Crystallize shields for additional damage absorption. Her Burst delivers instant team-wide healing as emergency reset.
Requires 180-200% Energy Recharge for consistent Burst availability. C0 functions adequately; C1 reduces Skill cooldown.
Diona: Dual Shield and Healing
Diona combines shielding and healing in one slot. At Level 90, T9, C0:
- Shield: 5,032 absorption, 9s uptime, 15s cooldown
- Particles: 4 per 15s cycle (0.8 per paw)
Shield covers 60% of cooldown window, requiring Burst healing during gaps. Her Burst creates healing field ideal for stationary DPS windows during Zibai's Skill.
Noelle: Healing Through Damage
Noelle scales with DEF, creating natural synergy with DEF-focused Zibai builds. At Level 90, T9, C0:
- Shield: 9,959 absorption, 12s uptime, 24s cooldown
Primary healing comes from Burst, converting DEF percentage into healing per Normal Attack hit. Requires field time, creating trade-off with Zibai's DPS windows. Works as secondary DPS during Zibai cooldowns in double Geo teams.
Needs 1,800+ DEF for meaningful healing and 140-160% ER for Burst uptime.
F2P Shield Characters
Shield Strength Comparison

Level 90, T9, C0 values:
- Noelle: 9,959 absorption, 12s uptime, 24s cooldown
- Layla: 9,171 absorption, 12s uptime, 12s cooldown
- Kirara: 8,637-13,823 absorption, 12s uptime, 8-12s cooldown
- Thoma: 5,274 single Skill, 14,357 stacked, 8s uptime, 15s cooldown
- Diona: 5,032 absorption, 9s uptime, 15s cooldown
Layla: Optimal F2P Uptime
Layla's 12s shield duration with matching cooldown creates 100% uptime. Her shield generates 1.33 particles per attack, producing 2.66-5.32 particles every 12s depending on engagement.
Shield strength matches Diona but uptime advantage makes Layla superior for passive maintenance. Critical: particle generation requires unbroken shield.
Thoma's Stacking Mechanics
Thoma's initial Skill provides 5,274 absorption, but combined with Burst's shield refresh, total reaches 14,357. Burst refreshes shields with each Normal Attack, creating escalating protection.
Synergizes with Zibai's Normal Attack-focused damage. During Skill duration, Zibai's enhanced attacks simultaneously refresh Thoma's stacks while dealing DEF-scaled damage.
Requires 200%+ Energy Recharge for 80-energy Burst without battery. Must balance ER against HP% for shield strength.
Optimal Team Compositions
Team 1: Zibai + Barbara + Fischl + Anemo
- Zibai: Main DPS with Harbinger of Dawn
- Barbara: Hydro healing, enables Lunar-Crystallize
- Fischl: Off-field Electro damage via Oz, energy generation
- Sucrose/Anemo Traveler: Crowd control, VV shred
Rotation: Barbara Skill → Fischl Skill/Burst → Anemo Skill → Zibai Skill + Normal combo → repeat.
Team 2: Zibai + Diona + Xiangling + Flex
- Zibai: Main DPS
- Diona: Shield and healing, Cryo particles
- Xiangling: Off-field Pyro via Guoba and Pyronado
- Flex: Anemo support or second Geo for resonance
Rotation: Diona Hold Skill → Xiangling Skill/Burst → Flex utility → Zibai Skill + combo.
Team 3: Zibai + Noelle + Double Geo
Pure Geo maximizing Geo Resonance:
- Zibai: Main DPS
- Noelle: Shield, healing, secondary DPS
- Geo Traveler/Ningguang: Geo battery, Geo Resonance
- Flex: Additional sustain
Rotation: Noelle Skill → Geo battery Skill/Burst → Zibai Skill + combo → Noelle Burst during Zibai cooldown.
Geo Resonance provides 15% DMG bonus and shield strength increase.
Artifacts & Stats
Best Artifact Sets
Husk of Opulent Dreams (4pc): 24% DEF and 24% Geo DMG at max stacks. Optimal for pure damage.
Archaic Petra (2pc) + DEF% sets (2pc): 15% Geo DMG + 30% DEF. More consistent without stack management.
Gladiator's Finale (4pc): 35% Normal Attack DMG for sword users. Viable but less optimal than Husk.
Main Stats & Substats
Main Stats:
- Sands: DEF%
- Goblet: Geo DMG%
- Circlet: CRIT DMG
Substat Priority:
- CRIT DMG (target 150-180% total)
- DEF% (aim for 2,000+ total DEF)
- CRIT Rate (reach 60-70% total)
- Energy Recharge (120-130% with Geo battery)
- Flat DEF
Balancing CRIT Ratio
With 28% CRIT Rate from weapon and 5% base, you start at 33%. Reaching 65% total requires only 32% from artifacts—achievable through 4-6 good substat rolls.
CRIT DMG target of 180% requires 95% from artifacts after weapon (46.9%) and ascension (38.4%). CRIT DMG circlet provides 62.2% at +20, leaving only 33% from substats—5-7 good rolls. Achievable within 2-3 weeks of focused farming.
Maintaining 90% HP in Combat
Enemy Pattern Recognition
Most enemies telegraph attacks through animations. Hilichurls raise weapons before swinging, Ruin Guards flash red before missiles, Abyss Mages display elemental auras before casting. Recognize signals for dodge timing that preserves stamina.
Prioritize eliminating ranged enemies first. Archers and Fatui deal chip damage that accumulates, eroding the 90% threshold.
Shield Refresh Timing
Refresh shields before expiration, not after breaks. For Layla's 12s shield with 12s cooldown, refresh at 11s for continuous coverage. For Noelle's 24s cooldown with 12s duration, incorporate healing during the 12s gap.
Layer shields with healing for redundancy. If Diona's shield breaks, her Burst field provides backup healing.
Spiral Abyss Strategies
Floor 11: Energy drain and stamina consumption. Prioritize ER substats for healer/shielder Bursts. Manage stamina during dodges.
Floor 12: High damage demands perfect shield uptime. Use Burst iframes to avoid heavy attacks—casting provides brief invincibility. Time iframes against telegraphed attacks like Ruin Guard stomps.
Damage Calculations vs Alternatives
Level 90 Zibai with 2,000 DEF, 65% CRIT Rate, 180% CRIT DMG:
Harbinger of Dawn R5:
- Average multiplier: 1 + (0.65 × 1.80) = 2.17
- Skill 1-Hit: 409.754% × 2,000 × 2.17 = 17,783 damage
- 4-Hit Normal: 207.0496% × 2,000 × 2.17 = 8,986 damage
Amenoma Kageuchi R5 (1,800 ATK, 55% CRIT Rate, 140% CRIT DMG):
- Average multiplier: 1 + (0.55 × 1.40) = 1.77
- Skill 1-Hit: 409.754% × 2,000 × 1.77 = 14,505 damage
- 4-Hit Normal: 207.0496% × 2,000 × 1.77 = 7,329 damage
Harbinger delivers ~22% higher damage per hit when passive stays active, despite lower base ATK.
When to Switch Weapons
Switch when:
- Corrosion mechanics: Rifthounds bypass shields, making 90% maintenance extremely difficult
- 5-star acquisition: Mistsplitter or Jade Cutter provide superior total stats
- Speedrun strategies: Burst-focused runs may prefer energy weapons
For standard content including Abyss Floors 9-12, Harbinger remains competitive with R1 4-star gacha weapons when passive uptime exceeds 80%.
For premium resources, genshin impact recharge through BitTopup offers competitive rates with instant delivery.
Common Mistakes
Overinvesting in CRIT Rate
Don't build CRIT Rate past 70%. With Harbinger providing 28%, reaching 70% requires only 37% from artifacts. Exceeding this sacrifices CRIT DMG or DEF substats.
Calculate effective DPS: Base Damage × (1 + CRIT Rate × CRIT DMG). A 70:180 ratio yields 2.26 multiplier, while 80:160 yields 2.28—nearly identical.
Poor Cooldown Management
Cast shields and heals proactively before expiration, not reactively after damage. If Diona's shield lasts 9s with 15s cooldown, refresh at 14s to minimize gaps.
Use visual timers or character portraits to track cooldowns. When Skill icon illuminates, immediately swap and refresh.
Aggressive Positioning
Don't stand directly adjacent to enemies. Position at maximum melee range—edge of attack hitbox. This provides reaction time for dodges while maintaining damage.
Against charge attacks, position near walls or obstacles that block enemy movement, making patterns more predictable.
Version 6.3 Meta & Future-Proofing
Version 6.3 runs until March 3, 2026. Zibai's banner: February 3-24, 2026. Current Abyss blessings favor sustained damage over burst windows, making Harbinger's consistent CRIT Rate particularly valuable.
Abyss Blessing Synergies
6.3 Abyss provides Geo DMG bonuses when triggering Crystallize, synergizing with Zibai's A4 passive converting Hydro Crystallize into Lunar-Crystallize. Teams with Barbara gain double value—healing plus Crystallize triggers.
Enemy lineups feature moderate damage without extreme corrosion or shield-piercing, creating ideal environment for Harbinger builds. No Rifthounds in current rotations.
Long-Term Investment Value
Harbinger requires minimal resources—105,000 Mora and farmable materials. Reaches R5 through normal gameplay, ensuring accessibility.
The weapon extends beyond Zibai to other DEF-scaling or CRIT-hungry characters like Albedo. This versatility ensures continued usefulness.
Even if future content challenges HP-threshold weapons, the fundamental stat efficiency ensures relevance. At 60-70% passive uptime, it remains competitive with many 4-star alternatives.
FAQ
Is Harbinger of Dawn good for Zibai in 6.3? Yes, Harbinger R5 is excellent, providing 46.9% CRIT DMG and 28% CRIT Rate at 90%+ HP. Outperforms most 4-stars in sustained damage, making it optimal F2P choice with proper healers and shielders.
How do you keep the passive active? Maintain HP above 90% through consistent healing and shielding. Use Barbara for continuous healing, Diona for combined shields/healing, or Layla for 100% shield uptime. Layer defenses, dodge telegraphed attacks, refresh shields before expiration.
What F2P healers work best? Barbara provides most consistent healing through off-field Skill. Diona offers superior utility with combined shielding and healing. Noelle works in double Geo as secondary DPS during Zibai cooldowns.
Can Zibai use 3-star weapons effectively? Yes, extremely effectively due to CRIT DMG ascension and DEF-scaling damage. The 28% CRIT Rate and 46.9% CRIT DMG reduce artifact farming while delivering competitive damage. At R5, outperforms many R1 4-stars.
Does Harbinger outperform 4-star weapons? Harbinger R5 outperforms most craftable 4-stars and competes with R1 gacha 4-stars when passive uptime exceeds 80%. Delivers ~22% higher damage than Amenoma R5 with achievable artifacts. Only specific 5-stars or high-refinement gacha 4-stars provide clear upgrades.
Which F2P character provides best shields? Layla provides best uptime with 12s duration matching 12s cooldown (100% coverage). Noelle offers strongest single shield at 9,959 absorption but 24s cooldown creates gaps. For strength, Noelle; for uptime, Layla. Combine either with healing for optimal maintenance.


