

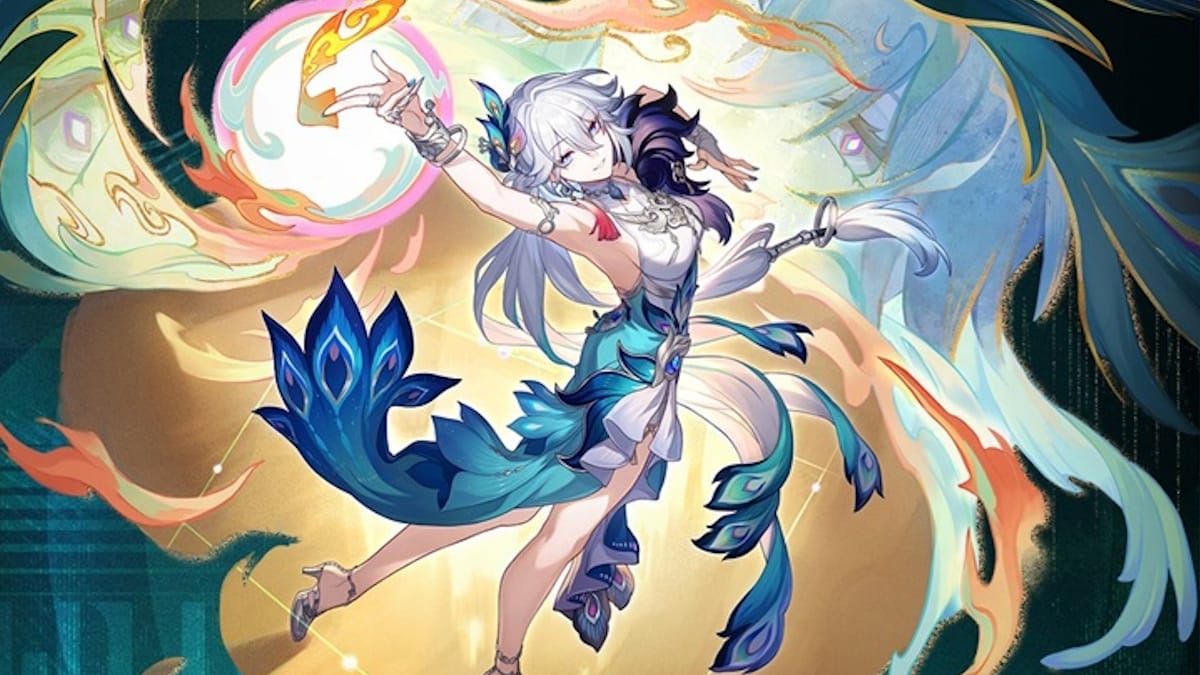
Yao Guang Overview: Role and Meta Position
Yao Guang functions as a Physical Elation hybrid buffer-DPS who amplifies team damage through Zone deployment and Punchline generation. Base SPD 101, max Energy 180.
Core Mechanics:
- Skill (Decalight Unveils All): Deploys 3-turn Zone generating 3 Punchlines, +15% ally Elation, +20% self Elation
- Talent (Behold Wherever Light Unfolds): Certified Banger grants up to 24% Elation DMG per ally attack (max 3 stacks)
- Ultimate (Hexagram of Feathered Fortune): Consumes 5 Punchlines for Aha Instant; 20 Punchlines grants extra turn with 20% All-Type RES PEN for 3 turns
- Basic ATK: 90% ATK single target + 30% ATK adjacent, generates 30 Energy
- Elation Skill (Let Thy Fortune Burst in Flames): 100% Physical Elation DMG across 5 hits + 20% to random targets, applies Woe's Whisper (16% increased Elation DMG taken for 3 turns)
Critical Trace - Amaze-In Grace: At SPD ≥120, gains 30% Elation + 1% per excess SPD point (up to 200 excess). Creates breakpoints at 134, 143, 152, and 160 SPD.
Poised and Sated: Recovers 1 Skill Point when using Elation Skill, grants 60% CRIT DMG.
For pulls and resources, recharge Honkai Star Rail oneiric shards express supply through BitTopup offers competitive pricing and instant delivery.
Level 80 Stats: HP 1242, ATK 466, DEF 655, SPD 100
Meta Position: Strong A-tier in Version 4.0 (launched Feb 12, 2026 NA / Feb 13, 2026 EU/Asia, Phase 1 until March 6). Excels in Pure Fiction, solid in Memory of Chaos floors 11-12 with proper SPD tuning.
Best Builds Tier List
S-Tier: Premium DPS
- Light Cone: When She Decided to See (signature)
- Relics: Diviner of Distant Reach 4pc
- Main Stats: CRIT Rate Body, SPD Feet, Physical DMG% Sphere, ERR% Rope
- Substats: SPD > CRIT Rate > Effect RES > ATK%
- Targets: 160+ SPD, 70%+ CRIT Rate, 140%+ CRIT DMG, 130%+ ERR
Achieves 160 SPD breakpoint for max CRIT Rate (+18%) from Diviner 4pc. Signature provides 18% SPD, 10% CRIT Rate, 30% CRIT DMG, 12% ERR to allies, plus 15 Energy at wave start.
A-Tier: Balanced Hybrid
- Light Cone: Alternative 5-star Elation or high-refinement 4-star
- Relics: Diviner of Distant Reach 4pc
- Main Stats: CRIT Rate Body, SPD Feet, Physical DMG% Sphere, ERR% Rope
- Substats: SPD > CRIT Rate > ATK% > Effect RES
- Targets: 143-152 SPD, 65%+ CRIT Rate, 120%+ CRIT DMG, 120%+ ERR
Sacrifices 18-24% team DPS vs S-tier but requires less investment.
B-Tier: F2P Friendly
- Light Cone: 4-star Elation from events/Herta's Store
- Relics: Diviner 2pc + flexible 2pc (SPD/ATK%)
- Main Stats: CRIT Rate Body, SPD Feet, Physical DMG% Sphere, ATK%/ERR% Rope
- Substats: SPD > CRIT Rate > ATK%
- Targets: 120-134 SPD, 55%+ CRIT Rate, 100%+ CRIT DMG
Achieves 120 SPD threshold for +10% CRIT Rate and Amaze-In Grace activation. 35-40% less personal damage than S-tier but maintains core buffing.
Light Cone Selection
When She Decided to See (Best-in-Slot)
Level 80: HP 1058, ATK 529, DEF 529
Passive: +18% SPD, allies gain +10% CRIT Rate, +30% CRIT DMG, +12% ERR, 15 Energy at wave start
Provides ~18 SPD alone, requiring only 1-2 SPD substat rolls to reach 120. Team CRIT buffs increase total DPS by 18-24% in optimal comps.
4-Star Alternatives
Performance gap: 22-28% personal damage, 12-18% team contribution vs signature. Prioritize options with CRIT Rate, SPD, or Energy regeneration.
F2P options reduce effectiveness by 35-45% but maintain core functionality. Purchase Honkai Star Rail oneiric shards namless honor through BitTopup to accelerate acquisition.
Relics and Planar Ornaments
Diviner of Distant Reach (Best 4pc)
- 2pc: +6% SPD
- 4pc: At SPD ≥120: +10% CRIT Rate; at SPD ≥160: +18% CRIT Rate total; first Elation Skill usage grants allies +10% Elation
SPD-scaling CRIT Rate eliminates need for CRIT Rate substats on several pieces. Ally Elation buff synergizes with Zone for 25% total Elation increase (15% Skill + 10% relic).
2+2 Combinations (Temporary)
- Diviner 2pc + Musketeer 2pc: SPD +6%, ATK +12%
- Diviner 2pc + Physical DMG 2pc: Max personal damage, less team utility
Reduces effectiveness by 15-20%. Use only while farming optimal 4pc.
Planar Ornaments
Sphere: Physical DMG% main stat universally Rope: ERR% optimal for Ultimate frequency; ATK% acceptable alternative
Choose sets emphasizing SPD, CRIT, or Energy mechanics.
Stats Priority
Main Stats (Non-Negotiable)
- Body: CRIT Rate
- Feet: SPD (25 flat SPD = ~25% of total needed for 160 breakpoint)
- Sphere: Physical DMG%
- Rope: ERR% (preferred) or ATK%
Substat Hierarchy
- SPD: Each point contributes to breakpoints + Amaze-In Grace (1% Elation per excess SPD beyond 120)
- CRIT Rate: Target 70%+ total
- Effect RES: Mitigates CC in endgame
- ATK%: Scales base damage after CRIT optimization
Minimum Thresholds: 15-20 SPD from substats (3-4 rolls), 20-25% CRIT Rate (4-5 rolls), 30-40% Effect RES
SPD Breakpoints
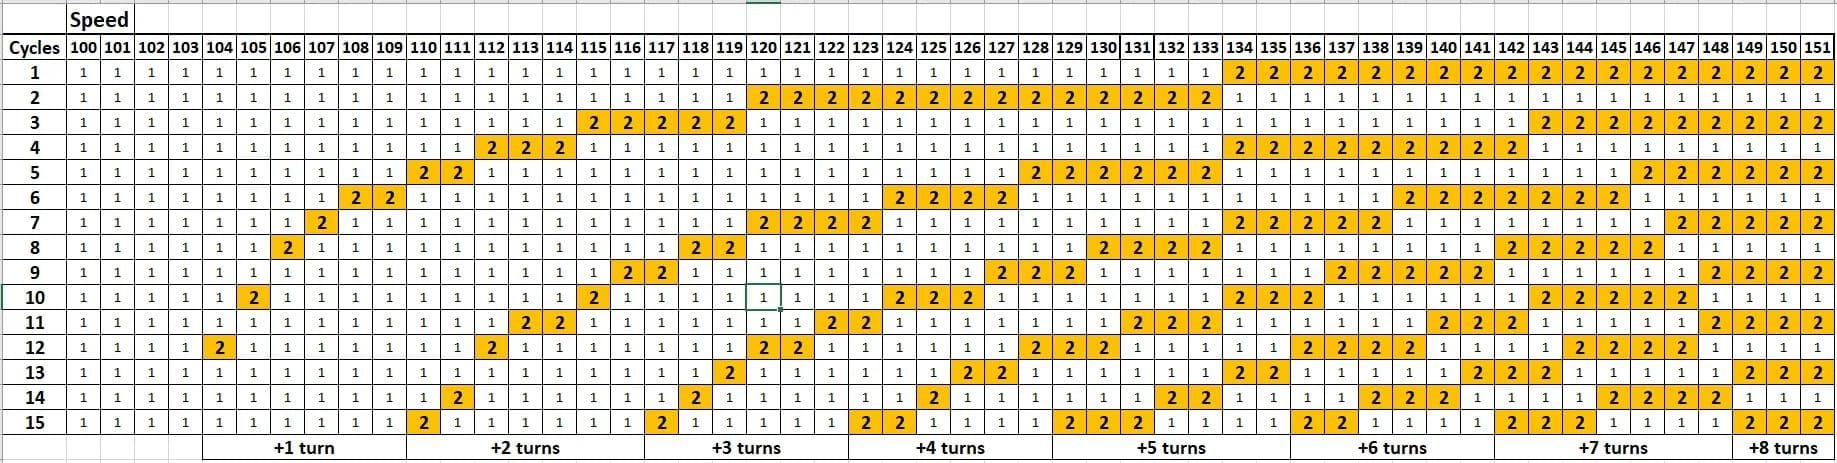
- 120: Activates Amaze-In Grace (+30% Elation) + Diviner 4pc (+10% CRIT Rate)
- 134: +14% Elation from Amaze-In Grace
- 143: +23% Elation total
- 152: +32% Elation total
- 160: Max Diviner bonus (+18% CRIT Rate), +40% Elation total
Reaching 160: Requires ~59 SPD from equipment (18 Light Cone + 25 Feet + 6 Diviner 2pc + 10 substats = 2-3 rolls). Most achievable optimal target.
CRIT Ratio
Target 1:2 Rate:DMG with Diviner adjustments. At 160 SPD with CRIT Rate Body + signature: ~70-75% CRIT Rate (38% Body + 18% Diviner + 10% Light Cone + 5% base + substats).
Competitive: 70% CRIT Rate / 140% CRIT DMG Premium: 75% CRIT Rate / 160% CRIT DMG
Poised and Sated's 60% CRIT DMG bonus amplifies damage during Elation Skill windows.
Trace Leveling and Eidolons
Skill Priority
- Skill (Priority 5): Max first for Zone duration + Elation buffs
- Talent (Priority 4): Certified Banger damage
- Ultimate (Priority 3): RES PEN scaling
- Basic ATK (Priority 2): Minimal usage in optimal rotations
Prioritize team buffing before personal damage.
Total Investment: 8 Tracks of Destiny, 12 Vanquished Flow's Reticence, 18 Fluffy Hand-drawn Storyboards, 69 Fluffy Serialization Memorial Issue, 139 Fluffy Collector's Edition, 56 Whimsy Wax, 71 Dreamweave Steel, 73 Lucid Awl, 3,887,800 Credits
Eidolon Value
- E1: Fixes Punchlines at 30-40, +140% Elation Skill DMG, ignores 20% DEF. ~15-18% personal damage increase
- E2: Zone allies gain +12% SPD, +16% Elation. Highest priority - 18-24% team DPS increase
- E3: Skill Lv +2, Basic ATK Lv +1, Elation Skill Lv +1
- E4: Ignores 18% DEF for Elation DMG, +150% Elation Skill multiplier. ~20-25% personal damage
- E5: Ultimate Lv +2, Talent Lv +2, Elation Skill Lv +1
- E6: Allies' Elation DMG +20%, Yao Guang's Elation Skill +60% multiplier
Stopping Point: E0 provides complete functionality. E2 optimal for low-spenders (max team utility per investment).
Best Teams
Premium Meta
Yao Guang + Sparkle + Sparxie + Dan Heng Permansor Terrae
Sparkle: SP generation + CRIT DMG buffs Sparxie: Action advancement + damage amplification Dan Heng: Hypercarry benefiting from Elation buffs + Zone
Maintain Zone uptime, funnel Sparkle buffs to Dan Heng during burst windows.
Balanced Mid-Investment
Yao Guang + Sparkle + Topaz & Numby + Gallagher
Gallagher: Healing + break capabilities Topaz & Numby: Follow-up attacks trigger Talent stacks Sparkle: SP economy + CRIT buffs
Requires only 2 limited 5-stars (Yao Guang, Sparkle). Accessible for moderate spenders.
F2P Accessible
Yao Guang + Sparkle + Fu Xuan + Evanescia
Fu Xuan: Premium sustain + CRIT Rate sharing (reduces relic requirements) Evanescia: Accessible damage Sparkle: Primary buffer
Sacrifices 25-30% total damage vs premium but clears all endgame content.
Teammate Synergies
Pair with characters who:
- Attack frequently (max Talent stacks)
- Benefit from CRIT buffs (signature Light Cone synergy)
- Utilize Elation damage (amplifies Zone + relic buffs)
- Provide Skill Points (compensates Skill-intensive rotation)
Avoid SP-hungry teammates without adequate generation.
Combat Strategy
Optimal Rotation
- Turn 1: Technique before battle (auto-Skill: 3 Punchlines, Zone active)
- Turns 2-3: Basic ATK for Energy (30 per use) while Zone active
- Turn 4: Refresh Zone with Skill before expiration (3 more Punchlines, total 6)
- Turn 5+: Basic ATK until 20 Punchlines or 180 Energy
At 20 Punchlines: Ultimate grants Aha Instant extra turn. Use bonus turn for Elation Skill during RES PEN window (20% All-Type RES PEN for 3 turns).
Ultimate Timing
Requires 180 Energy, consumes 5 Punchlines. Reaching 20 Punchlines triggers Aha Instant—use extra turn for max damage during RES PEN buff.
ERR% Rope accelerates Ultimate from every 5-6 turns to 4-5 turns (20-25% more usage). Signature's 15 Energy at wave start reduces first Ultimate by 1-2 turns.
Target Priority
Multi-target: Apply Woe's Whisper (16% increased Elation DMG taken) to priority targets before Elation Skill. Basic ATK's 30% splash to adjacent enemies favors central positioning.
Boss encounters: Maintain Zone uptime for ally Elation buffs over personal damage. Team-wide 15% Elation typically exceeds personal contribution.
Common Mistakes
- Letting Zone expire (breaks buff uptime, wastes Punchlines)
- Using Ultimate below 20 Punchlines (misses Aha Instant)
- Overconsumption of Skill Points (prevents teammate Skills)
- Ignoring SPD tuning (suboptimal turn order reduces buff sync)
Monitor Zone duration (3 turns), Punchline count, and SP availability.
Endgame Performance
Memory of Chaos Floors 11-12
Technique's auto-Skill establishes Zone immediately for first-wave efficiency. Floor 12 bosses require precise Ultimate timing to align RES PEN with teammate bursts.
Optimal clear: 4-6 cycles with premium builds. 20% All-Type RES PEN increases damage by 15-25% against high-resistance bosses.
Pure Fiction
Emphasizes AoE through Elation Skill's 5-hit distribution + Woe's Whisper. 16% increased Elation DMG debuff creates multiplicative scaling with Zone buffs.
Target 40,000+ points per stage. Certified Banger procs from frequent ally attacks generate substantial supplemental damage.
Apocalyptic Shadow
Single-target focus favors sustained buffing. Multi-phase bosses benefit from consistent Zone uptime (15% Elation throughout transitions).
Physical-resistant bosses reduce personal damage 30-40% but maintain team buffing value. Ultimate's 20% RES PEN partially mitigates resistance.
DPS Benchmarks (per cycle)
- S-Tier: 180,000-220,000 personal, 25-30% team contribution
- A-Tier: 140,000-170,000 personal, 20-25% team contribution
- B-Tier: 100,000-130,000 personal, 15-20% team contribution
Assumes optimal rotations, SPD tuning, synergistic teams.
Resource Planning
Ascension Materials (Level 80)
- Invasive Clot: 65 (Stagnant Shadow: Shape of Ire)
- Whimsy Wax: 15 (Calyx: Bud of Preservation)
- Dreamweave Steel: 15
- Lucid Awl: 15
- Credits: 308,000
Farm Invasive Clot during double drop events.
Trace Materials
Complete maximization: 2-3 weeks dedicated Trailblaze Power. Whimsy Wax (56), Dreamweave Steel (71), Lucid Awl (73) are primary bottlenecks.
Relic Farming
Diviner drops from specific Cavern of Corrosion domains. Expect 2-3 weeks (160 Trailblaze Power daily) for functional 4pc with acceptable substats.
Farm Body and Feet first (CRIT Rate, SPD main stats most critical). Use temporary alternatives for Sphere/Rope while farming.
Stellar Jade Investment
Securing Yao Guang + signature: ~160-240 pulls depending on pity. F2P accumulation: 60-80 pulls per patch. Supplement through BitTopup for competitive rates and instant delivery.
Common Mistakes
Stat Errors
- Excessive ATK% focus (damage scales from CRIT + Elation multipliers, not base ATK)
- Neglecting Effect RES (debuffs disrupt rotations)
- Ignoring SPD breakpoints (missing 120/160 sacrifices 10-18% CRIT Rate + Elation bonuses)
- Break Effect investment (no break-focused mechanics)
Prioritize: SPD to breakpoints → CRIT optimization → defensive stats → ATK%
Team Composition Pitfalls
- Insufficient SP generation (Yao Guang needs consistent Skill usage)
- Lack of sustain (moderate bulk requires healer/shielder)
- Redundant buffers (multiple CRIT Rate buffers create diminishing returns at 70%+)
- Element mismatch (optimal synergy needs Physical DMG/Elation mechanics)
Ensure teams include SP generation, sustain, damage dealers maximizing her buffs.
Investment Errors
- Premature Eidolon chasing (E0 complete; build functional teams first)
- Light Cone over character acquisition (signature improves 22-28%, new characters provide versatility)
- Relic perfectionism (80% optimal substats > waiting for perfect pieces)
Achieve minimum thresholds (120 SPD, 55% CRIT Rate, proper main stats) before optimization.
FAQ
What's the best light cone for Yao Guang?
When She Decided to See (signature): 18% SPD, team CRIT buffs (+10% Rate, +30% DMG), 12% ERR, 15 Energy at wave start. Increases team DPS 18-24% vs best 4-star alternatives.
Which relic sets work best?
Diviner of Distant Reach 4pc: +6% SPD, up to +18% CRIT Rate at 160 SPD, +10% Elation to allies when using Elation Skill. Perfect synergy with SPD-scaling + team buffing.
Best teammates?
Premium: Sparkle, Sparxie, Dan Heng Permansor Terrae F2P: Topaz & Numby, Gallagher, Fu Xuan, Evanescia
What main stats?
CRIT Rate Body, SPD Feet, Physical DMG% Sphere, ERR% Rope. Maximizes damage while achieving 120/160 SPD breakpoints.
Most important eidolons?
E2 (Blind Arrows Guided by Feathers): Zone allies +12% SPD, +16% Elation for 18-24% team DPS increase. E0 fully functional; E2 optimal stopping point for low-spenders.
What speed threshold?
Target 160 SPD: +18% CRIT Rate (Diviner 4pc), +40% Elation (Amaze-In Grace). Minimum 120 SPD: +10% CRIT Rate, +30% Elation. Achievable with moderate investment.


