

Varka Overview: The Grand Master Arrives
Varka launches February 25 - March 16, 2026 (UTC+8), bringing revolutionary Anemo hypercarry gameplay. Unlike traditional Anemo supports, he's a main DPS converting teammate elemental infusions into devastating dual-blade attacks.
Windbound Execution (Elemental Skill) activates Gale Rush Mode with Stormward Charge, infusing Normal Attacks with Pyro/Hydro/Electro/Cryo based on party composition while enabling stamina-free Azure Devour attacks. Tap triggers immediate Stormward Charge; hold executes chargeable leap for mobility.
Northwind Avatar (Elemental Burst) delivers twin slashes dealing 337.0% ATK + 181.4% ATK damage. 60 Energy cost, 15s cooldown integrates seamlessly into quickswap rotations.
Dawn Wind's March passive converts every 1000 ATK into 10% Anemo DMG Bonus and corresponding Elemental DMG Bonus (25% cap). Wind's Vanguard grants Azure Fang stacks through Swirl reactions: 7.5% special attack damage per stack (max 4 stacks, 8s duration). Homebound Wind's Paean reduces Skill cooldown 5% per Mondstadt ally.
Buy Genshin Impact genesis crystals welkin moon through BitTopup for fast, reliable top-ups with competitive pricing.
Best Weapons: Tier List and Comparisons
5-Star Options
Ballad of the Mighty Wolf (Best-in-Slot)
- 608 base ATK, 33.1% CRIT Rate
- Passive: 6% damage increase stacking 5 times every 0.1s for 4s
- With Hexerei: +6% CRIT DMG per stack (30% max)
- Perfect for rapid attack patterns
Beacon of the Reed Sea
- 608 ATK, 33.1% CRIT Rate
- 20-40% ATK for 8s after Skill/taking damage
- Strong alternative when signature unavailable
Wolf's Gravestone
- 608 ATK, 49.6% ATK substat
- 20-40% ATK unconditional + 40-80% party ATK when enemies <30% HP
- Excellent team support, lacks CRIT Rate
4-Star Alternatives
- Serpent Spine (Battle Pass): CRIT Rate substat, stacking damage bonuses
- Prototype Archaic (F2P): ATK% substat, craftable
- Blackcliff Slasher: CRIT DMG substat, ATK stacking in AoE
Refinement Priority: Ballad of the Mighty Wolf R1→R5 provides substantial gains. For limited spenders, R1 signature > refining 4-stars. R5 Serpent Spine approaches 5-star performance at lower cost.
Optimal Artifacts and Stats
Best Sets
A Day Carved from Rising Winds (Best-in-Slot)
- 2pc: 18% ATK
- 4pc: 25% ATK for 6s
- Directly amplifies ATK-scaling kit
Viridescent Venerer
- 2pc: 15% Anemo DMG
- 4pc: Elemental RES shred for team damage
- Works best with consistent Swirl triggers
Mixed Sets: 2pc Rising Winds + 2pc Viridescent (18% ATK + 15% Anemo DMG) for balanced stats.
Main Stats
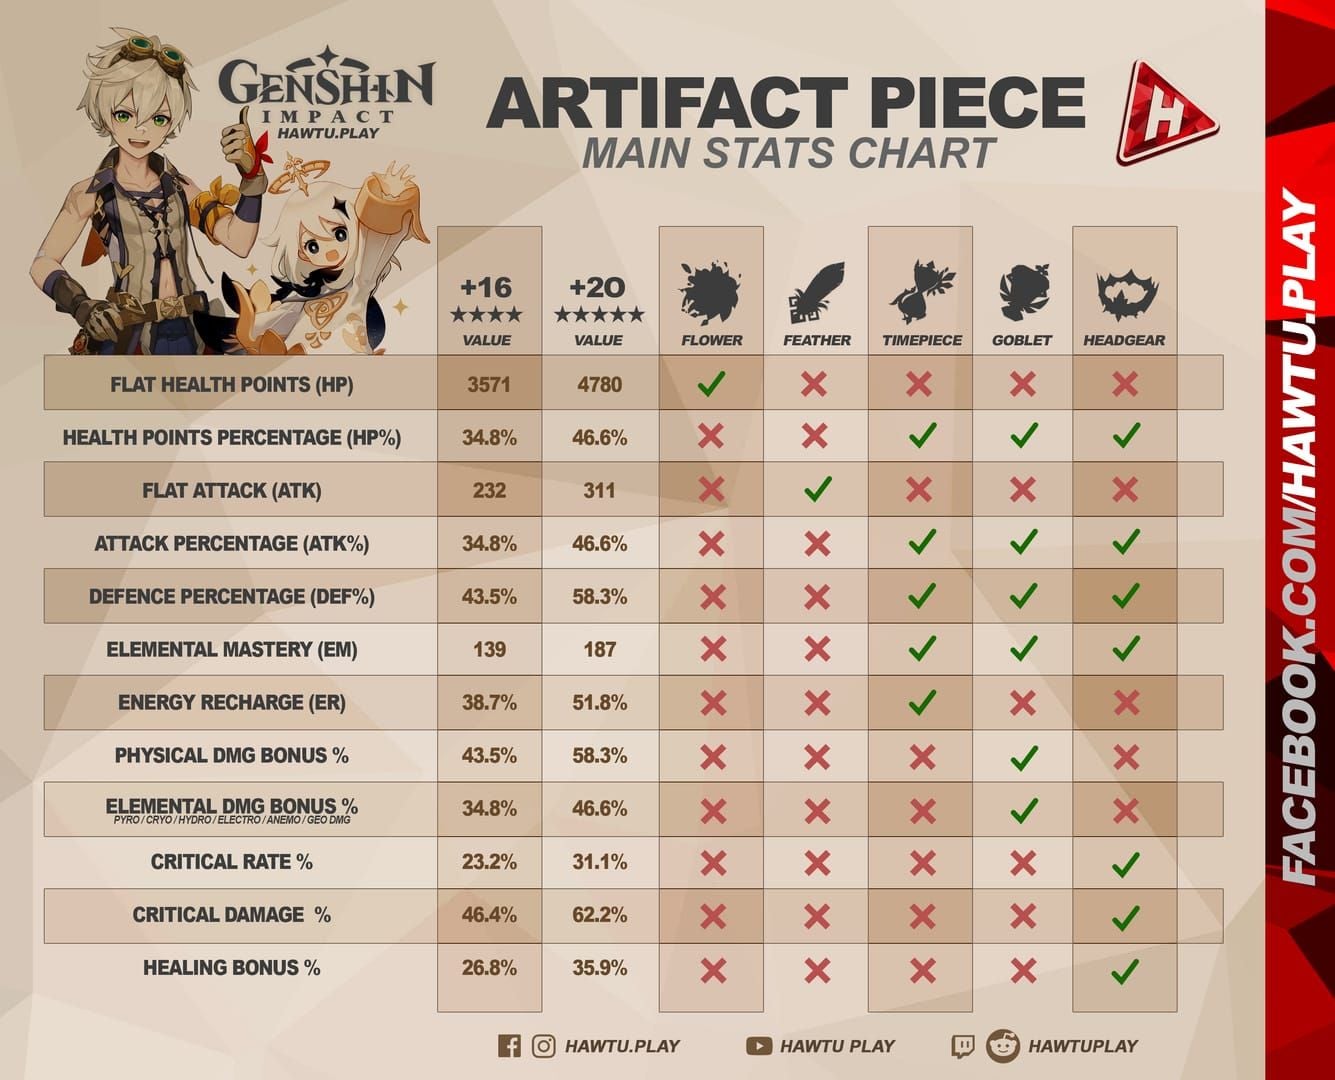
- Sands: ATK% (mandatory)
- Goblet: Anemo DMG% or ATK% (Anemo edges ahead 3-7%)
- Circlet: CRIT Rate/CRIT DMG
- Flower/Feather: HP/ATK (fixed)
Substats
Priority: CRIT Rate/CRIT DMG > ATK% > EM > ER
Targets:
- CRIT Rate: 50-60% (17-27% from artifacts with Ballad)
- CRIT DMG: 150-200%
- ATK: 2500+ for 25% damage bonus cap
- ER: 120-140% in double Anemo teams
Talent Priority and Rotations
Leveling Order
- Elemental Skill: Priority 1 (60-70% total damage)
- Elemental Burst: Priority 2 (significant burst contribution)
- Normal Attack: Priority 3 (infusion scales from Skill level)
Materials per talent to level 10:
- 9 Teachings of Freedom
- 63 Guide to Freedom
- 114 Philosophies of Freedom
- 18 Rook (weekly boss)
Farm Domain of Forgery: City of Reflections (Mon/Thu/Sun). Stop at 8/8/8 for 85% max damage while conserving resources.
Combat Rotations
Pyro Infusion (Varka/Venti/Durin/Bennett):
- Bennett Skill → Burst (ATK buff)
- Venti Skill → Burst (energy, grouping)
- Durin Skill → Burst (Pyro infusion)
- Varka Skill → Normal/Charged combos
220% damage multiplier with double Pyro resonance.
Hydro Infusion (Varka/Jean/Furina/Mona):
- Mona Skill → Burst (Omen debuff)
- Furina Skill → Burst (Fanfare stacks)
- Jean Skill → Burst (healing, Anemo resonance)
- Varka Skill → Normal chains
140% damage multiplier with superior survivability.
Energy Management
60 Energy cost + 15s cooldown = favorable uptime. Double Anemo generates 15-20 particles/rotation. Funnel particles by using Varka's Skill after teammate abilities.
Top up Genshin Impact genesis crystals blessing bundle at BitTopup for secure transactions and excellent service.
Constellation Analysis
C0 Viability
Complete hypercarry at C0. All essential mechanics included. Clears Abyss Floor 12 with proper support.
High-Value Constellations
C1: Lyrical Libation
- +1 Four Winds' Ascension use
- Doubles damage of one Four Winds/Azure Devour attack
- Extends Stormward Charge duration
C2 (Highest Value)
- 800% ATK AoE Anemo hit when Four Winds/Azure Devour activates
- 25-30% total damage increase
- Best damage-per-primogem ratio
C4
- 20% Anemo DMG + 20% Elemental DMG to allies for 10s after Swirl
- Transforms Varka into buffer
C6 (Whale Territory)
- Unlimited Stormward Charge uptime
- +15% CRIT DMG per Azure Fang stack (60% max)
- 80-100% damage increase over C0
Stopping Points
- F2P/Low Spenders: C0
- Welkin/BP: C1 if main DPS
- Moderate Spenders: C2 (recommended)
- Whales: C4 for utility, C6 for max performance
Best Team Compositions
Premium Teams
Double Anemo Double Pyro (Varka/Venti/Durin/Bennett)

- Highest damage ceiling: 220% multiplier
- Bennett provides 1000+ ATK buff
- Venti crowd control + energy
- Excels in AoE scenarios
Double Anemo Double Hydro (Varka/Jean/Furina/Mona)
- 140% multiplier with superior survivability
- Furina Fanfare + Mona Omen
- Jean healing for sustained combat
Hypercarry Quickswap (Varka/Faruzan/Kazuha/Bennett)
- Maximizes Anemo damage amplification
- Faruzan RES shred + Kazuha Elemental DMG
- Requires precise rotation timing
F2P Options
Budget Double Anemo (Varka/Sucrose/Xiangling/Bennett)
- Sucrose EM sharing + VV
- Xiangling consistent Pyro
- Achievable for most players
Mondstadt Synergy (Varka/Jean/Rosaria/Kaeya)
- 20% Skill cooldown reduction (4 Mondstadt chars)
- Jean healing + energy
- Rosaria/Kaeya CRIT sharing
Infusion Priority
Pyro > Hydro > Electro > Cryo for damage output. Prioritize consistent application over element choice.
Ascension Materials

Complete Checklist (Level 90)
Vayuda Turquoise:
- 1 Sliver, 9 Fragments, 9 Chunks, 6 Gemstones
- Farm Anemo Hypostasis (40 Resin/attempt)
Wolfhook: 168 total
- Wolvendom region, 48h respawn
- 50-60 per cycle, requires 3 cycles
Drive Shafts:
- 36 Broken, 96 Reinforced, 129 Precision
- Fatui Landcruisers (Fontaine)
Radiant Moongecko: 46 required
- Weekly boss material (30 Resin/attempt)
- 4-6 weeks farming
Resources:
- 7,100,000 Mora
- 419 Hero's Wit
- 1,200-1,400 Resin investment
Talent Books (Per Talent to 10)
- 9 Teachings, 63 Guide, 114 Philosophies of Freedom
- Domain of Forgery (Mon/Thu/Sun)
- 60-80 runs (1,200-1,600 Resin) for triple crown
- 18 Rook from Unresolved Chess Game
Pre-farming Timeline
8 Weeks Before: Wolfhook collection, weekly boss, Mora Ley Lines 6 Weeks Before: Freedom books, Drive Shafts 4 Weeks Before: Anemo gems, Hero's Wit 2 Weeks Before: Final talent books, verify quantities, artifact farming
Combat Strategies
Reaction Optimization
Swirl triggers Azure Fang stacks (7.5% damage/stack, 30% max). Prioritize Swirls during burst windows.
Infusion enables reactions:
- Pyro: Vaporize (1.5x) with Hydro, Melt (2x) with Cryo
- Hydro: Electro-Charged chains
- Avoid Crystallize (consumes auras, disrupts infusion)
Spiral Abyss Strategies
Floor 12 First Half (AoE): Varka + Venti for crowd control, maximize Swirl reactions
Floor 12 Second Half (Single-target): Varka + Bennett + Mona for burst amplification, time Omen windows
Maintain double Anemo for energy funneling.
Boss Techniques
- High-mobility bosses: Use hold Skill leap to chase
- Shield-phase bosses: Pair with dedicated shield-breakers
- Interruption-heavy: Position carefully, use burst i-frames
Common Mistakes
- Neglecting 2500+ ATK threshold for 25% damage bonus
- Applying multiple elements (inconsistent infusion)
- Wasting Azure Fang stacks (8s duration)
- Skipping double Anemo (5% CDR, energy generation)
- Poor burst timing (outside buff windows)
Meta Positioning
Varka vs Eula
Eula: Physical damage, burst-focused, high variance Varka: Anemo/infusion, sustained damage, consistent output
Varka offers broader team options and stronger C0 performance. Eula requires specific supports (Raiden, Rosaria).
Varka vs Wriothesley
Wriothesley: Cryo specialist, self-sufficient, straightforward Varka: Anemo base, team-dependent, higher skill ceiling
Varka provides superior flexibility (4 infusion options) and Swirl access. Wriothesley suits players preferring simpler gameplay.
Pull Value
Pull if you want:
- Anemo hypercarry option
- Flexible team building
- ATK-scaling DPS (strong Bennett synergy)
Skip if you have:
- Heavy Physical DPS investment (Eula C6)
- Weak Anemo support roster
- Preference for simple rotations
- Plans for Version 6.5-6.6 characters
Future-Proofing
Anemo element ensures relevance through Swirl mechanics. ATK-scaling benefits from future artifact sets. Constellation value unaffected by meta shifts. New Anemo/ATK buffer releases expand team options.
FAQ
Is Varka main DPS or sub DPS? Main DPS exclusively. Requires 8-10s field time per rotation for Stormward Charge attacks. Minimal off-field contribution.
Best weapon for Varka? Ballad of the Mighty Wolf (608 ATK, 33.1% CRIT Rate, 30% damage + 30% CRIT DMG at max stacks). F2P: Serpent Spine (BP) or Prototype Archaic (craftable) at 70-75% signature performance.
Which artifact set? A Day Carved from Rising Winds 4pc (18% ATK + 25% ATK for 6s). Alternative: Viridescent Venerer 4pc for team support.
Best teams? Double Anemo Double Pyro (Varka/Venti/Durin/Bennett) for 220% multiplier. F2P: Varka/Sucrose/Xiangling/Bennett.
Talent priority? Elemental Skill > Elemental Burst > Normal Attack. Recommended: 9/8/8 for resource efficiency.
Is C0 worth pulling? Yes. Complete hypercarry functionality, clears Abyss Floor 12. C1/C2 optional. Full value at C0 for F2P/low-spenders.
Ready to bring the Grand Master home? Secure Varka pulls with instant primogem top-ups at BitTopup – trusted by millions with 24/7 support, competitive rates, and guaranteed safe delivery. Top up now and start building your ultimate Varka today!


