

Understanding Stygian Onslaught 6.3
Located north of Mingyun Village, requires Archon Quest Prologue Act 3 and AR20. Six difficulties: Normal I (Lv40), Advancing II (Lv70), Hard III (Lv90), Menacing IV (Lv100, 120s timers), Fearless V (Lv105), Dire VI (Lv110, 180s total). Difficulties 4-6 prohibit character reuse across three teams.
For faster progression, Genshin Impact Battle Pass recharge fast through BitTopup provides premium weapons and resources.
Boss Mechanics
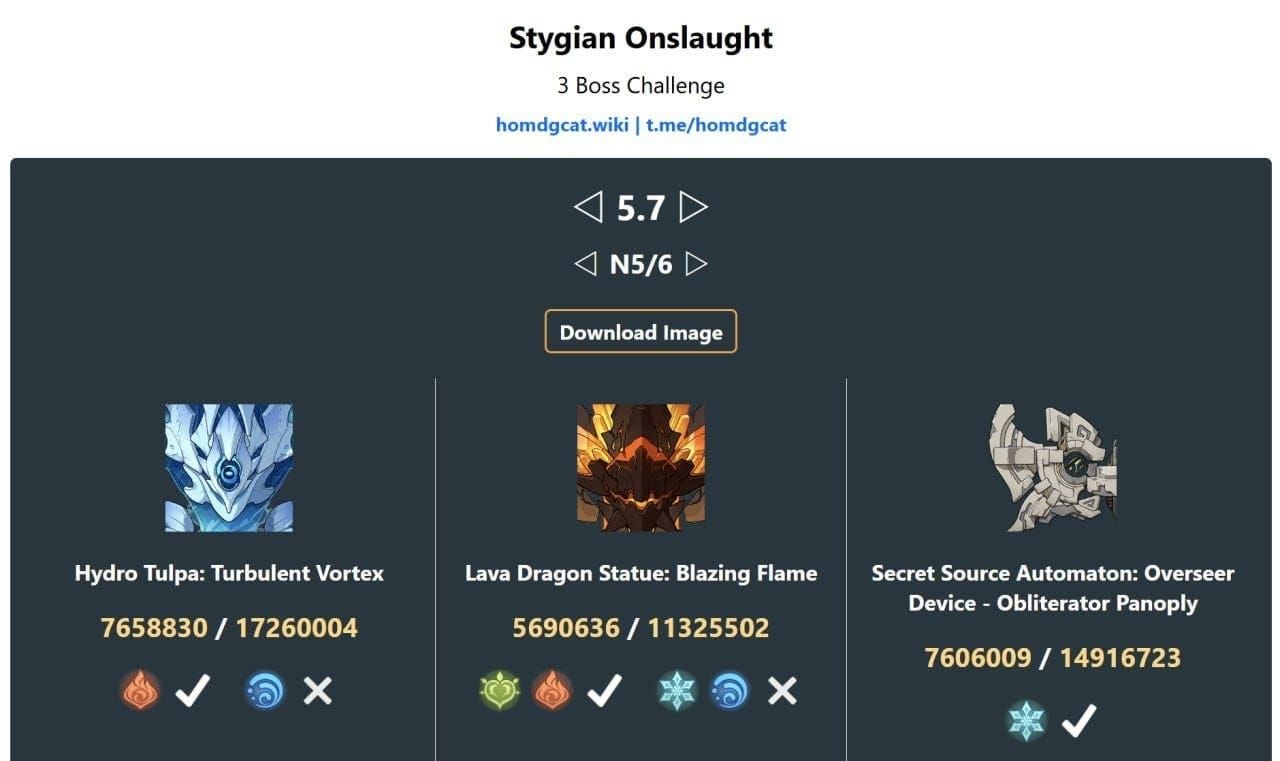
Iniquitous Baptist (Stage 1): 12,437,830 HP (Lv105), 13,614,572 HP (Lv110). Elemental Rings require reactions to interrupt attacks. Elemental Wards paralyze boss 18s when broken. Deepdark Shield at 45% HP—destroying removes 20% HP and reduces all RES by 60%. Anglers reduce shield integrity 25% each.
Battle-Hardened Iktomisaurus (Stage 2): 9,232,639 HP (Lv105), 17,195,518 HP (Lv110). Three shield layers (4.5% HP each). Cryo Wards trigger 12s knockdown when broken. 600% Electro-Charged damage amplification. Three torches respond to Charged Attacks for Pyro damage.
Experimental Field Generator (Stage 3): 8,552,749 HP (Lv105), 14,042,886 HP (Lv110). Requires three Pneuma attacks to disable Ousia core. Plunging Attacks reduce shockwave damage. 64U Pyro horns need Hydro application.
Investment Standards
Low-investment = 4-star characters C0-C2, craftable/4-star weapons R1-5, targeted artifact farming. Character level 80/90, talents 6/8/8, artifacts +16 to +20 with correct main stats, weapons 80/90. Approximately 3-4 weeks resin per team.
Team #1: National (Xiangling/Xingqiu/Bennett/Sucrose)
Build Requirements
Xiangling: 4pc Emblem, ATK%/Pyro/Crit, 180% ER, 50/100 Crit. The Catch R5 > Dragon's Bane R5 > Favonius Lance R3+.
Bennett: 4pc Noblesse, HP%/HP%/Healing, 200% ER. Any ER sword.
Xingqiu: 4pc Emblem, ATK%/Hydro/Crit, 200% ER (180% with Sac Sword R3+), 60/120 Crit. Sacrificial Sword R3+ > Favonius Sword R5.
Sucrose: 4pc VV, EM/EM/EM, ignore substats. Sacrificial Fragments R3+ > Thrilling Tales R5.
Rotation
- Bennett Burst
- Sucrose Skill → Burst (Swirl Pyro for VV)
- Xingqiu Burst → Skill
- Xiangling Burst → Skill (snapshot Bennett buff)
- Bennett Skill (funnel to Xiangling)
- Sucrose Normal Attacks (drive Rain Swords, 15s)
- Repeat
Critical: Xiangling casts Burst in Bennett circle. Sucrose Swirls Pyro before Xingqiu applies Hydro.
Performance
Stage 1: Rapid Ward destruction via Vaporize. 45-60s clear (Diff VI). Stage 2: Hydro-Pyro triggers Electro-Charged with boss's Electro aura. 50-70s. Stage 3: Bennett sustains, Xiangling handles Pyro horns. 55-75s.
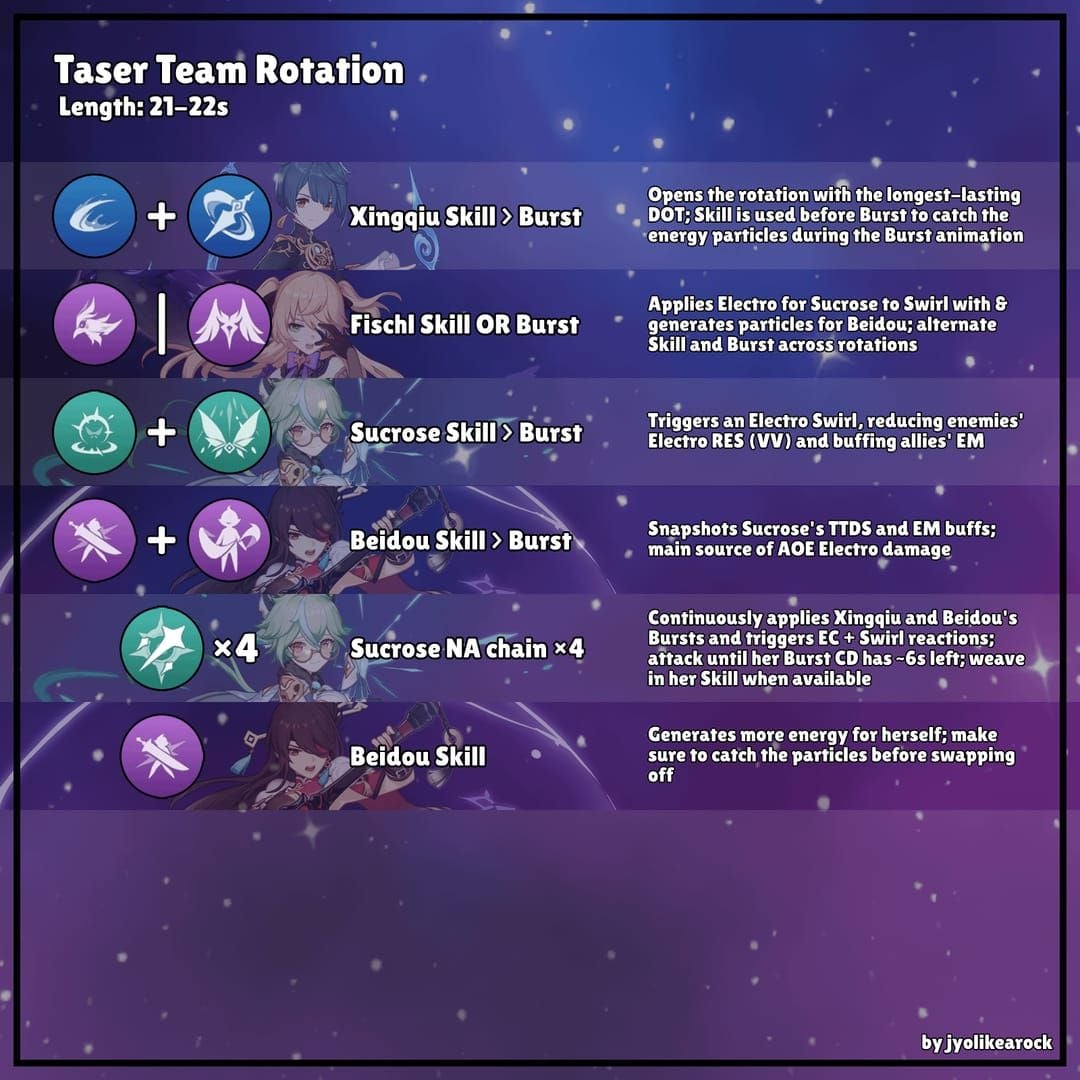
Team #2: Taser (Sucrose/Fischl/Beidou/Xingqiu)
Build Requirements
Sucrose: Same as National.
Fischl: 4pc Thundering Fury or 2pc TF+2pc ATK%, ATK%/Electro/Crit, 120-140% ER. Stringless R5 > Favonius Warbow R3+.
Beidou: 4pc Emblem, ATK%/Electro/Crit, 160% ER. Serpent Spine R1 > Sacrificial Greatsword R3+ > Prototype Archaic R5.
Xingqiu: Same as National.
Rotation
- Fischl Skill (deploy Oz)
- Beidou Burst
- Xingqiu Burst → Skill
- Sucrose Skill (Swirl Electro for VV)
- Sucrose Normal Attacks (12-15s)
- Fischl Burst (reposition Oz)
- Repeat
Beidou Burst requires active Normal Attacks for chain lightning. Funnel Fischl particles to Beidou by swapping after Oz deployment.
EM vs ER Priority
- Sucrose: 600-800 EM, 120-140% ER
- Beidou: 160% ER threshold before Crit/ATK
- Fischl: 120-140% ER, then ATK/Crit
- Xingqiu: 200% ER minimum
Performance
Excels Stage 2 due to 600% Electro-Charged amplification. 8-12 reactions per rotation at 4,500-6,000 damage each = 27,000-36,000 per reaction amplified. Single rotation breaks 1-2 shield layers.
Team #3: Hyperbloom (Dendro Traveler/Xingqiu/Kuki/Fischl)
Build Requirements
Dendro Traveler: 4pc Deepwood, ER/Dendro/Crit or ER/ER/ER, 180% ER. Favonius Sword > Sapwood Blade.
Xingqiu: Same as previous teams.
Kuki Shinobu: 4pc Flower of Paradise Lost, EM/EM/EM, 800+ EM, 180% ER. Iron Sting (craftable).
Fischl: 4pc Thundering Fury, ATK%/Electro/Crit, 120-140% ER.
Rotation
- Dendro Traveler Burst (deploy Lea Lotus Lamp)
- Xingqiu Burst → Skill
- Fischl Skill (deploy Oz)
- Kuki Skill (trigger Hyperblooms)
- Kuki on-field Normal Attacks (15-20s)
- Dendro Traveler Skill (refresh aura)
- Repeat
Dendro Cores persist 6s. Kuki's Skill applies Electro every 1.5s, detonating 4-5 Cores per duration.
Hyperbloom Damage
Level 90 base: 1,446.85 damage. With 800 EM: ~6,337 per Hyperbloom. Against Lv110 bosses (10% Dendro RES): ~5,703 damage. 3-4 Cores/second × 15s = 45-60 Hyperblooms = 256,635-342,180 reaction damage alone.
Kuki EM Breakpoints:
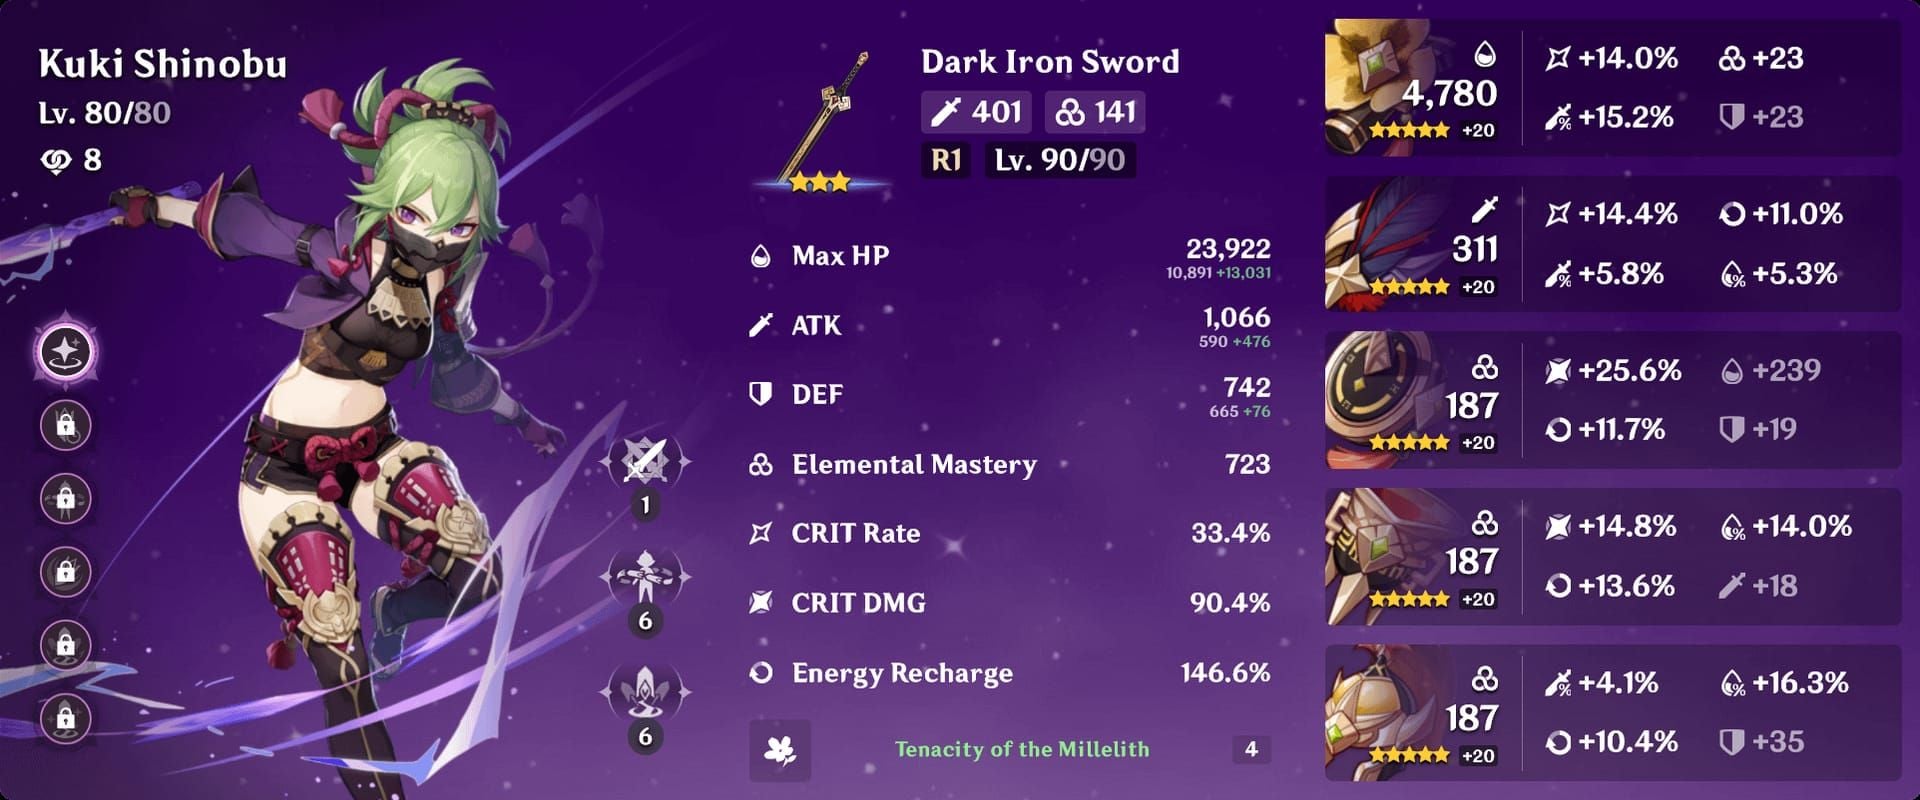
- 600 EM: ~5,100/Hyperbloom
- 800 EM: ~6,300/Hyperbloom (recommended)
- 1000 EM: ~7,400/Hyperbloom (ceiling)
Performance
Stage 1: Consistent damage bypasses shields. 60-80s. Stage 2: Ignores shield layers, sustained DPS. 55-75s. Stage 3: Addresses Pyro horns, unaffected by field mechanics. 65-85s.
Stage-Specific Strategies
Stage 1: Iniquitous Baptist
Deepdark Shield at 45% HP removes 20% HP when destroyed. Summon Anglers—four kills destroy shield (25% each). Break Elemental Wards for 18s paralysis = 2-3 rotation cycles.
Blessings: ATK% (15-25%), Elemental DMG (20-30%) for National/Taser. EM (80-120) or Hyperbloom DMG (25-40%) for Hyperbloom.
Stage 2: Iktomisaurus
Three shield layers (774,698 HP each at Lv110). 600% Electro-Charged amplification. Taser achieves 8-12 reactions/rotation at 27,000-36,000 damage each = 216,000-432,000 shield damage, breaking 1-2 layers.
Break Cryo Wards for 12s knockdown. Three torches respond to Charged Attacks (Sucrose/Fischl) for 8,000-12,000 Pyro damage each.
Blessings: Electro-Charged DMG (40-60%) for Taser, Vaporize (30-50%) for National, Hyperbloom (35-55%) for Dendro.
Stage 3: Field Generator
Pneuma requirement workaround: Focus damage during boss's natural 6s vulnerability phases every 45-50s. Plunging Attacks during charge-up reduce shockwave power 40-60%. 64U Pyro horns need two Xingqiu Burst cycles (~40U Hydro per cycle).
Blessings: Plunging Attack DMG (50-80%) if applicable, otherwise ATK%/Elemental DMG.
Energy Management
ER Thresholds
National:
- Xiangling: 180% (standard), 220% (solo Pyro)
- Bennett: 200% (comfortable)
- Xingqiu: 180% (Sac Sword R3+), 220% (non-Sac)
- Sucrose: 120% (Sac Fragments), 140% (non-Sac)
Taser:
- Beidou: 160% (standard), 180% (solo Electro)
- Fischl: 120-140%
- Xingqiu/Sucrose: Same as National
Hyperbloom:
- Dendro Traveler: 180% (standard), 200% (comfortable)
- Kuki: 180% (standard)
- Xingqiu/Fischl: Same as above
Funneling Techniques
Elemental particles: 3 energy (same element), 1 energy (off-element). Neutral particles: 2 energy (all).
National: Bennett Skill → swap to Xiangling (catches 2-3 particles for 6-9 energy).
Taser: Fischl Skill → swap to Beidou after 3-4 Oz attacks (9-12 energy).
Hyperbloom: Dendro Traveler Skill → catches own particles. Favonius weapons generate 3 neutral particles (6 energy to all).
Burst Timing
Xingqiu's 15s Rain Swords = rotation ceiling. Extending beyond 18s sacrifices reaction consistency.
Durations:
- Xingqiu/Beidou: 15s
- Xiangling: 14s
- Bennett: 12s (snapshot window)
- Dendro Traveler: 12s
- Kuki Skill: 12s
Cast longest Bursts first (Xingqiu, Beidou), snapshot Bursts after buffs (Xiangling after Bennett), drive 12-15s maximum.
Common Misconceptions
Premium DPS Not Required
Neuvillette simplifies encounters but isn't necessary. Damage comparison (Stage 1, 60s):
- Neuvillette C0: 450,000-600,000
- National: 400,000-550,000
- Taser: 380,000-520,000
- Hyperbloom: 350,000-480,000
10-20% differential = 5-10 additional seconds, well within 120-180s limits.
Investment Myths
Actual Diff VI thresholds:
- Levels: 80/90 (90/90 provides <3% increase)
- Talents: 6/8/8 DPS, 1/6/8 supports
- Artifacts: +16 Flower/Feather, +20 Sands/Goblet/Circlet
- Weapons: 80/90 DPS, 70/80 supports
Resin: Minimum viable build = ~2,400 resin vs recommended 4,800 resin. 50% reduction allows two teams in same timeframe.
Constellation Requirements
Critical: Xingqiu C2 (extends Burst), Sucrose C1 (second Skill charge) Valuable: Xiangling C4 (Pyronado duration), Bennett C1 (ATK buff no HP restriction), Fischl C6 (coordinated attacks) Marginal: Beidou C2, Kuki C2
C0 variants clear Diff VI with 10-15% longer times.
Resource Efficiency
Artifact Priority
- Emblem domain (Momiji-Dyed Court): Xiangling, Xingqiu, Beidou simultaneously. 2-3 weeks until 180% ER with correct main stats.
- VV domain (Valley of Remembrance): Sucrose EM/EM/EM only. 3-5 days (360-600 resin).
- Flower domain (Spire of Solitary Enlightenment): Kuki only. Alternatives (Gilded Dreams) comparable.
Talent Priority
Level 6→8: ~20% damage, 12 books + 450k Mora. Level 8→9: ~8% damage, 16 books + 700k Mora.
Priority:
- Xiangling Burst (6→8 priority): 60-70% personal damage
- Xingqiu Burst (6→8 priority): 70-80% personal damage
- Beidou Burst (6→8 priority): 75-85% personal damage
- Bennett Burst (6→8 sufficient): Scaling plateaus
- Fischl Skill (6→8 valuable): Oz damage scales
- Normal Attacks (leave 1-4): Minimal impact
Primogem Strategy
Nine characters total: Xiangling, Xingqiu, Bennett, Sucrose, Fischl, Beidou, Dendro Traveler, Kuki. Only Kuki requires targeted wishing.
Avoid: Weapon banner, DPS 5-stars until core teams complete Consider: Supportive 5-stars (Kazuha, Yelan) after Diff IV clears Prioritize: Resin refreshes during Disturbance Outbreak (first 10 days)
For character acquisition, purchase Genshin Impact Blessing of the Welkin Moon top up through BitTopup provides 2,700 Primogems monthly.
Advanced Tips
Roster Adjustments
No Sucrose: Anemo Traveler provides VV but lacks EM sharing. Reduces National 15-20%, Taser 20-25%. Viable Diff IV-V, struggles Diff VI.
No Fischl: Lisa provides Electro but demands on-field time. Hyperbloom substitutes Raiden (5-star).
C0 Xingqiu: 15s Burst creates tight windows. Barbara provides Hydro but sacrifices 60-70% damage.
Failed Clear Diagnostics
DPS check failure:
- Verify ER meets thresholds—missing one Burst = 25-35% damage loss
- Confirm artifact main stats
- Review rotation—Xiangling snapshots Bennett, Sucrose Swirls correct element
- Check weapon levels—Lv70 = 15-20% less damage than 80/90
Dying:
- Healer needs +16 HP% artifacts minimum
- Dodge telegraphed attacks
- Destroy Wards/Rings (prevents 40-50% incoming damage)
- Use food buffs
Energy problems:
- Practice particle funneling (3× energy on correct character)
- Favonius weapons need 20-30% Crit Rate
- Extend rotations 2-3s for additional Skills
- Use Burst immediately when available
Optimization
Animation canceling: Dash after Bursts saves 0.3-0.5s/rotation. 6-8 rotations = 2-4s saved.
Pre-casting: Begin rotations during boss invulnerability. Xiangling's Pyronado persists, dealing damage when vulnerability resumes.
Enemy grouping: Beidou chain lightning + Xiangling Pyronado hit boss + adds = 15-25% effective DPS increase.
FAQ
Minimum artifacts for Diff VI?
Correct main stats +16 to +20 matter most. ER thresholds: Xiangling 180%, Xingqiu 200%, Beidou 160%, Bennett 200%. Crit 50/100 suffices—60/120 or 70/140 provides 10-15% increase but not required.
Clear without 5-stars?
Yes. All three teams use 4-stars. Dendro Traveler free, Kuki on rate-ups. Clear times 10-20s longer than 5-star variants, within time limits.
Easiest team to build?
National. Xiangling/Xingqiu/Bennett appear frequently. The Catch free from fishing. Emblem domain serves both Xiangling and Xingqiu. Functional team within 2-3 weeks focused resin.
Constellation importance?
C0 clears with 10-15% longer times. Priority: Xingqiu C2 (+3s Burst), Sucrose C1 (second Skill), Bennett C1 (no HP restriction). Others incremental. Avoid wishing specifically for 4-star constellations—accumulate naturally 3-6 months.
Stage 2 DPS check failure?
Iktomisaurus has highest HP (17,195,518 Lv110). Break three shield layers via Electro-Charged—each removes 6% HP (1,031,731 damage). Taser excels (600% amplification). Ensure Beidou 160% ER for Burst uptime (40-50% team damage). Activate three torches with Charged Attacks for 24,000-36,000 Pyro damage.
Energy without Sacrificial weapons?
Increase ER by 20-40%. Xingqiu needs 220% without Sac Sword vs 180% with. Favonius weapons generate neutral particles for team. Extend rotations 2-3s for additional Skills. Consider ER Sands instead of ATK% Sands, accepting 12-15% damage loss for rotation consistency.


