

Understanding Remnants of Twilight Hidden Achievements
Remnants of Twilight runs 7 January 2026 12:00 to 9 February 2026 03:59 Server Time. Five hidden achievements reward 25 Stellar Jade total, adding to base rewards: 600 Stellar Jade, 1 Tracks of Destiny, 200 Relic Remains.
Requires Trailblaze Level ≥21 and Dawn, Shine at the World's End completion. Five stages unlock daily: Earthshaker Leo (Day 1), Corrupting Shadowfiend (Day 2), Greatsword Guardian (Day 3), Synergy Duo (Day 4), Elegy Siren (Day 5). Three difficulties—Easy, Hard, Nightmare—with Nightmare prohibiting trial characters.
For efficient Stellar Jade collection, Honkai Star Rail Oneiric Shards recharge through BitTopup offers competitive pricing and instant delivery.
Five Hidden Achievements
- Transcendent Shot: Defeat Back Row Targets 15 times (Earthshaker Leo)
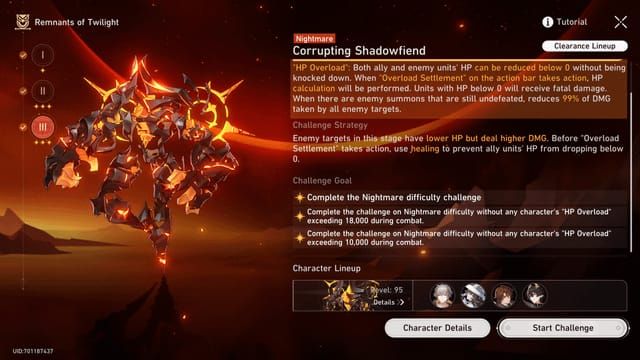
- Crazy Diamond: Clear Nightmare Corrupting Shadowfiend with HP Overload ≤8000
- Qliphoth Counter: Restore HP Count 12 times (Greatsword Guardian)
- No Time to Die: Trigger Fight in Unity (Synergy Duo)
- Siren Tears: Hallucinogenic Mermaid takes fatal damage (Elegy Siren)
Crazy Diamond vs Siren Tears
Crazy Diamond demands sustained HP management across full Nightmare encounter—8000 HP Overload threshold leaves minimal error margin. Siren Tears requires one reactive moment: allowing transformed Hallucinogenic Mermaid to receive fatal damage. Both completable on any difficulty, though Nightmare restrictions complicate Crazy Diamond.
Crazy Diamond Achievement: HP Overload ≤8000 Explained
HP Overload Mechanic

HP Overload tracks total damage absorbed by your team as separate metric. When HP Overload drops below 0, Overload Settlement deals fatal damage to affected units. Unlike traditional HP depletion, this requires minimizing total damage intake—not just maintaining positive HP.
Corrupting Shadowfiend summons reduce all enemy damage taken by 99%, forcing immediate summon elimination. Extended combat from ignored summons pushes HP Overload past 8000.
HP Overload Accumulation
Every damage instance contributes to HP Overload:
- Direct enemy attacks (Basic, Skill, Ultimate)
- AoE damage hitting multiple members
- Damage-over-time effects
- Counterattack damage
Critical: Shields don't prevent HP Overload accumulation—absorbed damage still counts toward 8000 limit. Damage prevention through crowd control or faster kills provides more value than shields alone.
Nightmare enemies deal increased damage, accelerating accumulation. Single boss Ultimate can add 2000-3000 HP Overload.
The 8000 HP Threshold
No in-game UI displays current HP Overload. Track through:
- Enemy attack rotation count
- Multi-target damage instances
- DoT effect duration
- Healing frequency (more healing = more prior damage)
Conservative strategy: aim for 6000-7000 HP Overload by final phase. If exceeding 7500 before 50% boss HP, restart—final phase aggression makes completion nearly impossible.
Successful clears involve 15-20 total enemy actions. Each action averaging 400-600 damage per target creates framework: limit enemy turns, minimize multi-target exposure.
Difficulty Impact
HP Overload ≤8000 requirement applies to all difficulties despite Nightmare specification. Easy difficulty might accumulate only 3000-4000 HP Overload with standard play, making achievement nearly automatic.
Nightmare offers superior rewards: 20 Nameless EXP, 5 Nameless Honor, 10,000 Credit vs Easy's 40 Nameless EXP, 4 Nameless Honor, 40,000 Credit. Attempt Nightmare only after mastering mechanics on lower tiers.
Step-by-Step Strategy for Crazy Diamond
Team Selection
Optimal composition prioritizes damage mitigation:
- Primary Sustain: Luocha, Fu Xuan, Huohuo, or Gallagher
- Secondary Support: Crowd control, debuffs, energy acceleration
- Efficient DPS: High damage-per-action characters
- Flex Slot: Additional support or secondary DPS
Fu Xuan excels through damage redirection and mitigation, reducing team-wide HP Overload by 30-40%. Her Crit Rate buff accelerates enemy elimination.
Light Cones: prioritize defensive stats and energy regeneration. Relics: HP%/DEF% on Body, Speed on Boots (140+ for sustain), Energy Regeneration on Planar Spheres.
Turn-by-Turn Tactics
Phase 1 (100%-70% Boss HP):
- Eliminate summons within 2 turns (99% damage reduction prevents boss damage)
- Use sustain Skills every 2-3 turns maintaining 80%+ HP
- Reserve DPS Ultimates for summon waves
- Position slower characters after enemy turns for immediate healing
Phase 2 (70%-40% Boss HP):
- Maintain crowd control on boss (Freeze, Imprison, Entanglement)
- Prioritize Toughness bar breaks for Weakness Break delay
- Use defensive Ultimates before boss Ultimate
- Avoid multi-target attacks triggering counterattacks
Phase 3 (40%-0% Boss HP):
- Activate all defensive buffs before enraged state
- Focus single-target burst minimizing phase duration
- Keep sustain Ultimate available for emergency healing
- Accept minor HP deficits on DPS to preserve sustain resources
Always eliminate summons immediately—99% damage reduction extends combat 5-10 turns, adding 2000-4000 unnecessary HP Overload.
Critical Moments
Summon Overlap: When Shadowfiend summons while previous summons remain active, 99% damage reduction prevents efficient elimination. Maintain energy for Ultimate-burst on summon appearance.
Boss Ultimate Without Mitigation: Deals 2500-3500 damage to all members in Nightmare. Without shields/damage reduction/crowd control, consumes 30-40% HP Overload budget. Track boss energy, ensure defensive measures activate before Ultimate.
Sustained DoT: DoT effects tick 3-5 turns dealing 300-500 damage per tick per character. Single DoT affecting all four members for full duration adds 3600-10,000 HP Overload. Cleanse immediately or eliminate DoT-applying enemy.
Emergency Recovery
If HP Overload exceeds 7000 before final phase:
- Use crowd control on cooldown skipping every possible enemy turn
- Sacrifice DPS characters preserving sustain actions
- Ultimate chain burst eliminating boss before additional enemy actions
- Exit/re-enter refreshing Technique Buffs (Nightmare auto-triggers all)
If HP Overload exceeds 7500 before 50% boss HP, restart—saves time vs unlikely completion.
Siren Tears Achievement: Trigger Conditions
Activation Mechanics
Boss applies Phantom Illusion transforming one character into Hallucinogenic Mermaid. Transformation removes direct control—Mermaid operates under AI:
- Mermaid Skill: Applies Max-HP-based DoT to enemies
- Mermaid Basic ATK: Dispels transformation, returning character to normal
Achievement triggers when Hallucinogenic Mermaid receives fatal damage while transformed. Fatal damage = any instance reducing Mermaid HP to ≤0. Can occur from enemy attacks, DoT, or self-inflicted damage.
Transformation lasts 2-3 enemy turns before Mermaid AI self-dispels. Must allow Mermaid to remain vulnerable long enough for enemy killing blow—requires withholding healing.
Enemy Interactions
Aggro Management: Mermaid doesn't draw increased attention. High-aggro characters (Preservation with taunt) may cause enemies to ignore Mermaid. Avoid taunt abilities during transformation.
Damage Threshold: Transformed character retains normal HP pool and defensive stats. Character with 3000 HP requires enemies dealing 3000+ damage. Nightmare easily meets this; Easy may require pre-damage.
DoT Interaction: Undispellable DoT from Elegy Siren can trigger Siren Tears if ticking while Mermaid at low HP. Reliable method: allow Mermaid HP to drop to DoT-killable range (<500 HP), wait for DoT tick.
Timing Windows
Optimal trigger: Mermaid's second transformed turn.
- Turn 1: Character becomes Mermaid, AI takes control
- Enemy Turns: Boss/enemies act, potentially damaging Mermaid
- Turn 2: AI likely uses Basic ATK dispelling transformation
Fatal damage must occur during enemy turn phase between Mermaid actions. If Mermaid survives to Turn 2 and dispels, wait for another Phantom Illusion.
Reduce Mermaid Speed through relics before encounter. Speed <100 allows 2-3 additional enemy actions per transformation cycle.
Confirmation
Achievement triggers immediately upon fatal damage. Visual confirmation:
- Achievement notification upper-right screen
- Siren Tears displayed with 5 Stellar Jade reward
- Character defeat animation for transformed Mermaid
- Combat continues normally
No special dialogue/cutscene. Monitor achievement tracker in event menu for verification.
If Mermaid dispels before fatal damage, achievement doesn't trigger. Transformation must be active at killing blow moment.
Optimal Team Compositions
Best Sustain Characters
Luocha: Automatic healing triggers when allies drop below 50% HP. Ultimate provides emergency full-team heal. Weakness: Skill doesn't generate Skill Points.
Fu Xuan: Redirects 65% damage from allies to herself, reducing redirected damage by 18%—effectively reduces team-wide HP Overload 30-40%. Crit Rate buff accelerates elimination. Requires 3500+ HP, 1200+ DEF.
Huohuo: Combines healing with energy regeneration enabling frequent Ultimates. Talent auto-heals maintaining consistent HP. Energy regeneration allows defensive supports more Ultimate usage.
Gallagher: Budget sustain with Break Effect scaling. Accessible without limited 5-stars. Lower healing throughput requires careful HP management.
For building achievement roster, buy Honkai Star Rail Stellar Jade top up at BitTopup for limited character banners with secure transactions.
DPS with Survivability
Jingliu: Transcendence state consumes own HP—self-inflicted loss doesn't count toward HP Overload. High burst damage with minimal threshold contribution.
Blade: Consumes own HP for damage amplification without adding to HP Overload. Self-healing through Talent partially offsets consumption. Counterattacks accelerate combat conclusion.
Seele: High single-target burst with Resurgence providing additional turns. More actions per Skill Point = faster elimination and shorter combat. Lacks inherent survivability.
Imbibitor Lunae: Flexible damage scaling through enhanced Basic ATK. Adjusts output based on available Skill Points. Righteous Heart provides minor damage reduction.
Support Characters
Tingyun: Accelerates Ultimate usage through energy regeneration. ATK buffs improve damage efficiency. Low defensive stats make her vulnerable.
Pela: Reduces enemy DEF through Ultimate improving damage 40-50%. Ice element provides Freeze opportunities skipping enemy turns.
Silver Wolf: Implants weaknesses, reduces resistances enabling consistent Weakness Breaks. DEF reduction stacks with Pela.
Bronya: Turn manipulation and damage buffs allowing DPS double-actions. High Skill Point cost requires careful management.
F2P Team Templates
Budget Crazy Diamond:
- Gallagher (Sustain) - Free, Break Effect build
- Pela (Support) - Free, DEF reduction
- Asta (Support) - Free, SPD buffs
- Herta/Serval (DPS) - Free, AoE for summons
Expected HP Overload: 6500-7500 Nightmare with proper execution.
Hybrid Achievement Team:
- Luocha (Sustain) - Automatic healing
- Tingyun (Support) - Energy cycling
- Pela (Support) - DEF reduction, Freeze
- Seele (DPS) - High burst
Handles both achievements. For Siren Tears, withhold Luocha healing when Seele transforms.
Nightmare vs Lower Difficulties
Nightmare Challenges
Increased Damage: Nightmare enemies deal 150-200% damage vs Hard. Boss Ultimate dealing 1500 per character in Hard inflicts 3000+ in Nightmare, doubling HP Overload from same action.
Trial Character Prohibition: Forces complete roster reliance. Impacts newer players lacking built sustain.
Automatic Technique Buffs: All Technique Buffs trigger automatically. Offensive Technique Buffs dealing combat-start damage can trigger counterattacks adding HP Overload before first action.
Lower Difficulty Advantages
Reduced Damage: Easy enemies deal 40-50% damage vs Nightmare. Same execution accumulating 8000 HP Overload in Nightmare generates only 3200-4000 in Easy.
Trial Character Access: Easy/Hard allow trial characters, enabling testing premium sustain without ownership.
Faster Iteration: Lower difficulty attempts conclude in 8-12 minutes vs Nightmare's 15-20 minutes. Failed attempts cost less time.
Recommended Progression
- Easy: Complete achievements understanding mechanics without pressure
- Hard: Test compositions under moderate challenge
- Nightmare: Pursue only after mastering mechanics and confirming roster capability
5 Stellar Jade reward identical regardless of difficulty—no Nightmare bonus. Prioritize Easy for time efficiency.
Daily Achievement Schedule
Day 1: Transcendent Shot (Earthshaker Leo) Day 2: Crazy Diamond (Corrupting Shadowfiend) Day 3: Qliphoth Counter (Greatsword Guardian) Day 4: No Time to Die (Synergy Duo) Day 5: Siren Tears (Elegy Siren)
Complete each stage's achievement on unlock day, return for higher difficulty SS ratings separately.
Light Cone and Relic Optimization
Top Light Cones
Sustain:
- Echoes of the Coffin (5★, Luocha): Increases ATK after Ultimate, improving healing 24-36%
- Texture of Memories (5★, Fu Xuan): Increases Effect RES, provides Shield on Skill
- Night of Fright (5★, Huohuo): Restores Energy, increases Energy Regeneration
- Post-Op Conversation (4★, free): Increases Energy Regeneration and healing—80% premium value
DPS:
- Cruising in the Stellar Sea (5★, free): Increases CRIT Rate, ATK buff on enemy defeat
- Swordplay (4★): Increases DMG per hit on same target
Relic Sets
Sustain Priority:
- Passerby of Wandering Cloud (4pc): +10% Outgoing Healing, Skill regenerates 1 Energy for all allies
- Alternative: Longevous Disciple (4pc): +12% Max HP, +8% CRIT Rate when hit
- Planar: Broken Keel (2pc): +10% Effect RES, +10% all allies' CRIT DMG at ≥30% Effect RES
DPS Priority:
- Character-specific optimal sets
- Defensive Hybrid: Guard of Wuthering Snow (4pc): -8% DMG taken, restores 2% ATK as HP after Ultimate
- Planar: Fleet of the Ageless (2pc): +12% Max HP, +8% all allies' ATK at ≥120 SPD
Main Stat Priorities
Sustain:
- Body: Outgoing Healing% or HP%
- Feet: Speed (140+ target)
- Planar Sphere: HP%
- Link Rope: Energy Regeneration%
DPS (Crazy Diamond):
- Body: CRIT Rate%/CRIT DMG%
- Feet: Speed (120-140)
- Planar Sphere: Element DMG%
- Link Rope: ATK% or Energy Regeneration%
Support:
- Body: Effect Hit Rate% or HP%
- Feet: Speed (140+)
- Planar Sphere: HP%/DEF%
- Link Rope: Energy Regeneration%
Substat Thresholds
Sustain:
- Speed: 140+
- HP: 3500+
- DEF: 1000+
- Effect RES: 30%+
DPS:
- CRIT Rate: 60%+
- CRIT DMG: 120%+
- Speed: 120-140
- ATK: 2000+
Support:
- Speed: 140+
- Effect Hit Rate: 67%+
- Energy Regeneration: 120%+
Common Mistakes and Solutions
Crazy Diamond Failures at 7500+ HP Overload
Mistake 1: Ignoring Summon Priority Players focus boss while summons remain active. 99% damage reduction extends combat 8-12 turns adding 800-1200 HP Overload. Solution: Redirect all damage to summons immediately, eliminate within 2 turns.
Mistake 2: Overhealing vs Damage Prevention Spam healing maintaining 100% HP, consuming Skill Points. High HP doesn't reduce HP Overload—only preventing damage matters. Solution: Maintain 70-80% HP, reserve Skill Points for DPS burst shortening combat.
Mistake 3: Poor Ultimate Timing Reactive healing after heavy damage doesn't prevent HP Overload—damage already occurred. Solution: Track boss energy, activate defensive Ultimates at 80-90% boss energy preventing Ultimate through crowd control or mitigating through shields.
Siren Tears Not Triggering
Cause 1: Mermaid Self-Dispels AI uses Basic ATK after 1-2 turns. Solution: Pre-damage character to 30-40% HP before transformation ensuring enemies deliver killing blow within window.
Cause 2: Auto-Heals Luocha/Huohuo Talents trigger at <50% HP preventing fatal damage. Solution: Time transformation immediately after sustain actions maximizing gap before next heal.
Cause 3: Enemies Target Others High-aggro characters draw attention from Mermaid. Solution: Avoid taunt abilities during transformation.
Cause 4: Too Much HP Characters with 4000+ HP require multiple actions exceeding transformation duration. Solution: Use lower-HP characters (2500-3000 HP supports) ensuring single actions deliver fatal damage.
Cause 5: Misunderstanding Fatal Damage Achievement triggers instant fatal damage occurs, even if revival restores character. Solution: Allow any damage reducing Mermaid HP to ≤0.
Shield Mechanics Misconceptions
Misconception: Shields prevent HP Overload accumulation.
Reality: HP Overload tracks all damage directed at team regardless of shield absorption. 2000-damage attack absorbed by shield still adds 2000 to HP Overload.
Implication: Shield-focused sustain (Aventurine, Trailblazer Preservation) offers no inherent advantage vs healing-focused alternatives. Optimal sustain depends on damage prevention (crowd control, debuffs, redirection) not shield generation.
Recovery from Failed Attempts
Post-Failure Analysis:
- Estimate final HP Overload (count enemy actions × 400-600 damage per target)
- Identify spike moments (summon overlap, boss Ultimate)
- Adjust team if HP Overload exceeded 10,000
- Modify strategy if 8,500-9,500 (improve execution)
Resource-Efficient Retry:
- Test on Easy first (same 40 Trailblaze Power, faster iteration)
- Complete achievement on Easy, separately pursue Nightmare SS rating
- Use Condensed Aether for double rewards on successful clears, not during testing
Mental Reset: After 2-3 failures, switch activities 30-60 minutes. Fresh attempts show 40-50% higher success rates.
Advanced Tips from 100+ Clears
Speed Tuning
Optimal Turn Order:
- Support (145+ Speed): Apply debuffs/buffs first
- Sustain (140-144 Speed): Heal prior damage
- DPS (130-139 Speed): Deal damage with active buffs
- Secondary DPS/Support (120-129 Speed): Cleanup/additional support
5-15 Speed gaps prevent turn order randomization from enemy Speed manipulation.
Action Delay Manipulation: Sustain characters alternate Basic ATK and Skill fine-tuning turn timing, ensuring healing occurs after enemy burst damage not wasting healing on full-HP targets.
Energy Management
Energy Breakpoints:
- Sustain Ultimates (120-140 cost): 1 per 3 cycles
- DPS Ultimates (110-130 cost): 1 per 2-3 cycles
- Support Ultimates (100-120 cost): 1 per 2 cycles
Sustain with 120%+ Energy Regeneration generates 30-40% more Ultimate usage, translating to 2-3 additional defensive activations preventing 1500-2500 HP Overload.
Energy Funneling: Tingyun/Huohuo provide energy to allies. Prioritize sustain during defensive phases, redirect to DPS during offensive bursts.
Enemy Pattern Recognition
Corrupting Shadowfiend Patterns:
Phase 1 (100%-70%):
- Turn 1: Basic ATK (single, moderate)
- Turn 2: Skill (AoE, DoT)
- Turn 3: Summon
- Turn 4: Basic ATK
- Turn 5: Ultimate (if energy sufficient)
Phase 2 (70%-40%):
- Turn 1: Skill (AoE)
- Turn 2: Summon
- Turn 3: Enhanced Basic ATK
- Turn 4: Ultimate (guaranteed)
Phase 3 (40%-0%):
- Turn 1: Ultimate (guaranteed)
- Turn 2: Skill (AoE)
- Turn 3: Enhanced Basic ATK
- Repeat
Recognizing patterns allows preemptive defensive Ultimate before guaranteed boss Ultimates, preventing 2000-3000 HP Overload per prevented Ultimate.
Resource-Efficient Farming
Daily Priority:
- Complete new stage unlock for achievement (40 Trailblaze Power)
- Complete remaining stages on Easy for base rewards (160 Trailblaze Power)
- Return for Nightmare SS ratings after all achievements complete
Total: 200 Trailblaze Power/day × 5 days = 1000 Trailblaze Power for all achievements.
Condensed Aether: Save for Nightmare SS rating clears after achievement completion. Using during attempts wastes double reward if failing SS requirements.
Team Investment ROI: One versatile team handling multiple achievements provides better efficiency than specialized teams. Hybrid template (Luocha/Gallagher + Pela + Tingyun/Asta + Seele/Herta) handles Crazy Diamond, Siren Tears, Transcendent Shot requiring only 4-5 character investment.
Maximizing Rewards Checklist
All Hidden Achievements
Day 1 - Transcendent Shot: Defeat Back Row Targets 15 times | 5 Stellar Jade | Any difficulty
Day 2 - Crazy Diamond: Clear with HP Overload ≤8000 | 5 Stellar Jade | Any difficulty
Day 3 - Qliphoth Counter: Restore HP Count 12 times | 5 Stellar Jade | Any difficulty
Day 4 - No Time to Die: Trigger Fight in Unity | 5 Stellar Jade | Any difficulty
Day 5 - Siren Tears: Hallucinogenic Mermaid fatal damage | 5 Stellar Jade | Any difficulty
Total: 25 Stellar Jade
Stellar Jade Priority
Total Available: 625 Stellar Jade
- Base rewards: 600 Stellar Jade
- Hidden achievements: 25 Stellar Jade
Optimal Sequence:
Week 1 (Days 1-5): Complete each stage Easy for achievement (200 Trailblaze Power) | Collect 25 + ~200 Stellar Jade
Week 2 (Days 6-10): Hard completions (200 Trailblaze Power) | Collect ~200 Stellar Jade
Week 3 (Days 11-15): Nightmare SS ratings (200 Trailblaze Power) | Collect ~200 Stellar Jade + remaining rewards
Total Investment: 600 Trailblaze Power over 15 days Total Return: 625 Stellar Jade + 1 Tracks of Destiny + 200 Relic Remains + 400,000 Credit
Efficiency: 1.04 Stellar Jade per Trailblaze Power vs 0.67 from standard Calyx (55% better).
Progress Tracking
In-Game: Event menu shows stage completion status, achievement indicators, remaining rewards, days remaining.
Manual Spreadsheet: Track Stage | Difficulty | Attempts | HP Overload Estimate | Achievement Status | Notes
Verification: Check achievement notification during combat, event menu gold star, Stellar Jade currency addition.
Future Event Patterns
Remnants of Twilight establishes patterns for future events:
Mechanical Understanding: Future achievements require deep mechanic understanding vs brute force. Invest time learning new mechanics.
HP Management Variations: Crazy Diamond represents new category focused on damage minimization. Future may introduce similar constraints (healing used, Skill Points consumed, turn limits).
Transformation Mechanics: Siren Tears suggests future achievements involving temporary state changes, ally sacrifice, deliberate failure states.
Difficulty-Agnostic: Most achievements work on any difficulty, rewarding mechanical understanding over roster power.
Resource Investment: Build versatile sustain/support handling diverse requirements. Specialized DPS provides less achievement value vs flexible defensive options.
FAQ
What is the HP Overload limit for Crazy Diamond?
8000 total HP Overload. Accumulates from all damage received throughout entire encounter regardless of healing. Applies across all difficulties, though Nightmare's increased damage makes it significantly harder.
How do you trigger Siren Tears?
Allow Hallucinogenic Mermaid (transformed character during Phantom Illusion) to receive fatal damage from enemies. Keep transformed character at low HP without healing, let enemy attacks or DoT deliver killing blow while transformation active. Triggers immediately upon fatal damage.
Can you get Crazy Diamond below Nightmare difficulty?
Yes. Despite description mentioning Nightmare, HP Overload ≤8000 requirement applies to all difficulties. Easy's reduced enemy damage often results in only 3000-4000 HP Overload with standard play.
What characters are best for HP Overload management?
Fu Xuan (damage redirection/mitigation reducing accumulation 30-40%), Luocha (automatic healing maintaining high HP), Huohuo (healing + energy regeneration). For DPS: Jingliu and Blade (self-HP consumption doesn't count toward HP Overload).
Does HP Overload reset between phases?
No. Accumulates continuously throughout entire encounter without phase resets. Damage from Phase 1 counts toward same 8000 threshold as Phase 3. Requires consistent minimization across all phases.
How many Stellar Jade do hidden achievements give?
Each of five achievements rewards 5 Stellar Jade (25 total). Supplements event's base 600 Stellar Jade, totaling 625 available.


