

Understanding Harmony Trailblazer's Role in HSR 3.8 Apocalyptic Shadow
Here's what I've learned after countless hours optimizing Harmony Trailblazer builds: they're not just another support character. They're the engine that makes Super Break teams actually work.
Harmony Trailblazer serves as the cornerstone of Super Break teams through SP-positive rotations that enable sustained damage loops against bosses like the Opportunistic Provocateur. What makes them special? They maintain consistent buff uptime while generating Skill Points – something most supports can't do. This dual role makes sub-stat optimization absolutely crucial.
For optimal character development, you can buy stellar jade for HSR Harmony Trailblazer stats through BitTopup's secure platform, ensuring sufficient materials for relic farming and character optimization.
Harmony Path Mechanics and Support Functions

The kit revolves around three core functions: energy generation, buff application, and Break Effect amplification. But here's where it gets interesting – their Ultimate doesn't just provide teamwide advances, it creates these beautiful synergistic loops where proper sub-stat allocation directly impacts your entire team's performance.
In practice, each additional energy point translates to more frequent Ultimate usage and more Skill Points for your DPS characters like Firefly or Boothill. The SP-positive rotation makes Energy Regeneration Rate exponentially valuable – something I didn't fully appreciate until I started running extended Apocalyptic Shadow encounters.
Break Effect scaling adds another layer of complexity. When you pair Harmony Trailblazer with Ruan Mei's 50% teamwide break efficiency, they achieve significant damage contribution through Super Break mechanics. This makes Break Effect investment surprisingly valuable beyond traditional support stats.
Version 3.8 Changes Affecting Harmony Trailblazer
Version 3.8 threw us a curveball with extended Apocalyptic Shadow stages. These longer encounters completely shifted sub-stat priorities toward consistency and resource management – the old burst and pray strategies just don't cut it anymore.
The new boss mechanics emphasize Weakness Break strategies. Bosses now begin with 50% damage reduction buffs that you can only remove through Weakness Breaking. This change makes Break Effect investment significantly more valuable than before.
What really caught my attention were the new blessing synergies like Stunning Remark, which provide +15% Break DMG and +20% Super Break DMG. These create multiplicative scaling opportunities that make Break Effect investment feel genuinely rewarding.
Extended stages test your builds over prolonged encounters where sub-stat optimization literally determines success or failure. The 6,600 point scoring system across four difficulty levels creates tight performance margins. Small improvements in energy efficiency compound over long encounters, making previously minor stat differences surprisingly significant.
Complete Sub-Stat Priority Ranking for Harmony Trailblazer
Tier S Sub-Stats: Energy Regeneration Rate Explained
Energy Regeneration Rate isn't just the most valuable sub-stat – it's in a tier of its own. Each percentage point reduces energy requirements for consistent Ultimate rotations, creating multiplicative effects on team performance that become more pronounced as encounters drag on.
With optimal ERR investment, Harmony Trailblazer achieves Ultimate usage every 2-3 turns instead of 4-5 turns. That's not just a nice improvement – it's the difference between maintaining your rotation and watching everything fall apart.
ERR scaling provides future-proofing benefits as encounter lengths increase. I've seen teams with properly optimized ERR maintain performance in extended encounters where others completely fail. Target ERR values vary by Light Cone choice: energy-focused Light Cones require 15-20% ERR from sub-stats, while damage-focused options need 25-30% ERR for consistent rotations.
Tier A Sub-Stats: Speed Tuning and Breakpoints
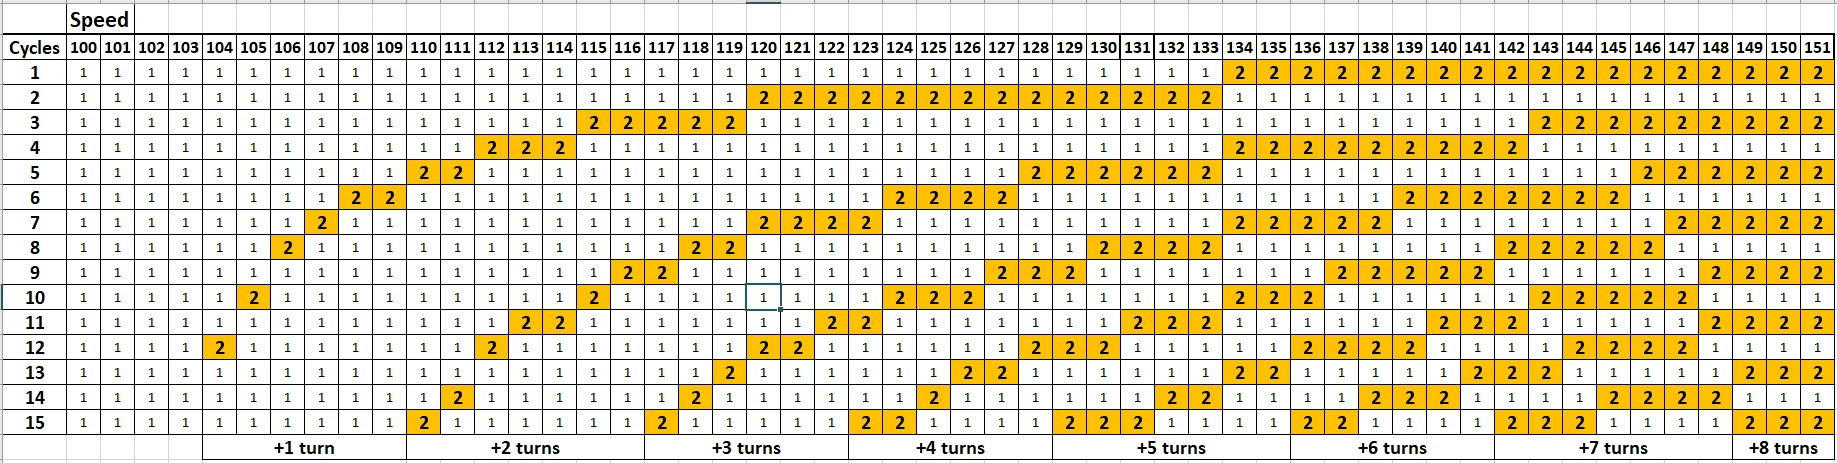
Speed optimization involves two critical breakpoints that every serious player should know: 134 Speed for basic action priority and 160+ Speed for advanced 0-cycle strategies.
The 134 Speed threshold ensures Harmony Trailblazer acts before most DPS characters. This timing is absolutely essential in Apocalyptic Shadow – without it, your buff application becomes inconsistent and your damage suffers.
Advanced players targeting 160+ Speed unlock 0-cycle potential through multiple actions per enemy turn. This creates opportunities for rapid Weakness Breaking that can completely change how encounters play out.
Speed tuning affects energy generation timing in ways that aren't immediately obvious. Faster characters generate energy more frequently, creating synergy between Speed and ERR investment that amplifies both stats when properly balanced.
Tier B Sub-Stats: Break Effect Investment Analysis
Here's where things get controversial – Break Effect investment creates surprising value when properly utilized. The scaling becomes multiplicative with team buffs like Ruan Mei's 50% break efficiency, and teams featuring Firefly or other Super Break DPS characters benefit significantly from Harmony Trailblazer Break Effect investment.
The Apocalyptic Shadow meta particularly favors Break Effect due to boss mechanics rewarding efficient Weakness Breaking. Investment thresholds typically range from 30-50% depending on team needs.
Mathematical analysis reveals 50-70% Break Effect investment can contribute 15-25% of total team damage in break-focused compositions. That's enough to justify Break Effect prioritization over defensive stats in most scenarios.
Energy Regeneration Rate: The Core Sub-Stat
How Energy Regeneration Rate Affects Skill Rotation
ERR directly impacts energy gained from all sources through multiplicative scaling. What works best is understanding that this provides compounding returns as encounter length increases.
Optimal rotations with sufficient ERR follow a clean pattern: Skill → Basic → Ultimate → repeat. Without adequate ERR, this rotation breaks down completely, forcing suboptimal Basic Attack usage that reduces team DPS and SP generation.
Each 5% ERR investment reduces average Ultimate cooldown by 0.5-0.7 turns, depending on encounter variables. This reduction compounds over long encounters, creating significant performance differences between optimized and suboptimal builds.
Optimal ERR Thresholds for Different Light Cones

Light Cone choice dramatically affects ERR requirements – something that catches many players off guard. Players using Memories of the Past require 15-20% ERR from sub-stats due to the weapon's energy generation passive. Premium Light Cone users often require 25-30% ERR for similar consistency, though these weapons provide superior damage or utility effects justifying higher ERR investment.
To optimize Light Cone choices and ensure proper ERR investment resources, consider using BitTopup's platform to secure Honkai Star Rail top up for Apocalyptic Shadow preparation, offering competitive rates and instant delivery.
Calculating Your Energy Needs in Apocalyptic Shadow
Standard encounters generate 30-40 energy per turn cycle through enemy attacks and Skill usage. With base energy costs of 110-120 for Ultimate abilities, this creates 3-4 turn Ultimate cycles without ERR investment.
20% ERR reduces effective energy cost to 88-96, enabling 2-3 turn Ultimate cycles that dramatically improve performance consistency. The math is straightforward, but the impact is profound.
Experienced players calculate precise ERR needs by analyzing encounter patterns and identifying energy generation bottlenecks. This enables targeted sub-stat investment that maximizes performance improvement per stat point.
Speed Optimization and Turn Order Control
Critical Speed Breakpoints for Harmony Trailblazer
The 134 Speed breakpoint represents the minimum threshold for competitive performance. Reaching 134 Speed requires Speed main stat boots combined with 2-3 Speed sub-stat rolls on other pieces – achievable but requiring some farming commitment.
The 160+ Speed threshold unlocks 0-cycle potential and superior action economy through multiple actions per enemy turn. Beyond 160 Speed, diminishing returns set in hard. Your stat investment typically provides better returns when allocated toward ERR or Break Effect depending on team composition.
Speed Tuning with DPS Characters
Proper speed tuning ensures Harmony Trailblazer acts immediately before DPS characters, maximizing buff uptime and damage output. The ideal speed differential maintains Harmony Trailblazer 5-10 Speed above primary DPS characters.
This ensures consistent turn order while accounting for speed variation from enemy effects – something that becomes crucial in longer encounters where turn order can shift unexpectedly.
Advanced speed tuning considers secondary DPS characters and enemy action values. Complex team compositions may require multiple speed breakpoints for optimal buff coverage across all team members throughout extended encounters.
Break Effect Sub-Stats: When and Why to Invest
Break Effect Scaling for Harmony Trailblazer Kit
Harmony Trailblazer's Ultimate and Skill both contribute to break damage when enemies are weakness broken. With sufficient Break Effect investment, these become meaningful damage sources complementing support functions.
Break Effect scaling becomes exponentially valuable when combined with team buffs. Ruan Mei's 50% break efficiency multiplies break damage output, creating synergistic scaling that justifies significant investment.
In practice, 50-70% Break Effect investment can contribute 15-25% of total team damage in break-focused compositions. That's enough to justify prioritization over defensive stats in endgame scenarios.
Optimal Break Effect Targets by Team Composition
Super Break teams featuring Firefly or Boothill benefit most from Harmony Trailblazer Break Effect investment through multiplicative scaling. Traditional support teams typically require minimal Break Effect, focusing on ERR and Speed optimization instead.
Hybrid compositions balance break damage with support functions, requiring moderate Break Effect alongside core support stats. F2P teams often rely heavily on Harmony Trailblazer break damage due to limited DPS options – potentially justifying maximum Break Effect investment to compensate for weaker primary damage dealers.
Practical Sub-Stat Builds for Different Scenarios
F2P Budget Build: Minimum Viable Sub-Stats
Target stats: 134 Speed, 15% ERR, and 30% Break Effect as baseline requirements. This enables basic functionality through standard farming without excessive resource investment.
Relic selection prioritizes main stat correctness over sub-stat optimization. Correctly main-stated pieces with mediocre sub-stats outperform incorrectly main-stated pieces with perfect sub-stats – something many players learn the hard way.
Using energy-focused 3-star Light Cones reduces ERR requirements, enabling stat allocation toward Speed and Break Effect.
Mid-Investment Build: Balanced Optimization
Target stats: 145-150 Speed, 20-25% ERR, and 40-50% Break Effect. This provides significant performance improvements while remaining achievable through focused farming.
Sub-stat optimization requires selective enhancement of pieces with multiple desired stats. Focus on 2-3 good sub-stats per piece rather than perfect optimization – the resource investment for perfection rarely justifies the marginal gains.
Whale Build: Maximum Performance Ceiling
Target stats: 160+ Speed, 30%+ ERR, and 60%+ Break Effect with additional defensive stats. Perfect sub-stat optimization becomes feasible, requiring extensive farming and selective enhancement of only highest quality pieces.
Light Cone selection focuses on maximum performance through premium 5-star options with full superimposition.
Common Sub-Stat Mistakes and Misconceptions
Myth: Harmony Trailblazer Needs High Effect Hit Rate
This represents one of the most common misconceptions I encounter. Effect Hit Rate investment is largely wasteful – Harmony Trailblazer's primary functions focus on team buffing and energy generation rather than debuff application.
The character's most important abilities don't require Effect Hit Rate to function properly. Players should prioritize ERR, Speed, and Break Effect over Effect Hit Rate in virtually all scenarios.
Mistake: Over-Investing in Defensive Sub-Stats
Excessive defensive investment reduces overall character effectiveness. Harmony Trailblazer's positioning typically provides natural protection – they rarely face direct damage requiring extensive defensive investment.
Minimum survivability thresholds generally require only basic HP investment through main stats and incidental sub-stat rolls.
Testing and Measuring Sub-Stat Performance
Key Performance Indicators to Track
Ultimate frequency represents the most important performance metric, providing direct measurement of energy efficiency and rotation consistency. Buff uptime measurement reveals Speed and ERR optimization effectiveness.
Consistent buff coverage indicates proper stat allocation while gaps suggest improvement areas. Break damage contribution becomes relevant for Break Effect-focused builds, requiring damage meter analysis to evaluate investment effectiveness.
Team performance metrics like clear time and survival rate provide holistic evaluation. These reveal whether individual character improvements translate to meaningful team performance gains – the ultimate test of optimization success.
Frequently Asked Questions
What are the most important sub-stats for Harmony Trailblazer in HSR 3.8? Energy Regeneration Rate and Speed are highest priority, with ERR enabling consistent Ultimate rotations and Speed ensuring proper turn order. Target 20-25% ERR and 134+ Speed as baseline requirements, with Break Effect as valuable third priority for Super Break teams.
How much Energy Regeneration Rate does Harmony Trailblazer need? ERR requirements vary by Light Cone: 15-20% for energy-focused 3-star weapons to 25-30% for damage-focused options. These thresholds enable 2-3 turn Ultimate cycles maintaining consistent buff uptime and SP generation.
Is Break Effect worth investing in for Harmony Trailblazer? Break Effect becomes highly valuable in Super Break compositions, particularly with Ruan Mei's 50% break efficiency buff. Target 40-60% Break Effect for meaningful damage contribution, especially in F2P teams where Harmony Trailblazer serves as secondary DPS.
What speed should Harmony Trailblazer have for Apocalyptic Shadow? Minimum viable speed is 134 for basic action priority, while 160+ Speed enables advanced 0-cycle strategies. Most players should target 145-150 Speed as balanced optimization providing good performance without excessive stat investment.
Which sub-stats should I avoid on Harmony Trailblazer relics? Avoid Crit Rate and Crit DMG as these provide no benefit to support functions. Effect Hit Rate is generally unnecessary since primary abilities don't require debuff application. Focus on ERR, Speed, Break Effect, and HP instead.
How do I know if my sub-stats are optimized correctly? Monitor Ultimate frequency and buff uptime as key indicators. Optimal builds achieve Ultimate usage every 2-3 turns with consistent buff coverage. Energy shortages or buff gaps indicate need for increased ERR investment; turn order problems require Speed adjustment.
Optimize your Harmony Trailblazer faster with premium resources! Get Stellar Jades, Oneiric Shards, and Express Supply Passes at the best rates on BitTopup. Instant delivery, secure transactions, and 24/7 support for all your Honkai Star Rail needs. Power up your account today!


