

Why Acheron's Absolutely Dominating MoC 3.7
Memory of Chaos 3.7 (November 5 - December 16, 2025) features summon-focused Turbulence that's practically tailor-made for Acheron's hypercarry potential. And honestly? It shows.
Stage 12 showcases Physical and Lightning weaknesses, which means Acheron teams can exploit debuff mechanics like nobody's business. Current meta positions her as T0.5 DPS with a staggering 95.99% usage of signature Light Cone Along the Passing Shore. That's not coincidence—that's necessity.
Here's what makes her tick: Acheron's hypercarry archetype excels through her stack-based Ultimate system requiring 9 Slashed Dream stacks. Each debuff applied by Nihility teammates generates stacks via her Talent, while A4 Trace provides that crucial 60% damage multiplier with 2+ Nihility allies. This multiplicative scaling? Non-negotiable if you want competitive performance.
Quick note from the editor: if you're serious about maximizing Acheron's potential, securing Stellar Jade through Honkai Star Rail Acheron build Stellar Jade top up ensures access to essential Light Cones and Eidolons. BitTopup offers competitive rates and instant delivery for Star Rail currency—something I've personally verified for 36-star Memory of Chaos progression.
How Acheron's Hypercarry Mechanics Actually Work
The Nihility Teammate Math You Can't Ignore
Acheron's damage scaling depends entirely on Nihility teammate count through A4 Trace. With 1 Nihility ally: 115% damage bonus. With 2+ Nihility allies: 160%.
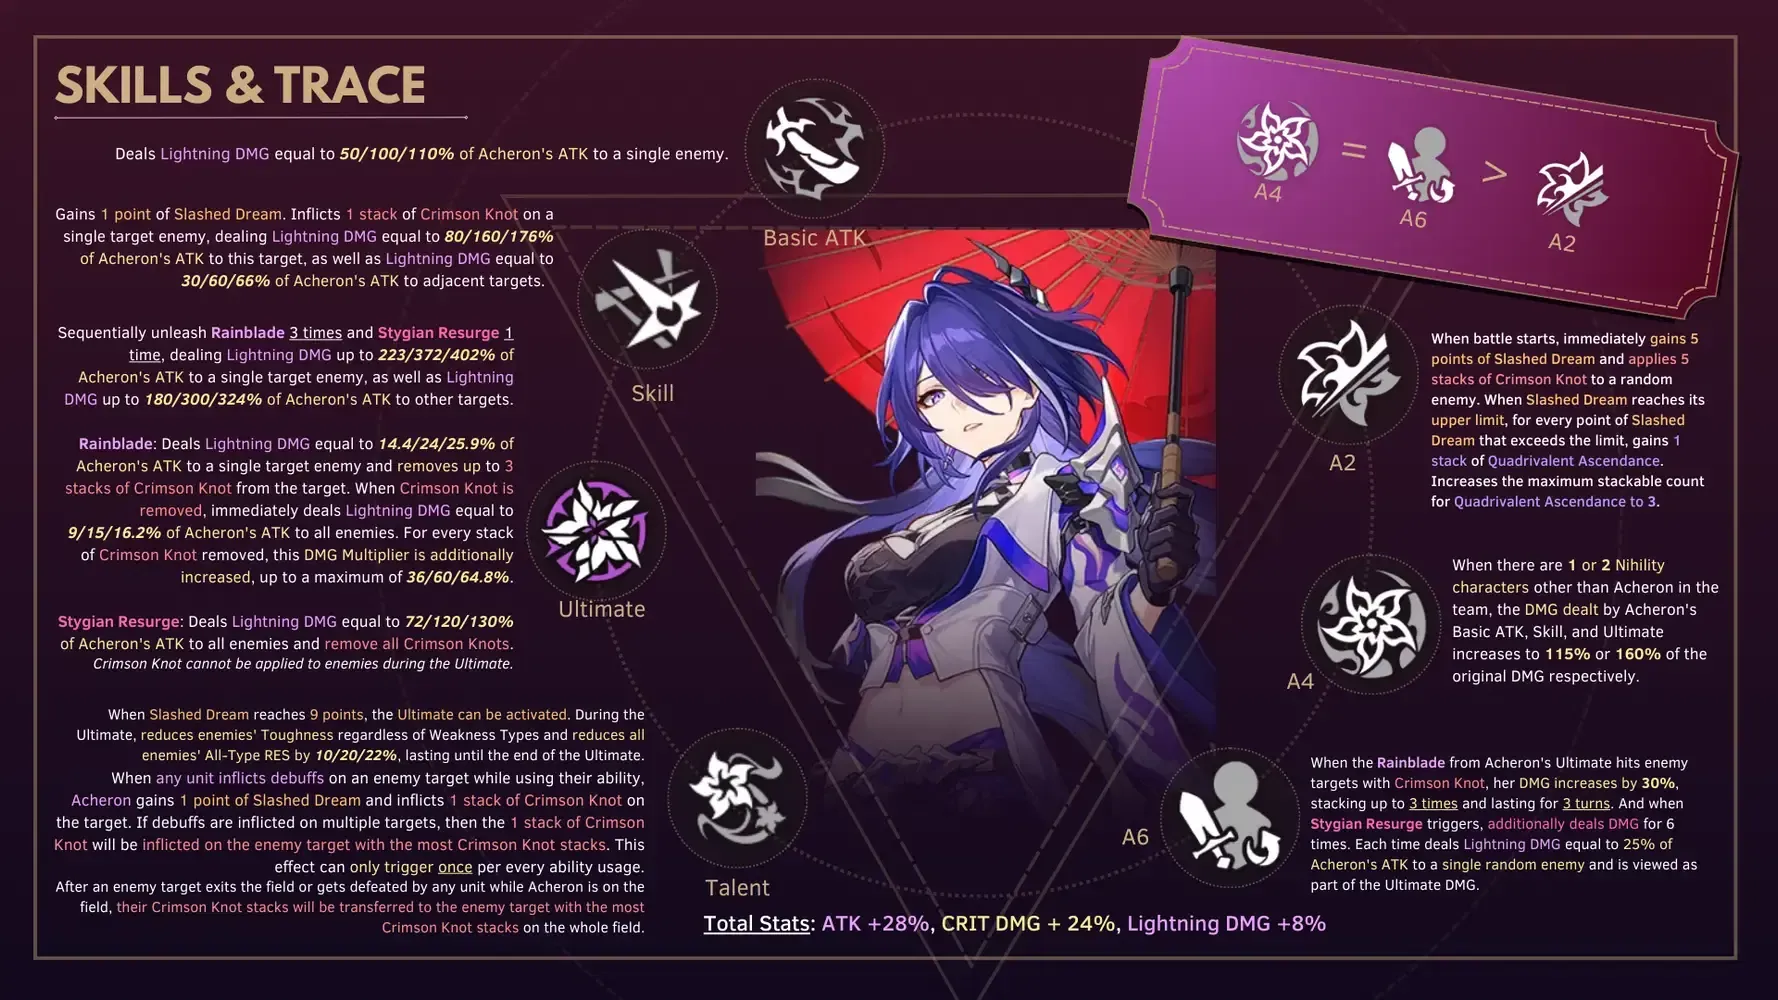
That's a 45% multiplicative difference defining hypercarry viability. Not additive—multiplicative.
E2 Eidolon changes the game by reducing Nihility requirement by 1, allowing single Nihility teams while maintaining damage bonus. E2 also grants 1 stack and Crimson Knot at turn start, dramatically improving Ultimate uptime and energy economy. It's why many consider E2 her true breakpoint.
Slashed Dream & Crimson Knots Breakdown
Ultimate requires 9 Slashed Dream stacks generated through: debuff application by any ally (via Talent), Skill usage (+1 stack), enemy defeats (+2 stacks).
The Ultimate itself consists of 3 Rainblade hits—24% single-target + 15% AoE per Crimson Knot, scaling up to 60%—followed by Stygian Resurge at 120% AoE. Crimson Knots stack to 3, each providing +30% damage to Thunder Core.
Simple math, devastating results.
Best Acheron Hypercarry Teams (Tested & Ranked)
Premium Meta: Acheron, Jiaoqiu, Sparkle, Aventurine

This is the gold standard. Jiaoqiu provides consistent debuffs on enemy turns plus +15% Ultimate damage. Sparkle contributes CRIT Damage amplification and action advance. Aventurine supplies shields and additional debuffs through Ultimate.
This setup achieves sub-6 cycle MoC 12 clears consistently. Sparkle's +2 SP recovery addresses the energy demands that plague most hypercarry compositions. Speed tuning priority: Sparkle > Acheron > Aventurine.
Standard E0: Acheron, Pela, Silver Wolf, Sustain
The workhorse composition. Silver Wolf provides 45% DEF shred and weakness implant against non-Lightning enemies—crucial for universal coverage. Pela contributes 40% AoE DEF shred through Ultimate, with E4 extending debuff duration for improved stack generation.
Sustain options include Aventurine (premium) or Gallagher (F2P). Gallagher's E6 provides turn economy benefits and Besotted debuff application that's surprisingly effective.
F2P Friendly: Acheron, Pela, Guinaifen, Gallagher

Budget compositions can achieve 10+ cycle performance while maintaining 36-star viability—don't let anyone tell you otherwise. Pela's E4 and Resolution Shines Light Cone improve debuff consistency substantially. Guinaifen provides Burn application and Nihility support. Gallagher's E6 enables SP-neutral gameplay through enhanced turn economy.
Performance gap? About 20-30% DPS difference vs premium teams. Still very much viable.
Top Support Units Ranked (No Fluff)
Debuffers Comparison
Jiaoqiu: Premier Nihility support offering vulnerability debuffs that activate on enemy turns plus +15% Ultimate damage. Provides consistent stack generation without SP investment. He's expensive but worth it.
Silver Wolf: Excels in weakness manipulation with 45% DEF shred and Lightning weakness implant. Bug debuffs offer RES reduction and damage amplification that's hard to replicate elsewhere.
Pela: Most accessible option with 40% AoE DEF shred. E4 extends debuff duration significantly, E6 provides dispel utility. Resolution Shines Light Cone enhances debuff consistency substantially—don't sleep on this combo.
Harmony Supports
Sparkle: Provides CRIT Damage amplification and action advance, particularly valuable in E2 Acheron teams. That +2 SP recovery addresses hypercarry energy demands like nothing else.
Robin: Offers ATK scaling and action advance through Ultimate. Harmony typing requires careful team building to maintain Nihility requirements, but the damage ceiling is impressive.
Best Light Cones for Acheron (Tested Performance)
BiS: Along the Passing Shore

Provides 36% CRIT Damage baseline with Mirage Fizzle debuff granting +24-40% damage and +40% Ultimate damage. Skill-based stack generation synergizes perfectly with rotation requirements—explaining that 95.99% usage rate among top performers.
Best 4-Star: Good Night and Sleep Well
Provides +12% damage per debuff on enemies, scaling to 36% with 3 debuffs. Consistent damage amplification makes it the premier F2P choice, particularly at S5 refinement.
Editor's note: for competitive Memory of Chaos performance, prioritize secure Honkai Star Rail recharge for MoC meta teams to access premium Light Cones and refinements. BitTopup's secure payment processing and instant delivery ensure reliable access to essential upgrades.
Relics & Planar Ornaments (The Numbers Don't Lie)
Pioneer Diver of Dead Waters

Achieves 97.63% usage among top Acheron builds. There's a reason for this dominance.
4-piece effect provides +12% damage against debuffed enemies, +4% CRIT Rate, +12-24% CRIT Damage based on debuff count. Effect doubles for 1 turn after applying debuffs, creating substantial damage windows that define her burst potential.
Planar Ornaments
Izumo Gensei: +12% ATK and +12% CRIT Rate with same-Path teammates, optimal for dual Nihility compositions. CRIT Rate bonus helps achieve 70%+ threshold while providing consistent ATK scaling.
Inert Salsotto: +8% CRIT Rate and +15% Ultimate/Follow-up damage at 50%+ CRIT Rate. Competitive option, but Izumo's team synergy typically provides superior performance in practice.
Target Statistics (Non-Negotiable Thresholds)
- CRIT Rate: 70%+ (including set bonuses and team buffs)
- CRIT Damage: 160%+
- ATK: 3000-3500
- Speed: 134+ (4 actions per 2 cycles breakpoint)
Main stats: Body CRIT Rate/Damage, Feet ATK%/Speed, Sphere Lightning Damage%/ATK%, Rope ATK%. Sub-stats priority: CRIT Rate until threshold, then CRIT Damage > ATK > Speed.
MoC 3.7 Strategy & Rotations (What Actually Works)
Skill Point Management Reality Check
Hypercarry compositions face serious SP challenges due to Acheron's Skill-heavy rotation. This isn't theoretical—it's the biggest practical hurdle you'll face.
Sparkle's +2 SP recovery and Gallagher E6 turn economy benefits address this directly. Optimal rotation involves Skill usage for stack generation, Basic attacks during Ultimate downtime. Priority targeting: early debuff application for stack accumulation, burst priority targets during Ultimate windows.
Ultimate Timing Optimization
MoC 3.7's multi-wave structure requires careful Ultimate timing for maximum efficiency. Acheron's AoE capabilities excel in wave clear scenarios with maximum Crimson Knots—but timing is everything.
Stage 12 strategy: early debuff application against Furiae Praetor leveraging Physical weakness, Aventurine shields against Dreamjolt Gorilla reflect mechanics. The reflect damage can catch you off-guard if you're not prepared.
Eidolon Investments (Where Your Money Goes)
E1 vs E2 Analysis
E1: +18% CRIT Rate against debuffed enemies, offering substantial stat efficiency for CRIT thresholds. Allows CRIT Damage body pieces while maintaining rate requirements. Solid value.
E2: Major hypercarry breakpoint reducing Nihility requirements by 1 while providing +1 stack and Crimson Knot at turn start. This enables flexible team building with single Nihility setups maintaining damage multipliers. Turn start benefits significantly improve Ultimate uptime and energy economy.
E6: +60% Ultimate CRIT Damage allowing Basic/Skill attacks to trigger as Ultimate damage. Investment cost typically exceeds practical benefits for most players—whale territory.
The Bottom Line
Acheron's hypercarry potential in MoC 3.7 remains exceptional with proper builds achieving consistent sub-10 cycle performance. That dual Nihility requirement shapes optimal compositions, while Pioneer Diver relics and signature Light Cone provide the competitive performance foundation you need.
Investment priorities? Achieve 70%+ CRIT Rate first. Maximize Ultimate levels to 12. Secure reliable Nihility supports before pursuing Eidolons. F2P builds remain viable for 36-star clears—though premium compositions offer that 20-30% DPS advantage that makes everything smoother.
Current meta favors Acheron's debuff-centric gameplay, making her a solid long-term investment for endgame content. She's not going anywhere anytime soon.
FAQ (The Questions Everyone's Actually Asking)
What minimum CRIT Rate is needed for Acheron hypercarry builds? Target 70%+ CRIT Rate including set bonuses and team buffs. Pioneer Diver provides +4% base, Izumo adds +12% with same-Path teammates, making 54% from substats sufficient. Don't overthink it.
Can Acheron work without 2 Nihility teammates? Single Nihility teams lose that 45% damage multiplier (115% vs 160%). E2 Acheron can run single Nihility maintaining damage bonus, but E0 builds require dual Nihility for competitive performance. Period.
Is Jiaoqiu worth pulling specifically for Acheron teams? Jiaoqiu provides best debuff consistency and +15% Ultimate damage, making him premier Nihility support. However, Pela and Silver Wolf combinations achieve similar results at lower investment costs. Depends on your budget.
How important is speed tuning in Acheron hypercarry teams? Speed breakpoints at 134+ ensure 4 actions per 2 cycles—crucial for Ultimate timing. Sparkle should move first for buffs, followed by Acheron, then supports. Mess this up and your rotation falls apart.
What's the biggest mistake players make with Acheron builds? Overcapping stacks beyond 9 wastes potential, while inconsistent debuff application reduces Ultimate uptime. Focus on maintaining 2-3 debuffs consistently rather than burst application patterns. Consistency beats burst every time.
Should I prioritize Acheron's signature Light Cone or E2? E2 provides more flexibility and consistent performance improvements, while signature Light Cone offers raw damage scaling. E2 enables better team building options, making it generally more valuable for long-term account development. My personal recommendation? E2 first.


