

Understanding Forward Vaporize Mechanics
Forward vaporize occurs when Hydro attacks trigger on existing Pyro auras, delivering a 2x damage multiplier to Hydro damage. This contrasts with reverse vaporize (Pyro on Hydro for 1.5x). The distinction matters for Furina teams since she's the on-field Hydro damage dealer requiring consistent Pyro aura maintenance.
The elemental gauge system governs reaction consistency. A 1U Pyro application creates a 0.8U Pyro aura (20% aura tax) lasting 9.5 seconds. A 1U Hydro attack from Furina consumes 2U worth of Pyro aura in forward vape—meaning one 1U Pyro application supports exactly one forward vape reaction before depletion.
For character acquisition needs, the Genshin Impact Top Up Shop at BitTopup offers competitive pricing and instant delivery.
Gauge consumption rates determine whether your Pyro enabler maintains aura uptime. Since forward vape consumes Pyro auras twice as fast as application gauge units suggest, your off-field Pyro character must apply elements faster than Furina's Hydro coordinated attacks.
Forward Vape vs Reverse Vape: Key Differences
At 100 Elemental Mastery, forward vaporize delivers ~2.33x damage while reverse vaporize provides 1.75x—a 33% advantage. But gauge consumption asymmetry creates challenges. Reverse vape allows one Hydro aura to support multiple Pyro triggers since 1U Pyro consumes only 0.5U Hydro. Forward vape's 2U consumption means Pyro auras vanish rapidly, requiring constant reapplication.
Furina's kit enables forward vape through her coordinated attack pattern. Her off-field Hydro application frequency synchronizes well with consistent Pyro enablers, transforming traditionally difficult forward vape into viable damage strategy.
Elemental Gauge Theory Basics
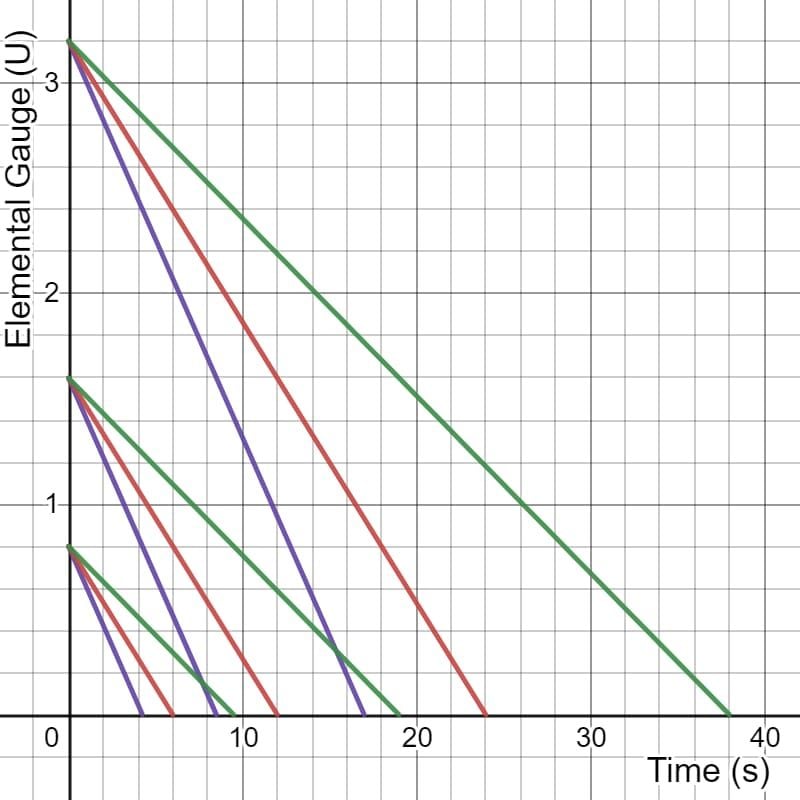
Gauge units quantify elemental application: 1U (weak), 2U (strong), 4U (heavy). Most abilities apply 1U per hit. Aura tax reduces applied gauge by 20%—1U becomes 0.8U aura, 2U becomes 1.6U aura.
Aura duration scales with gauge strength:
- 0.8U aura: 9.5 seconds
- 1.6U aura: 12 seconds
- 3.2U aura: 17 seconds
Internal cooldown (ICD) prevents characters from applying elements with every hit. Standard ICD follows 2.5-second timer or 3-hit rule. Abilities with no ICD apply elements every hit—exceptionally valuable for reaction teams.
Mavuika Pyro Application Analysis
Mavuika's Elemental Skill delivers 6 distinct 1U Pyro procs in a 2-second window via Scroll of the Hero passive. Procs occur at ~0.4-second intervals, creating rapid-fire application that establishes auras quickly but exhausts potential within the brief window.
Her ICD follows standard mechanics (2.5s or 3 hits), limiting total applications to 8-12 per cycle depending on rotation timing. Mavuika excels at establishing initial auras and concentrated bursts rather than sustained maintenance.
Skill and Burst Application Patterns
The 2-second window creates frontloaded Pyro ideal for snapshot-dependent damage. When activated, 6 procs establish immediate Pyro presence, enabling Furina to trigger multiple forward vapes in rapid succession.
Outside this burst, application drops significantly. Standard ICD prevents continuous element application, creating gaps where auras may expire before renewal. This suits quickswap teams but struggles in extended combat requiring persistent coverage.
Total applications per rotation: 8-12 instances. Respectable for burst windows but falls short for sustained enabler requirements.
Uptime and Rotation Frequency
Mavuika's optimal rotations compress into 16-18 second cycles—shorter than traditional Pyro enablers. This accelerated tempo suits hypercarry teams cycling through supports quickly to maximize main DPS field time.
The condensed rotation creates synchronization challenges with Furina's ability durations. Furina's coordinated attacks persist longer than Mavuika's application window, creating periods where Pyro coverage lapses. You must time Mavuika's skill activations to align with Furina's highest damage windows.
Energy generation favors shorter rotations, requiring less ER investment. This stat flexibility allows greater investment in Crit Rate, Crit Damage, and EM, potentially offsetting application frequency disadvantages through raw damage scaling.
Xiangling Pyro Application Analysis
Xiangling's Pyronado represents the gold standard for off-field Pyro, delivering 1U Pyro every 0.5 seconds with no ICD. Over 14-second base duration, Pyronado applies 28 total instances—more than tripling Mavuika's maximum per cycle.
No ICD means every rotation applies Pyro without timing gaps or hit count limitations. This ensures auras remain active throughout Furina's field time, minimizing missed vapes due to aura expiration. The 0.5-second interval perfectly supports forward vape's demanding consumption rate.
Pyronado Rotation Speed and Hit Frequency
Pyronado's 0.5-second frequency = 2 Pyro applications per second, establishing reliable baseline for aura maintenance. When Furina triggers forward vape consuming auras, Xiangling's next application arrives within half a second, minimizing downtime.
The 14-second base duration extends to 19.6 seconds with C4 (40% increase). This constellation dramatically improves rotation flexibility, allowing coverage of extended damage windows without aura gaps. For forward vape optimization, C4 represents significant power spike.
Guoba provides supplementary Pyro with 1U hits and no ICD, though stationary targeting and limited range reduce practical contribution. His primary value lies in particle generation supporting energy requirements.
Energy Recharge Thresholds
Xiangling's 80-energy burst demands 180-220% ER for consistent rotations depending on team composition and enemy count. This substantial requirement forces stat allocation away from offensive stats, reducing individual hit damage for uptime reliability.
Battery characters like Bennett partially offset ER through particle generation, potentially reducing necessary ER to 160-180% in optimized teams. However, forward vape teams prioritizing Furina's damage may lack space for dedicated batteries, pushing Xiangling toward higher ER thresholds.
The energy investment trade-off becomes critical for total team damage. While Xiangling sacrifices personal damage for application consistency, Furina's amplified damage through reliable forward vape typically compensates.
When building demanding team compositions, the Genshin Impact Top Up Center at BitTopup provides secure transactions for Genesis Crystal needs.
Snapshot Mechanics Impact
Pyronado snapshots Xiangling's stats at cast time, preserving buffs throughout full duration regardless of buff expiration. This allows Bennett's ATK buff, Kazuha's elemental damage bonus, and other temporary buffs to amplify Pyronado's full 14 seconds even when buffs last only 8-10 seconds.
Snapshot optimization requires precise rotation sequencing—activating all buffs before casting Pyronado to capture maximum stat bonuses. This rewards skilled execution but punishes errors with significant damage loss.
For forward vape teams, snapshot matters less than reverse vape since Furina triggers reactions and receives damage multipliers. Xiangling's snapshotted stats affect her base Pyro damage but don't directly amplify the vaporize multiplier applied to Furina's Hydro damage.
Direct Comparison: Application Speed

Application speed reveals distinct profiles. Mavuika delivers 3 Pyro applications per second during her 2-second burst (6 procs ÷ 2s), then drops to near-zero outside this window due to ICD. Xiangling maintains steady 2 applications per second throughout Pyronado's 14 seconds without interruption.
Total gauge units per rotation heavily favor Xiangling. Her 28 applications over 14 seconds provide 28U total Pyro gauge. Mavuika's 8-12 applications deliver only 8-12U total. Despite faster rotation speed, Xiangling applies more than double the total gauge per cycle.
Total Gauge Units Per Rotation
Calculating effective gauge for forward vape requires accounting for Furina's consumption rate. If Furina triggers one forward vape per second, she consumes 2U Pyro aura per second. Xiangling's 2U application per second (2 hits × 1U) exactly matches this consumption, maintaining aura presence throughout.
Mavuika's 6U application over 2 seconds provides sufficient aura for 3 seconds of forward vape (6U ÷ 2U consumption per second). After this window, coverage becomes inconsistent until next skill activation. In 16-second rotation, Mavuika might provide two windows totaling 12U, supporting 6 seconds of forward vape with gaps between.
The gap coverage difference determines practical reaction consistency. Xiangling's continuous application ensures Furina can trigger forward vape on nearly every coordinated attack throughout Pyronado's duration. Mavuika's burst windows create high-intensity vape periods separated by gaps where reactions become unreliable.
Application Consistency and Reliability
Consistency metrics reveal Xiangling's fundamental advantage. Her no-ICD Pyronado eliminates timing variance—every 0.5 seconds delivers Pyro regardless of previous hits or elapsed time. This predictability allows precise rotation planning and maximizes vape reaction counts.
Mavuika's ICD-dependent application introduces timing variance. The 2.5s or 3-hit ICD creates scenarios where rapid hits exhaust the hit counter before timer resets, creating irregular application patterns. This variance complicates rotation optimization and increases missed reaction risk.
Range and targeting further differentiate these characters. Pyronado orbits the active character, applying Pyro to enemies within rotation radius regardless of positioning. Mavuika's skill requires specific positioning and targeting, potentially missing enemies in chaotic combat or against mobile opponents.
Furina Hydro Application Patterns
Furina's coordinated attacks trigger at regular intervals during Salon Members' presence, applying Hydro to enemies engaged by the active character. Her application frequency determines required Pyro application rate from enablers—too slow and Pyro auras expire between attacks; too fast provides no additional benefit beyond maintaining aura presence.
Her coordinated attacks apply 1U Hydro per hit, consuming 2U Pyro aura per forward vape. If attacks trigger every second, the Pyro enabler must apply at least 2U Pyro per second to maintain constant aura coverage.
Matching Pyro Application to Furina's Rhythm
Synchronizing Pyro application with Furina's attack rhythm maximizes vape counts. Xiangling's 0.5-second interval provides two Pyro hits for every one Furina coordinated attack (assuming 1-second intervals), ensuring aura presence even if one application misses or gets consumed by environmental reactions.
Mavuika's burst pattern creates synchronization challenges. Her 6 procs over 2 seconds might align with 2-3 Furina attacks during the window, then leave subsequent attacks without Pyro auras until next skill activation. This mismatch reduces total vaporized hits despite high instantaneous application rate.
Constellation effects on Furina's Hydro application primarily affect damage scaling rather than frequency. Her constellations increase coordinated attack damage and add effects, but fundamental attack rhythm remains consistent. This stability simplifies Pyro enabler selection—application rate requirement stays constant regardless of constellation level.
Real Combat Testing Results
Single-target scenarios demonstrate Xiangling's consistency advantage. Against stationary bosses, Pyronado's continuous application maintains Pyro auras throughout Furina's field time, achieving 90%+ vaporize rates on coordinated attacks. Mavuika's burst windows achieve 100% vape rates during application periods but drop to 30-40% between windows, averaging lower total vaporized hits.
Multi-target situations amplify application rate demands. When Furina's coordinated attacks hit multiple enemies simultaneously, each requires independent Pyro aura maintenance. Xiangling's Pyronado hits all enemies within radius every 0.5 seconds, maintaining auras across multiple targets. Mavuika's skill may not hit all enemies consistently, creating aura gaps on secondary targets.
Rotation Timing and Alignment
Rotation alignment challenges emerge when combining Mavuika with Furina's extended field time requirements. Furina typically occupies 12-15 seconds per rotation to maximize damage output and Fanfare stacks. Mavuika's 16-18 second cycle creates awkward timing where her second skill activation might occur after Furina's optimal damage window closes.
Xiangling's 20-24 second rotations better accommodate Furina's field time needs. Casting Pyronado, swapping to Furina for 14 seconds of vape reactions, then cycling through remaining supports for buffs and energy generation creates natural rotation flow. The extended rotation allows comfortable buff stacking and energy regeneration without rushed execution.
Energy regeneration timing affects rotation consistency. Xiangling requires funneling particles during field time to reach burst energy for next rotation. Mavuika's lower energy requirements and faster rotations reduce particle funneling needs, allowing more flexible team slot allocation for damage amplifiers rather than dedicated batteries.
Team Building Considerations
Energy requirements fundamentally shape team construction. Xiangling's 180-220% ER demands either significant ER substat investment or dedicated battery characters like Bennett. This consumes team slots and artifact budgets that could otherwise increase damage through offensive stats.
Mavuika's lower energy requirements free team slots for additional damage amplifiers or defensive supports. Without needing dedicated batteries, teams can include Kazuha for elemental damage bonuses, Zhongli for resistance shred, or other supports that directly amplify Furina's vape damage.
Artifact and Weapon Investment
Xiangling's artifact optimization prioritizes ER to 180-220% threshold, then EM for personal reaction damage, followed by Crit Rate and Crit Damage. Emblem of Severed Fate provides both ER and burst damage scaling, making it optimal. Weapons like The Catch or Favonius Lance address energy needs while providing useful secondary effects.
Mavuika's artifact flexibility allows greater offensive stat focus. Without extreme ER requirements, she can prioritize Crit Rate, Crit Damage, and ATK% for personal damage scaling. This stat allocation freedom potentially increases individual damage contribution even if application rate falls short.
Investment efficiency favors Xiangling for most players. As a 4-star available through wishes and events, obtaining Xiangling and constellations requires less resource investment than limited 5-stars. Her proven performance across multiple team archetypes provides broader account value beyond forward vape applications.
Constellation Requirements
Xiangling's C4 dramatically improves forward vape performance by extending Pyronado duration 40% (14s to 19.6s). This extension provides 11 additional Pyro applications per rotation, substantially increasing total vape opportunities. C4 represents her most impactful constellation for enabler roles.
Mavuika's constellations primarily scale personal damage rather than application frequency. While constellations increase her value as damage dealer, they don't fundamentally solve application consistency challenges for forward vape enabler roles. Players seeking optimal forward vape performance gain less relative value from Mavuika constellations compared to Xiangling C4.
The constellation accessibility difference matters for long-term planning. Most dedicated players eventually obtain Xiangling C4 through standard wish accumulation and event rewards. Mavuika constellations require limited banner pulls with significant primogem investment, making benefits less accessible for F2P and low-spending players.
Common Misconceptions
The faster is better misconception leads players to overvalue instantaneous application speed while ignoring sustained requirements. Mavuika's 3 applications per second during burst window appears superior to Xiangling's 2 per second, but 2-second duration versus 14-second duration reverses the practical advantage for sustained reaction strategies.
Application rate calculations must account for full rotation cycles rather than peak windows. Averaging Mavuika's 8-12 applications across 16-18 second rotation yields 0.5-0.67 applications per second sustained rate. Xiangling's 28 applications over 20-24 seconds provide 1.17-1.4 per second sustained rate—more than doubling Mavuika's rotation-averaged speed.
Understanding Aura Tax and Hidden Mechanics
Aura tax reduces applied gauge by 20% when creating elemental auras—a hidden modifier affecting reaction calculations. Players calculating aura duration using raw gauge units without accounting for aura tax overestimate aura persistence, leading to rotation timing errors and missed reactions.
Pyro auras lost decay inheritance in Version 3.0, changing how aura refreshes function. Current mechanics replace old aura entirely, resetting decay timers. This benefits consistent applicators like Xiangling who continuously refresh auras, while reducing value for burst applicators.
The gauge consumption asymmetry between forward and reverse vape creates counterintuitive optimization requirements. Players familiar with reverse vape teams where Xiangling triggers reactions might assume similar application rates suffice for forward vape. The doubled consumption rate in forward vape demands significantly higher Pyro application frequency.
Practical Recommendations
Xiangling emerges as superior choice for prioritizing forward vape reaction consistency and total vaporized hit count per rotation. Her sustained application rate, extended duration, and no-ICD mechanics provide reliable Pyro aura maintenance Furina requires for maximizing vape damage across full rotation cycles.
Mavuika suits quickswap teams with multiple damage dealers who benefit from concentrated application windows. In teams where Furina occupies field time for only 4-6 seconds per rotation rather than extended 12-15 second windows, Mavuika's burst application pattern aligns better with compressed damage windows and faster rotation cycles.
When Xiangling Outperforms
Sustained combat scenarios favor Xiangling's extended Pyronado duration. Against bosses with long damage windows and minimal phase transitions, maintaining continuous Pyro auras throughout Furina's field time maximizes total damage. Xiangling's 14-second coverage ensures consistent reactions without timing gaps.
Multi-target situations amplify Xiangling's advantage through Pyronado's AoE application. When fighting multiple enemies simultaneously, maintaining Pyro auras on all targets becomes critical for maximizing Furina's AoE Hydro damage. Pyronado's orbital pattern hits all nearby enemies every 0.5 seconds, ensuring comprehensive aura coverage.
Energy-positive team compositions enable Xiangling's high ER requirements without sacrificing damage. Teams including Bennett for battery support and Pyro resonance, or Raiden for universal energy generation, allow Xiangling to reach necessary ER thresholds while maintaining offensive stat investment.
Investment Priority for New Players
New players should prioritize Xiangling development for broader team versatility. Her performance across reverse vape, melt, overload, and forward vape teams provides exceptional account value. Building Xiangling with proper ER and offensive stats enables multiple meta team compositions beyond Furina-specific applications.
Mavuika represents a luxury option for players with established rosters seeking rotation optimization or preferring her playstyle. Her value increases in accounts with multiple built damage dealers who can capitalize on shorter rotation cycles and concentrated buff windows. However, her forward vape enabler performance doesn't justify priority investment over Xiangling for most progression-focused accounts.
Constellation targeting should prioritize Xiangling C4 before pursuing Mavuika constellations for forward vape purposes. The 40% duration extension fundamentally improves Xiangling's enabler performance, providing more value than equivalent primogem investment in Mavuika constellations that primarily scale personal damage.
Optimizing Forward Vape Team Performance
Optimal rotation sequences for Xiangling-Furina forward vape begin with support buff stacking, then Pyronado cast, followed by immediate Furina swap for extended field time. This ensures Pyronado snapshots all available buffs while providing maximum vape opportunities during full duration.
Standard Rotation:
- Cast support buffs (Bennett Burst, Kazuha Burst)
- Activate Xiangling Burst to snapshot buffs
- Swap to Furina and activate abilities
- Maintain field time for 12-14 seconds triggering vapes
- Cycle through supports for energy regeneration
- Repeat at 20-24 second intervals
Artifact stat priorities for Xiangling in forward vape emphasize ER to 180-220% threshold, then EM for personal reaction damage, followed by Crit Rate and Crit Damage. Since Furina triggers most vapes, Xiangling's EM affects only personal damage rather than team reaction damage, reducing priority compared to reverse vape builds.
Supporting Character Recommendations
Bennett provides optimal support through ATK buffing, Pyro battery functionality, and healing. His burst snapshots to Pyronado while providing Pyro resonance for 25% ATK bonus. The combination of particle generation and ATK buffing addresses Xiangling's energy needs while amplifying team damage.
Kazuha offers elemental damage bonuses and crowd control benefiting both Xiangling and Furina. His Viridescent Venerer resistance shred increases both Pyro and Hydro damage, while elemental damage bonus from EM scaling amplifies Furina's vape damage. Swirling Pyro before Furina's field time ensures Hydro damage bonuses remain active throughout vape window.
Zhongli provides universal resistance shred and shield protection enabling face-tanking strategies for maximizing Furina's field time. His 20% universal resistance shred amplifies both Pyro and Hydro damage without element-specific restrictions. Shield protection prevents interruption during Furina's attack sequences, ensuring consistent coordinated attack triggers.
Troubleshooting Common Issues
Missed vape reactions typically result from insufficient Pyro application frequency or aura coverage gaps. If Furina's coordinated attacks frequently hit without triggering reactions, verify Pyro enabler uptime and application rate. Xiangling requires sufficient ER for burst availability every rotation, while Mavuika needs proper skill timing to align application windows with Furina's field time.
Reverse vape contamination occurs when Pyro hits trigger on Hydro auras instead of Furina's Hydro triggering on Pyro auras. This reversal reduces damage multipliers from 2x to 1.5x and transfers reaction ownership to Pyro character. Prevent contamination by ensuring Pyro application occurs before Furina's coordinated attacks and maintaining Pyro aura presence throughout field time.
Energy regeneration failures prevent consistent rotations and create downtime between burst cycles. Xiangling requires active particle funneling—catching particles while on-field to receive full energy value. Swap to Xiangling immediately after Bennett's skill or other Pyro particle generation to maximize energy gain.
FAQ
What is forward vaporize in Genshin Impact?
Forward vaporize occurs when Hydro attacks trigger on existing Pyro elemental auras, applying a 2x damage multiplier to Hydro damage. This contrasts with reverse vaporize where Pyro triggers on Hydro auras for 1.5x multiplier. Forward vape requires consistent Pyro application to maintain auras for Hydro characters.
Does Mavuika apply Pyro faster than Xiangling?
Mavuika applies Pyro faster during her 2-second burst window (3 per second), but Xiangling maintains superior sustained application at 2 per second for 14 seconds. Over full rotations, Xiangling delivers 28 total applications versus Mavuika's 8-12, making Xiangling faster for sustained forward vape.
What is the ICD for Mavuika's Pyro application?
Mavuika's Pyro application follows standard ICD of 2.5 seconds or 3 hits, whichever occurs first. This limits total applications despite rapid hit frequency during her skill's 2-second window, resulting in 8-12 total Pyro applications per rotation cycle.
How many gauge units does Xiangling's Pyronado apply?
Xiangling's Pyronado applies 1U Pyro gauge per hit with no ICD, hitting every 0.5 seconds for 14 seconds base duration. This results in 28 total 1U applications per cast (28U total Pyro gauge). With C4, duration extends to 19.6 seconds for 39 total applications.
Which character has better off-field Pyro application?
Xiangling provides superior off-field Pyro for sustained reaction strategies through Pyronado's 14-second duration, 0.5-second hit frequency, and no ICD restrictions. Her 28 total applications per rotation more than double Mavuika's 8-12, ensuring consistent Pyro aura maintenance for forward vape teams.
What Energy Recharge does Xiangling need for forward vape teams?
Xiangling requires 180-220% ER for consistent Pyronado availability in forward vape teams, depending on team composition and enemy count. Teams with Bennett battery support can reduce requirements to 160-180%, while teams without dedicated Pyro batteries need higher ER approaching 220%.
Ready to optimize your Furina forward vape team? Top up Genesis Crystals at BitTopup for the best rates and instant delivery. Get the characters and constellations you need to dominate the Abyss!


