

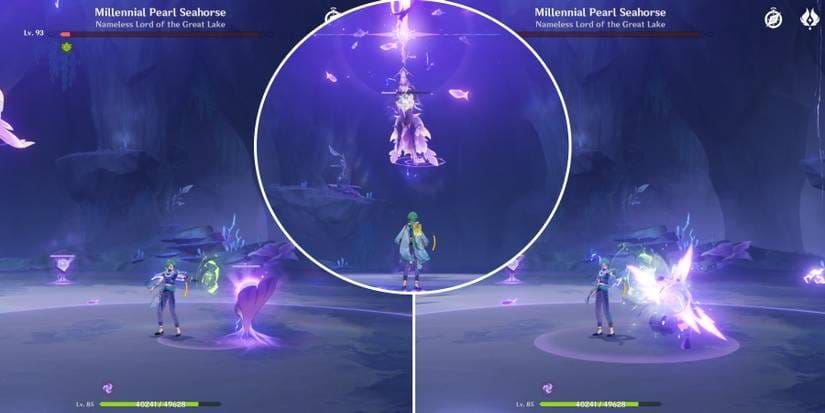
What Makes This Boss Special (And Frustrating)
The Millennial Pearl Seahorse dropped into Fontaine with Version 4.1 back in September 2023, and honestly? It’s been humbling overconfident players ever since. This isn’t your typical bring your strongest DPS and unga bunga World Boss—it’s one of those fights that actually makes you think about team composition.
What sets it apart from other Fontemer Aberrants is its complete reliance on elemental strategy over brute force. You can’t just throw Raiden Shogun at it and call it a day.
Getting There (The Underwater Maze)
Finding this boss feels like a treasure hunt gone wrong. It’s tucked away in an underwater cave north of the Liffey Region, and the route isn’t exactly intuitive:
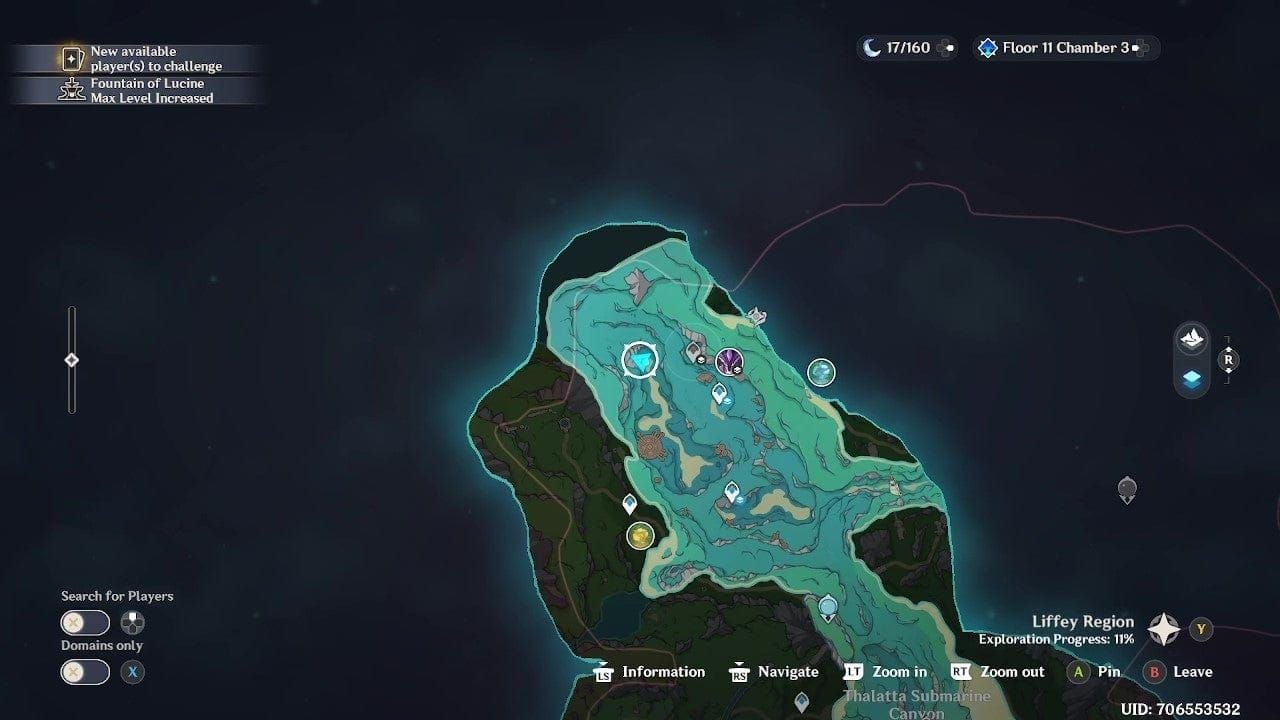
First, you’ll need the Statue of the Seven in Liffey Region unlocked. Then comes the fun part—diving underwater and swimming north to that second-most northern Teleport Waypoint. From there, head northwest until you spot an underwater cave entrance (there’s a Hydroculus nearby if you’re lost).
Follow the current deeper into the cave, surface at the end, and unlock that Teleport Waypoint—you’ll thank yourself later. Finally, glide down to the floating island arena where this mechanical nightmare awaits.
Standard World Boss rules apply: 40 Original Resin per reward claim, three-minute respawn timer.
For players serious about farming efficiently, utilizing a beginner-friendly Genshin top up service keeps your resin flowing. BitTopup’s competitive pricing and instant delivery mean you’re never waiting around when you want to tackle Fontaine’s tougher content.
Breaking Down the Attack Patterns
Phase 1: Learning the Dance
Shock Dive hits like a truck—this thing leaps high and crashes down with massive Electro AoE damage. Sometimes it’ll chain two dives back-to-back, so don’t get comfortable after dodging the first one. Those ground indicators are your best friend here.
Homing Projectiles come in two flavors: direct Electro missiles or summoned fish that fire tracking shots. The timing’s everything—dash just before impact rather than panicking early.
Fish Ambush is pure chaos. It summons fish around your position that explode after a brief delay. Keep moving, don’t stop, don’t think about it too hard.
Fontemer Hoarthunder Strike channels lightning through its horn for a massive circular blast. At least it’s polite enough to show you exactly where it’s going to hit.
Phase 2: The Pearl Game-Changer
Here’s where things get interesting (and where most players mess up). The Xenomare Pearl isn’t just decoration—it’s both shield and damage amplifier. While it’s active, your damage gets reduced and the boss hits harder.
The pearl responds to Cryo, Pyro, and Dendro applications, with Cryo being the most effective. Once you deplete its gauge, the pearl shatters and the boss becomes a sitting duck for several precious seconds.
During the Fontemer Hoarthunder phase, the boss goes airborne and spawns three Resonant Coral Orbs while raining thunder strikes. Here’s the kicker—destroy all three orbs with the right elements and you instantly shatter the pearl, forcing a vulnerability state. It’s incredibly satisfying when you pull it off.

Elemental Strategy: What Works and What Doesn’t
Electro is Dead to This Boss
Complete immunity. Zero damage. Your Raiden Shogun, Keqing, Cyno—they’re all benched for this fight as primary DPS. (Though Raiden can still trigger Hyperbloom reactions, which is something.)
The Damage Hierarchy
Cryo: Your best friend for pearl destruction. Mono Cryo teams absolutely demolish this boss.
Pyro: Strong pearl damage plus Vaporize potential makes it versatile.
Dendro: Solid pearl damage and enables those satisfying Bloom reactions.
Hydro/Anemo/Geo: Standard damage, perfect for support roles.
Personal observation here—Hyperbloom and Bloom teams feel almost unfair against this boss since Dendro Cores completely bypass its damage reduction. It’s like finding a cheat code.
Character Recommendations That Actually Work
Ranged DPS Reign Supreme
The boss’s mobility and aerial phases make ranged characters your MVPs. Yoimiya’s auto-tracking arrows are practically designed for this fight—no aiming required while the seahorse bounces around like it’s on caffeine.

Top Archer Picks:
Yoimiya: Those auto-targeting arrows plus Pyro for pearl breaking? Chef’s kiss.
Ganyu: Reliable Cryo damage that chunks the pearl’s health bar.
Lyney: Pyro damage with crowd control elements.
Tighnari: Dendro application for consistent Bloom setups.
Melee Options: Ayaka’s Cryo-infused kit (dash, skill, burst) melts the pearl gauge faster than you’d expect. Alhaitham provides steady Dendro application if you prefer sword users.
Support Characters That Matter
Shielders: Zhongli is almost mandatory here—his interruption resistance keeps you attacking through the boss’s constant AoE spam. Layla offers budget-friendly Cryo application plus decent shielding.
Essential Supports: Bennett (because Bennett), Kazuha (elemental damage bonus), Nahida (Dendro application plus EM sharing), Shenhe (Cryo amplification for those big numbers).
F2P-Friendly Option
Dendro Traveler, Xingqiu, Xiangling, Layla creates a surprisingly effective composition. Multiple elements for pearl-breaking, decent survivability, and utilizes characters most players already have built.
For consistent character development, accessing a safe Genshin recharge for new players ensures steady resource flow. BitTopup’s secure payment processing and round-the-clock support make team building less of a headache.
Fight Strategy: Step-by-Step Breakdown
The Opening Gambit (0-30 seconds)
Target that Xenomare Pearl immediately with your Cryo/Pyro/Dendro attacks. Ignore everything else—this is your priority. Dodge the inevitable Shock Dive using those helpful ground indicators, maintain distance from Fish Ambush chaos, and keep hammering the pearl until it shatters.
Vulnerability Window (30-40 seconds)
This is your moment. Activate every Elemental Burst you’ve got during the stagger. Position melee characters for maximum uptime, but prepare for the boss to recover and rebuild its pearl defense.
Fontemer Hoarthunder Phase (40-60 seconds)
Immediately locate those three Resonant Coral Orbs—they’re your ticket to another vulnerability window. Use ranged attacks if the boss stays airborne (which it usually does). Destroy all three quickly for instant pearl destruction and repeat your burst rotation.
Damage Rotations That Work
Mono Cryo (Ayaka, Shenhe, Kazuha, Diona)
Diona Skill → Kazuha Skill for Cryo Swirl → Shenhe Skill → Ayaka dash/Skill/Burst → Normal Attacks during vulnerability. Clean, effective, satisfying.
Hyperbloom (Alhaitham, Nahida, Xingqiu, Raiden)
Nahida Skill → Xingqiu Burst → Alhaitham Skill/Normal Attacks → Raiden Skill for triggers. Repeat while focusing pearl damage.
Vaporize (Yoimiya, Yelan, Zhongli, Bennett)
Zhongli Skill → Bennett Burst → Yelan Burst → Yoimiya Skill/Normal Attacks on pearl. Straightforward and reliable.
Drops and Farming Efficiency
What You’re Really Here For
Fontemer Unihorn: The exclusive ascension material for Neuvillette, Clorinde, and Chevreuse.

Each character needs 46 total for complete ascension (1-90), so you’ll be seeing this boss frequently.
Vajrada Amethyst Materials: Standard Electro character ascension materials. Rarity depends on your World Level.
The Math
At World Level 8, expect 2-3 Fontemer Unihorns per clear. Complete character ascension requires 15-23 clears—that’s 600-920 Resin total. Plan accordingly.
Achievement Hunting and Advanced Techniques
Fulgura Frango Achievement
Defeat the boss while it’s reconstructing its Xenomare Pearl after being staggered. Requires precise burst timing during that recovery animation—tricky but doable.
Collezione Di Sabbia Achievement
Break the pearl by attacking the airborne boss during Fontemer Hoarthunder phase without destroying those Resonant Coral Orbs. Ganyu makes this significantly easier with her charged shots.
Speedrun Approach
High-investment teams can actually skip most mechanics through sustained damage output. Less interesting mechanically, but faster for farming.
Common Mistakes (And How to Avoid Them)
Team Composition Blunders
Don’t bring Electro-focused teams. Yes, Raiden can trigger Hyperbloom, but her personal damage is literally zero here.
Positioning Problems
The boss’s aerial mobility punishes melee positioning. Prioritize archers and catalyst users—they’ll save you frustration.
Pearl-Breaking Inefficiency
Focus on characters with rapid elemental application rather than high single-hit damage. Consistency beats burst when it comes to breaking that pearl.
FAQ: The Questions Everyone Asks
What Adventure Rank do I need? No specific requirement beyond Fontaine access, but the mechanical complexity suits players with developed rosters and solid understanding of elemental reactions.
Can I co-op this fight? Absolutely—supports up to 4 players. Coordinate your elemental applications for pearl-breaking and make sure someone brings shielding.
How does this compare to other Fontaine World Bosses? It’s among the most mechanically demanding due to Electro immunity and pearl-breaking requirements. Think Oceanid-level strategic depth.
What if I ignore the Resonant Coral Orbs? The Xenomare Pearl becomes more durable for subsequent attempts, extending fight duration. The boss eventually descends to resume normal patterns, but you’re making life harder for yourself.
Do I need weekly boss materials? Nope—this only provides World Boss materials. Weekly materials come from separate encounters like the All-Devouring Narwhal.
Most resin-efficient farming strategy? Focus on teams that can consistently clear under 2 minutes. Mono Cryo with Ayaka or Hyperbloom with Alhaitham provide the fastest reliable clear times in my experience.


