

Rondo Map Overview for Long-Range Combat
Terrain Analysis
Here’s what makes Rondo special for snipers: this 8x8 km battleground was practically built for long-range warfare. The desert areas wrap around a central oasis like a natural amphitheater, giving you those gorgeous, unobstructed sightlines that make a sniper’s heart sing.
The destructible environment? Game-changer. You can carve out custom shooting lanes by demolishing bamboo trees, wooden walls, and mud structures with pickaxes, grenades, or just ramming them with vehicles. But here’s the catch — concrete and stone stay put, so those key defensive positions aren’t going anywhere.
Urban areas like Jadena City flip the script entirely. We’re talking high-rise warfare with interconnected bridges that’ll have you thinking more vertically than most maps demand.
Key Elevation Points
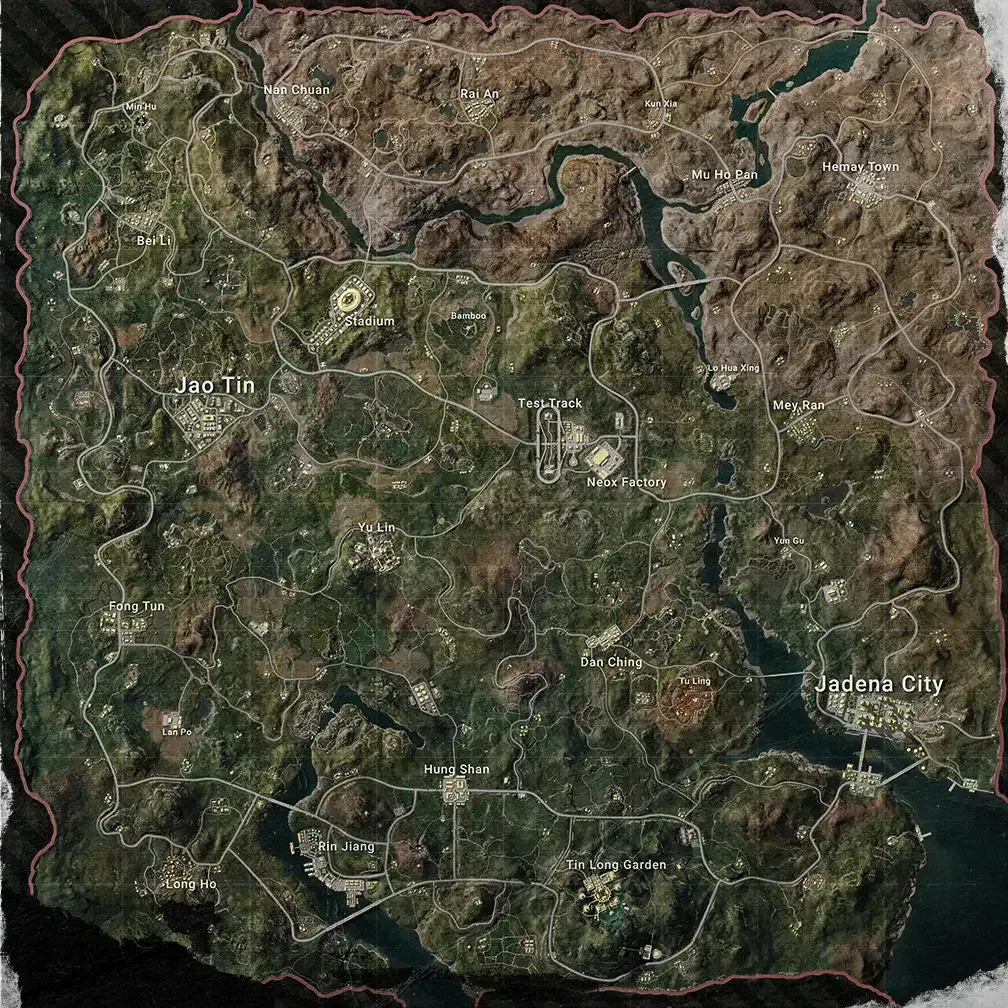
Lo Hua Xing fortress is the crown jewel of Rondo sniping spots. Period.
This elevated complex doesn’t just offer commanding views — it’s basically a 360-degree theater of operations. The AI guards might seem like a hassle, but clearing them out rewards you with genuinely premium loot. We’re talking MG3 potential and Level 3 armor that’ll keep you in the fight longer.
Coastal Cliffs present a different flavor entirely. Excellent vantage points, sure, but limited escape routes make these high-risk, high-reward positions. The surrounding desert provides scattered rock clusters — not perfect cover, but enough to keep you alive during those inevitable repositioning moments.
High-Traffic Zones
Jadena City’s escalator system creates this fascinating vertical combat dynamic you won’t find elsewhere. Those high-rise buildings and bridges aren’t just pretty scenery — they’re strategic goldmines for controlling massive map areas.
Don’t sleep on the Premium Stores at Renang and Low H Shine. After dealing with AI commanders (honestly, they’re not that tough), you’ll walk away with Rondo-exclusive JS9 submachine guns and potential MG3 acquisitions that can completely shift your tactical options.
Gyroscope Setup and Optimization
Basic Calibration Steps
First things first — disable auto-rotation in your device settings. Trust me on this one. Nothing ruins a perfect shot like your screen deciding to flip mid-engagement.
Set your gyroscope to Always On for both ADS and hip-fire control. The optimal grip technique combines whole-arm movements for those big adjustments with wrist control for surgical precision. It feels awkward initially, but this hybrid approach becomes second nature after a week of dedicated practice.
Sensitivity Configuration
After testing dozens of configurations throughout 2024, here’s what actually works:
2025 zero-recoil setup: No Scope 300%, Red Dot 280%, 2x Scope 270%, 3x Scope 180%, 4x Scope 160%, 6x Scope 120%, 8x Scope 100%.
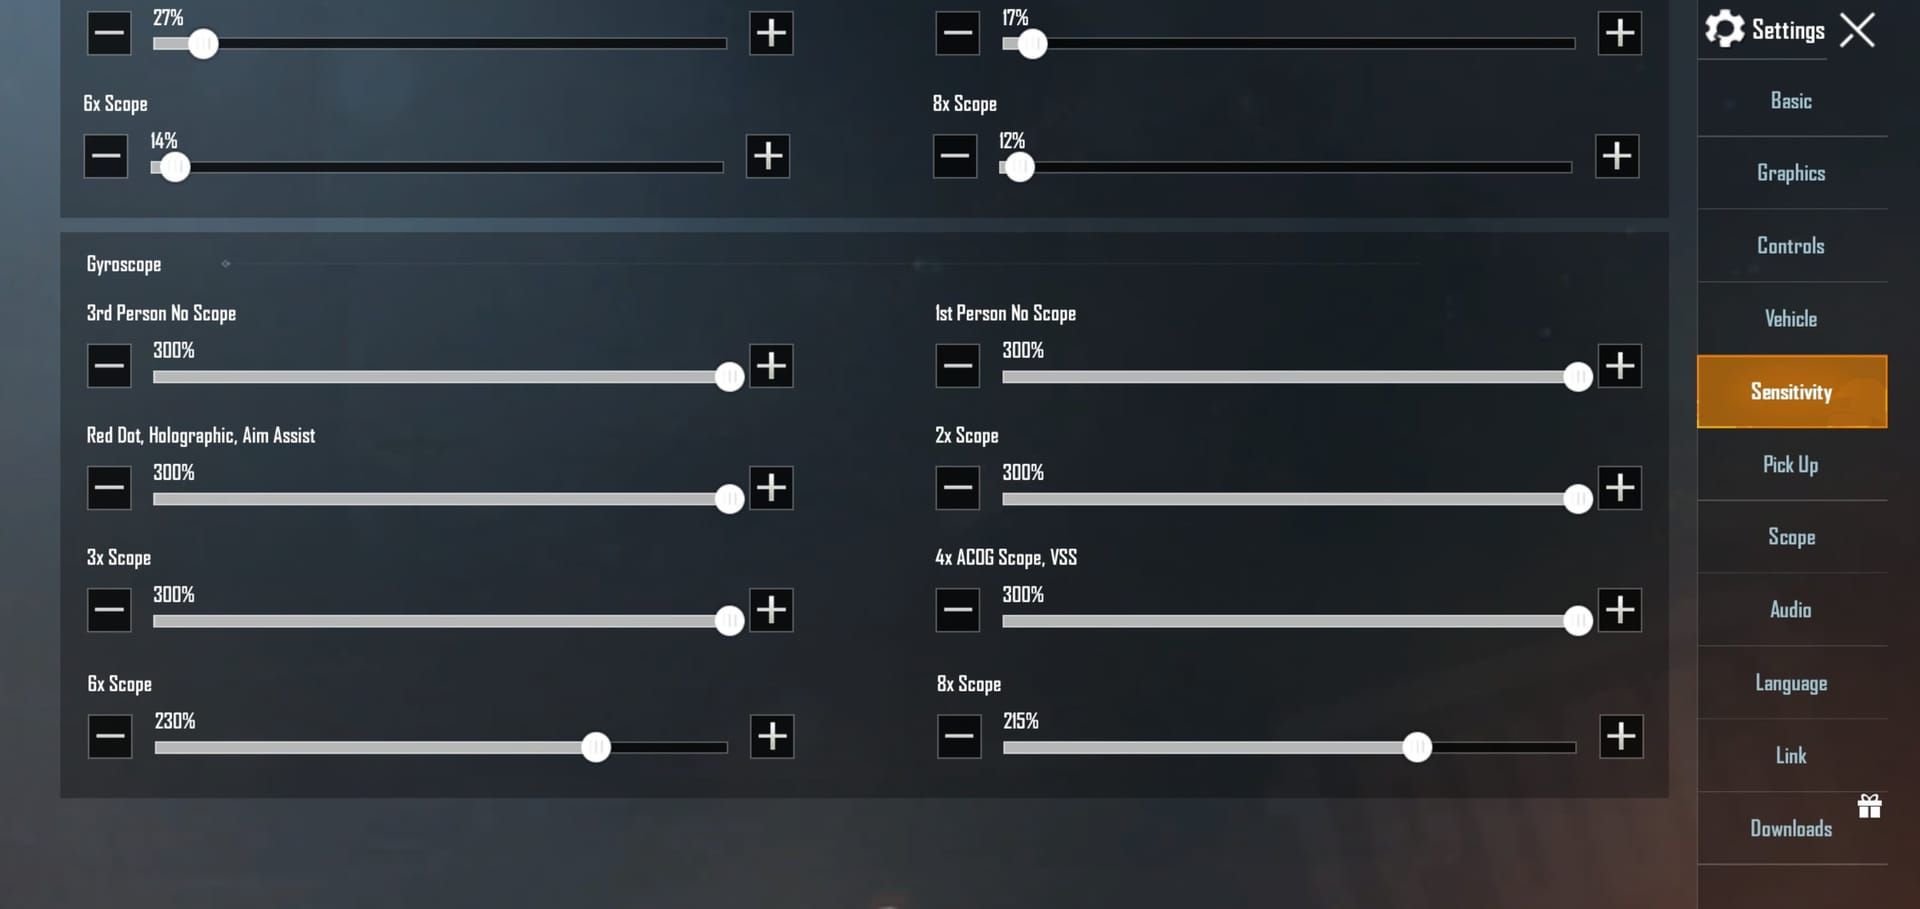
High-sensitivity alternative: Camera Gyroscope 400% for No Scope through 2x, dropping to 250-300% for 3x, 200% for 4x, 170% for 6x, and 55-70% for 8x.
Jonathan Gaming’s pro configuration has proven incredibly reliable: ADS Gyroscope 301% for Red Dot/2x, 236% for 3x, 171% for 4x, 101% for 6x, 76% for 8x scopes. (Editor’s note: I’ve personally used this setup for three months — it’s solid.)
Device-Specific Settings
Your hardware matters more than most players realize. 240Hz+ touch response rates aren’t just marketing fluff — they translate to measurably better performance. Minimal gyroscope latency and stable 60fps+ frame rates are non-negotiable for competitive play.
Devices supporting 120fps provide substantial advantages: iPhone 13+, ASUS ROG Phone series, flagship OnePlus and Samsung models. The difference is immediately noticeable once you experience it.
Quick import codes:
7307-1085-6780-4282-435 (zero-recoil)
7435-8846-3421-0303-0728 (2025 smartphone optimization)
7462-2496-3022-3831-210 (alternative setup)
Access through Settings > Sensitivity > Use Layout > Enter Code.
Essential Gyro Training Drills
Tracking Exercises
Start simple: strafe left and right using exclusively gyroscope controls while keeping your crosshair glued to a stationary target at 50 meters. Sounds easy? It’s not.
Progress to moving targets at 100-200 meters. The advanced drill involves transitioning between 3-4 targets spread across different ranges — this builds the muscle memory you’ll desperately need when facing multiple threats.
Flick Shot Practice
Equip a 4x, 6x, or 8x scope and practice quick flicks between distant targets separated by 90-180 degree angles. Begin with targets 100 meters apart, then advance to 200+ meter separations.
Focus on single-motion flicks rather than multiple corrections. Your accuracy will initially be terrible — that’s normal. Record your accuracy percentages during practice sessions. Seeing measurable improvement over time keeps you motivated during those frustrating early weeks.
Recoil Control Drills
Master recoil control with the M416 by firing full magazines at wall targets using steady downward device tilts. PUBG UC Top Up ensures you’ve got sufficient resources for those extended training sessions where you’re burning through hundreds of rounds.
Start in single-fire mode to understand weapon behavior, then progress to full-auto spray patterns. Advanced practitioners incorporate movement while firing — it’s significantly harder than it sounds.
Top Sniper Sightlines on Rondo
North Zone Positions
Northern ridgelines offer fantastic early-game overwatch with natural rock cover and clear sightlines toward central zones. The observation tower complex provides 360-degree visibility, while the communication array area delivers exceptional long-range coverage toward Jadena City.
Both locations feature multiple escape routes through valley systems — absolutely essential for late-game repositioning when the circle starts getting nasty.
Central Area Spots
The elevated highway overpass system provides excellent coverage of main transportation routes with hard cover against counter-sniping.
Central oasis positions feature scattered palm groves and rock formations that create natural shooting lanes toward all map edges. These spots require careful timing — they become increasingly exposed during late-game phases but offer exceptional target acquisition during mid-game rotations.
South Region Vantage Points
Southern ridge complex offers commanding views across the entire map with multiple terraced positions enabling tactical repositioning without losing elevation advantage.
Coastal cliff positions provide unique angles unavailable elsewhere. The positioning enables engagement at maximum weapon ranges, but you’ll need confident dueling skills and careful circle management due to limited escape routes.
Weapon Selection and Loadout
Sniper Rifle Comparison
AWM: One-shot headshot capability against Level 3 helmets with exceptional bullet velocity.
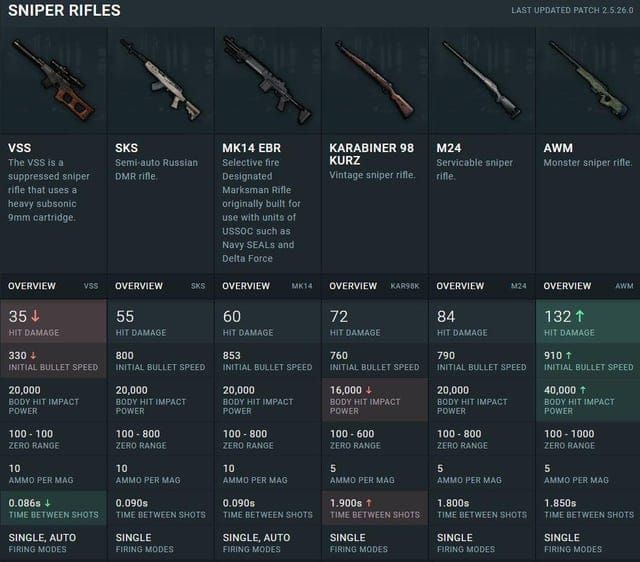
The catch? Airdrop exclusivity and unique .300 Magnum ammunition severely limit availability.
Lynx AMR: Maximum damage with vehicle destruction capabilities, but extremely limited .50 BMG ammunition (5-10 rounds) restricts usage to high-value targets only.
Kar98k and M24: The workhorses. Reliable performance with common 7.62mm ammunition providing consistent one-shot headshot potential against Level 2 helmets. (Editor’s note: I still prefer the Kar98k’s handling, though the M24 technically has better stats.)
Attachment Optimization
Scopes: 4x for versatile mid-to-long range, 6x for dedicated long-range, 8x for maximum magnification. Those rare 15x scopes from airdrops? Save them for extreme-range shots — they’re genuinely game-changing.
Muzzle attachments: Compensators reduce recoil for sustained fire. Suppressors conceal position during sniper engagements — crucial for avoiding counter-sniping.
Grips: Vertical Foregrips reduce vertical recoil, Angled Foregrips improve horizontal stability. Heavy Stock substantially reduces recoil but slows aiming speed — choose based on your playstyle.
Secondary Weapon Choices
Mk14 EBR: Exceptional versatility with devastating single-shot damage and switchable full-auto capability. Requires skilled handling due to massive recoil — not beginner-friendly.
Mini-14: Stability-focused performance with high fire rates, minimal recoil, large magazine capacity. Ideal for sustained pressure scenarios.
M416: The reliable choice. Excellent long-range spray capability when fully equipped, wide availability, manageable recoil. Buy PUBG UC through BitTopup for best rates and instant delivery — having loadout flexibility matters more than most players realize.
Advanced Positioning Strategies
Angle Holding Techniques
Position with cover on one side while maintaining clear sightlines toward anticipated enemy positions. This minimizes exposure while maximizing engagement opportunities — basic concept, but execution requires practice.
Establish primary, secondary, and tertiary positions with predetermined movement routes between them. When your position gets compromised (and it will), you’ll need those escape plans ready.
Rotation Timing
Early rotations provide positioning advantages and reduced competition for prime spots. Late rotations offer more enemy position information but increase zone pressure risks significantly.
Emergency Cover Flare summons deployable bunkers for instant hard cover in open areas — invaluable when caught exposed during forced rotations.
Escape Route Planning
Every sniping position requires multiple escape routes planned before engagement. Primary routes provide immediate hard cover; secondary routes offer alternative directions.
EMP Zone disables electronic scope reticles, forcing iron sight usage and preventing vehicle usage within radius. Plan alternative routes or backup weapons with iron sights accordingly.
Ballistics and Shot Mechanics
Bullet Drop Compensation
All projectiles experience gravity effects requiring elevation adjustments for distant targets. Bullet drop increases exponentially with distance — something many players underestimate.
Practice in Training Ground starting with 100-meter targets using minimal elevation, progressing to 200-300 meter shots requiring significant compensation. Higher-velocity rounds maintain flatter trajectories than standard ammunition.
Leading Moving Targets
Moving target engagement requires leading shots based on target speed, distance, and direction. Faster-moving targets require more lead — sounds obvious, but the calculations become intuitive only through repetition.
Vehicle targets present unique challenges due to high speeds and unpredictable movement. Focus on predictable segments like straight-line road travel. Anti-vehicle weapons like Lynx AMR provide more forgiveness due to explosive damage radius.
Counter-Sniping Defense
Spotting Enemy Snipers
Enemy detection relies on muzzle flashes, scope glints, and movement patterns. Unsuppressed weapons produce distinctive flashes visible at long ranges — use this to your advantage.
Systematic scanning of elevated positions, ridgelines, and building rooftops using binoculars or scoped weapons reveals enemy presence before engagement. Audio cues from suppressed weapons help triangulate positions.
Smoke Deployment
Deploy smoke grenades between your position and suspected enemy locations, creating visual barriers for movement. Multiple grenades create larger concealment areas enabling team movements or revive operations.
Advanced usage involves creating false movement indicators, forcing enemy snipers to divide attention between multiple potential routes.
Flanking Strategies
Use natural terrain features, building complexes, and vegetation for concealment during approach movements. Avoid direct routes that expose you to enemy sightlines.
Signal Jammer Backpack enables extended Blue Zone survival for unconventional flanking routes, positioning behind enemy lines while they focus on safe zone rotations.
Performance Tracking and Improvement
Key Metrics to Monitor
Track headshot percentages, engagement ranges, and survival rates during sniper-focused matches. These metrics provide concrete evidence of improvement over time.
Maintain practice logs recording sensitivity adjustments, accuracy percentages, and comfort levels with different weapons and magnifications. Monitor device performance including frame rate stability, touch response consistency, and gyroscope latency during extended sessions — degradation directly impacts accuracy.
Training Schedule
Dedicate minimum one week for gyroscope adjustment periods when implementing new sensitivity settings. Your muscle memory needs time to adapt.
Daily 30-minute Training Ground sessions focusing on specific skills provide measurable improvement. Alternate between tracking drills, flick shots, and recoil control exercises with progressive schedules beginning basic familiarization and advancing through weapon-specific drills.
FAQ
How do I optimize gyroscope settings for different scope magnifications? Start with the 2025 zero-recoil configuration: 300% no-scope decreasing to 100% for 8x scopes. Import codes 7307-1085-6780-4282-435 or 7435-8846-3421-0303-0728 as starting points, then fine-tune in Training Ground based on your device and grip style.
What are the best sniper positions on Rondo map? Lo Hua Xing fortress provides the premier location with high ground and Premium Store access. Coastal Cliffs offer excellent vantage points with limited escapes — high risk, high reward. Northern ridgelines excel early-game, southern mountains provide late-game advantages.
Which weapons work best for long-range combat on Rondo? AWM delivers one-shot headshot capability against Level 3 helmets but requires airdrop luck. Mk14 EBR provides versatility with high damage for skilled players. Mini-14 offers stability for sustained fire. M416 serves as the reliable all-around choice when properly equipped.
How do I practice gyroscope controls effectively? Implement three core drills: target tracking using only gyroscope while strafing, recoil control with M416 full-magazine sprays, and flick shots between distant targets. Practice 30 minutes daily, starting at 50 meters and progressing to 200+ meters as accuracy improves.
What should I do when facing enemy snipers? Use jiggle peeking with constant movement to avoid easy shots. Deploy smoke between positions for concealment during repositioning. Always reposition after missed shots — staying in the same spot is asking for trouble. Use Emergency Cover Flare for instant hard cover in open areas.
How does the EMP Zone affect long-range combat? Disables electronic scope reticles, forcing iron sight usage, and prevents vehicle operation within the radius. Plan alternative routes or prepare backup weapons with iron sights before entering. The zone disappears after the third Blue Zone phase, so timing your movements matters.


