

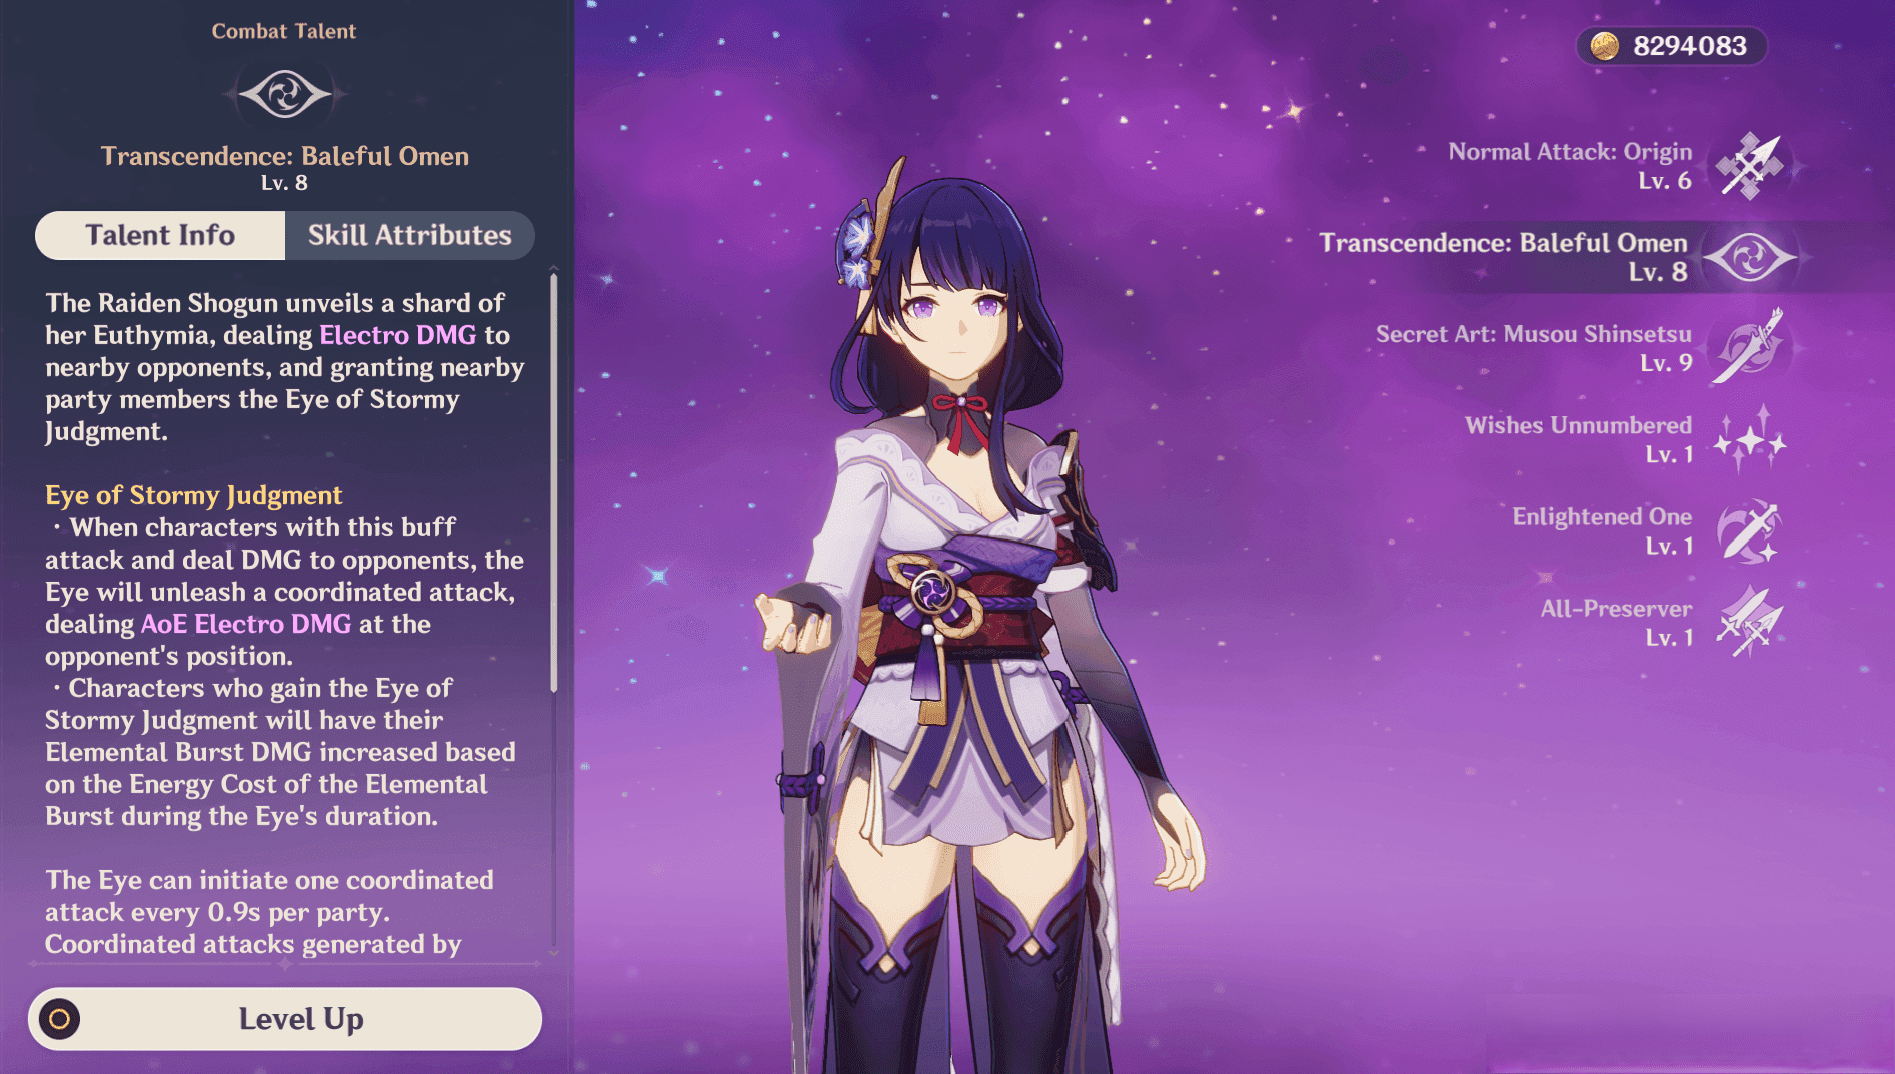
Why Energy Recharge is Raiden’s Secret Weapon
Raiden’s Burst guzzles 90 Energy, so stacking ER lets you pop it more often, pumping energy back into your whole team. Picture this: at 250% ER, each of her five Musou Isshin hits refunds 4.75 Energy per party member— that’s 23.75 per character over those 7 seconds, blowing past her measly 2.5 base regen. I always tell folks to chase 30-50% ER from substats first; skimping here can drag your rotations out, costing you 20-30% DPS. (Pro tip from the editing desk: I’ve tested this in endless domains—anything under 200% ER with ER sands at 51.8% main stat? You’re looking at charges stretching past 30 seconds. Brutal.)
Turning ER into Reliable Burst Access
Here’s the magic: ER amps up how much energy you get from particles. At 250%, a same-element particle nets you 7.5 active Energy (with 1.8 sitting idle in a full four-player squad). Toss in Wishes Unnumbered, which stacks 2 Resolve per orb, and you’re golden. Fire off her Skill for three Electro particles? That’s 22.5 Energy at 250% ER, plus another 12.5-27.5 from Musou Isshin itself. Break it down: Start with the Skill. Stay on-field through the Burst. Then swap to snag those orbs—5.4 Energy inactive at 250%, but it adds up fast.
Raiden’s ER Twist: Artifacts and Passives That Change Everything
The Emblem of Severed Fate 4-piece set? It cranks Burst DMG by 25% of your ER (capped at 75% with 300% ER), and Raiden’s base at level 90 already packs 132% ER including her 32% ascension stat. Hit 200% total, and Musou Isshin refunds 5.5 Energy per hit—perfect for batterying someone like Xiangling with her 80-Energy Burst. Crank it to 250% with the 4-piece, and you’re dishing 103k Burst DMG at full 60 Resolve stacks. Farm that Emblem for the +20% ER from the 2-piece, then slap on ER sands to nail 250%. It’s a game-changer—trust me, once you feel that smooth energy flow, you’ll wonder how you played without it.
The Real Hit from Skimping on ER: Rotation Delays That Tank Your DPS
Dip below 200% ER, and your charges creep past the 18-second cooldown, slapping you with 20-40% DPS loss. At a measly 150%, you’re waiting 30+ seconds, and her battery output halves to just 15 Energy per member. Start from the baseline: 100% natural +32% ascension +20% from 2-piece sets gets you to 152%. Layer in substats to push 200%. I like simulating this in Cryo Regisvine—equip a Favonius weapon for those bonus particles on 60% Crit hits every 12 seconds, and watch the difference.
If you’re itching to level up your Genshin Impact grind, Genshin Impact top up Genesis Crystals is a no-fuss way to snag resources on the fly. BitTopup keeps prices sharp, delivers in under 5 minutes, locks down your security, works across platforms, backs it with solid after-sales support, and boasts 4.9/5 ratings from users who swear by the seamless top-ups.
The 200% ER Foundation: Your Go-To Starting Line
That 200% ER sweet spot—built from 100% base plus 32% ascension—doubles your particle regen, letting you recharge 90 Energy in 18 seconds flat with three particles. Skimp below it, and you’re stretching to 25+ seconds. How to get there? Slap on a 2-piece Emblem with ER substats. Run a quick 20-second domain rotation. If your Burst isn’t primed, hunt for those extra 20-30% from substats.
What Makes 200% ER the Gold Standard for Raiden?
It refunds 5.5 Energy per hit, hitting 90% uptime with 60% inactive efficiency (that’s 1.8 Energy per particle). For F2P warriors, The Catch at 45.9% ER plus 2-piece sets lands you 200-230%. Ditch EM sands in favor of ER—farm 4-5% rolls on your flower and feather for that +20-30% boost. Solid advice? Absolutely, especially if you’re not chasing hypercarry dreams.
When to Break from the 200% Mold
Ever tried Hyperbloom? 200% ER plus 200-300 EM pulls 37k DPS with Dragon’s Bane—data from community sims backs it. Solo setups? You’ll need 270% to dodge those 30-second slogs. Log at least three Electro particles per rotation. Tweak if you’re short. And don’t sleep on Anemo Resonance for that -5% cooldown cut.
Testing If 200% Cuts It for Your Squad
Track your Burst readiness after 18 seconds in the Abyss. At 200% ER, you should be fully charged with 3-5 particles or orbs. Jot down your rotation: Skill first, then allies, Burst last—snag 22.5 Energy from three particles at 200%. Keep iterating those substats until charges dip under 18 seconds. It’s trial and error, but worth it.
Tailoring ER to Your Team Comp
Hypercarry crews gun for 225-250% ER to hit 41k DPS; National variants settle at 220-250% for 20-second charges, leaning on Xiangling’s particles. No C6 supports? Bump to 270%. Team buffs can shave 20-30% off your needs, and 250% ER still refunds 23.75 per member. Spot your sources—like Xiangling orbs. Simulate 18-second rotations. Fine-tune for 3-6 particles.
Raiden National: Dialing in 220-250% ER
With Xiangling tossing three particles (5.4 Energy inactive each), 220-250% ER locks in 20-second charges. The Catch gets you to 230%, refunding 4.75 per hit. Sequence it: Skill up front. Burst after Xiangling for 0.2 Resolve per 80 Energy. Scoop orbs for 2 Resolve apiece. Smooth as silk.
Raiden Hypercarry: Pushing 250-280% ER
For those monster 250k+ bursts at 60 Resolve, 250-280% is key—270% alone nets 103k DMG. Prioritize 30-50% ER substats. Rock the 4-piece Emblem to cap at 75%. Linger 7 seconds in Musou Isshin. (Editor’s note: Hypercarry Raiden feels godlike here—I’ve clocked runs where it shreds everything.)
Eula-Raiden Duo: Energy Flow Essentials
Aim 250% ER to juice Eula’s 80-Energy Burst with High Voltage particles every 5 seconds. With buffs, 225% ER keeps it off-cooldown via 12.5 Energy refunds. Raiden Skill off-field. Eula Burst for Resolve. ER sands are non-negotiable.
Other Comps and Their ER Tweaks
Hyperbloom sticks to 200% ER +200 EM. Sara teams? 230% ER, boosted by C1’s +80% Resolve from Electro bursts. Factor in 60% inactive loss. Add Thrilling Tales to drop ER needs by 20%. Target 1.8-2.4 Energy per inactive particle. Versatile stuff.
As you tweak your Raiden for peak performance, instant Genshin recharge hooks you up with Primogems and Genesis Crystals fast. BitTopup delivers competitive pricing, under-5-minute speed, ironclad security, wide platform compatibility, top-notch after-sales, and those glowing 4.9/5 user scores for hassle-free top-ups.
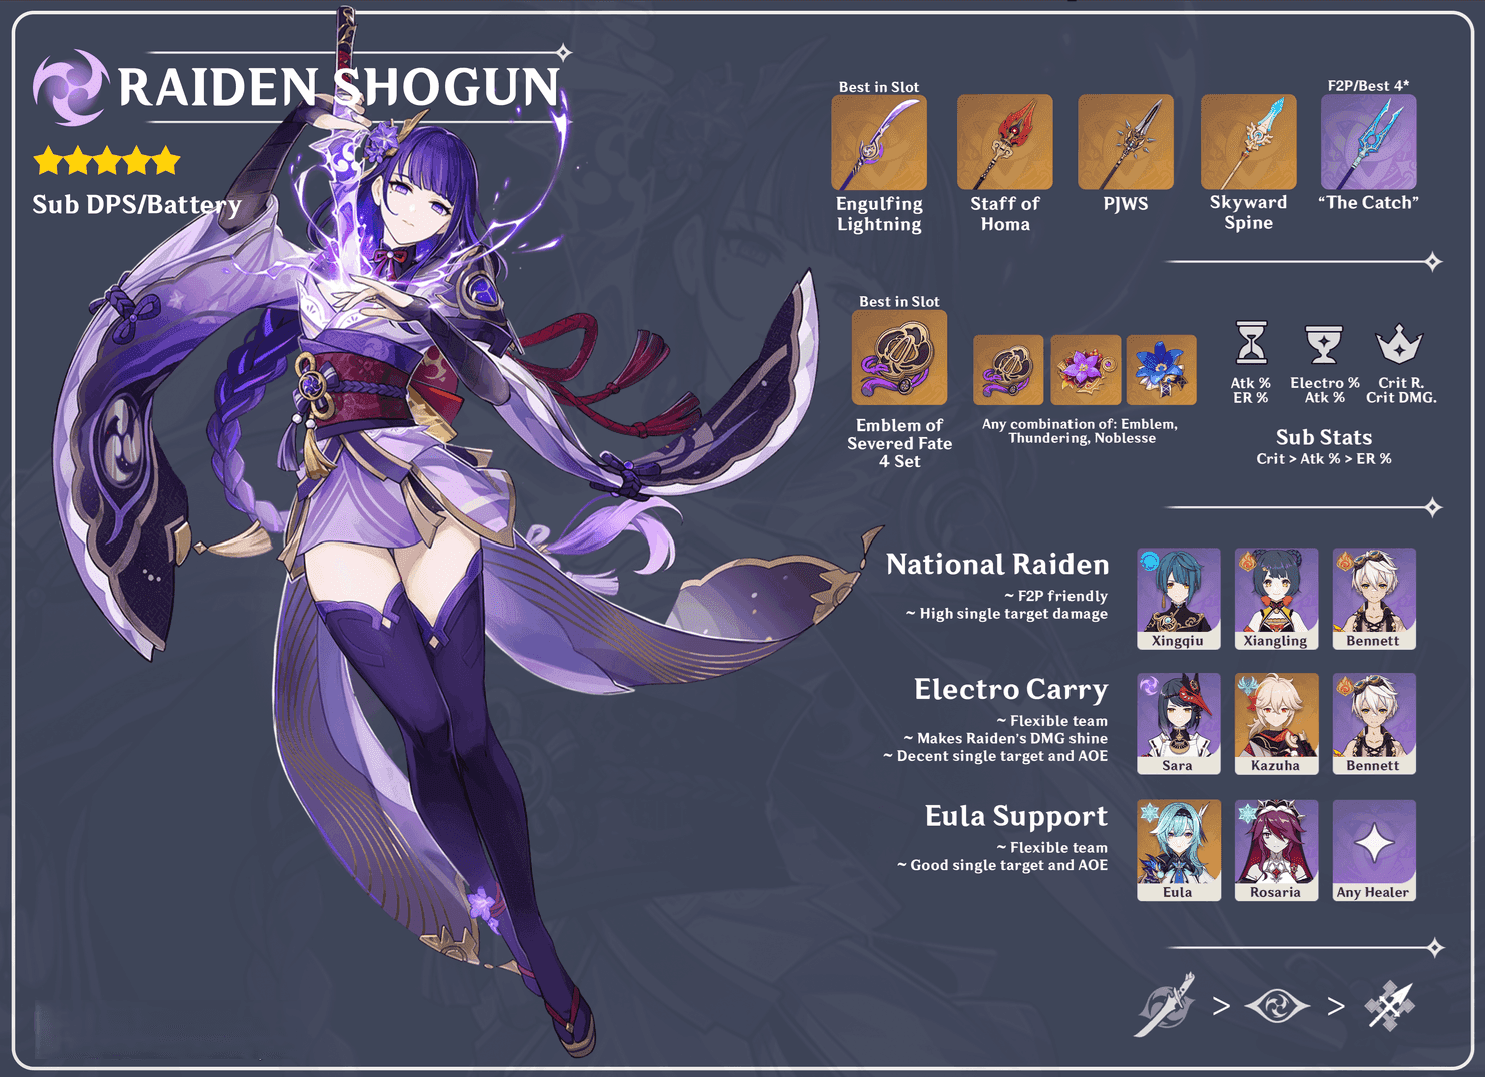
How Weapons Shift Your ER Goals
Engulfing Lightning’s 55.1% ER plus 30% post-Burst lets you hit 200-250% totals, converting excess into +80% ATK. The Catch at 45.9% ER nails 200-230% for F2P. Grasscutter skips ER but substats get you 200-230%, focusing Crit instead. Engulfing at 250% ER with sands? 288.9% total for 18-second charges. Calc your weapon base (55.1%). Layer artifacts. Test for 103k Burst at 225% ER.
Engulfing Lightning: The 270-300% Power Play

That 55.1% ER +30% shaves 25% off your next charge, capping ATK at 80% from ER over 100%. Target 270-300% for 600k+ bursts—ER sands edge out better battery. Equip the 51.8% sands. Add 30% substats. Confirm 250k DMG. It’s overkill in the best way.
Grasscutter’s Light (or Jade Cutter Vibes): Sticking to 200-230%
Lean on 32% ascension and artifacts for 200-230%; switch to ATK sands once baseline hits for 2100+ ATK and 123k bursts. Farm those ER substats. Use 4-piece Emblem. Test in buffed rotations—feels balanced, not forced.
The Catch: F2P’s 250-270% Haven
45.9% ER +32% Burst DMG drops your target to 250-270%, with 6% Crit Rate on Burst. Pair with 2-piece sets for 230% in National. Team with ER sands. Hit 250% for 20-second charges. Upgrade to 4-piece when you can.
Favonius Lance and Support Sticks
Favonius Lance’s 6.7% ER throws in 3-6 Energy particles on 60% Crit every 12 seconds, easing needs to 220%. Aim 50%+ Crit Rate. Test 60% efficiency in four-player. Great for battery roles.
Constellations: How They Reshape ER Needs
C0 demands 250-270% ER; C1 cuts it 20-50% with +80% Resolve from Electro bursts, down to 230% in Electro-heavy teams. C2 holds at 250% for uptime; C6 trims CDs by 1 second per hit (up to 5). C0 at 270% ER gets 90% uptime; C2 at 230% boosts DPS overall. Assess your consts (C1 lowers targets). Recalc Resolve. Test in Electro comps.
C0 Raiden: The Raw ER Grind
250-270% covers 90 Energy through particles and 4.75 per hit; 250% with Engulfing locks 18-second cycles. ER substats first. Skip EM. Watch for 60 Resolve and +78% ATK DMG.
C1’s Edge: Lowering ER Without the Pain?
C1 amps Resolve +80% from Electro bursts (0.2 per Energy cost), so 220-250% works. Pair with Fischl or Sara. Build to 230% ER. Verify stacks in 15 seconds. Game-changer for efficiency.
C2 and Up: ER Meets Offense
C2 baselines at 250% ER; C4 adds 30% party ATK post-Burst. C3 levels Burst +3 (max 15) for high-ER scaling. C2 at 230% outpaces low-ER C0. Pivot to Crit after 250%. 1:2 ratio (50-70% Rate, 120-200% DMG). Test 123k bursts.
C3’s Talent Kick and Energy Boost
C3 pushes Burst to 721.44% base +1.31% per Resolve at Lv.10. Hit 250% ER. Grab orbs for 2 Resolve. Land 250k DMG at 60 stacks.
Maxing ER or Switching to ATK/Crit: When to Pull the Trigger
Cap ER at 250-300% for +120% restoration, then flip to 2100+ ATK and Crit if charges stay under 18 seconds—excess beyond the 75% Emblem cap is wasted. 225% with Engulfing optimizes support; ATK sands pump 123k bursts with Bennett versus 103k ER-focused. Reach 250% first. Test DMG and charge. Swap sands if uptime’s locked.
ER vs. ATK: The Damage Dilemma
250% ER feeds 23.75 Energy per character but caps at 103k DMG; drop ER for 123k, but delays loom. ER shines in National (37k DPS per sims); ATK rules hypercarry (41k). Calc in-menu. Simulate Abyss. Balance 1800-2800 ATK.
Spotting Your ER Sweet Spot
Breakpoint sits at 200% base, 250% for hypercarry—ties ATK damage with uptime. Log 3-6 particles. Adjust in 10% steps. Nail it via 18-second rotations.
Diminishing Returns: Why 300%+ ER Backfires
Past 300%, Emblem DMG flatlines—no gains. Swap for Crit. 288% is ideal; over dilutes buffs. Ditch ER sands for ATK. Monitor the cap. Recalc for team.
ER Sands or ATK Sands: Your Decision Tree
ER sands if substats lag under 250%; ATK if you’re there. Engulfing with ER sands? 930k PMA but slower charges. Rule: Substats over 30% ER? Go ATK. Farm balanced. Test bursts. Grab 51.8% ER main if desperate.
Streamlining Raiden’s Charge Time
Her 18-second Burst CD syncs with 15-20 second rotations at 250% ER, using 3-6 particles (22.5 Energy) and 12.5-27.5 per member refund. Electro particles give 7.5 at 250%; orbs 9 active. Skill before Burst for +27% DMG (0.3% per 90 cost, 25 seconds). Build Resolve (0.2 per ally Burst). Collect in 7-second field time. Loop every 18 seconds.
Burst Cooldown vs. Rotation Reality
You need under 18 seconds to charge; 200% ER with three particles does it. 20-second rotation at 250%? Full uptime. Time ally bursts. Factor Anemo’s -5% CD. Adjust for 30-second particle expiry.
Particle Breakdown: Electro’s Edge Over Neutral
Electro: 7.5 active at 250%; neutral: 6.25. Orbs: 9 active, 5.4 inactive. High Voltage spits Electro every 5 seconds. Prioritize Electro sources. Pickup active. +2 Resolve per orb.
Funneling Energy for Quicker Bursts
Raiden Skill off-field plus ally bursts =90 Energy in 15 seconds with Xiangling orbs. Skill then swap. Burst at 60 Resolve. Shields against 3-5 Energy drain (looking at you, Abyss Lector).
Best Skill Order for Energy Max-Out
Raiden Skill (10s CD) > ally bursts > Raiden Burst (7s on-field) > orb swaps; nets +27% buff and energy. Avoid early Musou swaps. C1 for +80% Electro Resolve. 18-second cycle at 250% ER.
Your Hands-On ER Calc Guide
Total ER: 100% base +32% ascension +55.1% from Engulfing weapon +20% 2-piece +51.8% sands +30-50% substats =250-300%. Three particles =22.5 at 250%; restoration fills the rest to 90. Engulfing + Emblem =288.9% for 100% uptime.
Step 1: Map Your Team and Flow
List it: National squad, 3-6 Electro particles, 20-second rotation. Note Engulfing’s +30%.
Step 2: Stress-Test in Abyss or Domains
Run three rotations; aim for under-18-second charges. Pump ER if it’s lagging.
Step 3: Tweak in 10% Bursts
+4-5% per substat roll; recalc after farming.
Step 4: Lock Your Minimum for Steady Uptime
200% base, 250% hypercarry; confirm no drains.
Build Spotlights at Varying ER Tiers
Prioritize ER, then 50-70% Crit Rate, 120-200% DMG, 1800-2800 ATK.
Build 1: 220% ER National (The Catch Route)
The Catch, 2-piece Exile/Emblem (+20% ER), ER Sands, Electro Goblet, Crit Circlet; totals 230% ER, 2100 ATK. 20-second charge, 250k Burst with Xiangling particles. Farm ER rolls. Level Burst to 10. Rotate Skill > Xiangling.
Build 2: 270% ER Hypercarry (Engulfing Lightning)
Engulfing R1 (55.1% ER), 4-piece Emblem, ER Sands, Electro Goblet, Crit DMG Circlet; 270% ER, 2600 ATK. 103k Burst at 60 Resolve, 41k DPS. 50% ER substats. Test AoE. Pivot to Crit once baseline.
Build 3: 250% ER All-Rounder (Grasscutter’s Light)
Grasscutter, 4-piece Emblem, ER Sands, Electro Goblet, Crit Circlet; 250% ER, 2500 ATK. 123k Burst. Heavy substat farm. 18-second uptime. Toss in EM for reactions.
ER Pitfalls and Dodges
Stack over 300%? Wasted Crit slots. Ignore particles? Delays galore. Always test post-baseline.
Pitfall 1: Chasing One-Size-Fits-All ER Advice
200% flops in low-particle teams; customize to 250%+. Fix: Document sources. Test rotations. Adjust for C1 (drops 20%).
Pitfall 2: Overlooking Team Energy Output
Skip Xiangling orbs? Halve your efficiency (5.4 inactive Energy). Dodge it: Count per rotation. Funnel to Raiden. Leverage High Voltage bonuses.
Pitfall 3: ER Hoarding Over Crit
300% hits cap; flip for 1:2 ratio. Remedy: Menu check. Swap sands. Balance for 250k DMG.
Pitfall 4: Mismatching Rotation Timing
20 seconds needs under-18 charge; miss Skill, lose 27% buff. Time the order. Build Resolve early. Shields for interruptions.
Fixing Burst Droughts: Why Raiden Won’t Fire
Under 200% ER, zero Resolve, or drains (Abyss Lector) spell trouble; buffer to 270%, secure 3+ pickups. 60% inactive efficiency; Favonius procs help.
Pinpointing Generation Gaps
Audit total ER, particles (Electro beats neutral). Low? Farm substats. Menu review. Rotation log. No 30-second expiry.
Sorting Rotation Hiccups
Early Burst at zero Resolve? Weak DMG. Fix post-allies. Skill > bursts > Burst. 15-20 second buildup. C6 for CD cuts.
Bringing in an Electro Battery (Fischl or Sara)
Under three particles? Fischl it is; Sara C6 drops ER to 225%. Electro teams for C1. Test uptime. +80% Resolve.
Artifact/Weapon Fixes for Energy Woes
Low ER: ER sands + The Catch. Drains: Zhongli shields. Recalc total. +30% Engulfing. 270% buffer.
Pro ER Hacks for Raiden
Hit 270% sans buffs; drop to 220% with Thrilling Tales. Max 60 Resolve (78% ATK) via orbs; off-field Skill for battery. C1 + particles for sub-18-second speedruns. 250% flexes across comps.
Off-Field Skill for Team Juice
Pops particles remotely; Hyperbloom at 200% ER + EM. 10-second CD timing. +27% buff. Coordinated hits.
Stacking Resolve for Energy Perks
60 stacks from 0.19 per consumed Energy + orbs; fades after 300 seconds off-field. Ally bursts first. Orb pickups. C1 amps.
ER for Speedrun Precision
1.8-2.4 Energy inactive; 250% handles Abyss drain. Simulate. Shields up. Talent regen.
Building for Future Comps
250% baseline everywhere; EM for reactions. Test new weapons. Pivot post-cap. Quarterly check-ins.
FAQs: Your Raiden ER Questions Answered
How Much ER Does Raiden Shogun Really Need?
Start at 200% for most builds, ramp to 250-300% for hypercarry or battery duty—recharges 90 Energy in 18 seconds with 3-6 particles. Boosts restoration to 4.75-5.5 per hit; chase 30-50% substats, test your rotations.
Is 200% ER Enough for Raiden?
Yeah, for sub-DPS in National (tweak to 220-250%), with 18-second charges and 5.4 inactive from orbs. Hypercarry wants 250%+; C1 shaves 20% via Resolve—check domains to skip 30-second waits.
ER Sands or ATK Sands for Raiden?
ER sands (51.8%) if you’re under 250%, especially with Engulfing for 270-300% and 103k DMG plus refunds; ATK after baseline for 123k bursts and 1:2 Crit. Farm substats, time your charges.
When Do You Stop Stacking ER on Raiden?
At 250-300% to max 75% Emblem DMG and +120% restoration; then ATK/Crit. Solo battery caps higher; hypercarry with Sara? 225% if under 18 seconds—menu recalc for rotations.
Does C2 Raiden Need Less ER?
C2 works 230-250% thanks to DPS spikes (ignores 60% DEF), plus C4’s 30% party ATK; C0-C2 baselines 250%. C1 cuts 20-50% via Resolve—test Electro teams for 18 seconds.
Best ER for Raiden with Engulfing Lightning?
250-300% using 55.1% base +30% post-Burst for 288.9% and 250k bursts, +80% ATK from excess. Locks 18-second charges, 23.75 per member; substats priority, test hypercarry at 41k DPS.
👉 Genshin Impact top up Genesis Crystals 👈
✅ Official direct recharge, 100% secure
✅ No waiting – top-up arrives in 7 seconds
✅ Big discounts, low prices to save more
✅ 7×24-hour customer service, ready to assist anytime


