

Understanding Venti's Hexerei Support Role in Version 6.2
Here's what changed everything: Version 6.2 didn't just tweak Venti—it completely redefined how we think about Anemo support. The Hexerei system introduced a massive 50% damage bonus to his Elemental Burst after triggering Swirl reactions, and honestly? It's made budget Venti builds more viable than ever.
His Elemental Burst still does what it's always done best—creates that signature vortex grouping enemies while dealing consistent Anemo damage. But now those Swirl reactions aren't just nice-to-have damage; they're the key to unlocking Viridescent Venerer's full potential with up to 40% elemental resistance reduction.
For players looking to maximize their Venti's potential, securing adequate resources becomes crucial. Genshin Impact primogems for weapon banner can be efficiently obtained through BitTopup's reliable platform, ensuring you have the materials needed for optimal weapon choices.
What Defines the Hexerei Support Meta
The Hexerei system isn't just another damage multiplier—it's a complete team synergy overhaul. You need at least two qualifying characters to activate the full benefits: 20-35% additional resistance shredding and a whopping 75% damage boost to qualifying team members.
Venti becomes the conductor of this orchestra through consistent Swirl application. In practice, this means maintaining these buffs throughout extended combat encounters without breaking a sweat.
Key mechanics you'll want to understand:
- Stormeye Enhancement: 135% damage scaling (this is huge)
- Windsunder Arrows: Enhanced Normal Attacks that actually matter now
- Extended Burst Duration: +4 seconds of crowd control heaven
- Resistance Stacking: VV and Hexerei reductions combine beautifully
Why Venti Excels in Crowd Control Compositions
Let's be honest—no one groups enemies like Venti. His Elemental Burst remains the gold standard for corralling multiple enemies into convenient damage zones. The 6.2 buffs enhanced this utility by extending Burst duration and increasing damage scaling, making him even more indispensable.
But here's what experienced players know: his Elemental Skill provides underrated utility through wind current generation. That vertical mobility and positioning advantage? It's saved more runs than most people realize.
The Low Investment Philosophy: Maximum Value, Minimum Resin
After years of artifact farming, I've learned this truth: low investment building prioritizes functional performance over perfect optimization. You can achieve 80-90% effectiveness with 40-50% of the resin investment required for perfect builds.
This approach recognizes that support characters like Venti derive most value from set bonuses and mainstat selection rather than substat perfection. And frankly, that's liberating.
Defining 'Low Investment' Artifact Standards
When I talk about low investment standards, I'm focusing on achievable targets that won't drain your resin reserves:
- Mainstat Correctness over substat optimization
- Set Bonus Completion (maintaining 4-piece VV is non-negotiable)
- Functional Thresholds (meeting minimum Energy Recharge requirements)
- Resin Efficiency (stopping once functional requirements are met)
A typical low investment Venti build uses artifacts with 2-3 useful substats rather than requiring 4 perfect substats on every piece. Trust me—your resin will thank you.
When Good Enough Is Actually Good Enough
Support Venti reaches functional effectiveness once he can consistently use his Elemental Burst every rotation while maintaining that crucial 4-piece Viridescent Venerer set bonus.
Performance benchmarks that matter:
- Elemental Burst available every 15-20 seconds
- Consistent Swirl reaction triggers for VV resistance shredding
- Adequate crowd control duration for team damage windows
- Stable energy generation for team battery requirements
Hit these marks? You're done farming. Seriously.
Best Artifact Sets for Budget Venti Hexerei Build
4-Piece Viridescent Venerer: The Gold Standard

There's no substitute for VV's 4-piece bonus: 60% Swirl damage increase and 40% elemental resistance reduction for swirled elements, lasting 10 seconds. What makes this perfect for budget builds? The set's effectiveness doesn't depend on artifact quality.
Even 4-star VV pieces provide the same set bonus as 5-star artifacts. The resistance shredding applies regardless of substats—it's beautiful in its simplicity.
Farming efficiency tip: The Valley of Remembrance domain also drops Maiden Beloved artifacts useful for healers, making your resin investment more efficient overall.
2-Piece Combinations for Transitional Builds
While working toward 4-piece VV completion, these transitional builds can keep you functional:
- VV 2-piece + Wanderer's Troupe 2-piece: 15% Anemo damage + 80 Elemental Mastery
- VV 2-piece + Instructor 2-piece: Anemo damage + team EM support
- VV 2-piece + Scholar 2-piece: Energy generation support
These work as stepping stones but should be replaced with 4-piece VV as soon as possible. Don't get comfortable with transitional builds.
Mainstat Priority Guide for Low Investment Venti
Here's something that took me too long to learn: mainstat selection determines 70-80% of an artifact's effectiveness. Correct mainstat choices matter far more than substat optimization for low investment builds.
Sands: Energy Recharge vs Elemental Mastery Decision
Energy Recharge Sands provides the most reliable path to consistent Burst uptime. The 140-180% ER target often requires ER Sands unless you're using high ER weapons like Favonius Warbow (61.3% Energy Recharge).
Elemental Mastery Sands becomes viable when you're:
- Using Favonius Warbow
- Running double Anemo compositions
- Having Bennett battery support
- Achieving sufficient ER through substats
The decision point? Around 140% total Energy Recharge from other sources.
Goblet: Elemental Mastery for Swirl Optimization
Elemental Mastery Goblet provides superior value for Hexerei support builds. Why? Swirl reactions scale entirely with EM and character level—the 6.2 Swirl buffs enhanced this scaling significantly.
EM goblets offer:
- Consistent scaling regardless of enemy type
- Team synergy through enhanced reaction damage
- Future-proofing across different team compositions
Circlet: Elemental Mastery for Maximum Reactions
Elemental Mastery Circlet completes the EM-focused build approach, maximizing Swirl reaction damage while maintaining 4-piece VV resistance shredding utility. The EM/EM/EM mainstat combination works effectively when Energy Recharge requirements are met through weapon choice and substats.
Substat Requirements and Stopping Criteria
Energy Recharge Breakpoints for Different Team Compositions
Solo Anemo Requirements:
- 160-180% ER with Bennett battery
- 180-200% ER without dedicated battery
- 140-160% ER with Favonius weapon procs
Double Anemo Requirements:
- 140-160% ER with second Anemo character
- 120-140% ER with Sucrose providing additional energy
- 160-180% ER if second Anemo character has high energy costs
For those building optimal Hexerei teams, having sufficient resources for character development becomes essential. Genshin Impact top up for Venti rerun through BitTopup ensures you can secure Venti and his constellations when available, maximizing your team's potential.
Elemental Mastery Thresholds for Swirl Damage
EM Threshold Guidelines:
- 200-400 EM: Baseline effectiveness
- 400-600 EM: Optimal range for low investment builds
- 600-800 EM: Diminishing returns requiring high-quality artifacts
- 800+ EM: Optimization territory unnecessary for functional performance
These thresholds assume EM from mainstats providing approximately 500 EM total.
Energy Recharge Math: How Much Does Venti Really Need?
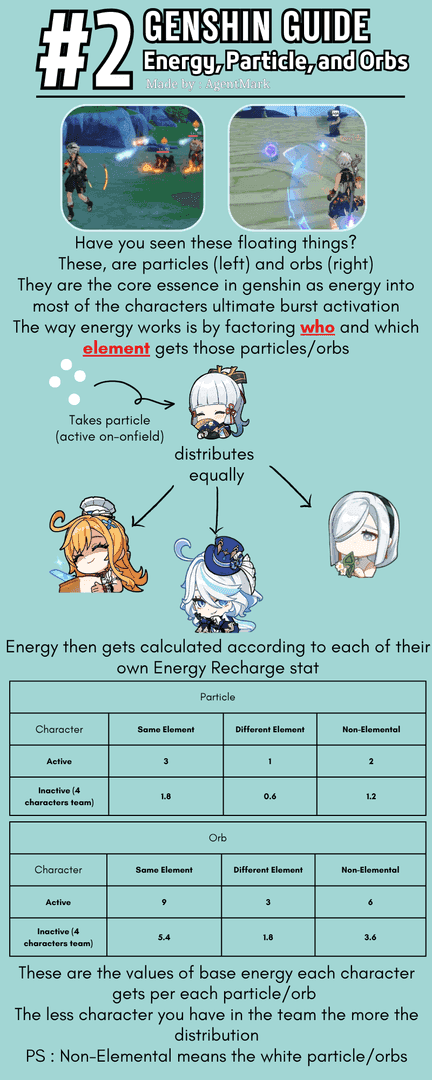
Let's break down the numbers. Venti's Elemental Skill generates 3 Anemo particles with a 6-second cooldown, providing consistent energy generation. His 60-cost Elemental Burst requires approximately 180-240 total energy depending on team energy generation and particle collection efficiency.
Solo Anemo vs Double Anemo Team Requirements
Solo Anemo teams require 160-180% Energy Recharge for consistent Burst uptime in challenging content. It's not negotiable if you want reliable performance.
Double Anemo compositions benefit from shared particle generation, allowing Venti to function effectively with 140-160% Energy Recharge. This is where team building really pays off.
Weapon Choice Impact on ER Needs
High ER Weapons:
- Favonius Warbow: 61.3% ER + particle generation
- Sacrificial Bow: 30.6% ER + skill reset
- Windblume Ode: EM focus, requires ER from artifacts
Low ER Weapons:
- The Stringless: Pure damage, requires significant ER from artifacts
- Elegy for the End: Team support, moderate ER
- Skyward Harp: Stat stick, minimal ER
Artifact Farming Strategy for Resin Efficiency
Valley of Remembrance Domain Guide

The Valley of Remembrance domain features Cryo and Hydro enemies with high elemental resistance. What works best is bringing Pyro DPS + Electro support for Overloaded reactions, Claymore users for shield breaking, and healers for sustained farming.
Pro tip: Use condensed resin for time efficiency and maintain daily farming routines for steady progress. Consistency beats intensity every time.
Common Mistakes to Avoid with Venti Artifacts
Over-Investing in Crit Stats for Support Role
Here's a mistake I see constantly: Critical hit stats provide minimal value for Venti's Hexerei support role. Swirl damage cannot critically hit—period.
Avoid these traps:
- Crit Rate/Crit Damage substats over ER/EM
- ATK% mainstats
- Anemo Damage Bonus goblet for pure support builds
- Physical Damage Bonus (seriously, don't)
Ignoring Energy Recharge for Pure EM Builds
Without reliable Burst access, Venti loses his primary value regardless of Swirl damage optimization. Warning signs include:
- Elemental Burst unavailable at rotation intervals
- Excessive reliance on other characters' energy generation
- Inconsistent VV resistance shredding application
Don't fall into this trap. Energy Recharge isn't optional.
Team Synergies That Affect Artifact Choices
Hexerei Core Team Compositions in 6.2

Durin/Venti/Bennett/Fischl provides:
- Overload reactions with VV resistance shredding
- Bennett energy battery support
- Fischl's consistent Electro application
Venti/Klee/Mona/Sucrose offers:
- Double Anemo composition reducing ER requirements
- Hydro/Pyro reactions enhanced by dual VV resistance shredding
Battery Characters and Reduced ER Requirements
Effective battery options include:
- Bennett: 2-3 Pyro particles every 2 seconds
- Fischl: Consistent Electro particles through Oz
- Diona: Cryo particles with utility
- Sucrose: Anemo particles directly benefiting Venti
With strong battery support, Venti functions effectively with 140-160% Energy Recharge instead of 180%+.
Comparing Budget vs Optimized Venti Builds
Performance Difference in Spiral Abyss
Budget builds achieve 85-90% of the crowd control and support utility provided by perfectly optimized artifacts. Let me break this down:
Budget Build (140% ER, 450 EM, 4pc VV):
- Consistent Burst uptime
- Full VV resistance shredding
- Adequate Swirl damage
- Reliable crowd control
Optimized Build (160% ER, 650 EM, perfect substats):
- 15-20% higher personal damage
- Slightly more consistent energy generation
- Marginal team performance improvements
Real Damage Calculations: 60% vs 90% Artifact Quality
Budget build produces ~8,000 Swirl damage per reaction, while optimized build achieves ~11,000 Swirl damage. That's a 37.5% increase requiring 200%+ more farming investment.
The resistance shredding utility? Identical between builds.
Alternative Artifact Sets Worth Considering
Instructor 4-Piece for Team EM Buffing
Provides 120 Elemental Mastery to all party members for 8 seconds after triggering elemental reactions. Available as 4-star artifacts, reducing farming requirements significantly.
Optimal for teams with multiple reaction-based damage dealers or compositions where enemies have low base elemental resistance.
Noblesse Oblige 4-Piece for ATK Buffing
Provides 20% ATK increase to all party members for 12 seconds after using Elemental Burst. Suitable for teams with ATK-scaling main DPS characters or compositions lacking dedicated ATK buffer.
Upgrading Your Venti: When to Reinvest in Artifacts
Signs Your Current Build Needs Improvement
Performance issues that warrant reinvestment:
- Inconsistent Elemental Burst availability
- Noticeably low Swirl damage
- Energy management problems
- Difficulty maintaining VV uptime
Account progression milestones:
- Completing other character builds
- Acquiring better weapons
- Shifting to demanding content
- Developing specialized team compositions
Priority Order for Artifact Upgrades
- Mainstat Optimization before improving substats
- Energy Recharge Sufficiency before damage optimization
- Set Bonus Completion while upgrading pieces
- Substat Quality improvements on worst pieces first
Frequently Asked Questions
What artifacts should I use for Venti in 6.2 Hexerei support role? Use 4-piece Viridescent Venerer with Elemental Mastery mainstats on Goblet and Circlet, plus Energy Recharge or Elemental Mastery on Sands depending on your weapon and team composition.
How much Energy Recharge does Venti need for Hexerei teams? Target 140-180% Energy Recharge depending on team composition. Solo Anemo teams need 160-180%, while double Anemo compositions can function with 140-160%.
Is 4-piece Viridescent Venerer mandatory for support Venti? Yes, the 40% elemental resistance shredding from VV 4-piece is irreplaceable for Hexerei team damage amplification.
What are the best mainstats for low investment Venti artifacts? Use ER or EM on Sands, EM on Goblet, and EM on Circlet. This maximizes Swirl damage while maintaining Burst uptime.
Can I use 4-star artifacts on Venti and still be effective? Absolutely. 4-star artifacts with correct mainstats and set bonuses provide nearly identical support utility to 5-star pieces.
When should I stop farming artifacts for support Venti? Stop farming once you achieve 4-piece VV with correct mainstats and sufficient Energy Recharge for consistent Burst uptime. Don't chase perfect substats—they're not worth the resin investment for support builds.


