

Xingqiu Overview and Meta Position 2025
Current Meta Standing
Here’s the thing about Xingqiu – he’s basically the cockroach of Genshin Impact. And I mean that in the best possible way.
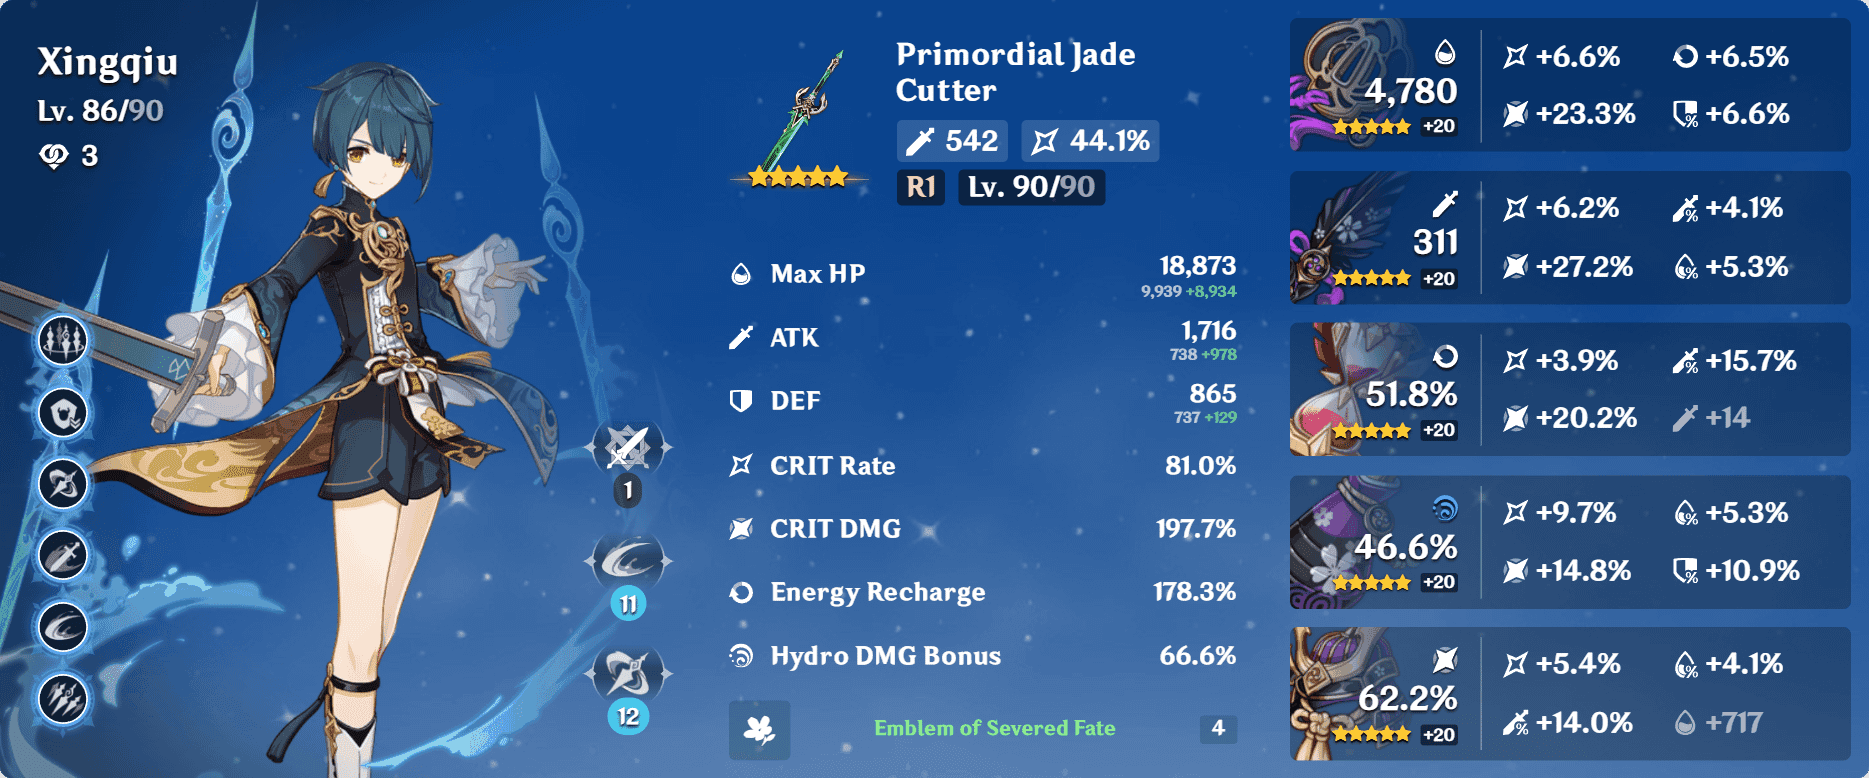
While flashier 5-stars come and go, this blue-haired bookworm just keeps delivering unmatched off-field Hydro application, chunky single-target damage, and defensive utility that’ll save your bacon more times than you’d expect. His Level 90 stats aren’t jaw-dropping (10,222 HP, 202 ATK, 758 DEF with 24% ATK ascension), but honestly? Numbers don’t tell the whole story here.
At C6, this guy genuinely rivals 5-star performance. Not kidding – the damage ceiling is wild.
His versatility is what really gets me though. National variants? Check. Hyperbloom compositions? Absolutely. Need survivability through damage reduction and interruption resistance? Xingqiu’s got your back. For constellation upgrades and weapon refinements, Genesis Crystals top up online through BitTopup offers competitive pricing and instant delivery.
Role and Key Mechanics
Xingqiu functions as your premier off-field Hydro DPS. That 80-energy Burst creates a sword rain symphony that triggers on Normal Attacks – 15 seconds of pure chaos (18 at C2).
The ICD system here is actually pretty sophisticated. Sword rain follows standard ICD rules (every 3 hits or 2.5 seconds), but those orbital Rain Swords? They’re on their own 2.25-second timer. It’s like having two separate Hydro applicators running simultaneously.
Defensive utility scales with Hydro DMG Bonus – 20% conversion rate means your damage investment doubles as survivability. Plus interruption resistance and healing (6% Max HP per Rain Sword). Pretty neat package.
Strengths: Best-in-class off-field Hydro, high single-target damage, valuable defensive utility, works everywhere, F2P friendly with incredible constellation scaling.
Weaknesses: That 80-cost energy requirement hurts. 21-second skill cooldown is rough. Primarily single-target focus, needs serious ER investment before C6, brief self-Wet application can be annoying.
Energy Recharge Breakpoints Analysis
ER Requirements by Team and Constellation
Alright, let’s talk numbers. These breakpoints matter – a lot.
C0-C5 Energy Requirements:
Solo Hydro scenarios (the painful ones):
Other Weapons: 220-260%
Favonius Sword: 190-220%
Sacrificial Sword R3+: 150-180%
Double Hydro compositions (much more reasonable):
Other Weapons: 200-245%
Favonius Sword: 165-205%
Sacrificial Sword R3+: 135-170%
With Raiden Shogun (the sweet spot):
Other Weapons: 180-185%
Favonius Sword: 150-155%
Sacrificial Sword R3+: 125-130%
C6 Energy Requirements (game changer – 30-40% reduction):
Solo Hydro: 180-220% / 150-180% / 130-150% Double Hydro: 165-205% / 135-170% / 120-140%
With Raiden: 140-145% / 115-120% / 100-105%
See that C6 difference? That’s why it’s such a massive upgrade.
Energy Generation Analysis
Elemental Skill generates 5 Hydro particles on a brutal 21-second cooldown. Sacrificial Sword can double-cast for 10 particles, but here’s the catch – it extends rotations by 1-2 seconds. Often causes net team DPS loss despite the energy comfort.
Favonius Sword generates universal Clear particles on CRIT hits. Benefits the entire team with way higher consistency than Sacrificial’s RNG-dependent passive. Just saying.
Weapon Comparison: Sacrificial Sword vs Wolf-Fang
DPS Performance Data
KQM’s calculations using Favonius Sword as baseline (100%) show some interesting patterns. At C0-C5, Sacrificial Sword R3+ hits 103% while Wolf-Fang R5 reaches 105%. Pretty close, right?
But at C6? Wolf-Fang jumps to 121% while Sacrificial drops to 100%. That performance gap comes from Wolf-Fang’s CRIT Rate secondary (27.6% at level 90) and its DMG% bonus to Skills/Bursts.
For weapon refinements and character upgrades, Buy Genesis Crystals instant delivery through BitTopup’s secure platform ensures quick access to materials with competitive rates and reliable service.
Weapon Selection Guidelines
Choose Sacrificial Sword when: You’re running C0-C5 Solo Hydro teams, prioritizing comfort over damage, need battery support for other Hydro characters, or just can’t get sufficient ER from artifacts.
Choose Wolf-Fang when: You’ve got C6 with reduced ER needs, want maximum damage output, run teams with solid energy generation (Raiden/Favonius weapons), or have high-quality ER artifacts available.
Favonius Sword Alternative: KQM analysis shows this offers the best balance – team-wide energy support without rotation extension. Those universal particles benefit everyone.
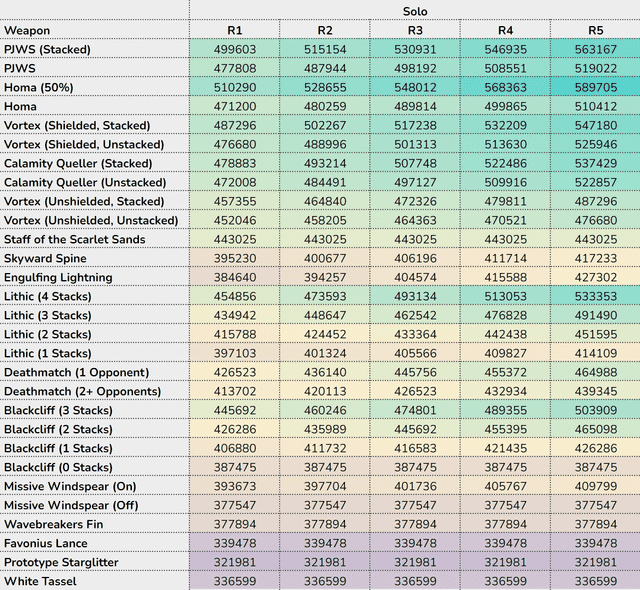
Complete Weapon Tier List
S-Tier Performance
C0-C5 Rankings: Primordial Jade Cutter dominates at 119% damage, followed by Mistsplitter Reforged (112%), Haran Geppaku Futsu (109%), and Skyward Blade (106%).
C6 Rankings: Primordial Jade Cutter still leads at 137% damage, Mistsplitter Reforged (129%), Haran Geppaku Futsu (124%), then Wolf-Fang R5 (121%).
Budget Options Analysis
Wolf-Fang brings 510 Base ATK, 27.6% CRIT Rate, and 16% Skill/Burst damage (32% at R5) with separate CRIT Rate stacking. Solid choice.
Skyward Blade provides ER secondary with CRIT Rate passive – that 608 Base ATK actually helps compensate for Xingqiu’s naturally low Base ATK.
Favonius Sword generates 6 Clear particles on CRIT (3-second cooldown). The 61.3% ER secondary makes building so much easier.
Fleuve Cendre Ferryman offers F2P ER secondary with CRIT DMG scaling, achieving 100% relative damage. Not flashy, but gets the job done.
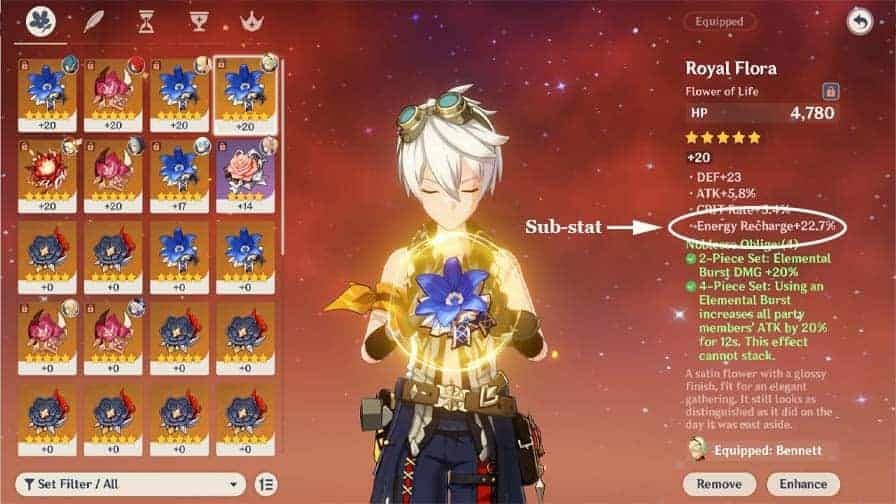
Optimal Artifact Builds
Emblem of Severed Fate Dominance
4-piece Emblem is just… chef’s kiss. 20% ER plus converting up to 75% of ER into Elemental Burst DMG bonus? KQM analysis shows 13-19% better performance than alternatives. That’s not even close.
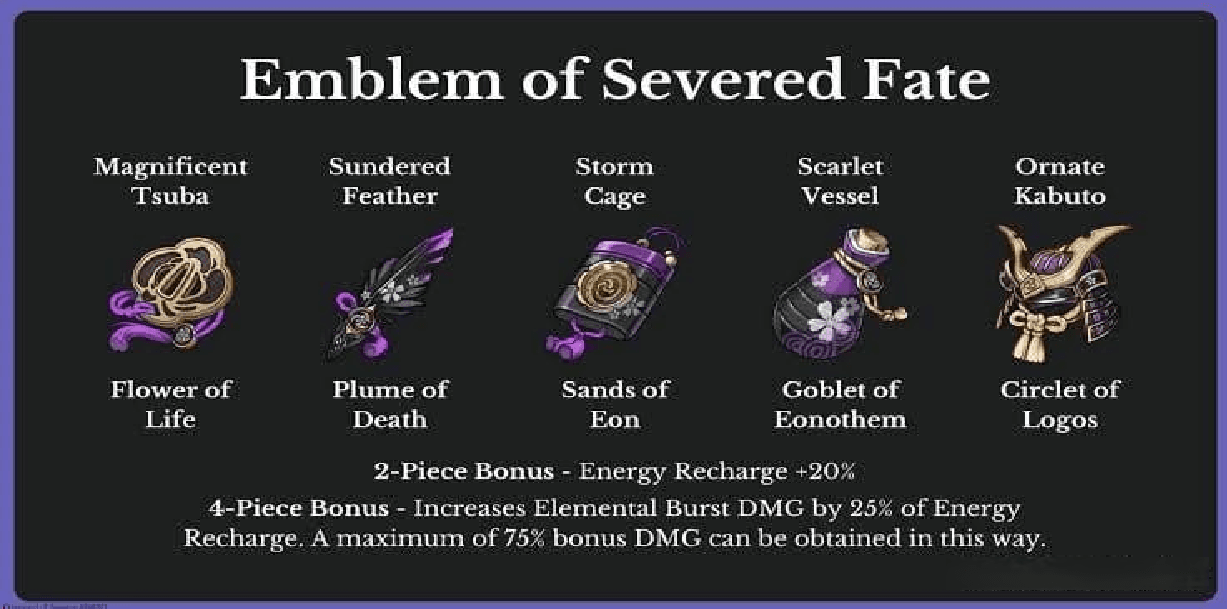
Set bonus formula: ER% × 0.25 (capped at 300% ER). Your typical 200% ER build gains 50% Elemental Burst DMG bonus. Free damage for stats you need anyway.
Alternative Sets only work with extremely low ER needs (<120-130%): 2pc Heart of Depth + 2pc Noblesse (15% Hydro DMG + 20% Burst DMG), or 2pc Heart of Depth + 2pc Emblem (15% Hydro DMG + 20% ER). But honestly? Just use Emblem.
Stat Optimization
Main Stats: ER/ATK% Sands (ER preferred), Hydro DMG Goblet (always), CRIT Rate/DMG Circlet (maintain 1:2 ratio).
Substat Priority: ER until requirement met > CRIT Rate/DMG (1:2 ratio) > ATK% > Elemental Mastery.
Target Stats: 1,800+ ATK, 180%+ ER (varies by team), 60-70% CRIT Rate, 120-150% CRIT DMG.
Best Team Compositions
National Team Variants
Raiden National: Raiden Shogun, Xingqiu, Xiangling, Bennett.
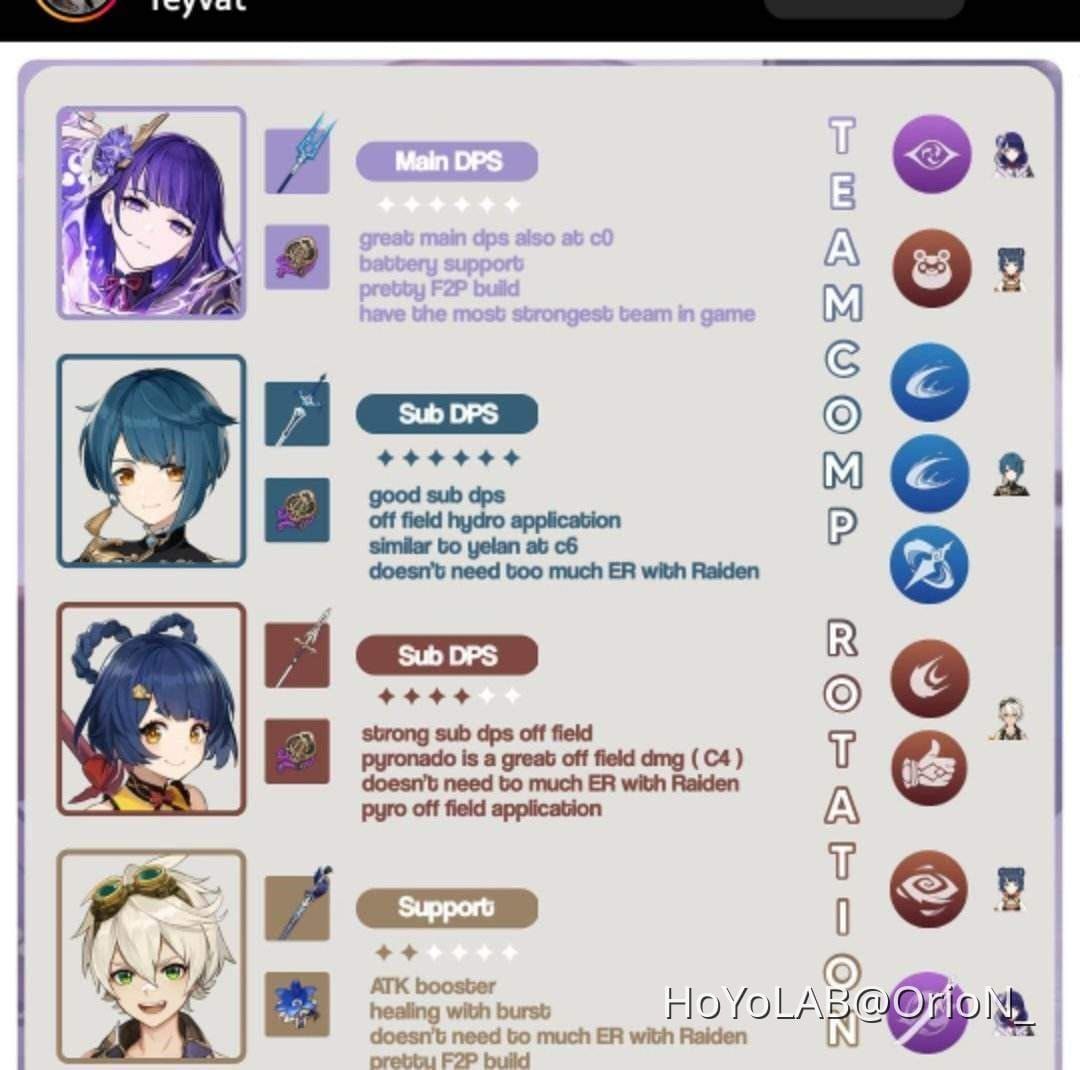
This is where Raiden really shines – solving those painful 80-energy Bursts for both Xingqiu and Xiangling while driving sword rain triggers.
The reaction layers here are beautiful. Xiangling’s Pyronado vaporizes, Raiden triggers Overload/Electro-Charged, Bennett provides ATK buffs. Consistently delivers highest single-target team DPS in the game.
Classic National: Swaps Chongyun for Raiden, uses Cryo infusion for reverse Melt. Lacks Raiden’s energy generation but remains highly effective and completely F2P accessible.
Taser and Freeze Teams
Sucrose Taser: Xingqiu, Fischl, Beidou, Sucrose for Electro-Charged mayhem.
Rotation goes: Fischl E > Sucrose E > D > Q > Xingqiu Q > N1 > E > D > Beidou E > N1 > Q > N1 > Sucrose on-field. Excels in AoE with Swirl grouping – the combined defensive utility often eliminates healing needs entirely.
Double Hydro Freeze: Pairs with another Hydro character for enhanced application and that sweet 25% HP Hydro Resonance. Works with Ayaka/Ganyu, though Mona/Kokomi are often preferred for AoE application.
Constellation Priority Guide
Critical Constellations
C6 (Highest Priority): This changes everything.
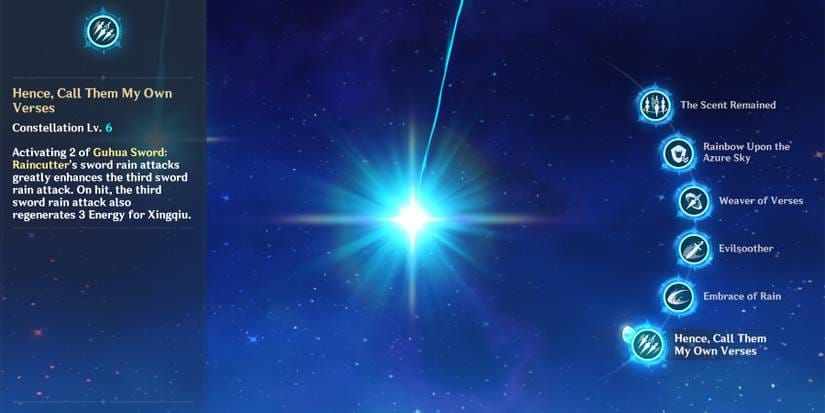
Sword pattern shifts from 2-3-2-3 to 2-3-5-2-3-5. That 5-sword wave deals enhanced damage and regenerates 3 Energy.
Total hits jump from ~37-45 to 60 per Burst. ER requirements drop 30-40%. This constellation literally transforms character performance to rival 5-stars. No exaggeration.
C2 (High Value): Extends Burst duration 15→18 seconds plus 15% Hydro RES shred. Duration extension improves uptime significantly, RES shred benefits all team Hydro damage.
C4 (Moderate): 50% increased Skill damage during Burst (Base DMG Multiplier 1.5). Requires Q > E rotation change though, which can create energy issues. Standard E > Q combo remains more reliable.
Investment Order
Priority: C6 > C2 > C4 > C3 > C5 > C1.
C6 represents one of the strongest 4-star upgrades in the entire game. C1 provides minimal value (just one extra Rain Sword). Skip it if you’re planning ahead.
Advanced Mechanics and Rotations
Optimal Combos
Standard (Energy Priority): E > D > Q. Pre-funnels particles for consistent uptime, dash-cancel minimizes animation time.
C4 Damage: Q > N1 > E > N1. Utilizes C4 bonus but requires careful energy management.
N1 Weaving: Insert single Normal Attacks between actions to trigger sword rain waves. Can result in 3+ additional waves per rotation. Free damage.
Critical Techniques
Animation Canceling: N1 weaving maximizes sword rain triggers while minimizing field time. Essential in quickswap teams where multiple characters need field time.
Particle Management: Stay on-field briefly after Skill or use the ‘book trick’ (pause via menu) for proper particle collection. Sounds silly, works perfectly.
Non-Snapshotting: Burst updates dynamically with stat changes, making mid-rotation buffs valuable. Unlike some characters who snapshot everything.
Common Mistakes and Optimization
Build Errors
Forcing C4 Combo: That Q > E combo often creates energy issues and rotation desynchronization. Damage gain rarely compensates for missed Burst uptime risk. Don’t fall into this trap.
Overvaluing Sacrificial Sword: Rotation extension often causes net team DPS loss despite energy comfort. Favonius typically offers better team performance – trust the math.
Neglecting ER: Attempting to maximize damage while ignoring ER thresholds leads to inconsistent uptime. Meeting ER requirements is always first priority. Always.
Performance Tips
Energy Calculator Usage: Use team-specific calculators for precise requirements rather than general guidelines. Allows optimal stat distribution between ER and offense.
Weapon Context: Consider your entire team’s energy needs, not just Xingqiu’s. Multiple Favonius weapons can enable damage weapons on Xingqiu.
Long-term Planning: C6’s dramatic ER reduction requires build adjustments. Plan artifacts and weapons for post-C6 optimization – you’ll thank yourself later.
FAQ
What are exact ER breakpoints for different teams? C0-C5 Solo Hydro: 220-260% (other weapons), 190-220% (Favonius), 150-180% (Sacrificial R3+). Double Hydro reduces to 200-245%/165-205%/135-170%. With Raiden: 180-185%/150-155%/125-130%. C6 reduces all values by 30-40%.
Is Sacrificial Sword better than Wolf-Fang? Depends entirely on constellation. C0-C5: Sacrificial R3+ achieves 103% damage vs Wolf-Fang R5’s 105%. At C6: Wolf-Fang jumps to 121% while Sacrificial drops to 100%. Sacrificial extends rotations, often reducing team DPS despite personal comfort.
Why is Emblem optimal for Xingqiu? Converts necessary ER into damage: 25% of ER becomes Burst DMG bonus (75% cap). 200% ER build gains 50% Burst DMG bonus. Performs 13-19% better than alternatives, perfectly synergizing with high ER requirements.
How does Xingqiu compare to Yelan in 2025? Xingqiu provides higher Hydro application, defensive utility, C2 RES shred, greater accessibility. Yelan offers higher personal damage, ramping buffs, simpler HP scaling. Many top teams actually use both in Double Hydro cores.
Most important constellations? C6 (highest priority): transforms kit with 2-3-5 pattern, increased damage, 3 Energy regeneration. C2: extends duration to 18s, 15% Hydro RES shred. C4: 50% Skill damage but requires rotation changes. C1 has minimal impact.
Optimal rotation for performance? Standard: E > D > Q (energy priority). C4 damage: Q > N1 > E > N1 (risks energy issues). Always use N1 weaving between swaps for maximum sword rain triggers. Taser example: Fischl E > Sucrose E > D > Q > Xingqiu Q > N1 > E > D > Beidou combo.


