

Why Yae Miko Dominates Aggravate Teams (A Quick 2025 Meta Rundown)
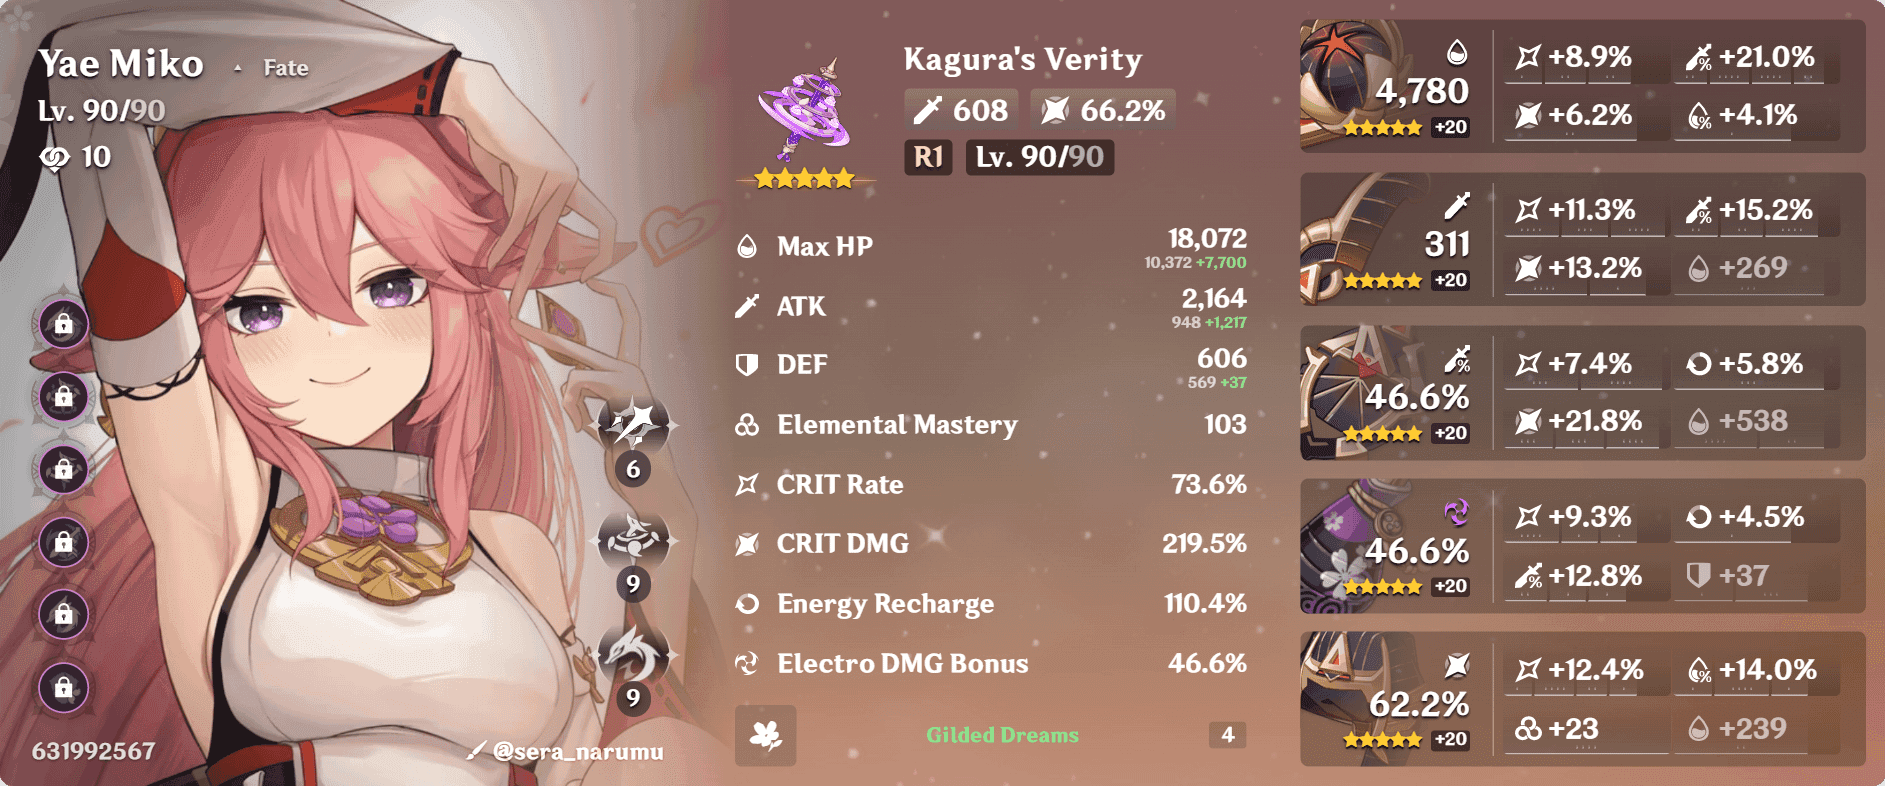
At Level 90, Yae Miko packs 10,372 HP, 340 ATK, 569 DEF, and a base 24.2% CRIT Rate—then she ascends to snag another +19.2% CRIT Rate, fueling her Aggravate bursts. Her totems from the Elemental Skill keep Electro flowing almost non-stop, ramping up Electro damage by that sweet 1.15x multiplier through EM in Quicken auras. And here’s the kicker: her A4 passive double-dips, adding +0.15% totem damage per EM point. In the post-Sumeru 2025 landscape, she lets Dendro heavy-hitters like Alhaitham rack up Aggravates while she chills off-field. Ever wonder why she’s not fading away? It’s that seamless synergy with the Dendro meta—pure elegance.
Getting the Hang of Aggravate Reaction Mechanics
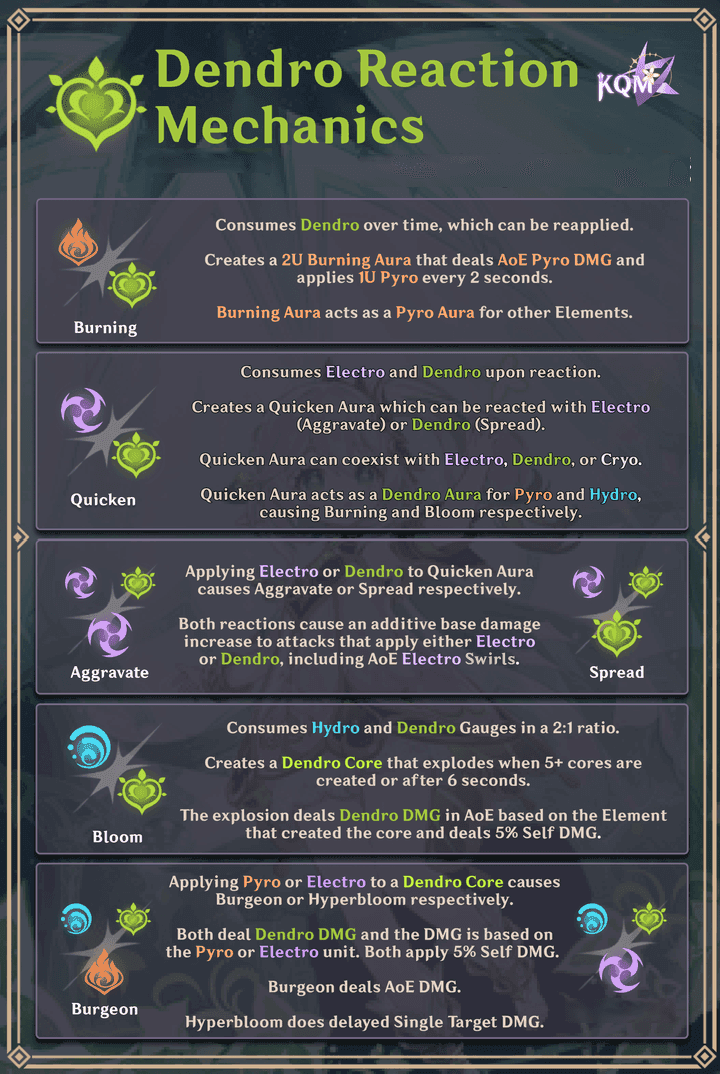
Aggravate kicks in when you hit Quickened enemies— that’s your Dendro + Electro aura combo, lasting about 7 seconds—with Electro damage getting a 1.15x boost scaled by EM. Keep it fresh by landing Dendro hits to refresh Quicken. Yae’s Sesshou Sakura totems unleash five lightning strikes apiece (that’s 15 in total from three totems at 60.7% damage at Level 1, scaling to 118.5% at Level 4), and their charged attacks skip ICDs for reliable procs. Break it down: First, Nahida’s Skill slaps on Dendro for Quicken. Then, drop Yae’s totems off-field. Finally, let your Dendro DPS swing away to trigger Aggravate— but hold off on extra Dendro to dodge Spread reactions stealing the show.
How Yae Miko’s Kit Meshes with Dendro Elements
Her Elemental Skill? A quick 4-second cooldown, three charges, and 14 seconds of totem action that levels up in a triangle formation for top-tier damage—perfect for sparking Quicken with Dendro. The Burst costs 90 Energy but devours those totems for a 260% AoE hit plus 334% per Thunderbolt (up to three), and her A1 passive resets one Skill charge per totem for near-100% uptime. Stack 100-300 EM to supercharge totem output in this 2025 meta. Try this: Position totems around foes before Quicken hits. Team her with Nahida for that EM buff and Dendro application. Then, Burst to nuke and reset, keeping the totems linked far from water or random objects that could mess things up.
Where Yae Fits in the Meta: Stacking Up Against Other Electro Subs
Yae edges out Fischl in Aggravate with rawer damage punch, a full 14-second Skill uptime, wider multi-target coverage, and zero reliance on reactions for consistency. Compared to Keqing’s 50/50 Burst gamble or Cyno needing full EM gear, Yae’s off-field style pairs beautifully with Dendro drivers. By 2025 standards, she’s topping the charts for Catalyze sub-DPS roles, even triggering Fischl’s A4 from afar. Build her for EM in Dendro comps. Duo with Fischl for 100% particle gen to ease ER demands. Or go solo Electro with Nahida to lock in Quicken sustain. (Editor’s take: If you’re theorycrafting, Yae’s the one that feels less finicky in spread-out Abyss rooms—trust me on that.)
For players looking to enhance their Genshin Impact experience, top up Genshin Impact crystals through BitTopup offers competitive pricing and instant delivery, ensuring secure, compliant transactions with broad support for multiple regions and excellent after-sales service, backed by high user satisfaction ratings.
The Best Yae Miko Aggravate Build: Artifacts and Stats That Stick
At its heart, go for 4-piece Gilded Dreams—snagging +80 EM from the 2-piece and +14% ATK per same-element teammate or +50 EM per different one (stack up to three, refreshing every 8 seconds off-field) to maximize EM scaling in Dendro chaos. Prioritize EM Sands (aiming for 2000+ total EM), Electro DMG Goblet, and a CRIT Rate or DMG Circlet. Subs? CRIT Rate/DMG aiming for 60% Rate and 150% DMG after buffs, plus 140%+ ER, EM, and ATK%. At C0, push for 9/9/1 talents with Skill leading the charge.
Top Artifact Sets: Why Gilded Dreams Beats Thundering Fury (And When It Doesn’t)
Gilded Dreams cranks that 1.15x multiplier with EM and ATK perks, and it’s resin-smart when you slap Deepwood Memories on your Dendro unit for resistance shred. Thundering Fury’s 2-piece gives +15% Electro DMG, paired with Golden Troupe’s 2-piece for +20% Skill damage off-field; or full 4-piece Golden Troupe for +25% off-field Skill DMG if you’re skipping Dendro. Mix it up with Thundering Fury 2-piece plus Gambler’s 2-piece for +20% Skill DMG and cooldown resets on kills. Farm Gilded Dreams weekly from its domain. Team it with Deepwood on Nahida. Test for that 50/50 EM-to-CRIT sweet spot—it’s all about balance in the numbers.
Main Stat Priorities Slot by Slot
Sands: EM all the way for reaction scaling—own that high EM personally. Goblet: Electro DMG Bonus to amp your Electro hits. Circlet: CRIT DMG if you’ve got 50%+ base Rate from ascension and weapon. Flower and Plume stay fixed on HP and ATK. Equip the EM Sands to hit that 2000 EM mark. Slot in the Electro Goblet right after. Balance the Circlet for a 1:2 CRIT ratio. Refine subs step by step—patience pays off.
Tuning Subs: Balancing CRIT and EM Without the Headache
Lead with CRIT—60% Rate, 150% DMG—then layer in ER, EM, and ATK%. Your 100-300 EM double-dips through A4, but watch ICD caps. For low investment, settle at 40% CRIT Rate, 120% DMG, and 150 EM. High-end? 70% Rate, 200% DMG, 250 EM. Plug into an in-game optimizer for substat rolls. Farm ER if you’re dipping below breakpoints. Chase EM subs in Gilded Dreams to lock in Dendro magic.
Stat Targets Based on Your Investment Level
Low-end C0 F2P: 1500 EM, 50% CRIT Rate, 120% CRIT DMG, 140% ER. Mid-tier C1: 1800 EM, 55% Rate, 140% DMG, 130% ER. High-roll C2+: 2200 EM, 65% Rate, 160% DMG, 120% ER with a battery buddy. These scale with your team—always test via ER calculator. Level her to 90. Ascend for that +19.2% CRIT. Tweak for dual Electro dropping ER needs by 20-30%.
Picking Weapons for Aggravate Yae Miko: What Works Best
Kagura’s Verity leads with 608 Base ATK and 66.2% CRIT DMG, stacking +12% Skill DMG (up to three via Skill/Burst) before converting to +12% All DMG for totem Aggravates. A Thousand Floating Dreams matches the ATK at 608 but throws in 265 EM, plus +32 EM to same-element allies and +16% team EM on Skill/Burst—Dendro dream fuel. F2P pick: Hakushin Ring at 565 ATK and 30.6% ER, granting +10% Elemental DMG after reactions.
Ranking 5-Stars: Kagura’s Verity and Its Rivals
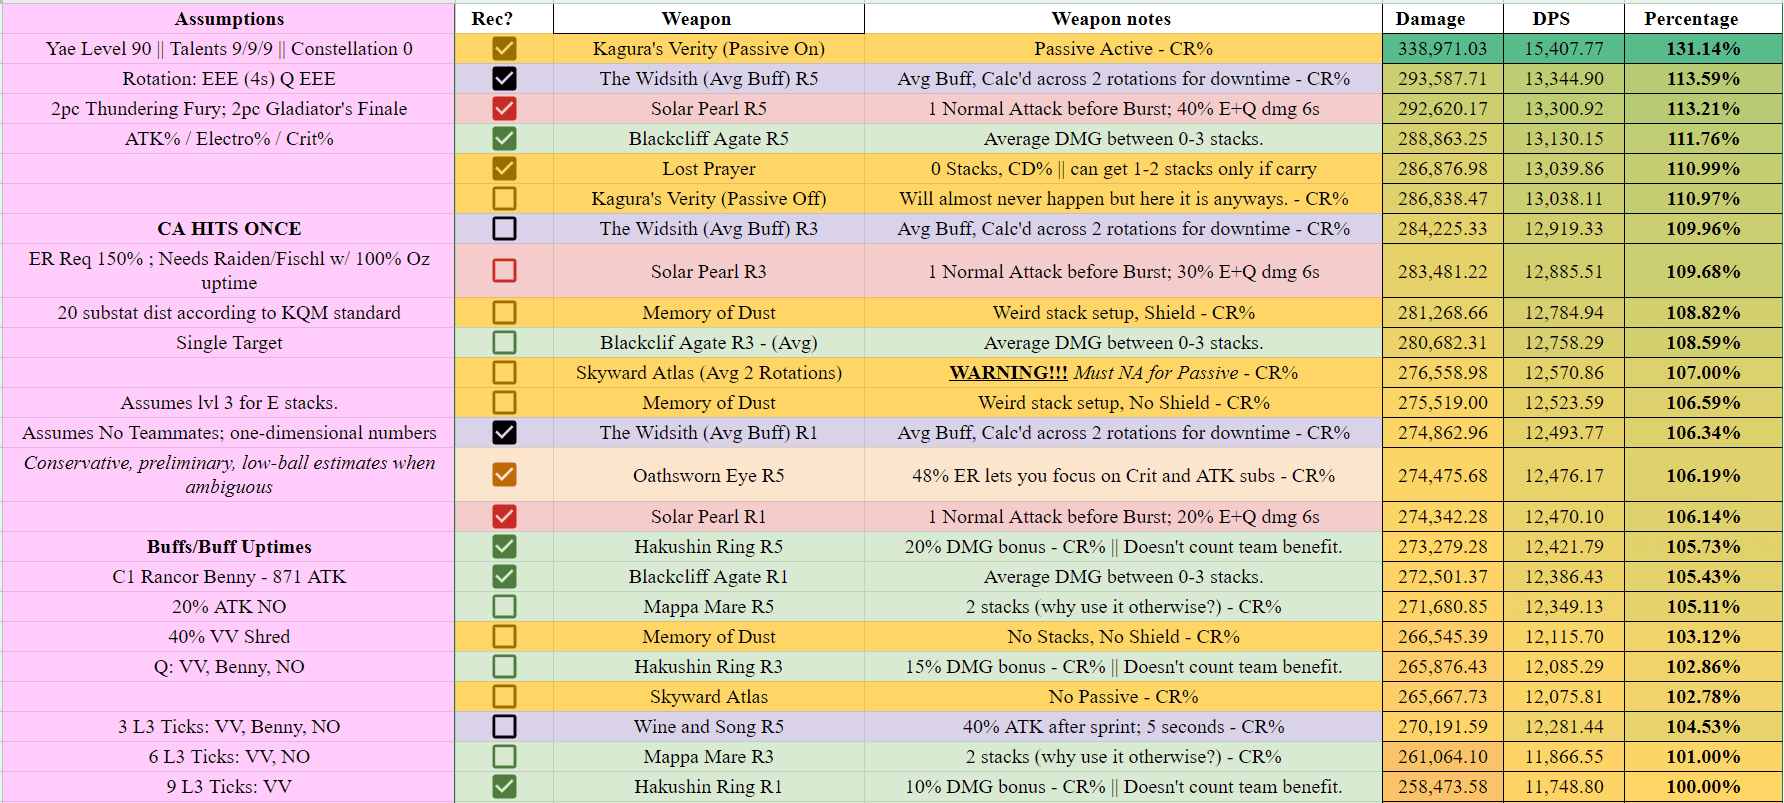
Kagura’s Verity: Stacks max for totem supremacy. 2. Lost Prayer (608 ATK, 33.1% CRIT Rate; +8% DMG every 4 seconds off-field). 3. Skyward Atlas (674 ATK, 33.1% ATK; +12% Elemental DMG). 4. Memory of Dust (510 ATK, 51.7% ATK; +20% Shield Strength, +30% DMG). 5. Sacrificial Jade (565 ATK, 41.3% CRIT Rate; +20-40% DMG post-reaction). Rankings hinge on EM/CRIT for Dendro—Verity pulls ahead with its stacks. Refine to R1+ for better stacking. Pair with EM artifacts. Test against Dreams for team-wide EM perks.
Solid 4-Star Choices: Widsith, Solar Pearl, and Hakushin Ring
Widsith (510 ATK, 55.1% CRIT DMG) drops +480 EM/ATK/CRIT buffs for 35-42% totem damage at R5 in Quicken. Solar Pearl R5 (510 ATK, 41.3% CRIT Rate) adds +20% Normal/Plunge DMG and +20% Electro on swap, proccing via N1 before Skill. Hakushin Ring handles ER and reaction DMG for F2P runs. Craft Mappa Mare (510 ATK, 48% EM; +16% Elemental DMG on reactions) as your starter. Gacha for Widsith’s EM bursts. Battle Pass folks, grab Oathsworn Eye (674 ATK, 22.1% ER; +48% ER post-Skill, +24% DMG).
F2P Weapon Picks That Actually Deliver
Lean on Mappa Mare for EM and reaction kicks, or Oathsworn Eye for ER stability. Skip Prototype Amber unless you’re desperate for battery. Top recs: 1. R5 Widsith for Quicken reliability. 2. Solar Pearl for hybrid Normal/Plunge play. 3. Hakushin for lone Electro duty. Widsith nets +35% totem damage versus Verity’s 24%—not bad for free-to-play grind.
How Weapons Stack Up in Practice
Kagura’s Verity: 20-30% Skill DMG edge over Widsith’s shifting EM. Dreams: +16% team EM, outperforming Atlas by 15% in Nahida squads. Widsith R5: 480 EM burst equals 72% totem boost at 50% uptime, half of Verity’s constant 100%. Solar Pearl: +20% Electro on swap, a 10% nudge past Mappa in non-reaction spots. Simulate in a calculator. Prioritize EM for Dendro. F2P? Stick to refined 4-stars.
Energy Recharge Deep Dive: What Yae Really Needs
Yae’s 90-Energy Burst demands 140-160% ER in two-Electro or every-rotation teams—drop to 110-140% for every-other or with C1 (restoring 8 Energy per Thunderbolt, up to 24 for ~40% less need). Solo Electro? 160-180%. On-field cuts it by 15%. Totems barely generate particles, so battery up with Fischl or similar.
How to Crunch ER Numbers Right
Start with her 90 base Energy, factor team particles (Electro resonance adds +80 every 10 seconds), weapon tricks (Favonius shaves ~10%), and artifacts (Emblem 4-piece swaps ER for Burst DMG). Input your team into a calculator. Run rotation tests for 100% Burst uptime. Swap Sands to ER if you’re short.
Solo vs. Dual Electro: ER Demands Side by Side
Solo or every rotation: 160-180%. Dual Electro (Fischl/Raiden) every time: 140-150%; C1 drops it to 100-110%. Off-field with Fischl: 130%. C0 Raiden team: 140-150%. Dual setups trim 20-30% via extra particles. Build a 150% base. Add Favonius subs. Funnel with Raiden’s Burst.
How Weapons and Artifacts Shift Your ER Game
Hakushin Ring (+30.6% ER) or Oathsworn Eye (+48% post-Skill) knocks needs down 20%. Favonius procs trim another 10%. Gilded Dreams offers zero ER, so hunt subs. C1 plus batteries? 100% ER in duals is doable. ER weapon first. Sub for 20-30 ER rolls. Recalc per team.
Real-World ER Targets by Team Setup
Nahida/Alhaitham/Yae/Kazuha: 140% every rotation. Yae/Fischl/Nahida/Zhongli: 130% off-field. Solo Yae/Dendro: 160%. C1 across the board: Subtract 27% (like 200% to 146%). Test in Abyss. ER Sands if under 140%. Favonius for steady procs.
In the midst of building your ultimate Yae Miko setup, consider Genshin Impact recharge online via BitTopup for fast, affordable crystal top-ups that support seamless progression, with robust security, wide game coverage, responsive customer support, and top-rated user feedback for hassle-free experience.
Talent Priorities and Constellation Worth
Talent order: Elemental Skill to Level 10 for totem damage (1,625,500 Mora, 1 Crown, 6 Aeons’ Discourses). Burst to 9 next. Normal Attack? Level 1 is fine. You’ll need 18 Old Handguards, 30 Kageuchi Handguards, 36 Famed Handguards, and Light series books (6 Teachings of Light).
Leveling Talents with Aggravate in Mind
Push Skill for those 118.5% totem strikes. Burst hits 334% on Thunderbolts. Max Skill charges for uptime. Level Burst after C1. Skip Normal unless you’re hybrid on-field. Materials: 1-6 Vajrada Amethyst, 168 Sea Ganoderma, 46 Dragonheir’s False Fin, 420,000 Mora.
Breaking Down Constellations (C0 to C6 Value)
C0 works great out the gate. C1 restores up to 24 ER, slashing needs by 40%. C2 starts totems at Level 2 with +60% range and multi-target perks. C3 bumps Skill +3 to 15. C4 adds +20% team Electro DMG for 5 seconds. C5 +3 to Burst. C6 ignores 60% enemy DEF. Grab C2 first, then C1. C2 shines solo Electro; C6 crushes bosses. Save for C2. C1 if ER’s a pain. C6 for late-game bosses.
Bare Minimum to Make Her Viable
C0 with 9-9-1 talents for mid-game fun; C2 unlocks Abyss potential. Lv8 Skill for casual play, Lv10 for meta chases. Farm Light domains on Wed/Sat/Sun. Weekly Raiden for Aeons. Nobushi camps for Handguards.
Killer Team Comps for Yae Miko Aggravate
Core lineup: Nahida (off-field Dendro and EM buffs), Alhaitham (on-field Dendro DPS), Yae (totem Electro for Aggravate), Kazuha (VV shred and grouping). Nahida sets Quicken; Yae’s totems proc on Alhaitham’s swings; Kazuha shreds RES. Swap in Tighnari as DPS with Nahida, Yae, and Zhongli for shields and shred.
Premium Squad: Yae Miko, Nahida, Kazuha, and Flex Spot

Yae/Nahida/Alhaitham/Kazuha: Nahida E/Q for marks and buffs; Yae totems fire up Aggravate. Flex with Zhongli for extra utility. Nahida setups first. Yae drops 3E. Kazuha E/Q. Alhaitham takes over DPS.
F2P Teams Featuring Dendro Traveler
Yae/Dendro Traveler/Collei/Tighnari: Traveler and Collei handle Dendro; Yae’s your only Electro. Collei Skill for Quicken. Yae totems. Tighnari Charged Attacks. Traveler Burst sustains.
Dual Electro Twists with Fischl
Yae/Fischl/Nahida/Baizhu: Double Electro for particles and 100% uptime; Baizhu heals and buffs Dendro. Yae triggers Fischl’s A4. Yae 3[N1E]. Fischl E. Nahida E/Q. Baizhu heals.
Flex Options: Shields, Heals, and Buffs
Shielders like Zhongli or Kirara keep Dendro rolling. Healers: Baizhu or Yaoyao. Buffers: Kazuha/Sucrose for VV/EM, Furina for DMG, Xilonen for heals and perks. Zhongli shreds RES. Kazuha groups. Baizhu Dendro heals.
Optimizing Rotations and Gameplay Tricks
Standard flow: Nahida E/Q for Dendro. Yae 3E totems. Kazuha E/Q shred. Alhaitham procs. Yae Q + 3E nuke and reset. Keep totems at 100% uptime—dash smart for placement.
Your Go-To Rotation Breakdown
For Yae-Fischl-Kirara-Kazuha: Yae 3[N1E] > Kazuha Q > Fischl E > Kirara EQ > Kazuha EP > Yae Q 3[N1E] N2 > Kirara E > Fischl Q > Kazuha EP. Single-target tweak: Yae/Fischl/Tighnari/Sucrose. Quick-swap the setup. Keep Yae off-field. Loop for max uptime.
Smart Totem Placement Hacks

Form a triangle with three totems for peak level and damage—dash to dodge while positioning. Steer clear of water, barrels, or clutter. Set around enemies pre-Quicken. Link for damage amps. Recast via Burst/A1. Jump-cancel to speed it up.
Funneling Energy Like a Pro
Battery with Fischl or Raiden; N1E to trigger passives. Electro resonance for +80 particles. Favonius procs. C1 restores. Stagger Burst with Raiden.
Rotation Pitfalls to Sidestep
Over-setup drags—shorten with C2’s range. ER shortfalls? Hit 140%+. Electro first after Quicken to block Spread. Practice fast 3E. Sim ER tests. Electro leads post-Quicken.
Unpacking Yae Miko’s Sub-DPS Role
Yae dishes Electro through totems (broad range, random strikes) for Aggravate on Quickened fields, freeing Dendro DPS to shine. Strengths? Steady application and EM scaling. Weak spots: That 90-Energy Burst and quick setups. In 2025, she slots perfectly into Catalyze off-field.
How Much DPS She Brings Off-Field
Fifteen strikes total from totems, EM-scaled for double-dips; Burst nukes extra. She pulls 40-50% team DPS in Dendro comps. 100% uptime via resets. Multi-target beast. Nahida marks speed procs.
Sub-DPS vs. On-Field Carry: When to Switch
Sub-DPS default for Dendro (off-field totems). On-field? Rare, needs shields for N2C weaves. 90% sub use; on-field for Taser niches. Off-field baseline. Add interruption guards. Skip without Xianyun plunges.
Teaming with On-Field Dendro Drivers
Nahida/Alhaitham: Totems proc Aggravate on Charged Attacks. Dendro Traveler/Emilie for Burning mixes. Yae + Nahida EM buff; Tighnari stationary synergy. Yae pre-DPS setup. Sustain Quicken. Zhongli no-knockback.
Head-to-Head Comparisons and Backup Plans
Yae vs. Fischl: Yae’s damage and range win; Fischl batteries better—duo them. Aggravate trumps Hyperbloom for Electro focus (similar EM, but Aggravate meta king). Alternatives: Spread with double Dendro + Yae; Overload niche via Chevreuse.
Yae Miko vs. Fischl: Who Wins Aggravate?
Yae: 14s duration, Burst-independent, multi-target pro. Fischl: Quick apply, particle gen. Yae 20% stronger in Dendro per data; Fischl taser edge. Yae as driver. Duo for ER. Yae in spread Abyss.
Aggravate vs. Hyperbloom Builds for Yae
Aggravate: EM Sands, Gilded Dreams for 1.15x Electro. Hyperbloom: 300+ EM, lower DMG; Furina niche. Aggravate loves Dendro RES shred. EM core. Swap for Bloom. 2025 picks Aggravate.
Where to Invest: Yae Over Other Electros?
Yae tops Fischl for multi-Dendro; Cyno ER-heavy. EM gear lasts. C2 Yae priority. F2P Fischl backup. Yae Catalyze staple.
Fixing Common Mistakes and Troubleshooting
Totem placement flops? Open areas, dash evade. ER skimps? 150%+ with batteries. Too much Dendro? Electro post-Quicken. Recast early via resets; C1 shortens setup.
Don’t Overdo Energy Recharge
No 200%+ solo—cap 160% with batteries. ER calculator. C1/Favonius. Dual Electro.
Missing the EM Scaling Boat
100-300 EM key for A4/reactions; skip ATK% caps. EM Sands. Dreams weapon. Gilded subs.
Bad Team Picks
No Dendro kills Quicken. Add Nahida/Traveler. 2 Electro particles. Utility flex.
Timing Rotations Wrong
Long setups interrupt—C2 fixes. Quick 3E. N1C weaves. Stagger Burst.
Making Your Yae Miko Build Last
She’s gold in 2025 Dendro— C2/C6 for staying power, Emilie hybrids ahead. EM setups keep Catalyze relevant; F2P Widsith holds. Tops new Dendro, Abyss spread strong. C2 invest. EM farm. Patch-watch synergies.
FAQ
What is the ideal ER for Yae Miko in Aggravate teams?
140-160% for dual Electro every rotation, 160-180% solo, 100-110% with C1 and Fischl batteries. 90 Energy Burst and minimal totem particles require ER calculator for team breakpoints and 100% uptime under 200%.
Is Yae Miko better than Fischl for Aggravate reactions?
Yae outperforms with 20% higher raw damage, 14s totem duration, multi-target range, and no Burst reliance. Fischl excels in particle generation for ER; duo in Dendro drives A4 for optimal output.
What artifacts should I use for Yae Miko Aggravate build?
4pc Gilded Dreams for +80 EM and ATK/EM stacks, with EM Sands (2000+ EM), Electro DMG Goblet, CRIT DMG Circlet. Substats: 1:2 CRIT ratio, 140%+ ER for Dendro synergy. Alternatives: Thundering Fury 2pc + Golden Troupe 2pc for Skill DMG.
Does Yae Miko need Elemental Mastery for Aggravate?
100-300 EM crucial for 1.15x multiplier and A4 (+0.15% totem DMG per EM, double-dip). Use EM Sands over ATK% in Dendro; Gilded Dreams and Dreams weapon reach 2000+ without ICD caps.
What is the best weapon for Yae Miko in Dendro teams?
Kagura’s Verity for +12% Skill stacks (max 24% All DMG) on totems. A Thousand Floating Dreams adds 265 EM and +16% team EM on Skill/Burst. F2P: R5 Widsith for +480 EM bursts and 35-42% totem DMG in Quicken.
How do you play Yae Miko as a sub-DPS?
Off-field: Deploy 3 totems in triangle (4s CD, 14s duration) for Electro apply, swap to Dendro DPS for Aggravate procs. Burst consumes/resets charges via A1. Rotation: 3E setup, Q nuke; dash placement, avoid objects in Dendro teams.
👉 top up Genshin Impact crystals 👈
✅ Official direct recharge, 100% secure
✅ No waiting – top-up arrives in 7 seconds
✅ Big discounts, low prices to save more
✅ 7×24-hour customer service, ready to assist anytime


