

Elation Path & Pure Fiction 4.0 Requirements
Elation characters accumulate Punchline stacks and Elation percentage to multiply damage. Unlike traditional DPS, they thrive in Pure Fiction's multi-wave format by converting skill point consumption into burst windows.
Pure Fiction 4.0's 10-cycle structure rewards action economy. Specific speed breakpoints grant additional turns within cycles, directly boosting scores. The mode favors hypercarry teams concentrating buffs onto one damage dealer.
Yao Guang deploys Zones increasing allies' Elation percentage. Sparxie enters livestream connection states for Engagement Farming that caps damage multipliers and Punchline points. Both convert team resources into exponential damage scaling.
For pulls, honkai star rail yao guang sparxie top up through BitTopup ensures you have 160 pulls for E0S1 acquisition.
Elation Character Mechanics
Elation operates on stacking damage where each SP spent builds toward ultimate bursts. Yao Guang's Skill deploys Zones passively increasing team Elation percentage. Sparxie's kit features three modes requiring 4/8/12 SP:
- Mode 1: 100% DEF ignore, 10 BIKURI stacks (4 SP)
- Mode 2: AoE, +30 BIKURI (8 SP)
- Mode 3: Enhanced AoE, 50+ BIKURI stacks (12 SP)
Punchline accumulation scales with SP expenditure. Edo Star Elation teams use Yao Guang and SP Sparkle together for coordinated burst windows.
Light Cone Bonuses:
- When She Decided To See: +18% SPD, +10% CRIT Rate, +30% CRIT DMG, +12% ERR for 3 turns
- Dazzled By A Flowery World: +36% CRIT DMG, +1 SP cap per Elation character (max 3), 5% DEF ignore per SP spent, +5% Elation per stack (max 4)
Pure Fiction Scoring System
Speed Breakpoint Bonus Turns:
- 134 SPD: 2 bonus turns (cycles 1, 4)
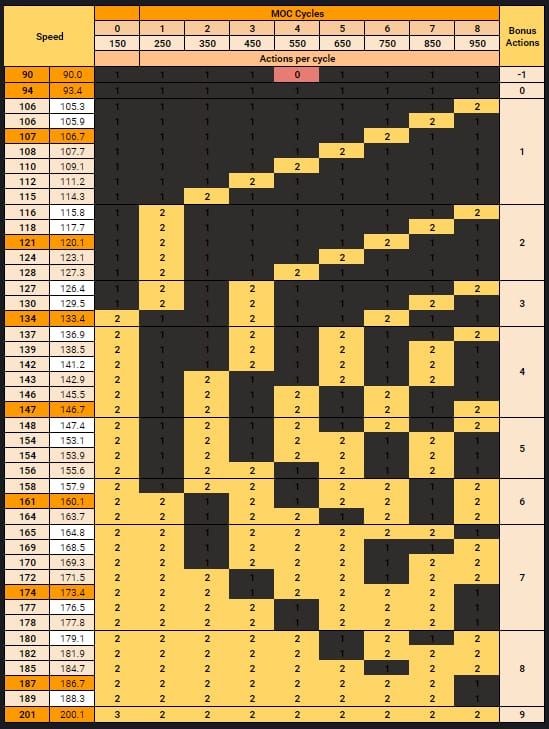
- 143 SPD: 2 bonus turns (cycles 1, 3)
- 146 SPD: 3 bonus turns (cycles 1, 3, 5)
- 156 SPD: 3 bonus turns (cycles 1, 3, 4)
- 160 SPD: 3 bonus turns (cycles 1, 2, 4)
Scoring weights early-cycle performance heavily. 3-cycle clears need higher stat investment but justify relic farming for competitive players.
Weekly Stellar Jades: 2400+ from Forgotten Hall (800), Pure Fiction (800), Apocalyptic Shadow (800), events (720+).
Hypercarry Meta Dominance
Hypercarry compositions concentrate all buffs onto one damage dealer, creating multiplicative scaling. Yao Guang and Sparxie both function as hypercarries demanding dedicated supports.
The meta favors this because Pure Fiction's turn economy rewards maximizing damage per action. A hypercarry taking 6 actions at 200% buffed effectiveness outperforms three characters at 2 actions each.
Elation hypercarries add [Punchline Stacks] × [Elation%] to standard damage formulas, creating unattainable ceilings for other paths.
Both function at E0S0 with 4-star light cones, though signatures provide 20-30% damage increases.
Yao Guang vs Sparxie: Character Comparison

Yao Guang: 5-star Physical Elation Harmony, launches February 18, 2026 (Phase 1: January 29 or February 13, 2026)
Sparxie: 5-star Fire Elation, Phase 2 starts March 5, 2026
Stat Requirements:
- Yao Guang: 70-80% CRIT Rate, 134 SPD minimum (143 optimal, 152 advanced), 23.3% ERR Rope
- Sparxie: 120% ERR minimum (134% optimal), 108 SPD minimum (117 recommended, 126 advanced)
Base Stats & Scaling
Yao Guang's Physical typing grants 38.88% DMG from Sphere. Her Harmony path enables team buffing while maintaining personal damage.
Sparxie's Fire element offers broader coverage. Pure DPS classification concentrates all trace bonuses into personal multipliers for higher individual ceilings.
Both scale from CRIT stats and ATK%, with diminishing returns past 80% CRIT Rate and 200% total ATK.
Kit Analysis
Yao Guang: Skill deploys Zones persisting multiple turns, passively increasing allies' Elation percentage without repeated SP investment. Ultimate delivers Physical damage scaling from Punchline stacks.
Sparxie: Three-mode system creates distinct phases. Mode 1's 100% DEF ignore (4 SP) for single-target. Mode 2's AoE (8 SP) for waves. Mode 3's Enhanced AoE (12 SP) after 50+ BIKURI stacks for maximum damage.
Yao Guang functions in SP-neutral teams. Sparxie demands SP-generating supports.
Ultimate Energy & Rotations
Yao Guang: 23.3% ERR from Rope enables Ultimate every 2-3 rotations. Trace priority: Ultimate > Skill > Talent (levels 6-8 recommended).
Rotation: Skill (Zone) → Basic → Ultimate → Basic → Skill refresh
Sparxie: 120-134% ERR demands Rope + substats. 134% ERR enables Ultimate every 1-2 rotations.
Rotation: Mode 1 (4 SP) → Basic → Mode 2 (8 SP) → Ultimate → Mode 3 (12 SP) at 50+ BIKURI
Critical Rate Breakpoints
CRIT Rate functions as probability multiplier: [Base Damage] × [1 + (CRIT Rate × CRIT DMG)].
- 50% CRIT Rate, 150% CRIT DMG: +75% average damage
- 80% CRIT Rate, 150% CRIT DMG: +120% average damage (45% relative improvement)
For Elation hypercarries, CRIT Rate consistency matters more because Punchline stacks amplify each crit. Non-crits during peak stacks waste buffs, making 70-80% CRIT Rate the practical target.
Crit Rate vs Crit Damage Ratio
Optimal ratio follows 1:2 baseline: 70% CRIT Rate with 140% CRIT DMG. Tengoku relics grant +16-32% CRIT DMG (32% with 3+ SP over 3 turns), shifting ratios toward higher CRIT Rate investment.
With Tengoku's +32%, 70% CRIT Rate and 120% base CRIT DMG reaches 152% effective CRIT DMG, matching 1:2 ratio. This allows prioritizing CRIT Rate substats.
When She Decided To See provides +10% CRIT Rate and +30% CRIT DMG during Great Fortune, temporarily shifting stats. Calculate unbuffed stats first, verify 70%+ CRIT Rate and 140%+ CRIT DMG before buffs.
70-80% Crit Rate Target
Yao Guang's 70-80% CRIT Rate creates 7-8 crits per 10 attacks. Achieving this needs CRIT Rate Body (32.4%) plus 38-48% from substats and light cones.
With 5 relics averaging 3 substat rolls each at 3.24% per roll, you gain ~48.6% from substats alone.
70% CRIT Rate: CRIT Rate Body + moderate substat luck
80% CRIT Rate: exceptional rolls (4-5 per piece) or CRIT Rate buffs
Today's Good Luck (4-star) provides +12-20% CRIT Rate, bridging the gap for budget builds.
The 10% difference (70% vs 80%) translates to ~8-12% average damage increase. Most players should stop at 70-75% and invest remaining budget into CRIT DMG or Speed.
Crit Damage Scaling
CRIT DMG scales linearly with CRIT Rate. At 50% CRIT Rate, +10% CRIT DMG increases damage by 5%. At 80% CRIT Rate, same +10% increases damage by 8%.
Relic Set Bonuses:
- Tengoku 2pc: +16% CRIT DMG (+32% with 3+ SP over 3 turns)
- Ever-Glorious Magical Girl 2pc: +16% CRIT DMG
- Ever-Glorious 4pc: Elation DMG ignores 10% DEF + 1% per 5 Punchlines (max 10 stacks, +20% total)
Substat Priority: SPD (to breakpoint) > CRIT Rate (to 70%) > CRIT DMG > ERR > Effect RES
Once at 70% CRIT Rate and speed breakpoint, every roll should target CRIT DMG.
Speed Breakpoints for Elation Hypercarries
Action value system: 10000 / Speed
- 134 SPD = 74.63 action value
- 160 SPD = 62.5 action value
134 SPD: 2 bonus turns (cycles 1, 4). Minimum viable investment. Achievable with SPD Feet (25.032) + 2-3 SPD substats (8-12 SPD).
143 SPD: Shifts bonus turns to cycles 1, 3 (frontloads damage). Needs +9 SPD beyond 134.
160 SPD: 3 bonus turns in cycles 1/2/4. Maximum early-game burst. Demands SPD Feet + 30-35 SPD from substats (~4 rolls per piece).
134 Speed: Standard Baseline
Requires SPD Feet (25.032) + ~9 SPD from substats. With 5 relics averaging 2 SPD rolls each at 2.3 per roll, you gain 23 SPD from substats. Combined with base character SPD (95-105), easily exceeds 134.
Suits Yao Guang's minimum, allowing Zone effects and Punchline accumulation across 2 bonus turns. Low SPD investment frees substat budget for CRIT stats.
For Sparxie, 134 SPD exceeds her 108 minimum but falls short of recommended 117. However, pairing 134 SPD with 120-134% ERR creates rotation alignment where Ultimate becomes available when Mode 3's 12 SP cost is affordable.
143-160 Speed: Advanced Tiers
143 SPD: Requires +9 SPD beyond 134 (3-4 SPD rolls). Shifts bonus turns one cycle earlier, increasing damage by ~8-12% through improved action economy.
Yao Guang's optimal 143 SPD balances action frequency with CRIT investment. Advanced 152 SPD provides marginal improvements but sacrifices 2-3 CRIT rolls—not worth it unless already at 75%+ CRIT Rate.
160 SPD: Demands SPD Feet + 30-35 SPD from substats (~4 rolls per piece). Suits speed-tuning where hypercarry acts before supports to snapshot buffs, or Diviner 4pc builds (+10% CRIT Rate at 120 SPD, +18% at 160 SPD).
Speed vs Damage Trade-offs
Each SPD roll (2.3 average) could be CRIT Rate (3.24%) or CRIT DMG (6.48%). At 70% CRIT Rate, trading one CRIT DMG roll for SPD sacrifices ~4.5% average damage.
Going 133→136 SPD (crossing 134 breakpoint) justifies sacrificing one CRIT DMG roll because 2 bonus turns provide more damage than 6.48% CRIT DMG. But 136→141 SPD (no breakpoint) wastes substat budget.
Calculate current SPD, identify next breakpoint, determine rolls required. If reaching next breakpoint costs 3+ CRIT rolls, investment isn't worthwhile unless already at 75% CRIT Rate and 150% CRIT DMG.
Relic Substat Priority Matrix
Universal Priority: SPD (to breakpoint) > CRIT Rate (to 70%) > ERR (to threshold) > CRIT DMG > Effect RES > ATK% > Flat stats
Yao Guang Main Stats: Body CRIT Rate/CRIT DMG, Feet SPD, Sphere Physical DMG, Rope ERR (23.3%)
Substat Priority: SPD to 134 > CRIT Rate to 70-80% > CRIT DMG
Sparxie Main Stats: Body CRIT DMG/CRIT Rate, Feet SPD, Rope ERR, Sphere HP/DEF
Substat Priority: ERR to 120-134% > SPD to 108+ > CRIT Rate to 70% > CRIT DMG
Substat Weight Calculation
At 70% CRIT Rate and 140% CRIT DMG, one CRIT Rate roll (3.24%) increases damage by ~4.5%, while one CRIT DMG roll (6.48%) increases damage by ~4.5%—equal value at 1:2 ratio.
Speed weights depend on breakpoint proximity. 5 SPD below breakpoint = massive value. 15 SPD above = zero value until next threshold. Binary weight assignments, not linear scaling.
ERR weights follow breakpoint logic. Sparxie needs exactly 120% or 134%—values between provide minimal benefit. Calculate ERR from Rope (23.3%) and light cone, determine if substats can bridge to next threshold. If not, prioritize CRIT stats.
Crit Rate vs Crit Damage Priority
Always prioritize CRIT Rate to 70% before heavy CRIT DMG investment. 90% CRIT Rate with 100% CRIT DMG deals less than 70% CRIT Rate with 140% CRIT DMG.
Farming Approach: Equip CRIT Rate Body, farm substats targeting 38-40% additional CRIT Rate. Once at 70% total, switch focus to CRIT DMG substats. If you get god-tier CRIT DMG Body with 4+ CRIT Rate rolls, swap and rebalance.
For When She Decided To See users (+10% CRIT Rate), target 60% unbuffed CRIT Rate. This frees 2-3 rolls for CRIT DMG.
Speed Substats: When to Stop
Stop pursuing SPD immediately after crossing target breakpoint. 136 SPD (2 above 134) performs identically to 100 SPD in turn structure—wasted substats. Additional SPD provides zero value until 143 (7 SPD gap, 3+ rolls).
Exception: Diviner 4pc grants +10% CRIT Rate at 120 SPD, +18% at 160 SPD. Here, 160 SPD provides both action economy and +18% CRIT Rate, justifying heavy investment.
Stop Points:
- Yao Guang (143 SPD optimal): Stop at 143-145
- Sparxie (117 SPD recommended): Stop at 117-120
2-3 SPD buffer accounts for relic swaps without complete refarming.
Yao Guang Optimization
Stat Targets: 70-80% CRIT Rate, 140-160% CRIT DMG, 134-143 SPD, 23.3% ERR from Rope
Physical DMG Sphere (38.88%) is non-negotiable. Body choice between CRIT Rate and CRIT DMG depends on substats—use CRIT Rate Body if substats provide <40% CRIT Rate.
Relic Sets: Tengoku 2pc for +16-32% CRIT DMG. Remaining 2pc: Ever-Glorious (+16% CRIT DMG) or Diviner (+6% SPD). 4pc bonuses generally underperform mixed 2pc.
Trace Priority: Ultimate > Skill > Talent (levels 6-8). Level 10 requires exponentially more materials for 10-15% gains—luxury investment.
Best Relic Sets
Tengoku 2pc + Ever-Glorious 2pc: Highest damage ceiling with 3+ SP over 3 turns (Tengoku +32% CRIT DMG) and 50+ Punchlines (Ever-Glorious max 20% DEF ignore). Suits SP-heavy teams.
Tengoku 2pc + Diviner 2pc: +6% SPD helps reach 143 breakpoint with fewer SPD substats. At 160 SPD, Diviner 4pc grants +18% CRIT Rate, potentially allowing CRIT DMG Body while maintaining 70%+ total.
Main Stats: CRIT Rate/CRIT DMG Body, SPD Feet, Physical DMG Sphere, ERR Rope. Only flexibility in Body slot based on substat CRIT Rate total.
Light Cone Tier List
When She Decided To See (5★ signature): +18% SPD, +10% CRIT Rate, +30% CRIT DMG, +12% ERR during Great Fortune (3 turns). Solves multiple stat requirements, enables CRIT DMG Body builds.
Dazzled By A Flowery World (5★): +36% CRIT DMG, +1 SP cap per Elation character (max +3), 5% DEF ignore per SP spent. Superior damage ceiling in triple-Elation teams but no SPD/CRIT Rate assistance.
Today's Good Luck (4★): +12-20% CRIT Rate, +10-14% Elation on Skill use (max 3 stacks). At S5, provides 20% CRIT Rate—best 4★ option. Elation stacking synergizes with Zone mechanics.
Team Synergies
Yao Guang functions in Elation-focused teams where multiple characters consume SP to maximize Zone's Elation buffs. Pairing with Sparxie creates dual-hypercarry potential but demands exceptional SP generation.
Optimal supports provide SP generation, CRIT buffs, or DEF shred. SP-positive rotations enable Yao Guang's SP-heavy Ultimate without starving team.
Sustain requirements minimal in Pure Fiction. Single shielder/healer suffices, freeing fourth slot for buffers or sub-DPS contributing to Punchline accumulation.
Sparxie Optimization
Stat Targets: 70-80% CRIT Rate, 140-160% CRIT DMG, 108-117 SPD, 120-134% ERR
Fire DMG Sphere (38.88%) non-negotiable. ERR requirement consumes significant budget—23.3% from Rope + 0-14% from substats depending on light cone.
For pulls, top up honkai star rail currency for light cone banners through BitTopup offers competitive rates for the 160 pulls needed for E0S1.
Relic Sets: Tengoku 2pc for CRIT DMG, paired with Ever-Glorious 2pc/4pc or Diviner 2pc. 4pc Ever-Glorious more valuable on Sparxie due to higher Punchline generation.
Recommended Stat Distribution
120% ERR minimum: Ultimate every 2-3 rotations, sufficient for 10-cycle clears.
134% ERR: ERR Rope (23.3%) + light cone ERR (When She Decided +12%) + 2 ERR substats (4.32% each) = 23.3% + 12% + 8.64% = 133.94% total.
This costs 2 substat rolls but increases Ultimate frequency to every 1-2 rotations, compensating through additional burst windows.
108 SPD minimum: Only SPD Feet (25.032) + base SPD needed.
117 SPD recommended: ~12 SPD from substats (5-6 rolls).
126 SPD advanced: 21 SPD from substats (9-10 rolls)—not worth CRIT sacrifice.
Best Relic Sets
Tengoku 2pc + Ever-Glorious 4pc: Maximizes damage at 50+ Punchlines. +16% CRIT DMG (Tengoku) + 16% CRIT DMG (Ever-Glorious 2pc) + 20% DEF ignore (Ever-Glorious 4pc max stacks). Highest ceiling with consistent Punchline generation.
Tengoku 3pc: +32% CRIT DMG with 3+ SP over 3 turns, easily maintained during mode rotations. Frees remaining 2pc for Diviner (+6% SPD) or superior substats.
Main Stats: CRIT DMG Body (if substats + light cone provide 40%+ CRIT Rate) or CRIT Rate Body, SPD Feet, Fire DMG Sphere, ERR Rope.
Light Cone Tier List
When She Decided To See: +18% SPD (helps reach 117), +10% CRIT Rate (reduces substat needs), +30% CRIT DMG, +12% ERR (bridges toward 134%). Solves multiple deficits simultaneously.
Dazzled By A Flowery World: Higher ceiling through +36% CRIT DMG and DEF ignore scaling with SP consumption (synergizes with 4/8/12 SP modes). No SPD/CRIT Rate/ERR assistance—demands god-tier substats.
Today's Good Luck (4★): 20% CRIT Rate at S5, enables CRIT DMG Body for F2P. Elation stacking (+14% at S5) amplifies mode damage—optimal 4★ choice.
Team Synergies
Sparxie demands SP-positive supports due to 4/8/12 SP mode costs. Teams should generate 2-3 SP per cycle for Mode 2 (8 SP) every other rotation and Mode 3 (12 SP) during Ultimate bursts.
Optimal teammates provide SP generation, ERR buffs, or Fire DMG amplification. SP-negative supports starve rotation, crippling damage.
Sustain with SP-positive kits maintains survivability without competing for SP budget. Shielders generally outperform healers through proactive prevention.
Real Gameplay Performance
3-cycle clears: 180-200% baseline stats. 75-80% CRIT Rate, 160-180% CRIT DMG, 143-160 SPD.
5-cycle clears: Comfortable benchmark. Yao Guang at 70% CRIT Rate, 140% CRIT DMG, 134 SPD achieves consistent full-stars. Sparxie needs similar stats + 120% ERR minimum.
Investment Comparison:
- E0S0 (4★ light cone): 5-cycle clears with well-rolled relics (3-4 substat rolls per piece in priority stats)
- E0S1 (5★ signature): 4-cycle clears with identical relics
- E6S5 (whale): 2-3 cycle clears, costs 1000+ pulls
F2P vs Whale Investment
F2P (Today's Good Luck S5): ~75-80% of whale damage at E0S0. 20% CRIT Rate enables CRIT DMG Body, partially closing gap. Relic quality matters more than eidolons.
Low-spender (E0S1): ~85-90% of whale damage at 25-30% cost. Signature provides 15-25% damage increase over best 4★—highest-value purchase after E0.
Whale (E6S5): 120-140% damage vs E0S1, primarily through eidolon multipliers. Requires 800-1000 pulls ($1000-1500 USD)—cost-inefficient for most.
Common DPS Mistakes
Neglecting speed breakpoints: 132 SPD (2 below breakpoint) performs identically to 100 SPD—wasted substats. Always calculate exact requirements.
Overinvesting CRIT Rate past 80%: 80% vs 90% equals ~6-8% damage, while those 3-4 rolls could provide 20-25% CRIT DMG for superior gains at 70-80% CRIT Rate.
Ignoring ERR requirements: Sparxie without 120% ERR may enter Mode 3 (12 SP) without Ultimate available, wasting highest damage window. Meet ERR thresholds before luxury stats.
Mismatching light cones: Using Dazzled By A Flowery World (SP-scaling) on SP-neutral rotations wastes primary mechanic. Match light cone to team's SP generation.
Investment Decision Framework
Account progression: Early-game (Level 40-50) benefits from Yao Guang's hybrid damage-buffer role. Late-game (60+) with established supports gains more from Sparxie's pure damage ceiling.
Roster synergy: Players with SP-positive supports prioritize Sparxie. Players lacking SP generation choose Yao Guang (Zone mechanics need less SP).
Stellar Jade cost: 160 pulls for 75% chance at E0S1. Weekly income 2400+ Jades = 15 pulls/week = 11 weeks saving for guaranteed E0S1.
Banner Schedule:
- Yao Guang Phase 1: January 29 or February 13, 2026
- Sparxie Phase 2: March 5, 2026
Future Content Viability
Pure Fiction 4.1+ likely continues favoring Elation mechanics. Both remain viable through at least 4.2 based on historical patterns.
Yao Guang's team buffing provides future-proofing—new Elation DPS benefit from Zones without kit changes. Sparxie's pure DPS faces potential power creep but maintains value through Fire coverage.
Investment priority: Secure E0 first, save for signature during reruns. Eidolons provide minimal value vs E0S1 baseline—luxury purchases after diverse roster.
F2P & Low-Spender Recommendations
F2P: Choose based on 4★ light cone availability. If you have Today's Good Luck S5, both perform adequately at E0S0. If lacking Elation light cones, prioritize whichever banner runs first to maximize saving time.
Low-spender (monthly pass): Additional 2700 Jades monthly = E0S1 every 2-3 patches. Prioritize Yao Guang if lacking buffers, Sparxie if needing pure DPS. Don't split resources—commit fully to one E0S1.
Optimal F2P strategy: Save 160 pulls, commit to one banner, secure E0, then decide whether to continue for signature or save for next limited. Signatures provide 15-25% damage increases—worthwhile if maining long-term.
FAQ
What are minimum stat requirements for Yao Guang in Pure Fiction 4.0?
70% CRIT Rate minimum, 134 SPD for first breakpoint, 23.3% ERR from Rope. CRIT DMG should reach 140%. These enable consistent 5-cycle clears with proper team and rotation.
Is Sparxie better than Yao Guang for F2P?
Both perform similarly at E0S0 with 4★ light cones. Sparxie offers higher ceiling but demands SP-positive supports. Yao Guang provides team buffs with lower SP needs. Choose based on roster—Sparxie if you have SP generators, Yao Guang if lacking buffers.
How much speed does a hypercarry need in Pure Fiction?
Minimum viable: 134 for 2 bonus turns. Optimal: 143 for earlier timing. Advanced: 160 for 3 bonus turns in cycles 1/2/4, but requires sacrificing CRIT substats—not worthwhile unless using Diviner 4pc for SPD-based CRIT Rate bonuses.
What relic substats should I prioritize for Elation characters?
SPD to breakpoint > CRIT Rate to 70% > ERR to threshold > CRIT DMG > Effect RES. Yao Guang needs minimal ERR with Rope, allowing CRIT focus. Sparxie requires 120-134% ERR, consuming 2-4 rolls before CRIT optimization.
Should I pull Yao Guang or save for Sparxie?
Pull Yao Guang if needing buffers or lacking Physical DPS. Save for Sparxie if you have established supports and need Fire DPS. Banner timing: Yao Guang Phase 1 (January 29 or February 13, 2026), Sparxie Phase 2 (March 5, 2026)—time to save between.
Do I need signature light cones?
Signatures provide 15-25% damage increases over best 4★ but aren't mandatory. Today's Good Luck S5 enables 5-cycle clears at E0S0 with good relics. Prioritize E0 first, save for signatures during reruns if maining long-term.


