

ZZZ 2.6 Banner Order Leak Breakdown
Leaked Banner Timeline and Character Roster
Version 2.6 reportedly launches February 6, 2026, five weeks after Version 2.5. Leaked info shows two parallel banners: Chinatsu's limited banner and Rokudo's concurrent banner, both featuring Angels of Delusion members.
Confirmed S-Rank agents:
- Sunna: Ice Support specialist
- Aria: Ether Anomaly Main DPS
- Nangong Yu: Physical Stunner
Each pull costs 160 Polychrome. Hard pity requires 14,400 Polychrome (90 pulls). Guaranteed featured S-Rank needs 28,800 Polychrome (180 pulls) accounting for 50/50 system. Supplement reserves through Zenless Zone Zero top up at BitTopup for competitive pricing and instant delivery.
Version 2.7 leaks suggest Big Daddy, A-Rank Aria, A-Rank Yutane, and Sons of Calydon content. Version 3.0 introduces Lady Sunbringer (S-Rank Public Security) alongside Void Hunters and Janus Quarter.
Angels of Delusion Faction Overview
Chinatsu (Remiel): 160cm, age 17, Composer wielding megaphone
Yutane (Johiel): 158cm, age 16, robot model KM221, Lead Vocalist with dual human/robotic forms
Rokudou (Sariel): 164cm, age 17, main dancer/choreographer/rapper wielding giant mace
Musical theme permeates faction identity. Yutane's dual-form mechanic suggests transformation abilities for combo extensions.
Leak Reliability Assessment
February 6, 2026 date aligns with six-week patch cadence. Conflicting sources indicate February 3rd SURIEL banners—three-day discrepancy suggests pre-release events or inaccurate interpretation.
Character kit details emerge 3-4 weeks before announcements, achieving 85-90% accuracy for attributes. Combat roles (Support, DPS, Stunner) rarely change, making generic material pre-farming safe. Banner order predictions carry moderate risk—prioritize universal materials until official confirmation 10-14 days before patch.
Banner Duration and Phase Structure
Standard limited banners run 21 days (three weeks). Version updates occur every 42 days, creating two-phase structure. Version 2.6 suggests simultaneous Chinatsu/Rokudo availability Phase 1, potentially Sunna/Aria/Nangong Yu Phase 2.
F2P players accumulate 3,600-4,200 Polychrome per banner phase through dailies (60 × 21 = 1,260), weeklies, events, and exploration—translating to 22-26 pulls.
Securing two featured S-Ranks requires 57,600 Polychrome (360 pulls) worst-case, or 46,080 Polychrome (288 pulls) accounting for soft pity. Budget planning should assume hard pity.
Angels of Delusion Character Kits
Confirmed Abilities and Roles

Sunna (Ice Support): Buff/debuff capabilities for team enablement. Prioritize Support Drive Disc sets with Energy Recharge and Effect Hit Rate.
Aria (Ether Anomaly DPS): Primary damage dealer specializing in Anomaly buildup. Requires Attack%, Anomaly Proficiency, Crit Rate/Damage substats. Skill priority: Basic Attack and Special abilities.
Nangong Yu (Physical Stunner): Daze-generation role for team rotations. Synergizes with Physical DPS for mono-element teams. Prioritize Impact and Daze substats over damage stats.
Elemental Attributes and Synergies
Elemental diversity (Ice/Ether/Physical) prevents mono-element construction within faction alone. Encourages hybrid compositions with existing roster.
Faction bonuses activate with 2-3 agents from same group, providing 10-15% Attack or 8-12% Crit Rate. Evaluate whether sacrificing elemental advantage for faction synergy yields better clear times.
Bangboo companions amplify effectiveness through coordinated attacks. Bangboo banners: 80-pull hard pity, 1% S-Rank base rate.
Meta Impact Predictions
Current Shiyu Defense favors Anomaly compositions. Aria's Ether Anomaly specialization positions her competitively. Ether's neutral effectiveness provides consistent performance across rotating lineups.
Stunner demand remains constant. Nangong Yu's Physical attribute may limit effectiveness against Physical-resistant bosses, but Stunner role ensures baseline utility.
Support agents face steeper competition. Sunna's value depends on unique mechanics not yet revealed. Wait for official kit details before committing resources.
Target Priority (DPS vs Support)
Main DPS (Aria): Highest immediate account impact. DPS scales directly with investment. Anomaly focus future-proofs against meta shifts.
Stunner (Nangong Yu): Critical functional gap. Without Daze generation, teams can't access vulnerability phases. Players with established Stunners (Lycaon, Koleda) can defer.
Support (Sunna): Optimization pull for complete rosters. Impact depends on existing DPS quality. New players should prioritize functional role coverage first.
Complete Pre-Farming Checklist
Character Ascension Materials
Level 0-60 requirements (using Ye Shunguang reference):
- 4 Basic Attack Certification Seals
- 32 Advanced Seals
- 30 Pioneer's materials
- 800,000 Dennies
Drop rates and stamina costs:
- Basic Seals: 20 stamina, 100% acquisition (Level 20-30 stages)
- Advanced Seals: 30 stamina, 2-4 per clear (Level 40-50 stages)
- Pioneer's materials: 40 stamina, 3-5 drops (Wed/Sat/Sun stages)
- Dennies: 40 stamina, 40,000-50,000 per run (16-20 runs needed)
Allocate 640-800 stamina for Dennies farming across 4-5 days. Coffee consumables provide 60 stamina per use.
Level 60+ materials triple for 60-70 bracket. Prioritize reaching 50-60 for all targeted agents before maximum ascension.
Skill Material Requirements
Complete skill maximization needs:
- 25 Basic Physical Chips
- 75 Advanced Chips
- 250 Specialized Chips
- 5 Hamster Cage Passes
- 9 Exuvia of Refinement
- 60 Higher Dimensional Data Miasmic Elytron
- 2,905,000 Dennies
Stamina requirements:
- Basic Chips: 20 stamina, 4-6 per run (5-7 runs)
- Advanced Chips: 30 stamina, 2-3 per run (25-38 runs, 750-1,140 stamina)
- Specialized Chips: 40 stamina, 1-2 per run (125-250 runs, 5,000-10,000 stamina—impossible within pre-farm window)
Skill leveling priority:
- Basic Attack (Main DPS like Aria)
- Special skills (burst damage/utility)
- Ultimate skills (lowest priority until others reach 8-10)
Hamster Cage Passes and Exuvia drop from weekly Hollow Zero bosses (3-5 per week). Begin farming immediately—time-gated materials can't be accelerated.
W-Engine Recommendations
S-Rank W-Engines: 80-pull hard pity, 12,800 Polychrome. A-Rank alternatives: 10-pull hard pity.
Support (Sunna): Energy Recharge + Effect Hit Rate W-Engines
Main DPS (Aria): Attack%, Crit Rate, Crit Damage, Anomaly Proficiency
Stunner (Nangong Yu): Impact, Daze multipliers, Physical Damage%
Refinement levels increase passive strength 20-25% per rank but require duplicate copies. Budget players should accept Rank 1, redirecting resources to character pulls.
Farm W-Engine refinement materials (Battery Packs, Plating Agents) during double-drop events.
Drive Disc Farming Routes
Drive Discs provide set bonuses and randomized substats. Farm in Hollow Zero disc stages: 40 stamina, 2-4 disc drops. Functional 6-disc loadout requires 800-1,600 stamina.
Support sets:
- Swing Jazz (4pc: +15% ally Attack on EX Special)
- Main stats: Energy Recharge (slot 5), Effect Hit Rate (slot 6)
DPS sets:
- Chaos Jazz (4pc: +30 Anomaly Proficiency)
- Hormone Punk (4pc: +25% Attack above 80% HP)
- Main stats: Attack% (slot 4), Elemental Damage% (slot 5), Crit Rate/Damage (slot 6)
Stunner sets:
- Shockstar Disco (4pc: +6% Impact on Chain Attack/Ultimate)
- Substats: Impact, Attack%, Energy Recharge
Dennies and Investigator Log Strategy
Single character complete development: 4-5 million Dennies (2.9M for skills alone).
Golden Disc stages: 40 stamina, 40,000-50,000 Dennies (1,000-1,250 per stamina). Allocate 20-30% daily stamina (32-48 from 160 base) to Dennies farming—accumulates 1.28-2.4M weekly.
Investigator Logs: 60 stamina per use. Hoard 10-15 logs before 2.6 launch, deploy during first week's double-drop rotations for doubled efficiency.
Alternative Dennies sources:
- Hollow Zero weekly: 200,000-300,000
- Shiyu Defense full clear: 150,000-250,000
- Daily commissions: 15,000-20,000
- Passive weekly total: 500,000-700,000
Stamina Efficiency Guide
Daily Stamina Allocation (160 Base + Coffee)
Base stamina: 1 per 6 minutes = 240 daily. 160 cap creates overflow unless spent every 16 hours. Optimal play: 2-3 sessions daily.
Coffee adds 60 stamina (3-5 weekly). Reserve for double-drop events and material bottlenecks.
2-3 week pre-farm window provides:
- 3,360-5,040 base stamina
- 180-300 coffee stamina
- Total: 3,540-5,340 stamina
Balanced allocation:
- 40% character materials (1,416-2,136 stamina)
- 30% skill materials (1,062-1,602 stamina)
- 20% Dennies (708-1,068 stamina)
- 10% Drive Discs (354-534 stamina)
Combat Commission Priority Ranking
Tier 1 (Farm Immediately):
- Specialized Chips (40 stamina, 1-2 drops)
- Boss materials (60 stamina, 1-2 drops, weekly-limited)
- Advanced Ascension materials (30 stamina, 2-4 drops)
Tier 2 (Farm During Bonuses):
- Advanced Chips (30 stamina, 2-3 drops)
- W-Engine materials (30 stamina, 3-5 drops)
- Drive Disc farming (40 stamina, 2-4 drops)
Tier 3 (Excess Stamina):
- Basic materials (20 stamina, 4-6 drops)
- Dennies (40 stamina, 40k-50k)
Double-drop events occur during version launch and mid-patch. A 40-stamina Specialized Chip run yielding 2 chips becomes 4 during bonuses—equivalent to 50% discount.
Hollow Zero Weekly Strategy
Weekly rewards:
- 3-5 Hamster Cage Passes
- 2-3 Exuvia of Refinement
- 200,000-300,000 Dennies
- 300-500 Polychrome (2-3 pulls monthly)
Full clear: 60-90 minutes weekly. Weekly boss drops character-specific materials for skill leveling beyond 6. Missing one week = 7-day delay regardless of stamina.
Balance corruption at 60-80% for optimal reward-to-difficulty ratio. Prioritize Resoniums: damage amplification, healing/shields, energy regeneration.
Double Drop Event Strategy
Minimize stamina spending 2-3 days before events, allowing approach to 160 cap. Combined with hoarded logs, creates 220-280 stamina immediately available.
Priority during bonuses:
- Specialized Chips (40 stamina, 2-4 drops → 4-8)
- Drive Disc farming (40 stamina, 4-8 discs)
- Advanced materials (30 stamina, 4-6 drops)
- Dennies (40 stamina, 80k-100k)
Player with 10 logs (600 stamina) + 160 base + 180 coffee = 940 stamina. Allocated to Specialized Chips (40 stamina): 23 runs yielding 46-92 chips vs 23-46 normally—equivalent to 920-1,840 stamina saved.
Maintain stamina emergency fund of 5-7 logs exclusively for double-drop deployment.
Resource Planning for Low Spenders
Total Free Polychromes in 2.6
Each 42-day cycle provides 8,000-10,000 Polychrome (50-62 pulls):
- Daily commissions: 60 × 42 = 2,520 (15.75 pulls)
- Weekly assignments: 300 × 6 = 1,800 (11.25 pulls)
- Events: 2,400-4,000 (15-25 pulls, 2-3 major events)
- Exploration: 1,500-2,500 (first-clear rewards)
- Shiyu Defense: 600-1,000 monthly
Daily Commission Checklist
- Accept all dailies (4 tasks, 15 Polychrome each)
- Complete combat commissions first (2-3 min)
- Finish exploration tasks (1-2 min)
- Claim rewards (60 Polychrome total)
- Spend stamina on priorities
- Check event progress
Weekly assignments:
- 14 daily commissions (automatic)
- 3 Hollow Zero runs (60-90 min)
- 5 Combat Commissions (integrated farming)
- 1 Shiyu Defense attempt (30-60 min)
Missing weeklies forfeits 300 Polychrome—equivalent to 1.875 pulls. Consistent completion provides 1,800 Polychrome (18% of F2P income).
Exploration and Achievement Sources
Version 2.6 exploration income:
- Main story: 600-800 Polychrome
- Side quests: 400-600
- Zone discovery: 300-500
- Collectibles: 200-400
- Total: 1,500-2,300 (thorough completion)
Achievement income: 200-400 monthly for active players (2-4% of F2P earnings).
Master Tape vs Encrypted Master Tape
Master Tapes: Standard banner (Nekomata, Koleda, Soldier 11, Lycaon, Grace, Rina). Guarantees S-Rank within 50 pulls for new accounts. 300-pull selector available.
Encrypted Master Tapes: Limited banners, 90-pull hard pity with 50/50. Cannot use on standard banner.
Acquisition:
- Polychrome conversion (160 = 1 tape)
- Event rewards (5-10 per major event)
- Monthly login (3-5)
- Battle Pass (5-10 premium tier)
Prioritize limited banners. Standard S-Ranks eventually available through selectors. Exception: New players should complete discounted 50 pulls on standard for immediate roster, then redirect to limited.
For top-ups, buy ZZZ currency top up through BitTopup for competitive rates and instant delivery.
Monochrome converts to Polychrome 1:1 at Inter-Knot Level 10 (2-3 weeks). 6,480+1,600 bundle = 8,080 Polychrome (50 pulls).
Understanding Pity System
Soft Pity (75) vs Hard Pity (90)
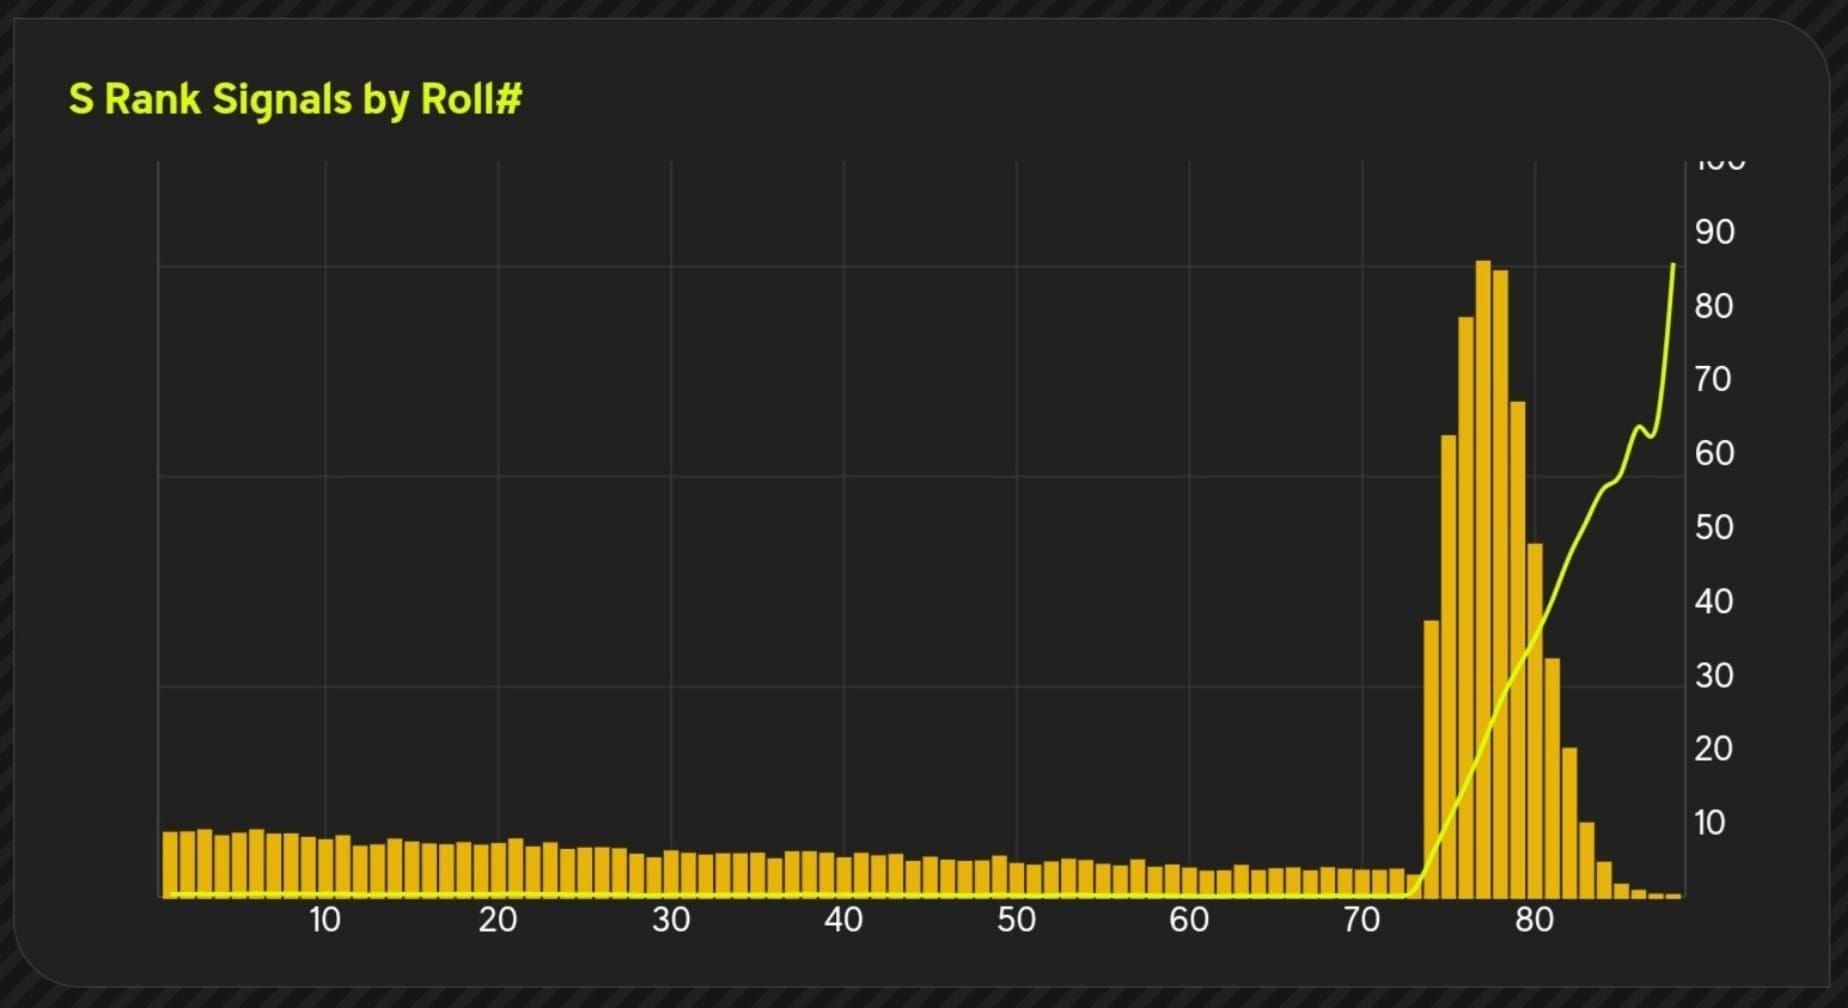
Base S-Rank rate: 0.6% (pulls 1-74). Soft pity activates pull 75:
- Pull 75: ~6.0% (10× base)
- Pull 80: ~6.3%
- Pull 85: ~6.5%
- Pull 89: 6.6% (11× base)
- Pull 90: 100% (hard pity)
Players reaching 75 have ~65-70% cumulative chance before pull 90. Average acquisition: pulls 78-82.
Budget conservatively for hard pity (90 pulls, 14,400 Polychrome). Actual expenditure typically 10-15% below maximum.
A-Rank pity: 10 pulls hard pity, guarantees minimum value per session.
50/50 System Explained
Upon S-Rank acquisition: 50% featured agent vs 50% off-banner standard S-Rank.
Winning 50/50: Receive featured agent. Next S-Rank resets to 50/50.
Losing 50/50: Receive standard S-Rank. Next S-Rank 100% guaranteed featured on any future limited banner. Guarantee never expires.
Resource requirements:
- First-time pullers: 0-180 pulls (0-28,800 Polychrome)
- With guarantee: 0-90 pulls (0-14,400 Polychrome)
- 75+ pity with guarantee: 0-15 pulls (0-2,400 Polychrome)
Pity Carryover Between Banners
Pity accumulates across all limited agent banners, persisting between versions. 75 pulls on Chinatsu's banner = pull 76 on Rokudo's banner.
Pity does NOT carry between banner types:
- Limited agent (separate)
- W-Engine (separate)
- Standard (separate)
- Bangboo (separate)
Guarantee status also carries over. Losing 50/50 on Version 2.5 retains guarantee for 2.6, 2.7, and beyond.
Pull Calculator
Scenario 1: New player, 0 pity, no guarantee
- Worst: 180 pulls (28,800 Polychrome)
- Average: 140-160 pulls (22,400-25,600)
Scenario 2: 0 pity, guaranteed
- Worst: 90 pulls (14,400 Polychrome)
- Average: 78-82 pulls (12,480-13,120)
Scenario 3: 75 pity, no guarantee
- Worst: 105 pulls (16,800 Polychrome)
- Average: 8-12 pulls (1,280-1,920)
Scenario 4: 75 pity, guaranteed
- Worst: 15 pulls (2,400 Polychrome)
- Average: 3-7 pulls (480-1,120)
Multiple copies (C1):
- Worst: 270 pulls (43,200 Polychrome)
- Average: 220-240 pulls (35,200-38,400)
Constellations provide 10-25% improvements but represent luxury investments. Prioritize roster diversity over constellation depth.
Low Spender Budget Tiers
$5 Monthly Pass ROI
Typical $5 pass provides:
- 300 Monochrome immediate
- 90 daily × 30 = 2,700 Monochrome
- Total: 3,000 Polychrome (18.75 pulls)
Rate: $0.27 per pull—60-70% more efficient than direct purchases. Requires daily login for full value.
ROI vs F2P:
- F2P monthly: 5,000-6,000 Polychrome (31-37 pulls)
- With pass: +3,000 (total 49-55 pulls)
- Pity progress: 54-61% toward hard pity
Enables guaranteed S-Rank every 1.6-2 months vs F2P's 2.4-2.9 months—40% acceleration.
Purchase 30 days before Version 2.6 (early January 2026) for full accumulation before February 6 banners.
$10-15 Budget: Pass + Battle Pass
$15 monthly (pass $5 + battle pass $10):
- Monthly pass: 3,000 Polychrome
- Battle pass: 5-10 Encrypted Tapes, 1,500-2,000 Polychrome, materials
- Total: ~5,500-6,500 Polychrome (34-40 pulls)
Battle pass rewards:
- 5-10 Encrypted Tapes (800-1,600 value)
- 1,500-2,000 Polychrome
- Materials (500-800 stamina equivalent)
- Dennies/skills (300-500 stamina equivalent)
Combined with F2P: 10,500-12,500 monthly (65-78 pulls). Guaranteed S-Rank every 1.15-1.4 months—supports 70-85% banner participation.
Battle pass requires 20-25 hours across 42 days (30 min daily average) for completion.
$20 Budget: Selective Top-Ups
$20 monthly: passes ($15) + selective top-ups ($5).
Strategic $5 deployment:
- Emergency pity completion (pull 85, need 5-8 more)
- First-time purchase bonuses (2× Polychrome)
- Guarantee activation (lost 50/50, 10 pulls before banner end)
Achieves 11,000-13,000 monthly (68-81 pulls) including F2P. Guaranteed S-Rank every 1.1-1.3 months—supports 80-90% banners.
First-time bonus optimization:
- Claim all tier bonuses ($1, $5, $10, $20, $50, $100) during critical banners
- Avoid repeat purchases until all tiers exhausted
- Reserve highest tiers for most-desired characters
Maximizes efficiency—potentially 50-100% more pulls vs repeated same-tier purchases.
When to Skip Banners
Skip when:
- Role duplicates existing invested agents
- Element provides redundant coverage
- Upcoming leaked characters better suit needs
- Pity below 50 without guarantee (low probability)
- Resources below 14,400 without guarantee
Pull when:
- Fills missing role
- Enables new team synergies
- Guarantee active with 75+ pity (near-certain within 15 pulls)
- Personal favorite regardless of meta
Version 2.7: Big Daddy, A-Rank Aria, A-Rank Yutane. Version 3.0: Lady Sunbringer. Players wanting Sunbringer should skip 2.6 entirely, accumulating 15,000-18,000 across two cycles.
First 6-8 S-Ranks provide exponential value through role coverage. Budget players should prioritize functional roster completion, then adopt selective pulling.
Common Pre-Farming Mistakes
Over-Investing in Unconfirmed Leaks
Character names/attributes achieve 85-90% accuracy. Specific multipliers change during beta. Farming character-specific materials before confirmation risks wasted stamina.
Conservative pre-farming (universal materials):
- Dennies (all agents)
- Basic/Advanced Seals (universal ascension)
- Basic/Advanced Chips (universal skills)
- Generic Drive Disc sets
Begin character-specific farming only after official announcements 10-14 days before release. This provides 1,400-2,240 stamina window while minimizing waste.
February 3rd vs 6th discrepancy exemplifies leak uncertainty. Avoid time-sensitive commitments based on unconfirmed dates.
Neglecting Core Team for New Characters
Level 40 S-Rank with level 3 skills performs worse than level 60 A-Rank with level 6 skills and optimized discs. Investment depth > roster width.
Optimal sequence:
- Core team to 60, skills 6+ (1 DPS, 1 Stunner, 1 Support)
- Complete Shiyu Defense Floor 7+
- Develop secondary team
- Pursue new characters
Players struggling Floor 5-6 should redirect all resources to core optimization. Fully-invested 3-agent core clears content 6-8 partial agents cannot.
Material mistakes:
- Leveling 5+ to 40 instead of 3 to 60
- Spreading skills evenly vs prioritizing key skills
- Farming discs for unused characters
- Pulling constellations before roster coverage
Stamina Waste: Wrong Material Tiers
Basic materials drop from Advanced stages (2-3 per 30-stamina run). Dedicated Basic farming inefficient except early game.
Efficient progression:
- Level 1-25: Basic materials (20 stamina)
- Level 25-40: Advanced materials (30 stamina, Basic drops as bonus)
- Level 40+: Specialized materials (40 stamina, Advanced/Basic drop as bonus)
Level 40+ players should never run 20-stamina stages. 30-stamina Advanced provides equivalent Basic yields plus Advanced materials—saves 33% stamina.
Drive Disc RNG:
- Correct main stats: 20% per slot
- Correct set: 25% for specific 4pc
- Optimal substats: 5-10% for 3+ desired
Functional set: 800-2,000 stamina. Optimized set: 2,000-5,000 stamina. Accept good enough (correct mains, 2-3 substats) rather than perfection.
Ignoring W-Engine and Drive Disc Pre-Farming
Character power sources: level (30%), skills (25%), W-Engine (25%), Drive Discs (20%). Neglecting W-Engine/Discs forfeits 45% potential performance.
Generic S-Rank W-Engines from standard banner provide 80-85% of signature performance. Farm refinement materials during pre-2.6 for immediate Rank 2-3 upgrades (20-40% of max value).
Drive Disc pre-farming (2-3 weeks before):
- Support: Swing Jazz
- DPS: Chaos Jazz or Hormone Punk
- Stunner: Shockstar Disco
Farm 2-3 functional sets across categories. 40 stamina per run, 240-320 stamina for 6-disc set (6-8 runs). Starting 14-21 days before provides 2,240-3,360 stamina budget—sufficient for 2-3 sets.
Delaying until launch forces choice between character usability and continued farming.
Team Composition Planning
Optimal Team Structures
Full Angels Team:
- DPS: Aria (Ether Anomaly)
- Stunner: Nangong Yu (Physical)
- Support: Sunna (Ice)
Activates max faction bonuses (10-15% stats). Elemental diversity prevents mono-element reactions. Excels in content requiring varied coverage.
Aria-Focused:
- DPS: Aria (Ether)
- Stunner: Lycaon (Ice, standard banner)
- Support: Sunna (Ice)
Ice synergy between Stunner/Support enables reactions and set bonuses.
Nangong Yu-Focused:
- DPS: Soldier 11 (Physical, standard)
- Stunner: Nangong Yu (Physical)
- Support: Sunna (Ice) or Rina (Electric, standard)
Mono-Physical maximizes damage bonuses.
Bangboo Synergies
For Anomaly Teams (Aria):
- Anomaly Proficiency (+30-50)
- Ether damage coordinated attacks
- Energy Recharge
For Physical Teams (Nangong Yu):
- Physical damage bonuses (+10-15%)
- Impact bonuses
- Defensive utility
For Support Teams (Sunna):
- Team-wide buffs
- Energy Recharge
- Crowd control
Bangboo banners: 80-pull hard pity, 1% S-Rank rate. Budget players prioritize characters over Bangboo—A-Rank provides 70-80% of S-Rank performance.
Existing Character Compatibility
Aria pairs with:
- Grace (Electric Anomaly, standard): Dual Anomaly stacking
- Rina (Electric Support, standard): Electric/Ether synergy
- Lycaon (Ice Stunner, standard): Daze windows
Nangong Yu pairs with:
- Soldier 11 (Physical DPS, standard): Mono-Physical
- Nekomata (Physical DPS, standard): Alternative Physical
- Any Support: Universal Stunner function
Sunna pairs with:
- Lycaon (Ice Stunner, standard): Mono-Ice foundation
- Any Main DPS: Universal Support value
Standard banner prevalence creates F2P-friendly paths. Acquire Lycaon/Soldier 11/Rina through 300-pull selector, integrate Angels as limited acquisitions.
F2P Team Alternatives
Hybrid Starter + Angels:
- DPS: Aria (limited)
- Stunner: [Starter]
- Support: [Starter]
Minimizes gacha dependency while capturing Angels performance. Works for any Angels character.
Progressive path:
- Full starter team (0 pulls)
- Add first limited S-Rank (90-180 pulls)
- Acquire standard S-Rank via selector (300 pulls passive)
- Replace remaining starters (ongoing)
Ensures continuous functionality while gradually improving quality.
FAQ
When does ZZZ 2.6 release?
Leaks indicate February 6, 2026, five weeks after Version 2.5's December 30, 2025 release. Conflicting sources suggest February 3rd for SURIEL banners. Monitor official announcements 10-14 days before expected launch.
How many Polychromes for guaranteed 5-star?
28,800 Polychrome (180 pulls) for first-time pullers without guarantee. 14,400 Polychrome (90 pulls) with active guarantee. Each pull costs 160 Polychrome. Hard pity at 90, soft pity starts pull 75 (0.6% → 6.6% by pull 89).
What materials to pre-farm for 2.6?
Universal materials: Dennies (800k ascension, 2.9M skills), Basic/Advanced Seals (4/32 for ascension), Basic/Advanced Chips (25/75 for skills). Character-specific only after official confirmation 10-14 days before release. Allocate: 40% character materials, 30% skills, 20% Dennies, 10% Drive Discs during 2-3 week window.
How does pity carry over?
Pity count and guarantee status carry between all limited agent banners indefinitely. 75 pulls on Version 2.5 retains for 2.6, 2.7, beyond. Pity does NOT carry between banner types (limited agent, W-Engine, standard, Bangboo maintain separate counters). Guarantee persists until claimed on any future limited banner.
Best spending strategy for low spenders?
$5 monthly pass: highest value at $0.27/pull (3,000 Polychrome monthly). $15 budget (pass + battle pass): guaranteed S-Rank every 1.15-1.4 months, supports 70-85% banners. Reserve first-time bonuses (2× Polychrome) for most-desired characters. Skip when characters duplicate roles or resources below 14,400 without guarantee. Prioritize roster diversity (6-8 S-Ranks) over constellations.
Pull new characters or wait for reruns?
Pull when filling missing roles, guarantee + 75+ pity ensures acquisition within 15 pulls, or personal favorite. Wait when resources insufficient for guarantee (below 14,400), character duplicates existing invested agents, or upcoming leaks better suit needs. Version 2.7/3.0 feature Big Daddy, Lady Sunbringer—players wanting these should skip 2.6, accumulating 15,000-18,000 across two cycles.


