

Understanding Apocalyptic Shadow: Core Mechanics and Objectives
What is Apocalyptic Shadow Mode
So here’s the deal with Apocalyptic Shadow – it’s basically HSR’s answer to what if we made boss fights even more stressful? You’re running two separate teams against rotating boss encounters, and that Action Value Timer? It’s constantly ticking down with every single action anyone takes. Allies, enemies, doesn’t matter.
The scoring system combines your remaining Action Value with how much boss HP you managed to chunk away. You’re shooting for 60,000 total points across both encounters if you want those sweet maximum rewards. Trust me, every point counts.
Getting in requires completing ‘Grim Film of Finality’ Adventure Mission over in Dreamflux Reef, Penacony. After that, just chat with NPC ‘Elegy’ to unlock Stage 1. New players at Trailblaze Level 21+ can use the ‘Finality Vision’ option to skip ahead – honestly, a pretty generous move from HoYoverse.
Reward Structure and Weekly Reset
Here’s where things get interesting (and slightly complicated). The mode operates on six-week cycles, dropping fresh content every Monday at 04:00 Server Time. The current ‘Lupine Warhead’ phase runs from August 18 through September 29, 2025.
Each phase throws up to 800 Stellar Jades and 600 Jade Feathers at you per completion cycle. The insignia system works like this: grab 1-8 insignias for 60 Stellar Jades each, but snag 9-12 and you’re looking at 80 Stellar Jades per piece. Nice scaling there.

First-time Difficulty 2 completion? That’s where the permanent goodies live. Free 4-star character Xueyi, 300 Stellar Jades, and 1 Self-Modelling Resin. For players needing consistent HSR Top Up Online resources, BitTopup offers competitive pricing and instant delivery for Stellar Jade purchases.
Difficulty Scaling and Player Requirements
Four difficulty tiers, each one adding more boss trait complexity. All difficulties feature this ‘Steadfast Safeguard’ trait – bosses take 50% less damage until you trigger Weakness Break, then suddenly they’re eating 100% increased damage. It’s like a switch flips.
Difficulty 3+ introduces ‘Apex Predator’ effects. Difficulty 4? That’s where ‘Till Death’ mechanics kick in, slapping another 15% damage reduction on top of everything else. Fun times.
Character usage statistics from 22,433 Stage 4 players paint an interesting picture: top limited 5-star characters hit 64.15% appearance rates, while accessible options reach 58.15% usage. What this tells me is that viable paths exist for various spending levels – you don’t need to whale to clear content.
Boss Pattern Recognition: Visual Cues and Attack Telegraphs
Reading Boss Animations
Fulminating Wolflord (that’s Hoolay for those keeping track) telegraphs his ‘Going Solo’ transformation through obvious stance changes and particle effects. Here’s the trick – defeat those summoned Wolftrooper enemies during the wind-up to reduce boss toughness. Don’t sleep on this.

Sanerot Hearteater (Shadow of Feixiao) signals ‘Sweep the Heavens, Swallow the Earth’ through claw positioning and energy gathering around summoned parts. Both bosses follow two-phase structures with screen-wide effects and model changes during transitions.
Phase 2 activations provide crystal-clear indicators for strategy adjustments. Use them.
Audio Cues and Environmental Indicators
Boss ultimate attacks feature distinct musical crescendos – we’re talking 2-3 seconds of audio buildup before execution. Screen border effects work as universal damage warnings: red borders mean incoming area damage, golden particles mark beneficial zones.
Ground indicators appear 1-2 seconds before targeted attacks hit. Blue means safe, red means pain. Status effect indicators above boss health bars communicate vulnerabilities and empowerment states. Learn to read these like a second language.
Safe Window Identification and Timing Strategies
Recognizing DPS Windows
The primary safe window happens immediately after Weakness Break activation. That ‘Steadfast Safeguard’ trait I mentioned earlier? It flips from 50% damage reduction to 100% damage amplification while delaying boss actions. Version 3.5’s ‘Ruinous Embers’ effect dispels control debuffs, recovers Skill Points, and activates all ally Ultimates during breaks.
Pre-position your ultimate abilities and damage buffs before toughness depletion. Support characters should apply Vulnerability debuffs during break setup phase for maximum multiplicative damage. Timing is everything here.
Positioning and Cooldown Management
Maintain maximum distance during boss charge-up phases while preserving movement options. Wolflord’s ‘Going Solo’ demands spread positioning, while Hearteater encounters benefit from grouped positioning for area healing.
Skill Point economy becomes absolutely critical during safe windows. ‘Fight In Unity’ buff rewards SP consumption with stacking damage bonuses up to 60%. ‘Fatality Exploitation’ buff provides 30% ultimate damage plus an additional 30% against broken enemies. Stack these properly and watch numbers soar.
F2P Team Compositions: Budget-Friendly Clear Strategies
4-Star Character Synergies
First-half team recommendation: Archer, Xueyi, Asta, Lynx. This utilizes ‘Fight In Unity’ buff through Asta’s skill point generation and Xueyi’s follow-up attacks. Second-half: Dan Heng, Serval, Trailblazer (Ice), Natasha exploits ‘Fatality Exploitation’ buff with Dan Heng’s ultimate scaling.

DoT compositions work beautifully here. Kafka, Sampo, Asta, Natasha benefit from ‘Obstinate Weed’ buffs triggering immediate DoT damage against broken enemies. This archetype creates multiplicative damage scaling without requiring premium characters – something I always appreciate in endgame content.
Free Character Optimization
Trailblazer variants provide exceptional value across the board. Harmony enables Super Break compositions, Ice offers reliable toughness breaking. Asta brings attack buffs, speed manipulation, and fire toughness contribution. Prioritize 134 SPD breakpoints, then focus attack and effect hit rate.
Natasha excels in healing-focused compositions with HP and healing bonus priorities. Lynx provides superior utility through cleansing and attack buffs, but requires speed and effect resistance investment.
Light Cone Alternatives
4-star options worth pursuing: ‘Resolution Shines As Pearls of Sweat’ and ‘Eyes of the Prey’ for DoT DPS via Herta Shop exchanges. ‘Swordplay’ and ‘Cruising in the Stellar Sea’ for hypercarry DPS through guaranteed shop rotations.
Support optimization focuses on ‘Past and Future’ for Harmony, ‘Meshing Cogs’ for energy-intensive compositions, ‘Landau’s Choice’ for aggro management. Buy Oneiric Shards efficiently through BitTopup to accelerate refinement progress.
Character Role Optimization in Apocalyptic Shadow
DPS Character Positioning
Position 1 gains ‘Heroic Vanguard’ buffs: 50% Weakness Break Efficiency and CRIT DMG bonuses after ultimate usage. Target 134 SPD breakpoints for reliable turn frequency, 146 SPD for premium performance.
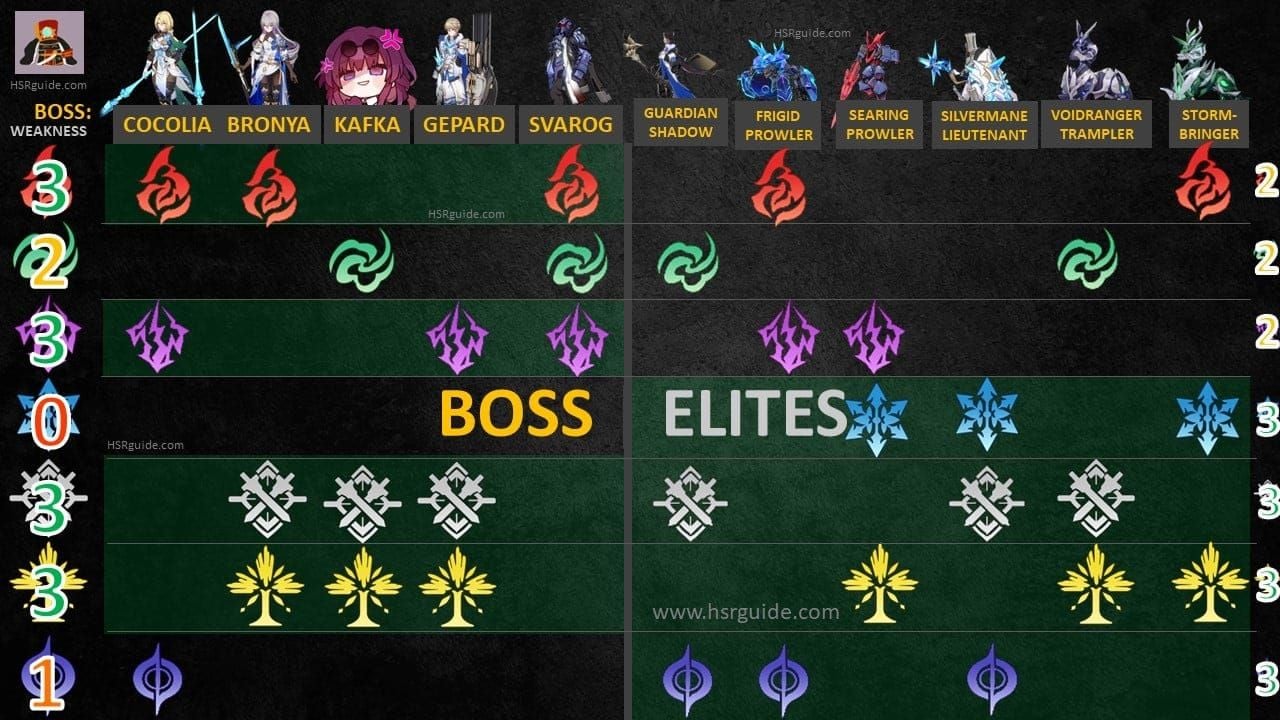
Current phase bosses share Physical, Fire, Wind weaknesses. Plan secondary DPS coverage for unique weaknesses: Quantum (Hoolay), Lightning (Feixiao). Don’t get caught with your pants down on element coverage.
Support Character Timing
Achieve 140+ SPD for reliable turn priority before DPS characters. Characters like Asta and Tingyun provide positive SP economy, enabling aggressive skill usage. Coordinate Vulnerability application with toughness break timing for maximum damage amplification.
Tank and Sustain Strategies
Gallagher provides exceptional value in break-focused teams through healing and additional toughness damage. Fu Xuan’s damage reduction and aggro manipulation protects fragile DPS characters. Prioritize effect resistance for cleanse-dependent encounters, then healing bonus and HP scaling.
Advanced Rotation Techniques and Skill Management
Optimal Skill Point Usage
Positive SP characters like Asta (+1 SP per skill) and Tingyun (+1 SP per skill) enable aggressive rotations. ‘Fight In Unity’ rewards SP consumption with 60% damage bonus at maximum stacks. Bank 4-5 SP before break opportunities for explosive damage windows.
Ultimate Timing for Maximum Impact
Queue multiple ultimates during Weakness Break setup, then execute sequential activation for overlapping bonuses. ‘Fatality Exploitation’ provides 60% total ultimate damage bonus against broken enemies. Delay activation until break confirmation for maximum effectiveness – patience pays off here.
Energy generation varies significantly by archetype: follow-up characters like Xueyi generate through triggered abilities, traditional DPS rely on basic attack/skill rotation. Light Cone selection dramatically impacts these strategies.
Boss-Specific Strategies: Current Rotation Analysis
Phase Transition Management
Wolflord’s transition triggers ‘Barrenness of Earth Gouged,’ eliminating Wolftroopers automatically. However, defeating them manually before transition provides toughness benefits. Hearteater’s ‘Soul Shattering Malediction’ converts an ally to ‘Bloodstained Lupine’ – select support characters for transformation if possible.
Both bosses increase aggression during phase 2. Prepare sustain ultimates and defensive abilities for transition periods when damage output peaks.
Weakness Break Optimization
Physical, Fire, Wind provide universal coverage across both bosses. Quantum (Hoolay) and Lightning (Feixiao) offer specialized advantages. High break efficiency characters like Harmony Trailblazer excel at rapid toughness depletion.
Break effect scaling influences post-break damage and debuff duration. Fire applies burn DoT, Physical applies bleed, Quantum creates entanglement for action delays. Each element brings unique utility beyond raw damage.
Common Mistakes and How to Avoid Them
Timing Errors in DPS Windows
Premature ultimate usage before Weakness Break wastes that crucial ‘Fatality Exploitation’ 60% damage bonus. Always verify break status before activation. Maintain 5-10 SPD differences between support and DPS for consistent buff coverage.
Poor Resource Management
Track SP generation and consumption religiously. Maintain 2-3 SP reserves for emergencies – you never know when you’ll need that clutch skill usage. Plan energy generation around ultimate timing, but avoid excess accumulation. Monitor buff timers and reapply amplification effects before break windows.
Positioning Mistakes
This one trips up more players than you’d think. Continuously adjust positioning based on attack patterns while maintaining damage range. Understand encounter-specific spacing requirements. Maintain movement options and pre-plan evacuation routes during complex sequences.
Preparation and Weekly Planning
Team Building for Upcoming Rotations
Historical data shows alternating emphasis on different damage types across rotations. Prioritize versatile units like Asta, Pela, Tingyun for universal support value. Focus on broadly applicable relic sets: ‘Musketeer of Wild Wheat’ for DPS, ‘Messenger Traversing Hackerspace’ for support.
Resource Allocation Strategy
Complete one character’s optimization before beginning another for measurable improvements. Honkai Star Rail Top Up planning should align with banner schedules. BitTopup provides secure transactions and competitive rates.
Practice in lower difficulties to develop muscle memory without timer pressure. Record and analyze attempts for improvement identification – trust me, reviewing your own gameplay reveals patterns you’d never notice otherwise.
FAQ
Q: How often does Apocalyptic Shadow rotate and what should I expect? Every six weeks on Monday at 04:00 Server Time, completely changing bosses, mechanics, and buffs. Current ‘Lupine Warhead’ phase runs until September 29, 2025. Expect significant strategy shifts between rotations.
Q: Can I clear effectively without 5-star limited characters? Absolutely. F2P clears remain viable using 4-star characters. Successful compositions include Kafka/Sampo DoT teams and Xueyi/Asta synergy builds. Synergy matters significantly more than rarity in this mode.
Q: What are the most important mechanics to master? Weakness Break timing for safe windows, Action Value Timer impact on turn frequency, and ultimate coordination during vulnerability periods. That ‘Steadfast Safeguard’ transformation from 50% damage reduction to 100% amplification is game-changing.
Q: How should I prioritize limited resources? Focus on versatile supports like Asta and Pela first. Develop one complete team before starting another. Target 4-star Light Cones from shop, universal relic sets, and 134 SPD breakpoints as baseline investments.
Q: What rewards can I expect? Up to 800 Stellar Jades and 600 Jade Feathers per phase, plus 220,000 credits. First-time Difficulty 2 completion provides Xueyi, 300 Stellar Jades, and 1 Self-Modelling Resin. Pretty generous for endgame content.
Q: How do I identify safe damage windows? Watch for broken shield icons above boss health bars triggering vulnerability phase with 100% increased damage. Defeat Wolftroopers before Hoolay’s transformation, break Feixiao’s summoned parts to prevent devastating area attacks. Visual cues are your best friend here.


