

Understanding Drop Timing Fundamentals in PUBG Mobile 2025
Risk vs Reward Assessment
Here’s something that caught my attention while reviewing 2025’s meta changes: we’re seeing a massive 28% increase in total item spawns on Erangel, plus these new dynamic weather systems that completely flip engagement ranges mid-match. Wild stuff.
Now, about those high-tier locations like Pochinki and Hacienda del Patrón – sure, the gear’s exceptional. But here’s the thing: you’ll face skilled players who can eliminate you before you’ve even grabbed decent equipment. Not exactly ideal.
Pro players I’ve spoken with consistently recommend locations with at least 70% survival chance during initial landing. Your minimum viable equipment? Assault rifle, Level 2 armor, basic healing supplies. That’s it. The survival-to-gear ratio matters way more than pure loot density – something many players still haven’t figured out.
Flight Path Analysis
The 750-800 meter rule remains your best friend for optimal landing speed. Jump when your target’s 750-800 meters from the plane’s current position, dive straight down to hit that sweet 234 km/h maximum falling speed. This ensures you’ll touch ground before opponents who jump too early or late.
Areas directly under the flight path? They’ve got 30% higher player density but only marginal zone inclusion increases. Map centers maintain 60% zone probability regardless of flight path, while edge areas drop to 30%.
Pro tip: Pre-mark specific target buildings before jumping. Trust me on this one – when multiple squads land in the same compound, you’ll thank yourself for having a clear looting plan.
Player Density Prediction
Monitor that plane passenger count and flight path to estimate competition for your chosen spots. Here’s something interesting – airdrops on Erangel frequently land near Pochinki, School, and Military Base, drawing players away from other areas. On Miramar, they favor Pecado, Monte Nuevo, and Hacienda del Patrón.
Use audio cues during your initial drop to gauge nearby competition. Multiple parachutes? Immediate combat incoming. Distant gunfire? You’ve got time to loot before things get spicy.
Always have an exit strategy before landing. Identify nearest vehicle spawn and alternative rotation routes – because when things go sideways (and they will), you’ll need options.
Erangel Drop Strategy: Hot Zones vs Safe Landings
Tier S Hot Drop Locations
Pochinki remains Erangel’s premier hot drop, and for good reason. Central positioning plus multi-story buildings enable those vertical combat strategies that separate good players from great ones. Expect 3-5 squads competing for resources, making weapon acquisition speed absolutely critical. Multiple assault rifle spawns and consistent Level 2-3 gear availability justify the risk – if you’re confident in your early-game skills.
Sosnovka Military Base provides the highest loot quality on Erangel. Level 3 gear and sniper rifle spawns are significantly above map average. The isolation reduces third-party interruptions during looting, but creates challenging rotations due to those bridge chokepoints. If you’re under the flight path, use the northeast U-shaped buildings for initial landing.
School and Apartments create absolute chaos in the early game. School building functions as what I call a death trap – limited escape routes make it brutal. The surrounding apartments offer better tactical flexibility. This area consistently produces early eliminations, ideal for aggressive players but completely unsuitable for consistent placement strategies.
Georgopol offers dual options that many players overlook. North Georgopol’s shipping containers provide concentrated loot, while South Georgopol’s residential buildings offer superior cover. The coastal position enables boat rotations to avoid bridge camping – a unique tactical advantage that’s seriously underutilized.
Safe Alternative Landing Spots
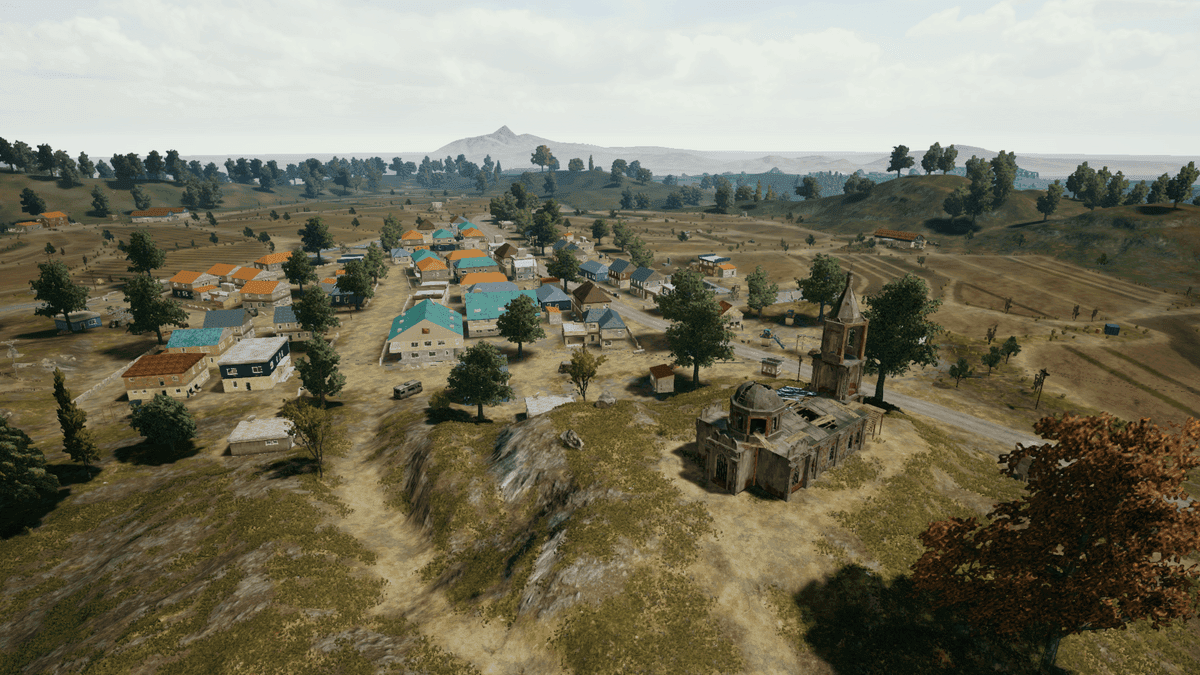
Yasnaya Polyana stands as Erangel’s most underutilized major city. Seriously, this place offers enough loot for a full squad with minimal early-game competition. The apartment buildings contain the highest loot density within the compound, and central positioning provides excellent rotation flexibility for all zone configurations.
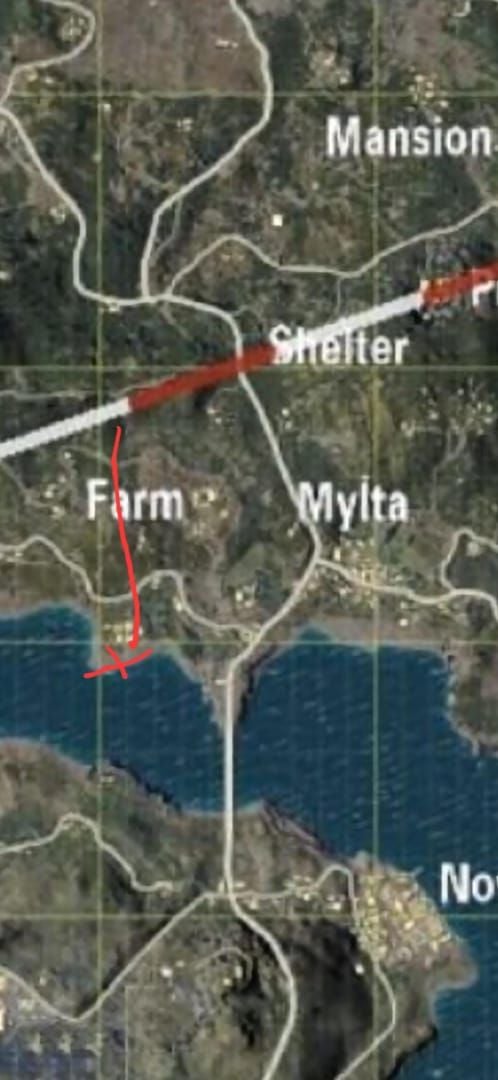
Mylta Power delivers exceptional loot quality while remaining consistently undercontested. Most players focus on Mylta proper, leaving the power plant’s superior gear spawns available. You’ll find reliable Level 2-3 equipment with assault rifle spawns comparable to hot drop locations.
Stalber occupies the northeastern mountain region and gets frequently ignored due to perceived isolation. It consistently provides Level 2-3 armor and assault rifles with virtually no competition. Main challenge? Rotation timing – you’ll need early movement and vehicle acquisition.
For teams prioritizing PUBG UC Top Up to access premium cosmetics and battle passes, these safer locations provide the survival consistency needed to maximize seasonal progression and rank advancement.
Loot Route Optimization
Follow this strict priority hierarchy: primary weapon (assault rifle preferred), armor (minimum Level 2), healing supplies, utility items. The 2025 meta emphasizes mobility, making smoke grenades essential for rotation safety.
In Yasnaya Polyana, start with apartment buildings for maximum loot density before expanding to outer structures. In Mylta Power, prioritize central facility buildings before clearing perimeter structures. Limit initial looting to 3-4 minutes maximum regardless of available gear to maintain rotation flexibility.
Miramar Drop Mastery: Desert Terrain Advantages
High-Value Desert Compounds
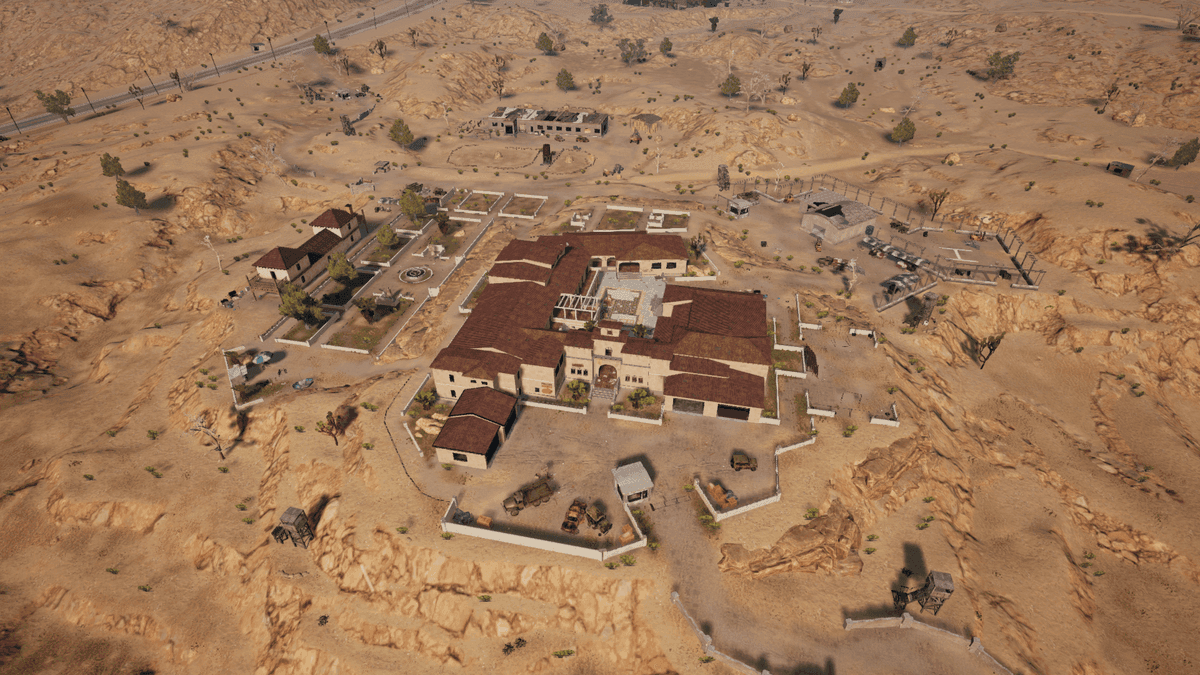
Hacienda del Patrón functions as Miramar’s premier loot location – that sprawling mansion complex offers unmatched weapon and attachment variety. Central positioning and exceptional gear quality can fully equip your entire squad, but expect intense competition from skilled players.
Pecado serves as Miramar’s equivalent to Erangel’s School, concentrating chaos in the Casino and Boxing Ring areas. It consistently spawns Level 3 equipment and high-tier scopes, but the compact layout creates unavoidable close-quarters combat. Optimal route: land at Casino, clear rear hotel areas, secure that tall Blue Building for tactical advantage.
Los Leones provides the largest loot area on Miramar. The city size allows tactical positioning and reduces immediate elimination likelihood compared to compact hot drops. Multiple squads can operate here while maintaining high gear quality.
El Pozo combines good loot spawns with reliable vehicle access – crucial for Miramar’s rotation requirements. The boxing ring area offers premium gear, but monitor that flight path as proximity increases competition significantly.
Terrain-Based Positioning
Miramar’s sparse cover and long sightlines heavily favor long-range combat. Scope acquisition and positioning become critical here. Use elevation advantages aggressively but avoid silhouetting on ridgelines – it’s a rookie mistake that’ll get you eliminated fast.
Vehicle dependency cannot be overstated. Those vast distances make vehicular movement essential for zone compliance, not optional.
Long-Range Setup Locations
Valle del Mar offers excellent long-range positioning while remaining consistently undercontested. The coastal location provides natural boundaries limiting approach angles, but requires vehicle acquisition for reliable rotation. Boats offer alternative rotation methods when available.
Water Treatment provides tactical advantages through elevated positioning and sight line control over surrounding areas. Main loot concentrates around central pipe structures, while outer buildings offer safer initial positioning.
Cave south of Los Leones represents Miramar’s most underrated location. Excellent loot in a concealed environment perfect for solo/duo players. Most players remain unaware of this location, providing consistent uncontested looting opportunities.
Third-Party Window Identification and Exploitation
Audio Cue Recognition
Gunfire audio provides critical information about engagement range, weapon types, and fight intensity. Single-shot weapons suggest long-range engagements with limited immediate threat. Automatic fire indicates close-quarters combat with rapid resolution potential.
Monitor engagement duration to assess third-party timing. Fights lasting over 60 seconds indicate evenly matched opponents with depleted resources – creating optimal third-party opportunities. Brief engagements suggest decisive victories with healthy survivors, requiring cautious approaches.
Optimal Engagement Timing
The ideal third-party window occurs immediately after one team eliminates another but before survivors fully recover. Position within 100-150 meters of ongoing fights to capitalize on resolution timing. Closer positioning risks involvement in the original engagement; greater distances allow too much recovery time.
Use the kill feed strategically to identify third-party opportunities. When elimination notifications appear, immediately move toward the engagement area while monitoring for additional teams with similar intentions.
Positioning for Third-Party Success
Edge Play Strategy provides optimal third-party positioning by maintaining zone edge positions offering protected flanks and clear sight lines into zone interior fights. This eliminates rear threats while providing excellent engagement opportunities.
Control high ground positions overlooking common engagement areas. Elevated positions offer superior sight lines and tactical advantages, but require careful positioning to avoid silhouetting. Pre-position near likely rotation chokepoints – particularly bridges on Erangel and elevated terrain transitions on Miramar.
Safe Zone Rotation Planning and Execution
Zone Prediction Techniques
Predictive Rotation involves moving toward anticipated zone locations before current zones finish closing, avoiding chaotic late rotations and gatekeeping scenarios. Here’s something useful: airdrop locations serve as reliable zone prediction indicators, frequently landing within or adjacent to subsequent safe zones.
Zones typically favor land mass over water and avoid extreme map edges. Central map areas maintain approximately 60% inclusion probability, while edge areas drop to 30% likelihood.
Route Planning Strategies
Plan primary and secondary rotation routes before zone revelation to maintain flexibility under pressure. Primary routes prioritize speed and safety; secondary routes offer alternatives when primary paths become compromised.
Gatekeeping positions near chokepoints allow teams to intercept and eliminate enemies forced into late rotations. Bridge positions on Erangel and elevated terrain on Miramar provide excellent gatekeeping opportunities.
Timing Your Movements
Execute rotations during early phases of zone closure to avoid late-rotation chaos and maintain tactical flexibility. Early movement provides positioning advantages and reduces exposure to gatekeeping teams.
Monitor other teams’ rotation patterns to identify tactical opportunities. Teams rotating late often face zone pressure and reduced tactical options, creating third-party opportunities for properly positioned opponents.
Vehicle Usage and Rotation Tactics
Map-Specific Vehicle Selection
Erangel Vehicle Strategy emphasizes versatility and stealth options. UAZ (closed top) provides excellent protection and passenger capacity for squad rotations; motorcycles offer speed advantages for rapid repositioning. Boats provide unique tactical advantages for avoiding bridge chokepoints.
Miramar Vehicle Requirements make vehicular movement essential rather than optional. Vast distances between compounds and sparse cover make vehicle acquisition critical for survival. Prioritize fuel-efficient vehicles for extended rotations and consider backup vehicle positioning.
Fuel Management
Monitor fuel consumption during extended rotations, particularly on Miramar where distances between fuel sources can exceed vehicle range. Plan refueling stops during route planning to avoid being stranded in unsafe positions. Share fuel resources among team members to maintain vehicle operation capability throughout the match.
Stealth vs Speed Rotations
Speed Rotations prioritize rapid movement over concealment when zone pressure or tactical requirements demand immediate repositioning. Use main roads and direct routes while accepting increased detection risk for time advantages.
Stealth Rotations emphasize concealment and tactical positioning over speed when time permits careful movement. Use terrain features and indirect routes to minimize detection while maintaining rotation progress.
Advanced Positioning Strategies for Both Maps
High Ground Control
Elevation advantages provide superior sight lines and tactical control, but require careful positioning to avoid silhouetting and maintain escape routes. Ridge Warfare involves using elevation changes as mobile cover for peek-and-shoot tactics.
Avoid extended positioning on open ridgelines where silhouetting creates vulnerability to long-range threats. Use terrain features and natural cover to break up your outline and maintain tactical flexibility.
Cover-to-Cover Movement
Natural Cover Utilization transforms terrain features into tactical advantages through proper positioning and movement techniques. Use rocks, trees, and terrain irregularities as cover points during rotations and engagements.
Treat open fields and water areas as death traps requiring special crossing techniques. Use smoke grenades and vehicle cover when forced to traverse exposed areas, minimizing exposure time through rapid movement.
Compound Control Techniques
Angle Control within compounds involves positioning to control key sight lines and approach routes while maintaining escape options. Secure perimeter positions before expanding into compound interiors. Control outer buildings and approaches before moving to central structures.
Use vertical positioning within multi-story buildings to control engagement ranges and maintain tactical advantages. Upper floors provide sight line advantages but require escape route planning for tactical flexibility.
Common Mistakes and How to Avoid Them
Drop Timing Errors
Over-looting represents the most common mistake affecting both new and experienced players. I’ve seen countless players spend excessive time searching for optimal gear while ignoring zone timing, creating unnecessary pressure. Limit initial looting to 3-4 minutes maximum regardless of available equipment.
Poor Jump Timing results from misunderstanding the 750-800 meter rule or failing to pre-mark target buildings. Practice timing in training mode to achieve consistent 234 km/h falling speeds. Flight Path Misreading leads to unexpected competition in supposedly safe locations.
Rotation Mistakes
Late Rotations create vulnerability to gatekeeping teams and zone pressure. Begin rotations during early zone phases to maintain tactical flexibility. Poor Route Selection involves choosing direct paths without considering terrain advantages or potential ambush positions.
Vehicle Dependency without backup plans creates vulnerability when vehicles become unavailable. Always identify alternative rotation methods and maintain tactical flexibility for various scenarios.
Third-Party Positioning Fails
Premature Engagement during ongoing fights eliminates third-party advantages and creates multi-team combat scenarios. Wait for engagement resolution before initiating attacks to maximize tactical advantages against weakened opponents.
Poor Positioning involves inadequate cover or escape routes. Maintain positional flexibility and escape options when engaging weakened teams. Audio Neglect prevents identification of additional third-party threats during engagements.
Team Coordination and Communication
Drop Coordination
Establish clear drop protocols before match initiation to ensure synchronized landing and tactical coordination. Designate primary and secondary landing locations with specific building assignments for each team member.
Role Assignment during drops should consider individual player strengths and tactical requirements. Assign aggressive players to weapon acquisition while support players focus on utility and healing supplies.
Rotation Callouts
Use precise directional callouts and distance estimates when communicating enemy positions. Enemy northeast, 200 meters provides actionable information compared to vague directional references.
Information Sharing should include enemy equipment, positioning, and movement patterns to enable tactical decision-making. Share scope sightings, weapon identifications, and tactical assessments with team members.
Information Sharing
Kill Feed Monitoring provides valuable intelligence about nearby engagements and tactical opportunities. Share kill feed information with teammates to identify third-party opportunities and potential threats.
Communicate resource availability and tactical needs to optimize team equipment distribution. Maintain continuous communication during engagements to coordinate tactics and maintain situational awareness.
2025 Meta Updates and Strategy Adaptations
Recent Map Changes
The 2025 season introduces dynamic weather systems affecting both Erangel and Miramar, influencing visibility conditions and engagement ranges. Weather changes occur mid-match, requiring tactical adaptation based on visibility conditions.
Loot Table Rebalancing significantly increased weapon availability on Erangel, with assault rifle spawns increased by 64% and sniper rifle spawns increased by 177%. These changes affect drop location viability and tactical planning for equipment acquisition.
New Vehicle Spawns
The enhanced buggy provides improved tactical flexibility with better protection and handling characteristics. Electric vehicle options reduce audio signatures during rotations, providing stealth advantages for tactical movement.
Vehicle spawn rate increases particularly benefit Miramar gameplay, where vehicular movement remains essential for effective rotation and tactical positioning throughout matches.
Updated Loot Tables
New Weapons Integration includes MK20 rifle and Spectre SMG as emerging top-tier options. The MK20 provides excellent balance for assault rifle roles, while Spectre offers superior close-quarters performance with proper attachment configuration.
The DBS shotgun significantly altered close-quarters combat dynamics, providing devastating damage output in building clearing and compound control scenarios. Traditional weapons like M416 and UMP maintain effectiveness in the evolved meta.
Players looking to maximize competitive advantage should consider using Buy PUBG UC services to access premium weapon skins and attachments that provide psychological advantages and improved weapon handling characteristics.
For consistent access to seasonal content and battle pass progression, PUBG Mobile Top Up Online through reliable platforms ensures uninterrupted access to new content and competitive advantages as the meta continues evolving throughout 2025.
Frequently Asked Questions
What’s the optimal drop timing for competitive advantage in 2025? Use the 750-800 meter rule: jump when your target’s 750-800 meters away, dive straight down to achieve 234 km/h maximum speed, pre-mark your specific target building. This ensures faster ground arrival than opponents jumping at different distances.
How do weather changes in the 2025 update affect drop strategies? Dynamic weather systems influence visibility and engagement ranges mid-match. Foggy conditions favor close-range drops like School or Pecado; clear weather benefits long-range positions like Stalber or Valle del Mar. Monitor weather patterns during the plane ride and adjust drop selection accordingly.
Which vehicles provide the best rotation advantages on each map? Erangel: UAZ (closed top) for squad protection, boats for bridge avoidance, motorcycles for speed. Miramar: prioritize fuel-efficient vehicles due to vast distances – enhanced buggy provides good protection while maintaining range. New electric bikes offer silent rotation advantages.
How do you identify optimal third-party timing windows? Monitor engagement duration and audio cues. Fights lasting 60+ seconds indicate evenly matched opponents with depleted resources. Position 100-150 meters from ongoing fights, wait for elimination notifications in the kill feed, then immediately move to engage weakened survivors.
What are the most reliable zone prediction methods? Track airdrop locations as they frequently land within or near subsequent safe zones. Central map areas have ~60% zone inclusion probability while edges drop to ~30%. Zones favor land mass over water and avoid completely deserted areas.
How has 2025 loot rebalancing changed drop location priorities? Erangel’s 28% total loot increase and 64% assault rifle spawn boost make previously marginal locations like Mylta Power and Yasnaya Polyana more viable. The 177% sniper rifle spawn increase benefits long-range focused drops, reducing the risk-reward gap between hot drops and safe locations.


