

Arena Breakout Infinite Basics: What Every Beginner Needs to Know
Game Mechanics Overview
So here's the thing about Arena Breakout Infinite – it's not your typical run-and-gun shooter. When it hit Steam on September 15, 2025, it brought something different to the table. You've got 30-minute PvPvE raids across three distinct maps, each with its own personality and player count.
Farm serves as your training ground (12 players, unlocks post-tutorial). Valley steps things up at Level 8 with 20 players. Northridge? That's the big leagues at Level 11, also 20 players, and honestly – it's where dreams go to die if you're not prepared.

Here's what separates the survivors from the statistics: aim for a >30% solo survival rate and 300k+ Koens profit per raid. Sounds ambitious? It's actually achievable through strategic routing and smart risk management. The 3x gear value principle is your financial lifeline – ensure your loot value exceeds three times your loadout cost. Otherwise, you're just gambling with extra steps.
For newcomers seeking enhanced gaming experience, Arena Breakout bonds top up for beginners through BitTopup provides secure currency acquisition. BitTopup offers competitive pricing, instant delivery, and comprehensive customer support for smooth transactions.
Victory isn't about your K/D ratio (though eliminations help). It's about successful extraction with valuable loot. Think of it as the world's most dangerous treasure hunt where the treasure shoots back.
Ignition Season Key Changes
Ignition Season didn't just add content – it fundamentally shifted how the game feels. Enhanced looting mechanics make container searching smoother, while relaxed extraction conditions give beginners more breathing room. The new Secure Ops mode? It's basically training wheels for map familiarization without the gear fear.
Northridge is where things get spicy. Eight safes scattered across Hotel Buildings A/B/C/D, plus three more at the Sewage Plant. We're talking 500k-800k Koens opportunities if you know what you're doing. The new bosses – Fred, Rolf, Kurt, and Bernard – each demand different approaches. Fred's a hotel tyrant, while Kurt loves his explosives a bit too much.
The season emphasizes accessibility in ways that matter. No friendly fire means your teammates can't accidentally ruin your day. HUD markers keep everyone oriented, and the revive system works for everything except headshots (because some things should stay permanent).
Dynamic weather affects more than just screenshots. Sunny days offer clear sightlines, overcast conditions provide natural camouflage, and light rain muffles audio cues. Each weather pattern changes your tactical calculus.
Victory Conditions and Objectives
Target 100k+ Koens per hour through speed farming – anything less and you're probably overthinking it. Keep raid durations between 15-20 minutes. Longer than that and you're either lost or greedy, both dangerous conditions.
Prioritize items worth >5,000 Koens per inventory slot. It sounds arbitrary until you realize how quickly premium loot fills your limited space. Joel Garrison tasks require eliminating 5 enemies and retrieving chest rigs – straightforward combat objectives. Evita tasks offer substantial XP and Koen rewards for circuit panel destruction, though finding those panels can be... educational.
Primary missions via the tab menu provide structured objectives for quick leveling. Those orange exclamation markers? They're your bread and butter – guaranteed rewards for main quests. Starred missions offer moderate rewards for mini-objectives when you need quick cash.
Pre-Raid Preparation: Setting Yourself Up for Success
Choosing Your Starting Loadout
Budget loadouts under 100k Koens are your friend until you understand the maps. The AK-74N with T3-T4 ammo delivers 630 RPM of reliable performance. Alternatively, the MPX costs 88k Koens but brings 850 RPM and 9x19mm AP6.3 T3 ammo delivering 679.68 damage with 424.8 penetration – impressive numbers for the price point.
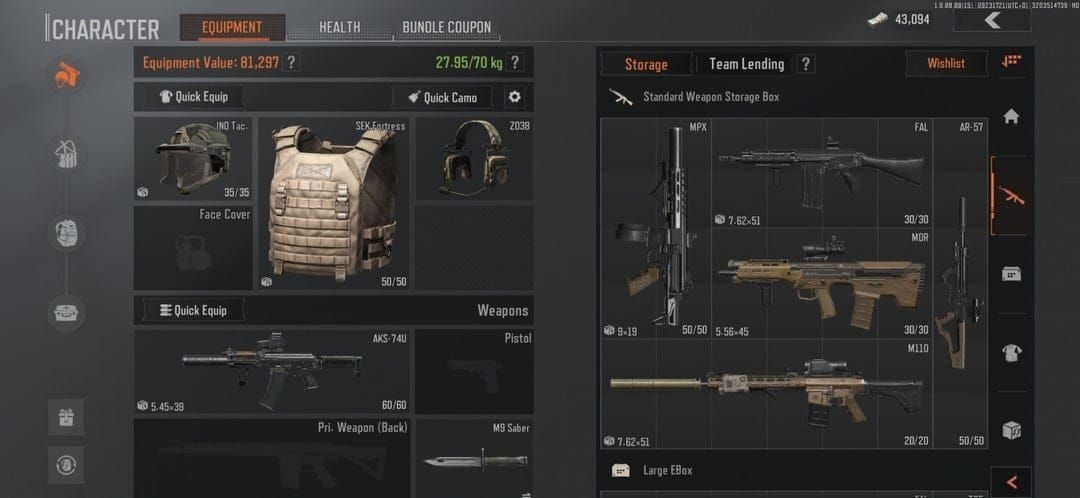
Don't forget the B3 Universal Chest Rig. Twelve external and 16 internal grid slots might not sound exciting, but organization saves lives. Essential accessories include 2-3 spare magazines, bandages, surgical kits, and painkillers. Basic stuff, but you'll miss it when you need it.
Mid-tier loadouts (200k-300k Koens) open up FAL or MPX with T5 ammunition. Premium setups (500k+ Koens) feature SJ16 sniper rifles with .338 ammunition and 6x-20x optics for long-range work. Though honestly, if you're reading a beginner guide, maybe save the sniper fantasies for later.
Insurance and Risk Management
Insure expensive gear before raids – it's cheap insurance against player elimination recovery. Configure graphics with lower shadows and post-processing for improved enemy visibility. Your artistic sensibilities can wait until you stop dying to players you never saw.
Customize keybinds for healing and leaning mechanics through offline practice. Muscle memory matters when someone's shooting at you.
Start with Normal Maps featuring knife-only entry and bot-dominated encounters. Advance to Lockdown Zone (Level 10+ requirement) with increased player density once you're comfortable with basic mechanics. There's no shame in learning against AI before facing human creativity.
Essential Survival Routes for Ignition Season 2025
Beginner-Friendly Map Areas
Farm western spawn offers a reliable introduction: Grain Trade Center → Stables (upstairs safe) → Motel (3 locked safes, multiple weapon boxes). Extract via Outpost or Boulder Wall. This route consistently delivers 100k+ Koens per hour through systematic speed farming.
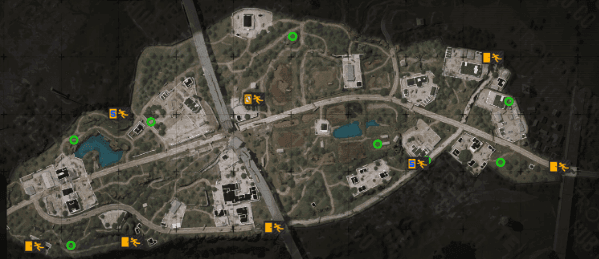
The southern route provides alternatives: Villa → Southern Wheat Field hut → Stables, using treeline cover and prone/crouch-walking for 60% audio reduction. It's slower but safer when you're still learning enemy movement patterns.
Valley's coastal route avoids the chaos: Coastal sheds → Port (1 safe, 7 weapon boxes) → Northeast/Northwest Road extraction. You'll skip the high-traffic Beach Villa while maintaining 300k-500k Koens potential through systematic container looting. Sometimes boring is profitable.
For optimal resource management, global Arena Breakout bonds recharge service via BitTopup ensures reliable currency access. BitTopup offers 24/7 customer support, secure payment processing, and competitive exchange rates for consistent loadout quality.
Safe Extraction Paths
Fixed green extractions remain always available opposite your spawn locations with no requirements. Simple concept, but you'd be surprised how many players forget this basic geography lesson.
Conditional orange extractions add complexity: Southern Blockade (2,000 Koens payment), Hunter's Path (backpack discard), Valley Helipad (2 Dogtags). Normal mode conditionals activate 10 minutes post-raid start; Lockdown mode costs 6,000 Koens – a significant expense when you're budget-conscious.
Northridge extractions require more thought. Dam extraction needs second-floor button activation for a 3-minute escape window. Cable Car Cabin's ground-floor activation notifies the entire map – subtle it isn't. Armored Vehicle requires 2 dogtags, which means engaging other players or finding bodies.
Monitor extraction lights religiously: green indicates availability, red shows active status. These visual cues prevent embarrassing extraction failures.
High-Traffic Zones to Avoid
Beach Villa attracts experienced players like honey attracts bears. Two safes, 10 weapon crates, and 70% map oversight make it a PvP magnet. Avoid during the first 10 minutes when encounters peak and everyone's feeling aggressive.
Northridge Hotel Buildings concentrate squads competing for 8 safes and Fred boss encounters. This requires T4+ gear and advanced tactics exceeding beginner capabilities. Save it for when you understand positioning and team coordination.
Farm Motel becomes contested due to 3 locked safes and Ajax boss spawns. The location demands advanced positioning knowledge that comes with experience, not guides.
Combat Fundamentals: When to Fight and When to Flee
Engagement Decision Matrix
Here's the uncomfortable truth: prioritize extraction over eliminations. Your ego might want those kills, but your bank account prefers successful extractions.
Engage only with superior positioning, T4+ ammunition, clear escape routes, and when you're not carrying 200k+ Koens loot. Single footstep patterns indicate solo players; coordinated movement suggests squads requiring immediate retreat. Learn to distinguish between the two – it's a survival skill.
Decision tree time: Can you eliminate the threat within 10 seconds? Do you have T4+ ammunition? Is your extraction route clear? Negative answers indicate retreat as the optimal choice for survival and profit preservation.
Basic Combat Techniques
Use cover, leaning, and suppressive fire over aggressive rushing. This isn't Call of Duty – patience wins firefights. Crouch-walking and slow-peeking minimize audio signatures by 60%. Sound discipline separates survivors from statistics.
Treat fractures, bleeding, and disabilities immediately using splints, bandages, and painkillers. Carry 500+ healing capacity plus bleed control items. The 100D Battlefield Medkit (400 durability) paired with Standard Military First Aid covers most situations.
Avoid sprinting during firefights as movement impairs accuracy. Practice suppressive fire to control enemy movement while repositioning. It's about tactical control, not spray-and-pray.
Positioning and Cover Usage
Utilize elevation and concealment advantages whenever possible. Northridge Observation Tower and Valley coastal positions provide superior sightlines for reconnaissance. Information gathering beats blind rushing every time.
Flashbangs enable aggressive pushes when necessary; smoke grenades facilitate retreats combined with painkiller mobility enhancement. Always assume single contacts represent squad advance elements. Maintain defensive positions preventing flanking while preserving ammunition for sustained engagements if retreat becomes impossible.
Loot Priorities: What to Grab and What to Leave
High-Value Items for Beginners
Mythical RED items provide maximum value per slot: Antique Teapots, Gem Necklaces, Gold Lion Statues exceed 5,000 Koens per slot. Investigate red pulsing circles indicating safes, weapon boxes, and filing cabinets – these visual cues guide efficient looting.
Legendary GOLD items deserve special attention: Gold Cups (270k Koens), Gold Pens (450k Koens) offer substantial profit margins that can fund multiple future raids. T6 ammunition commands 1,909 Koens per 60 rounds – expensive but effective.
Specialized keys like Motel 2011 unlock premium safes containing multiple high-value items. Target warehouses and bunkers for ammunition racks and unfolded backpacks enabling 3-layer inventory organization.
Inventory Space Optimization
Organization matters more than you'd expect. Medical supplies and ammunition need accessible positions for high-stress situations. Unfolded backpacks create additional storage layers; ammo racks consolidate bullet storage efficiently.
Discard low-value items immediately when discovering superior alternatives. Maintain strict 5,000+ Koens per slot thresholds – it's not greed, it's mathematics.
Medium backpacks provide balanced capacity and visibility profiles. Large backpacks offer more space but make you easier to spot. Choose based on your route and risk tolerance.
Market Value Understanding
Monitor trader discounts every 2 hours for arbitrage opportunities. Example: M110 purchases at 34k Koens can sell for 112k Koens during favorable conditions. It's basic economics applied to virtual warfare.
Covert Ops missions unlock at level 5, providing 100k Koens per mission with 3M weekly earning potential. Track market fluctuations for electronics, ammunition, and medical supplies to optimize selling timing. Seasonal events create temporary price spikes for specific categories, enabling strategic inventory management for maximum profit.
Boss Encounters: Beginner-Safe Strategies
Which Bosses to Avoid Early
Fred controls Northridge Hotel with T4 helmet/armor and varied weapons, accompanied by multiple squad members. This requires T4+ gear and advanced coordination exceeding beginner capabilities. Kurt specializes in explosive weapons; Bernard operates as a sniper specialist requiring distance tactics.
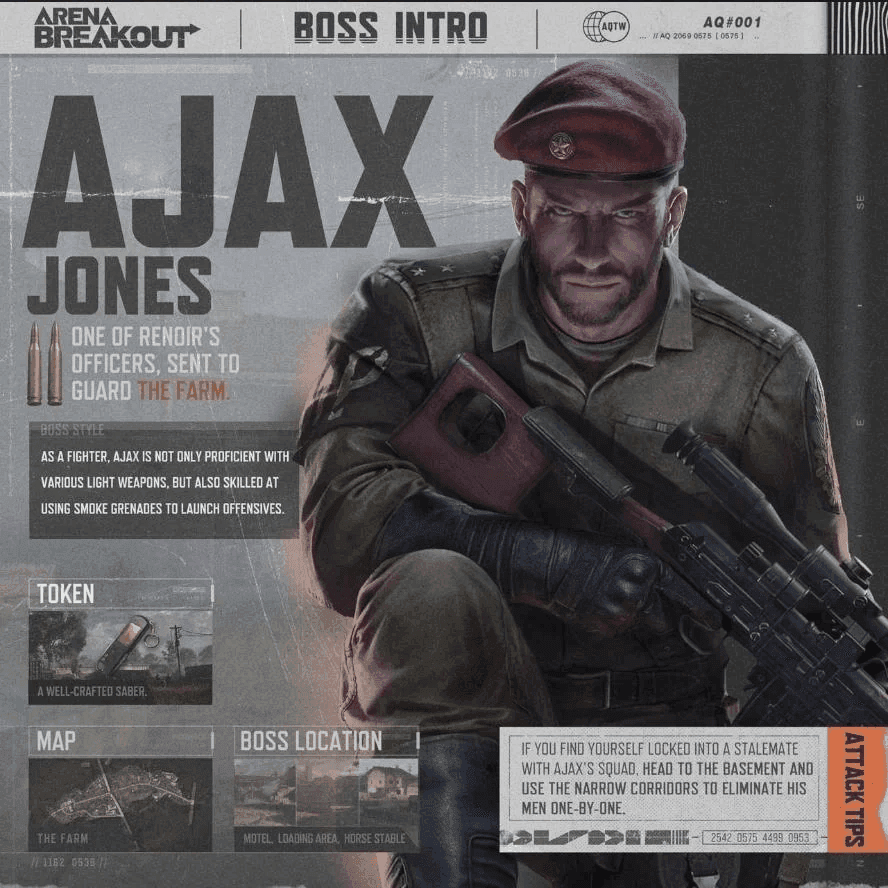
Rolf's melee specialization creates close-quarters scenarios unsuitable for new players. Focus on Ajax and Doss encounters once you're comfortable with basic mechanics and route navigation.
Safe Boss Engagement Tactics
Ajax spawns randomly at Farm Loading Area, Stables, or Motel with 5 bodyguards. Identify him by the red beret without helmet; prioritize rapid headshot elimination to prevent smoke deployment. Use suppressive fire on bodyguards from cover positions.
Doss occupies Beach Villa with 10 bodyguards wielding MP5s. Identify him by golden sunglasses; execute quick takedown using distance weapons like AK-74N. Flank with squad support and utilize flashbangs for coordinated pushes when possible.
Minimum Gear Requirements
Boss encounters require T4+ ammunition for reliable penetration – anything less is optimistic thinking. Stock 90-120 bullets for assault rifles (1x60 + 1x30 magazines + 120 spare rounds). SEK Composite Body Armor (T4, 70 durability, -5% movement penalty) provides adequate protection.
Budget alternatives include Basic Vest (T3) with Light Helmet for headshot protection. Prioritize ammunition quality over armor upgrades, allocating 60-70% of kit budget to T4+ penetration rounds. Dead players don't need expensive armor.
Resource Management: Making Every Raid Count
Budget Loadout Strategies
S-Tier weapons for 2025: FAL (250k-500k Koens, 31% PvP survival boost), MPX (88k budget to 485k premium), SJ16 (500k-1M Koens, one-shot potential to 190m). A-Tier alternatives include AK-74N (145k-200k Koens) and RPK-16 (600 RPM suppression).
The 2025 meta emphasizes FAL for medium-range engagements, MPX for close-quarters under 57m. Allocate 60-70% of your budget to ammunition like T6 M61 (714 penetration, 682.5 damage). MP5 series offers forgiving recoil with 50-round capacity for sustained firefights.
Healing Item Priorities
Budget medical loadouts: E3 Military + 2 Standard + 2 bandages for basic sustainability. Painkiller availability varies by map: Farm (4 uses), Valley (5 uses), Northridge (6-8 uses). Use Cond. variants for optimal time and durability without energy drain.
Top-tier combinations feature 100D Battlefield Medkit (400 durability) paired with Standard Military First Aid for comprehensive coverage during boss encounters and PvP situations.
Ammo Conservation Tips
T6 M61 delivers 714 penetration and 682.5 damage at 1,909 Koens per 60 rounds. T4 M80 provides 441 penetration and 850.5 damage at reduced cost. T3 AP6.3 offers 679.68 damage and 424.8 penetration for entry-level engagements.
Stock appropriate quantities: 90-120 rounds for assault rifles, 60-90 for submachine guns, 30-60 for sniper rifles. Prioritize ammunition quality over quantity against armored opponents – penetration matters more than volume.
Common Beginner Mistakes and How to Avoid Them
Overconfidence Pitfalls
Don't over-search containers during vulnerable animations. Limit searches to high-value containers with confirmed loot potential. Adapt routes based on audio cues and extraction timing rather than rigid adherence to predetermined paths.
Maintain optimal 15-20 minute raid durations to balance profit with survival probability. Late extraction rushes result from poor time management and excessive loot greed – both preventable problems.
Poor Timing Decisions
Carry primary weapon ammunition plus 50% reserve capacity with T4+ penetration. Match equipment quality to zone difficulty: Normal maps accept T3 gear; Lockdown zones require T4+ equipment.
Track survival metrics: target >30% solo survival rate, >50% team survival rate, 300k+ profit per raid. Use painkillers for enhanced mobility during tactical retreats when situations deteriorate. Budget gear usage in high-risk zones reduces survival probability significantly.
Inventory Management Errors
Establish consistent organization patterns with healing items in accessible positions and spare magazines grouped for rapid reloading. Muscle memory saves precious seconds during firefights.
Maintain strict value thresholds; discard items below 5,000 Koens per slot when discovering superior alternatives. Balance storage capacity with detection risk: medium backpacks suit most situations; large variants increase loot potential but create tactical disadvantages during stealth operations.
Building Your Skills: From Novice to Intermediate
Skill Progression Roadmap
Level progression 1-30 requires 20-30 hours with experience boosts. Focus on mission completion and survival rather than eliminations – the XP difference is substantial. Valley unlocks at Level 8, Northridge at Level 11. Covert Ops missions (Level 5) offer 100k Koens per mission with 3M weekly potential.
Battle Pass advancement through XP unlocks free items and progression rewards. Gear-based progression eliminates skill trees, focusing on equipment quality and tactical knowledge rather than character statistics. It's refreshingly straightforward.
Practice Recommendations
Offline mode enables weapon testing and muscle memory development without equipment risk. Practice recoil control, sight alignment, and movement techniques using various configurations. Secure Ops mode provides no firearm loss with low-risk map familiarization.
Team Deathmatch and Elimination modes offer respawn-based combat practice for engagement skills. These non-extraction modes focus purely on combat mechanics without loot management complications.
Community Resources
Monitor official channels for seasonal updates, balance changes, and new content announcements. Verified community wikis maintain current information on loot locations, boss spawn patterns, and extraction requirements. Join beginner-focused groups for squad formation and mentorship opportunities – the community's generally helpful to newcomers.
FAQ
Q: What's the most important tip for Arena Breakout Infinite beginners in 2025? Prioritize extraction over combat. Focus on safe routes, budget loadouts under 100k Koens, and 15-20 minute raid durations with 300k+ profit targets. Survival pays better than glory.
Q: Which map should beginners start with in Ignition Season? Farm map using western or southern spawn routes. Optimal risk-reward ratios with guaranteed safes, weapon boxes, and clear extractions while avoiding high-traffic PvP zones.
Q: What gear should new players prioritize when building loadouts? AK-74N or MPX with T4+ ammunition, B3 Universal Chest Rig, basic medical supplies, 2-3 spare magazines. Allocate 60-70% budget to ammunition quality over expensive armor.
Q: How do I know when to fight or flee during encounters? Engage only with superior positioning, T4+ ammunition, clear escape routes, and when not carrying high-value loot. Single audio cues indicate solo players; coordinated sounds suggest squads requiring retreat.
Q: What are the best loot priorities for maximizing profit? Target Mythical RED items (5,000+ Koens per slot), Legendary GOLD items like Gold Cups (270k Koens), T6 ammunition (1,909 Koens per 60 rounds), specialized keys for premium safe access.
Q: Should beginners attempt boss fights in their first raids? Avoid Fred and Ignition Season bosses initially. Focus on Ajax (Farm) and Doss (Valley) once comfortable with basic mechanics, using T4+ ammunition and maintaining safe engagement distances.


