

Understanding Airport Map Hard Reset in Season 11
The Dust to Gold event triggers a complete Airport hard reset on December 18, 2025, during a 4-6 hour maintenance window. This fundamentally alters loot tables, spawn rates, and zone configurations, creating a temporary high-value window before player traffic normalizes loot availability.
Hard resets regenerate all loot spawn points simultaneously, unlike soft resets that only refresh containers after player interaction. Your player stash, progression, and Koen reserves remain intact—your 750,000-1,250,000 Koens stay safe while the map environment refreshes completely.
For max post-reset efficiency, adequate Koen reserves are essential. Consider Arena Breakout Bonds cheap top up for S11 Airport raids through BitTopup for competitive pricing and instant delivery.
What Triggers a Hard Reset
Hard resets occur during scheduled seasonal events and major updates. S11 Dust to Gold specifically targets Airport reconfiguration, introducing experimental items:
- SCAR variant with modified damage/recoil
- AR57 with 5.56 experimental ammunition
- M110 with multi-scope compatibility
- Modular armor sets
- Advanced attachments
The reset operates server-wide, affecting all 20-player lobbies simultaneously. When maintenance concludes, every safe, weapon box, and container spawns fresh loot according to updated probability tables.
Hard Reset vs Soft Reset
Hard resets regenerate 100% of loot spawns regardless of previous player interaction. Soft resets only refresh containers that players opened. Post-hard reset, every location from Motel's 3 safes to Northridge Hotel's 8 safes contains fresh loot simultaneously. This creates a 24-48 hour window where loot density remains exceptionally high. Normal mode loot value cap of 450,000 Koens per raid remains enforced, though attachments and ammunition don't count toward this limit.
Optimal Timing
The first 6-12 hours post-reset offer maximum loot density but attract experienced players with high-tier gear. For mid-tier farming focused on survival rate optimization, enter 12-24 hours after reset to balance fresh loot against reduced PvP intensity. Weekday morning hours show decreased activity, creating ideal windows for safe runs.
Queue selection impacts reset timing access. Servers with lower population density during off-peak hours increase your chances of encountering fresh loot while minimizing hostile encounters. Monitor lobby fill times—queues under 30 seconds typically indicate lower populations suitable for safe farming.
S11 Changes to Airport Reset Mechanics
Season 11 introduces modified spawn mechanics affecting high-value locations:
- Farm area: 12 spawn points with 4 concentrated high-loot locations (Storage, Motel, Stables, South Wheatfield Hut)
- South Wheatfield Hut: Increased key spawn probability
- Small Factory: Guaranteed free safe and advanced weapons case spawn
- Gas Station: Second-floor safe with adjusted spawn rates
- Central Control: 3 safes favoring mid-tier weapons/attachments
- Set-up Area: Electronic safe with improved loot tables
Essential Pre-Run Preparation
Successful mid-tier farming requires strategic loadout planning balancing investment cost against expected returns. Target 15-20 minute cycle times with 100,000+ Koen profit margins.
Recommended Budget Loadout
Mid-tier runs demand functional equipment without excessive investment:
- Level 3 armor for adequate defense
- Reliable primary weapon with readily available ammunition
- 90-120 rounds (sufficient for 2-3 defensive engagements)
- 30-40+ slot backpack for optimal loot capacity
- Medical supplies for 2-3 combat encounters
Prioritize ammunition compatibility—weapons sharing ammo types reduce inventory complexity and weight. Crouch-walking reduces audio signatures by 60%, making stealth your primary defense over sustained firefights.
Server Selection Strategy
Server selection directly impacts loot availability and PvP encounter rates:
- Choose regions with lower player populations during your active hours
- Monitor queue times—longer queues indicate higher player density
- Target servers where local time corresponds to early morning hours (2-6 AM)
- Maintain acceptable latency (under 150ms for combat effectiveness)
Mental Preparation
Establish clear profit thresholds before entering raids:
- Define minimum acceptable returns (80,000-100,000 Koens for mid-tier runs)
- Set maximum risk tolerance for pursuing high-value items
- Develop extraction discipline with time-based triggers
- When raid timer reaches 25 minutes remaining, begin moving toward extraction regardless of current loot value
The Complete Safe Loot Route: Dust to Gold Path

The optimized route prioritizes low-heat zones with consistent mid-tier spawns, targeting 15-20 minute completion with minimal PvP exposure.
Spawn Point Selection
Spawning near Grain Trade Center provides immediate access to 2 ammo boxes while positioning you for Stables approach. Alternative spawns near Coastal Sheds enable Port route variation (1 safe, 7 weapon boxes) with Northeast or Northwest Road extraction options. Avoid spawns near Control Tower or Runway Center—high-traffic zones with poor loot-to-risk ratios.
Initial movement prioritizes sound discipline over speed. Crouch-walk through the first 200 meters, listening for other player movements and gunfire. If you detect nearby players within the first 2 minutes, rotate to alternative route segments.
Route Segment 1: Grain Trade Center to Stables
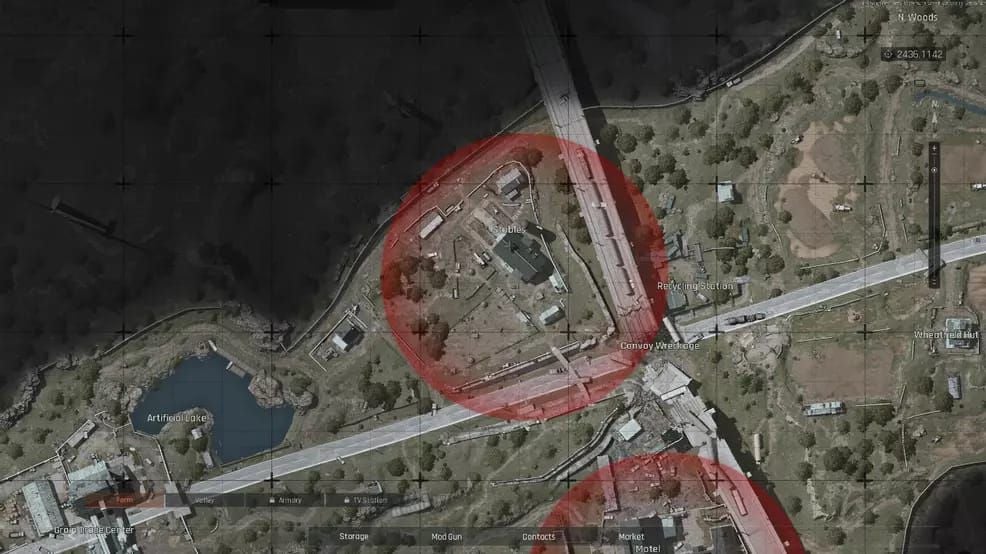
Grain Trade Center: 2 ammo boxes provide quick value with minimal exposure.
Stables: Move directly to upstairs safe—consistent mid-tier weapons or valuable attachments. Downstairs weapon box serves as secondary checkpoint. Before committing to upstairs safe, perform 30-second audio check from ground floor. Listen for footsteps, door interactions, or equipment sounds.
Route Segment 2: Motel (Primary Profit Center)

Motel contains 3 safes and multiple weapon boxes in a defensible structure. Approach from Stables side rather than main road—provides cover and reduces visibility. Systematically clear all 3 safes and weapon boxes, prioritizing high value-per-slot items.
Position yourself to monitor entry points while looting—never commit to container searches without maintaining awareness of doorways and windows. If you hear player activity, immediately cease container interaction and prepare for defensive engagement or tactical withdrawal.
Route Segment 3: Beach Villa Extension (Optional)
After Motel, route diverges based on time remaining and current loot value:
- If you've accumulated 100,000+ Koens within 12 minutes, proceed directly to Outpost or Boulder Wall extraction
- If loot value remains below target, consider Beach Villa extension (2 additional safes, 10 weapon crates)
Beach Villa requires careful approach timing. Avoid arriving during 15-20 minute raid window when most players complete primary routes. Approach from coastal side for better escape options.
Final Segment: Safe Extraction
Primary extractions: Outpost and Boulder Wall offer minimal exposure with direct paths from Motel route. These free extractions preserve profit margins.
Alternative extractions:
- Southern Blockade: Costs 2,000 Koens but provides guaranteed access
- Beach Villa Helipad: Requires 2 Dogtags (viable only after eliminating hostile players)
- Hunter's Path: Demands backpack discard (unsuitable for loot runs)
For secure Koen reserves to support S11 farming operations, online Arena Breakout Bonds recharge for Dust to Gold season through BitTopup ensures you maintain adequate reserves for paid extractions.
Avoiding High-Risk Zones and PvP Encounters
Control Tower: Avoid During Early Reset
Control Tower attracts aggressive players seeking PvP and high-tier loot. The vertical structure creates complex combat scenarios favoring experienced players. The 3 safes in Central Control sit within high-traffic zones—players monitoring approaches can easily ambush farmers.
Runway Center: High-Traffic PvP Hotspot
Runway Center's open terrain eliminates cover, creating ideal conditions for long-range engagements. Players with scoped weapons can engage from 100+ meters while you lack effective counter-engagement options.
When crossing is unavoidable, move during early raid timing (first 5 minutes) or late timing (after 30 minutes). Never cross during 15-25 minute window when player traffic peaks.
Sound Management
Audio discipline separates successful farmers from frequent casualties:
- Crouch-walking's 60% audio reduction creates detection range advantages
- Players moving at normal speed audible from 40+ meters
- Your crouch-walk remains undetectable beyond 15 meters
- Container interaction generates distinct audio cues
- Before opening containers, ensure 30-meter radius remains clear
When to Abandon Route
Establish extraction triggers to prevent greed-based deaths:
- If you accumulate 120,000+ Koens before route midpoint, consider immediate extraction
- Combat encounters should trigger immediate extraction consideration
- Assume other players heard gunfire and are converging on your position
- Extract using nearest available exit rather than continuing route
Mid-Tier Gear Priority List for Season 11
Most Valuable Mid-Tier Weapons and Attachments

Weapons:
- SCAR variant (modified damage characteristics)
- AR57 with experimental 5.56 ammunition
- M110 with multi-scope compatibility
Attachments (better value-per-slot than complete weapons):
- Suppressors: 8,000-15,000 Koens, 1-2 slots
- Advanced optics: 8,000-15,000 Koens, 1-2 slots
- Ergonomic upgrades: 8,000-15,000 Koens, 1-2 slots
Armor and Helmet Tier Prioritization
Modular armor sets: Complete sets command premium prices vs individual pieces. Level 4 armor pieces represent sweet spot—sufficient value without extreme rarity.
Helmets: Prioritize items with face shield compatibility. Generally provide poor value-per-slot vs weapons and armor—only collect when inventory space permits.
Medical Supplies Worth-Per-Slot
- Trauma kits: 4,000-6,000 Koens per slot
- Surgical kits: 4,000-6,000 Koens per slot
- Basic bandages/painkillers: Rarely justify inventory allocation
- Blood bags/specialized trauma equipment: Always take priority
Barter Items with High Vendor Value
S11 preparation emphasizes precious metals, advanced components, and rare alloys:
- Precious metals: 5,000-8,000 Koens per slot
- Components for SCAR variants, AR57 builds, M110 modifications show elevated demand
- Prioritize components with multiple recipe applications
Inventory Management for Maximum Profit
Value-to-Weight Ratio Framework
Establish minimum value-per-slot thresholds:
- 30-slot backpacks on 15-minute routes: 3,000 Koens per slot minimum (achieves 90,000+ Koen extraction)
- 40+ slot backpacks: 2,500 Koens per slot minimum
Calculate value-per-slot by dividing item vendor price by slot occupation. Example: 20,000 Koen weapon in 6 slots = 3,333 Koens per slot vs 12,000 Koen attachment in 2 slots = 6,000 Koens per slot.
When to Drop Low-Tier Items
Dynamic inventory management requires willingness to discard previously collected items when superior options appear. If you collected 3,000 Koens per slot items early and later encounter 5,000+ Koens per slot items, immediately drop lower-value items.
This upgrading process should occur continuously throughout your route. Never retain sentimental attachment—purely value-based decisions optimize long-term profit.
Container Searching Efficiency
Container searching speed impacts route completion times and PvP exposure:
- Develop systematic visual scanning patterns identifying high-value items within 2-3 seconds
- Prioritize scanning for weapons, armor, attachments before consumables
- Practice rapid item evaluation by familiarizing yourself with visual appearance of high-value items
- Reduce container interaction time from 8-10 seconds to 3-4 seconds
Backpack Space Optimization
Maintain dedicated spaces for specific item categories:
- Weapons: Top rows
- Attachments: Middle sections
- Consumables: Bottom areas
Reserve 4-6 slots for opportunistic high-value finds during extraction movement. This buffer prevents scenarios where you encounter exceptional items while moving to extraction but lack space.
Extraction Strategy and Emergency Protocols
Safest Extraction Points
Outpost and Boulder Wall: Serve Grain Trade Center-Stables-Motel route with minimal exposure. Free extractions with multiple approach vectors. Approach from varied angles across different runs.
Northeast and Northwest Road: Support Coastal Sheds-Port route variation. Lower player traffic than central map exits.
Reading Extraction Zone Activity
Never commit to extraction without reconnaissance:
- Position yourself 50-80 meters from extraction points
- Spend 30-45 seconds observing for player activity
- Watch for movement, listen for footsteps/equipment sounds
- Scan for players in overwatch positions
If you detect player activity near primary extraction, rotate to alternative exits.
Emergency Extraction When Compromised
When player contact occurs near extraction zones:
- Assess whether engagement or evasion offers better survival probability
- If you hold superior positioning and player appears unaware, consider defensive engagement
- If player holds advantages or you're uncertain of additional hostile presence, evade toward alternative extractions
- Execute pre-planned fallback routes immediately—hesitation creates vulnerability
Post-Extraction: Evaluating Success Metrics
Track key performance metrics across multiple runs:
- Completion time
- Extraction value
- PvP encounters
- Survival outcome
After 10-15 runs, analyze patterns to identify which route segments provide best returns. Calculate effective hourly rate by dividing total extracted value by total time invested (including failed raids). Mid-tier farming should consistently achieve 100,000+ Koens per hour.
Advanced Tips for Consistent Success
Time-of-Day Server Population Patterns
Server populations fluctuate predictably:
- Peak hours (6-10 PM local): High-competition, unsuitable for safe farming
- Off-peak windows (2-6 AM, 10 AM-2 PM weekdays): Optimal conditions with reduced player counts
Track your success rates across different time windows to identify personal optimal farming periods.
Recognizing Looted vs Fresh Areas
Visual cues for looted areas:
- Open container lids
- Disturbed item positions
- Missing high-value spawns
Fresh areas show:
- Closed containers
- Undisturbed environments
- Consistent presence of mid-tier items
Check 2-3 key containers immediately upon entering new zones. If indicator containers show signs of looting, bypass remaining containers and move to alternative zones.
Solo vs Duo Route Adjustments
Solo farming: Prioritizes stealth and PvP avoidance, favoring perimeter routes with multiple escape options.
Duo farming: Enables more aggressive route selection, accessing higher-value interior locations with one player providing security while the other loots. However, duo farming splits profits and requires coordination.
Tracking Success Rate and Profit
Maintain detailed records:
- Date, route, completion time, extraction value, survival outcome
- After 50+ raids, statistical patterns emerge
Primary metrics:
- Survival rate (below 70% indicates excessive risk-taking)
- Average extraction value (below 90,000 Koens suggests optimization opportunities)
- Effective hourly rate (below 100,000 Koens signals need for comprehensive strategy review)
Common Mistakes to Avoid
Overextending into High-Risk Zones
Most common fatal mistake: pursuing marginal additional loot in high-risk zones after accumulating solid profits. Players with 100,000+ Koens who push into Control Tower or Runway Center for potential 20,000-30,000 Koen gains create asymmetric risk scenarios.
Establish firm extraction triggers based on accumulated value. If you reach 120,000 Koens before completing planned route, extract immediately.
Ignoring Audio Cues
Tunnel vision during looting creates vulnerability. Develop habits of pausing container interaction every 8-10 seconds to listen for environmental sounds.
Gunfire intelligence:
- Distant gunfire (200+ meters): General player presence without immediate threat
- Close gunfire (under 100 meters): Trigger immediate heightened alertness and potential route adjustment
Poor Loadout Insurance Decisions
Over-insuring budget loadouts reduces profit margins. Under-insuring valuable loadouts creates excessive loss exposure.
Insurance strategy:
- Loadouts under 40,000 Koens: Don't justify insurance costs
- Loadouts exceeding 80,000 Koens: Warrant insurance consideration
- Koen reserves below 500,000: Insurance becomes more valuable
- Koen reserves 1,000,000+: Can typically self-insure
Greed-Based Deaths
Players who remain in raids past 30 minutes seeking additional loot create unnecessary exposure. Extended raids rarely generate proportional additional value compared to starting fresh raids.
Develop strict time-based extraction discipline: When raid timers reach 25 minutes remaining, begin extraction movement regardless of current loot value or remaining route segments.
Frequently Asked Questions
What is a hard reset in Arena Breakout Airport map? A hard reset completely regenerates all loot tables, spawn rates, and zone configurations simultaneously. S11 Dust to Gold triggers this on December 18, 2025, during a 4-6 hour maintenance window, creating fresh loot spawns at all locations.
What are the safest loot routes after reset? Grain Trade Center (2 ammo boxes) → Stables upstairs safe → Motel (3 safes, weapon boxes) → Outpost/Boulder Wall extraction. Completes in 15-20 minutes with minimal PvP exposure. Alternative: Coastal Sheds → Port (1 safe, 7 weapon boxes) → Northeast/Northwest Road extraction.
How long does a safe Airport loot run take? 15-20 minutes from spawn to extraction, yielding 100,000+ Koens per successful run. Faster completion (under 15 minutes) indicates missed opportunities. Slower timing (over 25 minutes) creates unnecessary PvP exposure risk.
What mid-tier gear spawns in Airport Terminal after reset? SCAR variants, AR57 with experimental ammunition, M110 rifles with multi-scope compatibility, modular armor sets, advanced attachments, and weapon components. Normal mode loot value cap of 450,000 Koens applies (attachments and ammunition don't count toward limit).
Where are the best extraction points? Outpost and Boulder Wall (free extractions for Grain Trade Center, Stables, Motel routes). Northeast and Northwest Road (coastal routes with lower player traffic). Southern Blockade (2,000 Koens, guaranteed access). Beach Villa Helipad (requires 2 Dogtags).
How to avoid PvP in Airport during S11? Crouch-walk for 60% audio reduction, avoid Control Tower and Runway Center, farm during off-peak hours (2-6 AM, 10 AM-2 PM weekdays). Maintain constant audio awareness, establish firm extraction triggers at 120,000 Koens or 25 minutes remaining. Never force contested extractions.
Ready to dominate Airport map in Season 11? Stock up on Koen and essential supplies through BitTopup for the best rates and instant delivery. Gear up smarter and loot harder with BitTopup – your trusted Arena Breakout resource partner. Visit BitTopup now and get back in the game faster!


