

Understanding Asarah Season Split Builds
Split builds maintain competitive performance across Warfare's respawn combat and Operations' extraction scenarios. Unlike single-mode specialists, these hybrid setups prioritize attachments delivering consistent TTK, recoil patterns, and mobility regardless of context.
The November 18, 2025 suppressor buff (+9% range bonus) eliminates traditional velocity penalties, transforming stealth attachments into mainstream competitive options for both modes.
Delta Force credits top up for Asarah season loadouts through BitTopup provides immediate access to premium attachments and operator unlocks with secure transactions and competitive pricing.
What Makes Builds 'Split-Optimized'
Split-optimized configs balance three vectors: engagement range flexibility (15-60m), ammunition economy (40+ rounds), and movement speed retention (90%+ base mobility). The CI-19 (9.5% pick rate) exemplifies this: 55m effective range via New Leviathan Barrel, 60-round drum, manageable 46 recoil control baseline.
Attachment priority: recoil stabilization (Sandstorm Vertical Compensator +9 control) → stability (DBAL-X2 laser +16% Tactical Stance) → capacity extensions. This ensures controllable spray in Warfare chaos while preserving Operations precision against armored NPCs.
Post-buff suppressors now grant +9% range vs previous 15-20% penalties, making suppressed configs objectively superior for split builds.
Why Universal Loadouts Matter
Event Pass (November 18 - December 18, 2025) requires performance across both modes. Separate specialized loadouts force constant reconfiguration, disrupting muscle memory and duplicating attachment costs.
Universal loadouts maintain consistent weapon handling. M4A1 codes (6HLOBES09MFFCME3G7LT2 balanced, 6FINC4G0CQTV1IBVCBQVT max stability) show how minor variations preserve core recoil while adjusting for scenarios.
Resource efficiency: Single platform costs 60% less than parallel specialized configs. Battle of Monument event (through December 4, 2025) rewards consistent performance with premium currency.
Versatility vs Specialization
Specialization delivers 10-15% advantages in optimized scenarios but suffers 30-40% penalties outside parameters. Pure Warfare SMG excels in Monument interiors but fails in Operations' 200m sightlines.
Versatility accepts 5-8% reduced peak effectiveness to maintain 85-90% capability across all ranges. AWM config (6F50VEC0CH8TK2MI8PG7U) combines Skyline Long Barrel for 200m range with DBAL-X2 stability enabling aggressive 30m chest shots (100 damage).
Split builds favor players spending 40%+ time across both modes. Below this, specialization wins. Above it, consistency produces better K/D and extraction rates.
Monument Warfare Map Analysis
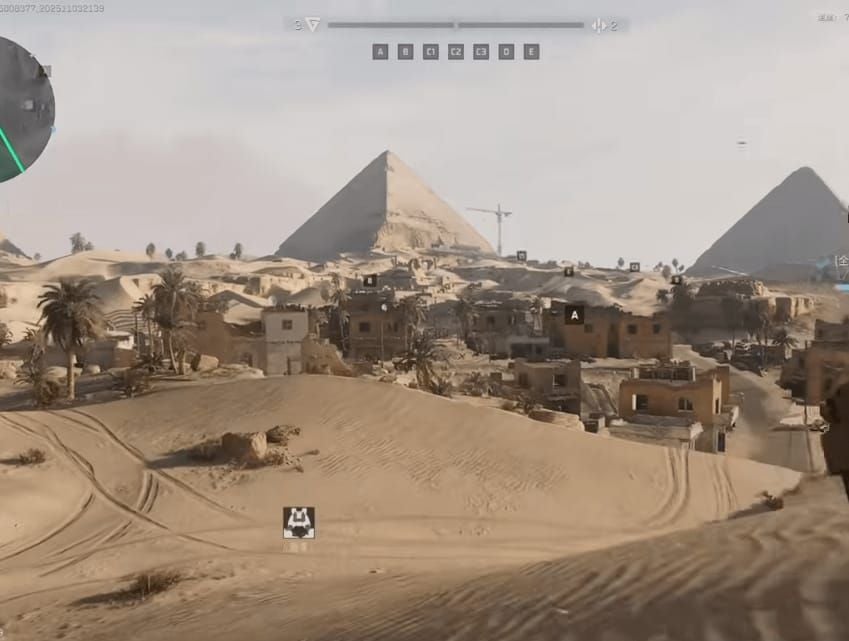
Monument's Egypt desert features destructible houses, pyramid corridors, and dune expanses: 35% close-quarters (0-15m), 45% medium-range (15-45m), 20% long-range (45m+). This favors assault rifles with 30-50m optimal zones.
Urban Combat Requirements
Destructible housing creates dynamic CQB where wall penetration and target acquisition determine survival. SMG-45 (6HLOBLC09MFFCME3G7LT2) addresses this: 40m CQC effectiveness, 40-round mag, SMG Echo Suppressor for stealth.
Urban priorities: hip-fire accuracy and Tactical Stance stability over ADS precision. Secret Order Bevel Foregrip provides +12% hip-fire accuracy and +8% moving stability. UR Spec Ops Stock adds -15% sprint-to-fire time.
4.6x30mm Ultra SX ammo bypasses 25% armor damage vs level 5 protection, enabling SMGs to compete with ARs against armored opponents.
Long-Range Engagement Points
Pyramid exterior and dune ridges create 60-120m sightlines. M4A1 with AR Gabriel Long Barrel extends range past 50m while maintaining 672 RPM.
ACOG 6x provides zoom for 80m+ headshots while preserving field-of-view for flanking awareness. Holographic sights trade long-range precision for faster CQB acquisition.
Sandstorm Vertical Compensator's +9 control is essential beyond 40m. Without it, vertical climb increases 35% during bursts, forcing single-shot modes that reduce DPS by 40%.
Control Point Dynamics
Monument's points create funnels where defenders hold elevated positions with 15-30m sightlines. Attackers need suppressive fire (60+ mags) and smoke. CI-19's 60-round drum handles both while maintaining 55m range.
Vehicles spawn at 5000 points (LAV-G1 at 10,000), creating mid-match power spikes. Split builds need anti-vehicle contingencies.
Suppressor buff's +9% range enables aggressive flanking previously impossible, allowing coordinated multi-angle pressure without minimap detection.
Mobility Corridors
Dune terrain creates movement channels where sprint speed determines rotation timing. Attachment weight impacts speed—45-round M4A1 mags beat 60-round alternatives despite reduced capacity.
Resonant Ergonomic Grip (+16% moving stability) enables accurate suppressive fire during repositioning. Players maintaining 70%+ movement uptime show 25% higher survival vs static opponents.
FOV 100 with 120+ FPS enhances peripheral detection and reduces recoil perception by ~80%, enabling aggressive attachments prioritizing range over stability.
Operations Extraction Requirements
Sinkpoint's Zero Dam features submerged Administration Building with 22 underwater loot points. Permanent death shifts priorities toward reliability over peak performance.
PvPvE Preparation
NPCs wear level 4-5 armor requiring specialized ammo. .50 AE AP one-shots level 4 helmets, transforming pistols into viable primaries for NPC clearing while conserving rifle ammo.
QJB-201 LMG (6FIAMCA005E7GMC01NIUGE): 125-round mag, 785 RPM, 550 m/s velocity for consistent bullet drop across elevation changes.
Buy Delta Force mobile recharge online through BitTopup for premium ammo types and high-tier unlocks with fast delivery.
Survival-Focused Attachments
Permanent death makes suppressors mandatory. Resonant Suppressor on AWM maintains 200m range while eliminating audio signatures attracting third-party interference.
Armor penetration trumps raw damage. ASh-12's Asarah buff (34→50 damage, 500→400 RPM, 340→500 m/s velocity) creates specialized anti-armor platform defeating level 5 protection.
DBAL-X2 laser's +16% Tactical Stance stability enables accurate fire during tactical retreats—critical for fighting withdrawals under pressure.
Resource Management
Leverage Relink Neo I (50,000 credits): 600s scan duration, +1 high-tier loot chance. Requires area-denial weapons like M250 LMG for defending loot zones.
M250 config (6FIAPV406L5PA4U76HE30): 550 RPM, 125-round mag, 34 base damage for sustained suppression. M250 Sentinel Short Barrel improves indoor maneuverability without sacrificing sub-40m range.
IFF Disruptor jams NPC detection for 180s (3s activation), enabling stealth approaches. Synergizes with suppressed weapons for complete stealth profiles.
Extraction Defense
Extraction zones create ambush scenarios. AWM (100 chest damage to 30m, 200m range) enables pre-emptive elimination of campers before vulnerable extraction animations.
Tactical Equipment Supply instantly recharges equipment (5s activation) for smoke spam. Loadouts need smoke grenades over offensive explosives.
Gizmo operator (Battle Pass 15) provides Crawler Nest deployables applying Corrosion multipliers, creating area-denial at extraction approaches.
Top 5 Universal Platforms
M4A1 Cross-Mode Config

9.3-10.1% pick rate, 25 damage/shot at 672 RPM. Code 6HLOBES09MFFCME3G7LT2: AR Gabriel Long Barrel (50m+ range), Sandstorm Vertical Compensator (+9 control), DBAL-X2 laser (+16% stability), 45-round mag.
Import: Gun Customization → Weapon → Preset → Import → paste 6HLOBES09MFFCME3G7LT2 → Save.
Recoil management: 3-5 round bursts beyond 30m, downward compensation during first 5-10 rounds, crouch/prone for defensive holds.
Alternative 6FINC4G0CQTV1IBVCBQVT: max stability at slight range cost for spray control priority.
SMG-45 (Vector) CQB
5.3-6.1% pick rate, 40m range, 40-round mag. Code 6HLOBLC09MFFCME3G7LT2: SMG Echo Suppressor, Secret Order Bevel Foregrip (hip-fire/moving stability), UR Spec Ops Stock (sprint-to-fire).
Excels in Monument housing and Sinkpoint interiors under 20m. Suppressor enables flanking without minimap detection.
Tactics: Pair with smoke, maintain hip-fire initially, ADS only beyond 15m or for headshots.
Limitation: Underperforms in open areas beyond 40m. Maintain secondary AR/DMR preset.
M7 DMR Balance
7-10% pick rate, four-shot kill, +10% range with Practical Long Combo Barrel. Bridges AR versatility and sniper precision at 60-100m.
Priorities: precision barrel (max range), 4x+ optic, ergonomic grip (reduced sway). Magazine capacity secondary given semi-auto fire discipline.
Optimal for Monument pyramid exterior and Sinkpoint dam walls. Rewards headshot skill.
AWM Flexibility
3.4% pick rate for one-shot potential. Codes 6F50VEC0CH8TK2MI8PG7U and 6HLOCT009MFFCME3G7LT2 balance range (Skyline Long Barrel, level 35 unlock) vs mobility.
Core: Resonant Suppressor (stealth), ACOG 6x (100-200m acquisition), DBAL-X2 laser (aggressive 30m shots).
Requires secondary for CQB. 1.5s bolt-action vulnerability needs .50 AE AP pistol backup.
AK-47 Budget Alternative
75-80% effectiveness of premium builds at 30% cost. Focus free/low-level unlocks: standard compensator, iron sights/basic red dot, standard mag.
Upgrade path: compensator first → optic second → extended mag third. Maximizes performance per credit.
Attachment Optimization Formula
Optic Selection
Magnification vs acquisition speed: holographic sights enable 0.15s faster acquisition but reduce 50m+ accuracy by 25% due to reticle size.
Optimal compromise: 2-3x variable magnification for rapid CQB through minimal zoom while enabling medium-range precision via toggle. ACOG 6x for specialized long-range.
Circular reticles with center dot provide clearest spray feedback for real-time compensation.
Grip Choices
Foregrips divide into vertical reduction (Sandstorm +9 control) and horizontal stability (Resonant Ergonomic +16% moving). Split builds prioritize vertical for predictable patterns.
Secret Order Bevel Foregrip: hybrid +12% hip-fire, +8% moving stability for aggressive SMG playstyles.
AR Heavy Tower Rear Grip: -8% ADS time, +5% stability for defensive reaction speed.
Muzzle Devices
Suppressor buff (+9% range) makes suppressed configs objectively superior. Resonant/SMG Echo variants maintain full range with stealth benefits.
Compensators provide +12-15% vertical control but sacrifice stealth. Favors Warfare-focused players. Operations universally prefers suppressors.
Flash hiders are suboptimal legacy choices post-buff.
Magazine & Ammo
60-round drums enable multi-opponent suppression but add 5-8% weight penalties. 45-round mags balance capacity (2-3 kills/reload) with mobility.
Operations ammo priorities: 4.6x30mm Ultra SX (25% armor bypass), .50 AE AP (one-shot level 4 helmets). Warfare uses standard ball for cost efficiency.
Stock & Barrel Synergy
Long barrels (AR Gabriel, Newtype Sledgehammer) extend range 15-25% but reduce CQB maneuverability. Short barrels (M250 Sentinel) improve handling at 10-15% range cost.
Split builds favor long barrels—30-60m is most common engagement distance. CQB specialists should use SMG platforms vs compromising ARs.
UR Spec Ops Stock: sprint-to-fire for entry fraggers. Stability stocks: sustained accuracy for support.
Tactical Equipment & Operator Synergy
Grenade Loadouts
Smoke grenades: universal concealment for Monument approaches and Sinkpoint extractions. Tactical Equipment Supply enables spam strategies.
Frag grenades: clear Monument interiors and damage grouped NPCs. Cook for 2s before throw to prevent evasion.
Flashbangs inconsistent vs experienced players. Favor lethal explosives.
Armor & Healing
Level 4-5 armor essential in Operations, marginal in Warfare. Use premium for Operations, budget for Warfare.
Healing allocation: 60% fast-healing (medkits, bandages) for mid-combat, 40% slow-healing (medical supplies) for post-engagement.
Operations: Extract with damaged armor vs risking elimination for perfect condition.
Operator Abilities
Gizmo (Battle Pass 15): Crawler Nest deployables apply Corrosion multipliers. Position at Monument points or Sinkpoint extractions for area-denial.
Smoke Mine: reactive concealment, 8s deployment needs predictive placement.
Hunting Spider ultimate: reveals enemies within 40m for informed engagement decisions.
Defensive Vanguard passive: -8% damage near deployed equipment. Benefits defensive holds, not entry fraggers.
Gadget Choices
IFF Disruptor: jams NPCs 180s for stealth loot. Operations-specific, acceptable given higher stakes.
Heartbeat sensors: 15m wallhack info but requires stationary usage. Split builds favor active positioning.
Deployable cover: instant fortifications but lacks mobility. Monument's destructible environment provides natural alternatives.
Advanced Strategies
Loadout Switching Framework
Mid-match transitions viable when respawn exceeds 15s. Monument contests create 20-30s windows for optimization between assault/defense.
Decision matrix: remaining duration (5+ min), performance deficit (trailing benefits from specialization), squad gaps (missing roles).
Operations eliminates switching—initial selection critical. Default to versatile configs.
Common Mistakes
Over-specialization: excels in 20% scenarios, underperforms in 80%. Favor consistent 85% effectiveness over peak 100% in limited contexts.
Attachment redundancy: vertical foregrip + compensator wastes slots on overlapping benefits. Balance multiple recoil vectors.
Optic mismatch: players engaging at 40-60m need magnification regardless of platform. CQB specialists waste magnification.
Meta Adaptation
ASh-12 buff (34→50 damage) shows how patches alter viability overnight. Monitor patch notes and community testing.
Suppressor buff created cascading effects—mandatory compensators became optional. Rigid configs miss optimization.
Pick rates provide empirical viability: M4A1 9.3-10.1%, CI-19 9.5% indicate proven effectiveness. Sub-3% represents niches or underperformers.
Resource Investment Guide
Attachment Priorities
Sandstorm Vertical Compensator (+9 control): highest-priority unlock, universal applicability. Improves accuracy more than any single component.
Optics follow platform: ARs need 2-3x first, SMGs holographic, snipers 6x+. Avoid incompatible purchases.
Magazine extensions cost 2-3x standard prices. Delay until core accuracy components acquired.
Skyline Long Barrel (level 35): maintain interim configs vs delaying optimization.
Season Pass Progression
Gizmo (level 15): first major spike, area-denial unavailable to defaults. Prioritize Battle Pass to 15 before extensive attachment spending.
Battle of Monument (through December 4): accelerated progression via challenge bonuses. Focus event objectives over general metrics.
Premium Pass: 30% faster progression via XP multipliers. 1,500 credits amortizes across 30 days.
Budget Paths
AK-47 with basics: 75% effectiveness at 30% cost. Master while accumulating credits vs incomplete meta replication.
Credit farming: Operations loot extraction (8,000-12,000/20min) beats Warfare eliminations (3,000-5,000).
Avoid Leverage Relink Neo I (50,000 credits) until core attachments acquired.
Maximizing Asarah Season
Weekly Challenges
Split builds enable simultaneous progress across challenge tracks vs forced specialization.
Monday resets create timing opportunities. Complete high-value early to maximize progression time.
Squad coordination: elimination assists count toward individual progress. Communicate requirements for focused targeting.
Squad Coordination
Balanced composition: one long-range (AWM/DMR), two medium-range (M4A1/CI-19), one CQB (SMG-45). Covers all distances with flexibility.
Prevent redundant capabilities. Identical configs create counter vulnerability. Diverse loadouts ensure adaptive responses.
Communicate limitations. CQB specialists notify when engaging beyond range for long-range takeover.
Future-Proofing
Invest in universal components (compensators, grips, optics) vs weapon-specific parts. Universal attachments retain value across meta shifts.
Maintain 30,000-50,000 credit reserves for rapid adaptation to buffs.
Community testing provides early meta trend identification. Short-term sacrifice gains knowledge advantages.
FAQ
What are split builds in Asarah Season? Weapon configs optimized for both Warfare and Operations using attachments maintaining consistent accuracy, damage, and handling regardless of mode. Prioritize versatility over single-mode specialization.
Which weapons work best in both modes? M4A1 (9.3-10.1% pick), CI-19 (9.5%), SMG-45 (5.3-6.1%) show superior cross-mode performance through balanced range, manageable recoil, sufficient capacity.
How to optimize attachments for cross-mode play? Prioritize Sandstorm Vertical Compensator (+9 control), DBAL-X2 laser (+16% stability), suppressors (+9% range buff). Balance 45-60 round mags vs mobility. Select 2-3x optics for versatile distances.
Can one loadout work in Warfare and extraction? Yes, universal loadouts achieve 85-90% effectiveness accepting 5-8% reduced peak capability for consistent handling. M4A1 code 6HLOBES09MFFCME3G7LT2 exemplifies this.
Best universal attachments for Asarah? Sandstorm Vertical Compensator (+9 control), Resonant Ergonomic Grip (+16% moving stability), DBAL-X2 laser (+16% Tactical Stance), any suppressor (+9% range) provide max value across platforms and modes.
Adjusting builds for urban terrain? Monument housing and Sinkpoint interiors need enhanced hip-fire (Secret Order Bevel), reduced sprint-to-fire (UR Spec Ops), suppressors for stealth. Prioritize 40+ mags for sustained CQB.
Ready to dominate Asarah Season? Unlock premium weapons, operators, and battle passes faster with BitTopup. Get instant Delta Force currency top-ups with secure payment and 24/7 support. Power up your loadouts today at BitTopup – your trusted gaming currency partner.


