

Understanding Covert Ops Mode: Zero-Risk Farming
Covert Ops unlocks at level 5 and changes Arena Breakout's risk equation. Unlike standard raids where death means losing everything, Covert Ops provides random Imposter loadouts at 20k per match. Gear loss comes from provided loadouts, not your stash.
NPCs don't shoot Imposter players, letting you navigate Northridge's 40-minute raids with reduced threat. Primary dangers: ~20 other players and time limits. Focusing on bot farming over PvP minimizes confrontation risks.
Players needing consistent access can arena breakout bonds top up through BitTopup's secure platform.
Key Differences from Standard Raids
Standard raids require your own weapons, armor, medical supplies, backpacks—all lost on death. Covert Ops eliminates equipment risk by providing everything needed.
Imposter status grants major advantages. Scavengers and regular NPCs ignore you unless you engage Militants. This allows selective engagement against bot types most likely carrying Tier 4 ammo.
Missions yield 100,000 Koen each, creating dual income: mission rewards plus looted items. This makes Covert Ops substantially more profitable than standard raids.
Why Covert Ops Excels for Tier 4 Ammo Farming
Northridge unlocks at Level 11 and becomes the premier Tier 4 farming location. Consistent bot spawns carry valuable ammunition, attachments, armor generating 25-60K per run. Risk-free nature allows infinite repetition without depleting personal reserves.
Bot enemies include scavengers and boss Frade Lee (T4 armor, spawns at Hotel/Campus Services/Cable Car Station). Frade drops wedding ring token plus premium loot. Regular bots carry level 3 armor selling for 18-20K at max durability.
Predictable bot AI patterns make engagements far more controllable than PvP. Bots follow patrol routes, respond consistently, lack human unpredictability—transforming Tier 4 farming into systematic profit operation.
Limitations and Advantages
40-minute time limit creates urgency but provides ample time for thorough bot farming. 20k entry cost requires positive margins—successful 25-60K runs easily cover this. Prepare 5 magazines (4 spares + 1 loaded) for multiple engagements.
Lockdown mode significantly increases difficulty with tier-4 armor foes and P90 guards. Lockdown Frade uses T5 ammo in SVD/AR-30. Standard Covert Ops provides optimal balance between loot quality and difficulty.
Tier 4 Ammunition: Value and Applications
Tier 4 ammo balances accessibility and performance. Unlike rare Tier 5, Tier 4 drops frequently enough for systematic farming while maintaining sufficient armor penetration for most PvP.
Complete Tier 4 Types and Penetration Stats

Tier 4 encompasses multiple calibers: 5.56x45mm, 7.62x39mm, 5.45x39mm variants. Each offers distinct penetration against various armor levels.
Prioritize ammo matching your preferred weapons. M4A1 users focus on 5.56x45mm Tier 4. AK-74 users target 5.45x39mm. This prevents wasting backpack space on unusable calibers.
Tier 4 penetration becomes critical against armored opponents. While Tier 2-3 struggles against level 4+ armor, Tier 4 reliably damages protected targets.
Market Value
Tier 4 maintains strong demand as the practical PvP choice. Players who can't afford constant Tier 5 but need reliable penetration create steady buyer demand.
Value-to-weight ratio makes it ideal for Covert Ops farming. Full magazines occupy minimal space while commanding significant Koen. Compared to bulky armor/weapons, ammunition maximizes profit per backpack slot.
Farming also builds personal stockpiles. Every extracted round saves future purchase costs—dual benefit of immediate sale profits or personal use savings.
Best Use Cases by Type
5.56x45mm Tier 4: High-velocity rifle rounds excel at medium-to-long ranges. Flatter trajectory and sustained energy deliver reliable hits on distant targets.
7.62x39mm Tier 4: Superior stopping power at close-to-medium ranges. Heavier projectile delivers more kinetic energy, effective in building combat within 50 meters.
5.45x39mm Tier 4: Excellent controllability in full-auto. Reduced recoil allows sustained accurate fire, valuable for suppressive tactics or engaging multiple targets.
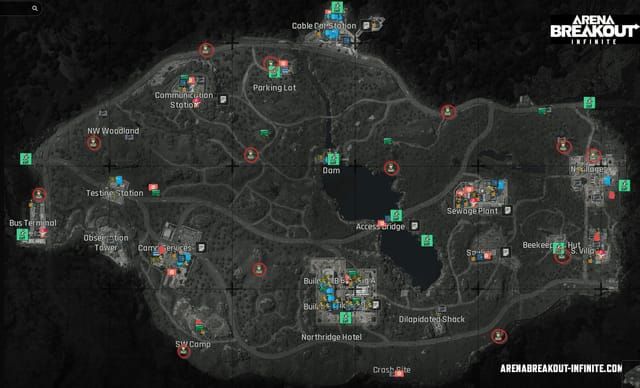
Northridge Map Overview
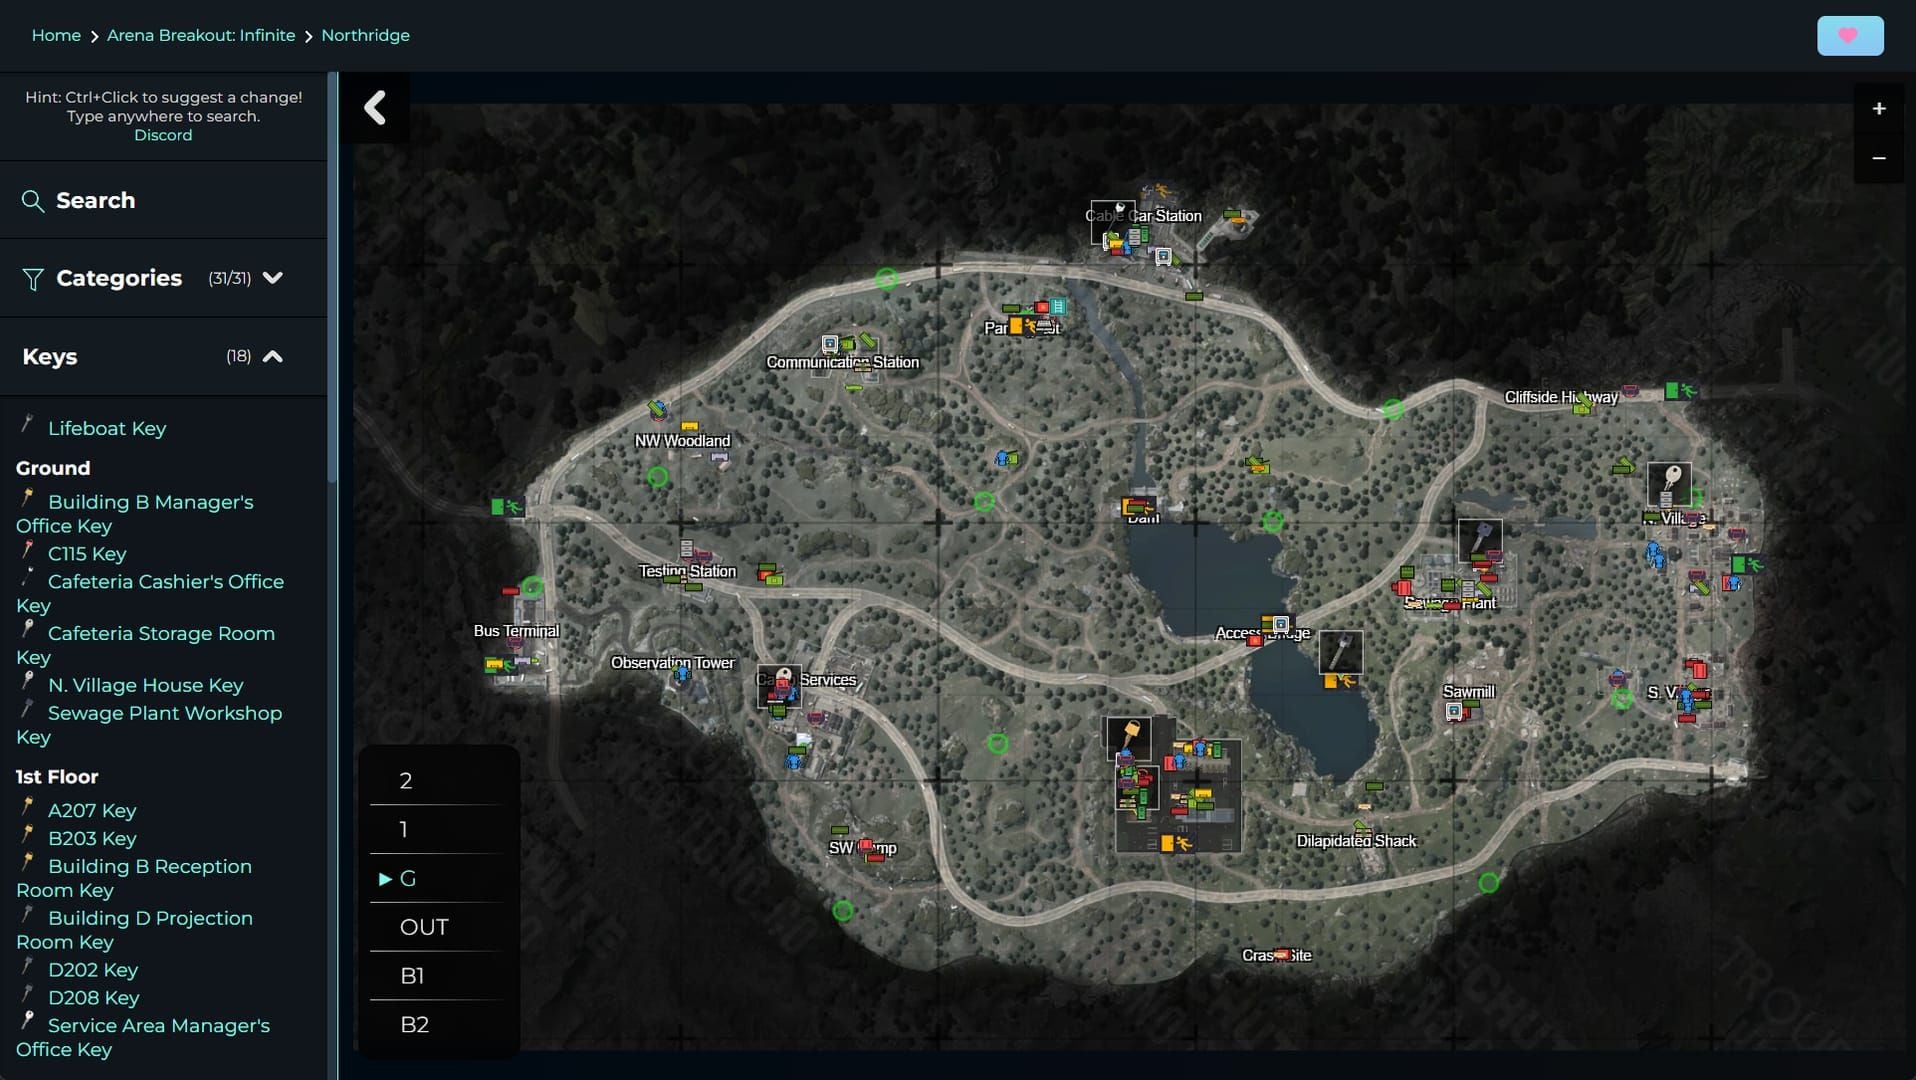
Northridge's design creates optimal bot farming conditions. Layout concentrates bot spawns in predictable locations with multiple navigation routes for controlled engagements.
40-minute duration gives substantial time to clear multiple zones, collect loot, reach extraction without rushing.
Layout and Key Landmarks
Northridge Hotel: Central landmark with 8 safes. Vertical structure with multiple entries creates tactical complexity but concentrates bot spawns. Frade Lee frequently spawns here.
Campus Services: 2 safes, consistent bot presence. Compact layout allows faster clearing. Good access to multiple extractions supports flexible exit strategies.
Cable Car Station: Third major Frade spawn location. Open approaches require cautious movement but concentrated spawns reward aggressive clearing.
Bot Density and Spawn Mechanics
Bots spawn at raid start, maintain presence throughout 40 minutes. Killed bots don't respawn—early aggressive farming maximizes looting time before other players eliminate targets.
Spawns cluster around key landmarks rather than distributing evenly. Efficient routes connecting high-density areas yield more encounters per minute.
~20 players per raid create competition. Popular routes see heavier traffic, increasing PvP risk. Alternative routes help avoid confrontations while maintaining access to profitable zones.
Northridge vs Other Maps
Northridge bots consistently include Tier 4 ammo at higher rates than alternatives. Superior gear on average makes each kill more likely to yield valuable ammunition.
Extraction options provide flexibility:
- Dam Sluice Gate: Activate via 2nd floor panel
- Access Bridge: Auto-activates after 25 minutes
- Lifeboat: Costs 7500 Koen, immediate availability
- Armored Vehicle: Requires 2 dog tags
40-minute duration allows thorough farming without rushing. Extended timeframe supports careful engagement, complete looting, safe extraction planning.
Complete Bot Spawn Locations and Patrol Routes
Systematic farming requires knowing exact spawn points and movement patterns. Memorizing these transforms farming into repeatable, profitable process.
Primary Spawn Points
Hotel Interior: Multiple spawns around lobby, hallways, upper floors. Bots position near reception desks, doorways, stairwell entrances. Clear systematically top-to-bottom or bottom-to-top.
Campus Services: Bots spawn in classrooms, administrative offices, connecting corridors. Linear layout makes room-by-room sweeping simpler. Frequently carry attachments (scopes, silencers, grips).
Cable Car Station: Outdoor/indoor spawns around platform, ticket office, maintenance areas. Mixed environment requires adapting tactics. Frade's potential spawn makes this high-priority despite exposed approaches.
Patrol Patterns
Bots follow established routes between spawn points. Understanding patterns lets you intercept at advantageous positions. Most patrols follow logical paths—hallway lengths, room perimeters, cover-to-cover.
When detecting threats, bots move toward cover while returning fire. Bait them into disadvantageous positions by revealing yourself briefly then repositioning.
Knife headshots on isolated bots provide silent, ammo-free kills. Works best on stationary/slow-moving targets. Preserves ammunition for tougher encounters, reduces noise attracting players.
High-Probability Tier 4 Drop Locations
Rifle-armed bots have highest Tier 4 probability. Prioritize these over pistol/SMG bots. Visual weapon identification from distance lets you target high-value enemies first.
Loot 3 guns from bots before exfil for maximum value. Weapons often contain magazines with Tier 4 ammo even if spare ammo is lower tier. Check chamber/magazine contents on looted weapons.
Boss Frade Lee represents highest-value single target. T4 armor, premium weapons, wedding ring token make him worth prioritizing. Check his three spawn locations systematically each raid.
Optimal Loadout for Bot Farming
Covert Ops provides random loadouts, eliminating personal risk but removing control. Understanding optimal configurations helps evaluate provided gear and adjust tactics.
Minimum Viable (20k Entry Cost Only)
20k entry cost is your only mandatory investment. Provided loadout always includes basic weapons, some armor, backpack—sufficient for farming even if not optimal.
With basic loadouts, focus on selective engagement. Prioritize isolated enemies and favorable positions. Limited medical supplies make damage avoidance critical.
For funding consecutive runs, buy bonds arena breakout through BitTopup ensures uninterrupted sessions with competitive pricing and instant delivery.
Recommended Mid-Tier Setup
Mid-tier loadouts: M4A1/AK-74 variants with basic optics, level 3-4 armor, adequate medical supplies. Enable more aggressive farming—engage multiple bots in sequence, sustain minor damage.
Rifles with 30+ round magazines allow engaging several bots before reloading. 5 magazines (~150 rounds) sufficient for 10-15 bot kills with reasonable accuracy.
Level 3-4 armor protects against bot weapons effectively. Trade shots when necessary rather than requiring perfect positioning. Speeds farming by reducing time on elaborate flanking.
Armor, Medical, Backpack Considerations
Armor condition impacts survivability. Even with Imposter status, player encounters or Militant engagements can occur. Avoid unnecessary damage to extend farming time.
Medical supplies determine sustainable damage. Heal only when necessary rather than after every minor hit. Preserves supplies for critical moments.
Backpack size limits loot capacity. Prioritize high-value, low-weight items (Tier 4 ammo, attachments) over bulky armor/weapons. Level 3 armor sells for 18-20K but occupies significant space—take only if room remains after securing ammunition.
Step-by-Step Farming Route (15-Minute Clear)
Efficient routes connect high-density areas while minimizing backtracking and player exposure. Well-executed route clears 8-12 bots, collects premium loot, positions near extraction in 15-20 minutes.
Mark exfil point at raid start for navigation reference. Plan farming path to end near extraction.
Spawn Selection and Initial Movement
Spawn location determines optimal movement. Near Hotel? Make it first target—secure Frade before others arrive. Campus Services spawns? Clear that building first, then move to Hotel/Cable Car.
First few minutes see highest player movement. Moderate-paced advancement balances speed with tactical awareness.
Listen for gunfire indicating player positions and bot engagements. Distant shooting shows where others farm—avoid contested areas. Close gunfire requires immediate decisions—engage if advantageous, or detour.
Zone-by-Zone Engagement
Clear each zone completely before moving. Partial clearing leaves bots who might ambush during looting or block retreat.
Hotel: Clear floor-by-floor. Enter, clear ground floor, work upward/downward. Check all 8 safes during sweep.
Campus Services: Sweep main building rooms sequentially, check 2 safes, engage all bots. Clear in 5-7 minutes.
Loot Priority and Inventory Management
Priority order:
- Ammunition (Tier 4 first, then Tier 3)
- Attachments (scopes, silencers, grips)
- Premium weapons (3 guns max)
- Armor (only if space remains)
Fill magazines first, collect loose ammo. After securing all ammo, grab attachments. Backpack of ammo + attachments generates more profit than weapons + armor.
Safe Exfil Route and Timing
Move toward extraction with 8-10 minutes remaining. Buffer accounts for unexpected encounters, navigation errors, last-minute looting.
Approach extraction cautiously—areas attract extracting players and campers. Scout before committing, prepare to use alternatives if primary appears contested.
Bot AI Exploitation: Combat Techniques
Understanding bot AI transforms difficult fights into controlled engagements. Bots follow programmed patterns that become predictable and exploitable.
Detection Range and Aggro Mechanics
Bots detect players within specific ranges. Position just outside detection distance, then engage on your terms. First shot advantage often secures kills before effective return fire.
Imposter status significantly reduces aggression. Regular scavengers ignore you completely. Only Militants respond with immediate hostility—killing them triggers broader NPC aggression.
Sound triggers bot responses outside visual range. Gunfire, sprinting, door breaches alert nearby bots. Bait them into disadvantageous positions by creating noise then repositioning. Move silently to approach undetected.
Headshot Positioning and Cover Usage
Bots expose heads predictably when engaging from cover. Pre-aim headshot positions for instant kills. Dramatically reduces ammo expenditure—one headshot vs multiple body shots per kill.
Bots aim for center mass when you're fully exposed but struggle with partial cover. Position behind cover with only head/weapon exposed—minimizes hit profile while maintaining offensive capability.
Shooting limbs disables movement/weapon handling without killing. Controls engagement pacing. Works well when suppressing a bot while repositioning or conserving ammo for headshots on other targets.
Exploitable AI Patterns
Flanking: Bots choose shortest path to last known position. Predictable approach routes let you set crossfire positions or pre-aim likely paths.
Damage Response: Bots retreat to nearest cover after taking damage before re-engaging. Brief windows let you reposition, reload, heal without taking fire.
Vertical Angles: Bots struggle with elevation changes. Engaging from elevated positions or below creates targeting difficulties. Staircases, balconies, multi-level areas become force multipliers.
Profit Analysis: Real Data
Systematic farming generates consistent profits. 25-60K range reflects loot RNG, bot spawn numbers, player competition, farming efficiency.
20k entry cost requires extracting 20k+ to break even. 100,000 Koen mission reward adds significant value, though farming-focused runs may not complete objectives.
Average Tier 4 Ammo Per Run
Efficient farming yields 60-150 rounds per successful extraction. Depends on bot spawn RNG, engagements, player competition. Securing Frade + clearing multiple zones trends toward higher end.
Not every bot carries Tier 4. Focus on rifle-armed bots and bosses to increase acquisition rate vs engaging indiscriminately.
Total Koen Value and Margins
Typical successful run: 100 rounds Tier 4 ammo + several attachments + one level 3 armor = ~40-50K total value. Minus 20k entry = 20-30K profit per run.
High-efficiency runs securing Frade, clearing multiple zones, avoiding players reach 60K+ extracted value = 40K+ profit.
Failed extractions (death/timeout) = total loss of 20k entry + time invested. High extraction success rates crucial for profitability.
Time Efficiency: Koen Per Hour
15-minute farming + 5 minutes matchmaking/inventory = 3 runs/hour. At 25K average profit/run = 75K Koen/hour.
Comparing to standard raids requires accounting for gear loss risk. Standard raids might generate higher single-run profits, but deaths wipe out multiple runs' gains. Covert Ops' consistent, risk-free returns often produce better long-term accumulation.
Best vs Worst Runs
Best: Favorable spawns, minimal player interference, efficient routing. Securing Frade early, clearing Hotel + Campus Services completely, full backpacks = 60K+ profits.
Worst: Heavy player competition, poor spawns, tactical mistakes forcing early extraction. 25-30K value barely covers entry, minimal profit.
Average: Moderate encounters, some player avoidance, decent loot = 35-45K value. Maintaining consistency at this level builds wealth steadily.
Common Mistakes and Solutions
Overloading Inventory with Low-Value Items
Don't fill backpacks with every weapon/armor. Backpack of Tier 4 ammo + attachments generates more Koen than common weapons.
Strict priority: Ammunition → Attachments → Premium weapons → Armor (if space remains).
Understand value-to-weight ratios. Scope worth 8K occupying one slot beats weapon worth 12K occupying four slots.
Poor Route Planning
Random wandering wastes raid time. Systematic routes connecting known spawns maximize encounters/minute.
Backtracking wastes time. Clear areas thoroughly before moving forward. Mark cleared zones mentally to avoid revisiting.
Failing to mark exfil at start leads to last-minute scrambling. Know extraction location throughout to plan farming route ending nearby.
Gear Quality Misconceptions
Don't avoid Covert Ops when receiving basic gear. Even minimal loadouts suffice with proper tactics.
Bot AI doesn't scale to gear quality—equally vulnerable regardless of equipment. Tactics and positioning matter more than gear.
Risk-free nature means even poor-gear runs yielding minimal profits cost only time. Adjust tactics to match gear but always farm when possible.
Advanced Tips: Maximizing Efficiency
Multi-Run Session Planning
Plan 3-5 run sessions rather than singles. Develop rhythm and muscle memory making each successive run smoother.
Track profits across sessions to identify patterns. Notice which routes produce better results, which areas yield most Tier 4, which times feature less competition.
Manage energy and focus. Fatigue leads to mistakes. Brief breaks between runs maintain mental sharpness, improving overall hourly profits vs grinding until performance degrades.
When to Sell vs Keep Tier 4 Ammo
Tier 4 serves dual purposes: immediate sale or personal stockpile. Decide based on current needs and market conditions.
Consider standard raid frequency and consumption rate. If burning 200 rounds weekly in PvP, keeping farmed ammo makes economic sense vs buying at market prices.
Market timing affects decisions. Price spikes suggest selling stockpiles. Price drops suggest holding for personal use or market recovery.
Scaling with BitTopup Support
Consistent farming requires maintaining sufficient Koen for entry fees. Running out mid-session interrupts rhythm and wastes potential farming time.
BitTopup provides reliable top-ups with competitive pricing, fast delivery, secure transactions keeping operations running smoothly. Excellent customer service and high ratings make it the trusted choice for thousands of players.
Scaling means running more sessions weekly and maintaining consistency. Reliable Koen access through BitTopup lets you focus on execution rather than currency shortages.
FAQ
What is Covert Ops mode in Arena Breakout?
Special raid mode unlocking at level 5, providing random Imposter loadouts instead of requiring personal gear. Pay 20k/match but risk no personal stash items. NPCs don't shoot Imposter players. Missions reward 100,000 Koen.
Can you lose items in Covert Ops?
Can't lose personal stash items—mode provides all gear. Only 20k entry fee at risk if failing to extract. Looted items lost on death represent missed profit, not actual gear loss from inventory.
Where do Tier 4 ammo bots spawn in Northridge?
Primarily at Hotel, Campus Services, Cable Car Station. Boss Frade Lee spawns at these three locations with T4 armor and premium loot. Rifle-armed regular bots have highest Tier 4 probability.
How much Tier 4 ammo per run?
60-150 rounds per successful extraction. Depends on bot spawn RNG, engagements, player competition, loot prioritization. Boss kills + clearing multiple high-density zones trend toward higher rates.
Is Covert Ops more profitable than standard raids?
Generates 25-60K profit/run with zero gear risk. 3 runs/hour = 75-180K hourly. Standard raids might produce higher single-run profits but carry gear loss risk eliminating multiple runs' gains. Covert Ops' consistent, risk-free returns often produce better long-term accumulation.
How to extract safely from Northridge?
Mark exfil at start, plan route to end nearby. Move toward extraction with 8-10 minutes remaining. Dam Sluice Gate (activate 2nd floor panel), Access Bridge (auto after 25 min), Lifeboat (7500 Koen), Armored Vehicle (2 dog tags). Scout areas before committing, prepare alternatives if primary contested.


