

Arlecchino's Role in 6.1 Meta
Here's the thing about Arlecchino—she's not your typical 5-star Pyro DPS. This character operates on Bond of Life mechanics that can feel counterintuitive at first (you're literally reducing your max HP for damage), but once you get the hang of it? She's absolutely devastating.
Coming back in Version 6.1 Phase 2 (November 11–December 2, 2025), she's hitting 200k+ Normal Attacks and 300k+ Burst damage with proper investment. That's not whale territory either—we're talking reasonable artifact investment here.
Her kit revolves around generating Bond of Life stacks through Blood-Debt Directives, then consuming these for enhanced Normal Attack damage. Here's what makes her special: 90% of her damage comes from Normal Attacks. She's completely self-sufficient with Pyro application and healing, which is rare in this game.
For Arlecchino banner pulls, Genshin Impact Arlecchino banner top up through BitTopup offers competitive rates, instant delivery, secure transactions with 24/7 support and high user satisfaction ratings.
What she excels at: High damage ceiling, self-sufficient gameplay, flexible team building, strong performance at C0 Where she struggles: Healing restrictions (Burst only), fragility without shields, needs 120-150% Energy Recharge
Bond of Life Mechanics
Okay, let's break down the mechanic that makes or breaks your Arlecchino experience. Bond of Life reduces your maximum HP—sounds terrible, right? But it's actually the key to her massive damage scaling.

Blood-Debt Directives grant 65% Max HP as Bond per Directive, with a maximum of 145% over 35 seconds. Once you hit 30%+ Bond, Masque of the Red Death kicks in. This converts your Normal Attacks to Pyro with serious ATK scaling bonuses.
Masque consumes 7.5% Bond every 0.03 seconds while active, but here's the payoff: extra damage and 0.8 seconds reduced Skill cooldown. Her A1 passive is where things get interesting—it upgrades Directives to Due status after 5 seconds, providing 130% Max HP Bond. That's literally double the generation.
Now, here's the catch (there's always a catch): Arlecchino's passive prevents external healing. You can only recover HP through her Burst, which heals based on Bond amount and ATK while clearing all stacks.
Management essentials: Time your absorptions properly (Charged Attack for single targets, Burst for multiple), always use shields—Zhongli, Thoma, or Chevreuse work great—and save that Burst for emergency healing or AoE phases.
Talent Priority & Analysis
This one's straightforward: Normal Attack > Burst > Skill. Why? Because Normal Attacks represent 90% of her damage output.
Normal Attack: Level this to 90 first. No exceptions. Masque state provides Pyro infusion and those crucial ATK scaling bonuses. Your optimal combos are C > N4–N6 with N3/N5 dash canceling for maximum DPS.
Elemental Skill: Deals Pyro damage with a dash AoE effect, applying Directives that last 30 seconds. These deal Pyro damage every 5 seconds with a maximum of 2 instances active.
Elemental Burst: This is your panic button and AoE solution. Absorbs all Directives, deals massive AoE damage, resets Skill cooldown, and provides that crucial self-healing.
Key Passives worth noting: A1 grants 130% Max HP Bond from defeated Directives; A4 provides 1% RES per 100 ATK above 1000 (maxing at 20%); her Utility passive gives 40% Pyro DMG but restricts healing—hence the self-sufficiency requirement.
Best Artifacts: Fragment of Harmonic Whimsy
Fragment of Harmonic Whimsy isn't just BiS—it's practically made for Arlecchino. You get 18% DMG Bonus per Bond change, stacking 3 times for 54% total increase. Since Arlecchino's constantly fluctuating Bond levels, you'll maintain near-permanent maximum stacks.

Farm this from Faded Theater domain on Petrichor Island in Fontaine. At AR45, expect 1 five-star per 20 resin with a 50/50 split between Fragment and Unfinished Reverie.
Alternatives that actually work: 4pc Gladiator (35% Normal Attack damage—solid but not optimal), 4pc Echoes (36% chance for +70% ATK—RNG dependent), or 2pc combinations like Gladiator + Fragment for +36% ATK.
Main Stats: ATK% Sands (EM for Vaporize teams), Pyro DMG Goblet, CRIT Rate/DMG Circlet Substat Priority: CRIT Rate/DMG > ATK% > ER > EM
Target Stats: 2000+ ATK (2200+ with Crimson Moon), 70-80% CRIT Rate, 160%+ CRIT DMG, 30,000+ HP, 100-200 EM for reaction teams
Energy Recharge requirements: Solo Pyro needs 150-160%, Double Pyro 130-140%, with Battery support 120-130%
Weapon Rankings
Crimson Moon's Semblance (674 ATK, 22.1% CRIT Rate): This is her signature weapon for good reason.

Provides 25% Max HP Bond every 14 seconds plus 12-28% DMG Bonus scaling to 24-56% above 30% Bond. We're talking 15-25% DPS increases while solving energy and survivability issues. Banner runs November 12 - December 3, 2025.
For weapon banner pulls, buy Genshin Impact Genesis Crystals online through BitTopup ensures sufficient resources with competitive pricing, instant delivery, and secure payment processing.
5-Star Alternatives: PJWS (674 ATK, 22.1% CRIT Rate with ATK stacking), Staff of Homa (608 ATK, 66.2% CRIT DMG with HP scaling—ironic but effective), Scarlet Sands (542 ATK, 44.1% CRIT Rate with EM conversion for Vaporize teams).
F2P Options that don't suck: White Tassel R5 (401 ATK, 23.4% CRIT Rate, +48% Normal Attack damage—seriously underrated), Deathmatch (454 ATK, 36.8% CRIT Rate, +32% ATK/DEF vs 2+ enemies), Favonius Lance (454 ATK, 36.8% ER for particle generation).
Constellations vs Weapon Priority
C1: +80% Masque damage and interruption resistance. This is your highest priority constellation—massive DPS boost plus quality of life improvements.
C2: Directives start as Due status; absorption triggers 900% ATK AoE with +20% RES shred lasting 15 seconds. Huge damage spike and team utility.
C6: Burst scales with Bond (+700% ATK multiplier); post-Skill grants +10% CRIT Rate and +70% CRIT DMG for 20 seconds. Whale territory but absolutely bonkers.
My take: Prioritize C1 over R1 Crimson Moon. Lower cost, immediate impact, and you keep weapon flexibility. Crimson Moon becomes priority only for maximum optimization or if you're struggling with energy/survivability.
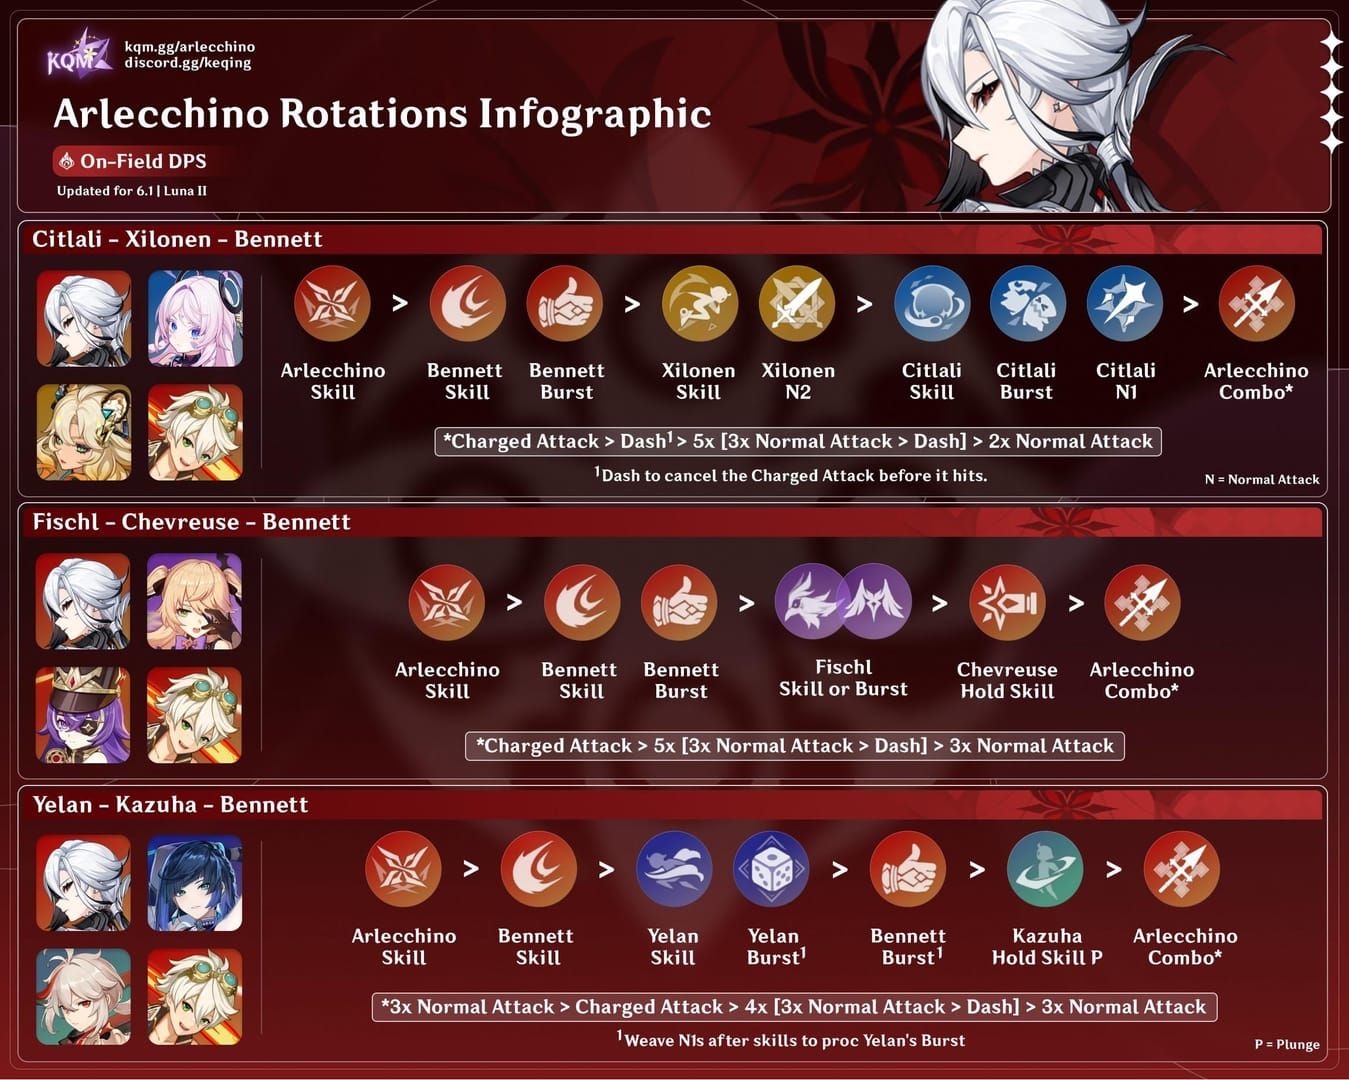
Top Team Compositions
Vaporize: Arlecchino + Yelan + Bennett + Kazuha/Xilonen.

This maximizes single-target through consistent reactions. Rotation: E > Q > Yelan E > Q > N1 > Bennett E > Q > Kazuha plunge > Arlecchino C + 6N. F2P version? Replace Yelan with Xingqiu—still very effective.
Overload: Arlecchino + Fischl + Bennett + Chevreuse. Chevreuse provides RES shred and healing specifically for Pyro/Electro teams. Alternative: Raiden Shogun for higher Electro application.
Mono Pyro: Arlecchino + Xiangling + Bennett + Xilonen. Maximizes Pyro damage through resonance without relying on reactions.
Double Geo: Arlecchino + Zhongli + Albedo + Bennett. Prioritizes survivability through Geo resonance and shields—great for learning her mechanics.
Gameplay Rotations
Optimal DPS sequence: E > Support buffs > CA > 6N combo > Dash cancel > Repeat until Burst needed
Animation Canceling techniques: N3/N5 dash canceling for higher DPS, CA jump/dash canceling, Burst dash canceling for faster transitions.
Survival without shields (not recommended but sometimes necessary): Maintain distance during Normal Attacks, save Burst for low HP situations, use Skill dash for i-frames, coordinate team crowd control.
FAQ
What's the best artifact set for Arlecchino in 6.1? Fragment of Harmonic Whimsy. Up to 54% DMG Bonus with near-permanent uptime on maximum stacks—nothing else comes close.
Is Crimson Moon's Semblance worth pulling? For dedicated Arlecchino mains? Absolutely. 15-25% DPS increases plus energy/survivability solutions. But C1 offers better value for most accounts.
How exactly does Bond of Life work? Generated by absorbing Directives via Charged Attack or Burst. At 30%+ Max HP Bond, Normal Attacks convert to Pyro with significant ATK scaling bonuses. Think of it as trading HP for damage multipliers.
Can external healing work on Arlecchino? Nope. Her Balemoon Alone passive prevents all external healing. Only her Elemental Burst heals, based on Bond amount and ATK.
Best F2P weapons? White Tassel R5 for pure damage (+48% Normal Attack damage), Deathmatch for balanced stats (excellent CRIT Rate), Favonius Lance for energy management.
Gladiator vs Harmonic Whimsy? Harmonic Whimsy's multiplicative 54% DMG Bonus outperforms Gladiator's 35% Normal Attack damage unless you have significantly better substats on Gladiator pieces.


