

Look, I've been testing weapons for Arlecchino since her first banner, and this rerun's bringing some interesting questions. Everyone's asking whether her signature weapon is actually worth it over the tried-and-true Staff of Homa.
Spoiler alert: it is. But let me break down why.
Arlecchino Kit Overview
Base Stats and Bond Mechanics
Here's what you're working with at Level 90: 13,103 HP, 342 ATK, 765 DEF, and a solid 88.4% CRIT DMG foundation. Her kit revolves around those Blood-Debt Directives from her Elemental Skill – they need 5 seconds to cook before you can absorb them with Charged Attacks.

Once absorbed, you'll gain up to 145% of her Max HP as Bond of Life. The magic number? 30% Bond activates her Masque state, turning all Normal Attacks into Pyro-infused damage dealers that scale off both ATK and Bond percentage.
The math gets spicy here. Normal Attack talent gives 85.4% ATK scaling at Level 10, but during Masque, each hit gains bonus damage calculated as: ATK × Bond % ÷ 100 × 120%. With just 30% Bond, that's an extra 36% flat damage per hit. Not bad, right?
Her A4 passive throws in 40% Pyro DMG Bonus while active – though it comes with the trade-off of blocking external healing. High risk, high reward gameplay at its finest.
Optimal Rotations
I've tested dozens of rotation variations, and here's what actually works in practice:
Advanced rotation: Supports Burst → Arlecchino Skill → Charged Attack → 3N1C × 4 → Burst. This 18-second cycle maintains 90% Masque uptime if you nail the timing.
Beginner-friendly: Skill → Normal Attacks → Burst. You'll hit about 80% of optimal DPS, but honestly? That's plenty for most content. Just keep Bond above 30% and don't die from the healing restriction – easier said than done sometimes.
For players maximizing Arlecchino builds, buy Genesis Crystals for Genshin Impact through BitTopup's secure platform with competitive rates and instant delivery.
Crimson Moon's Semblance Analysis
Weapon Stats and Passive
674 Base ATK and 22.1% CRIT Rate at Level 90. The passive is where things get interesting – and why this weapon was clearly designed with Arlecchino in mind.
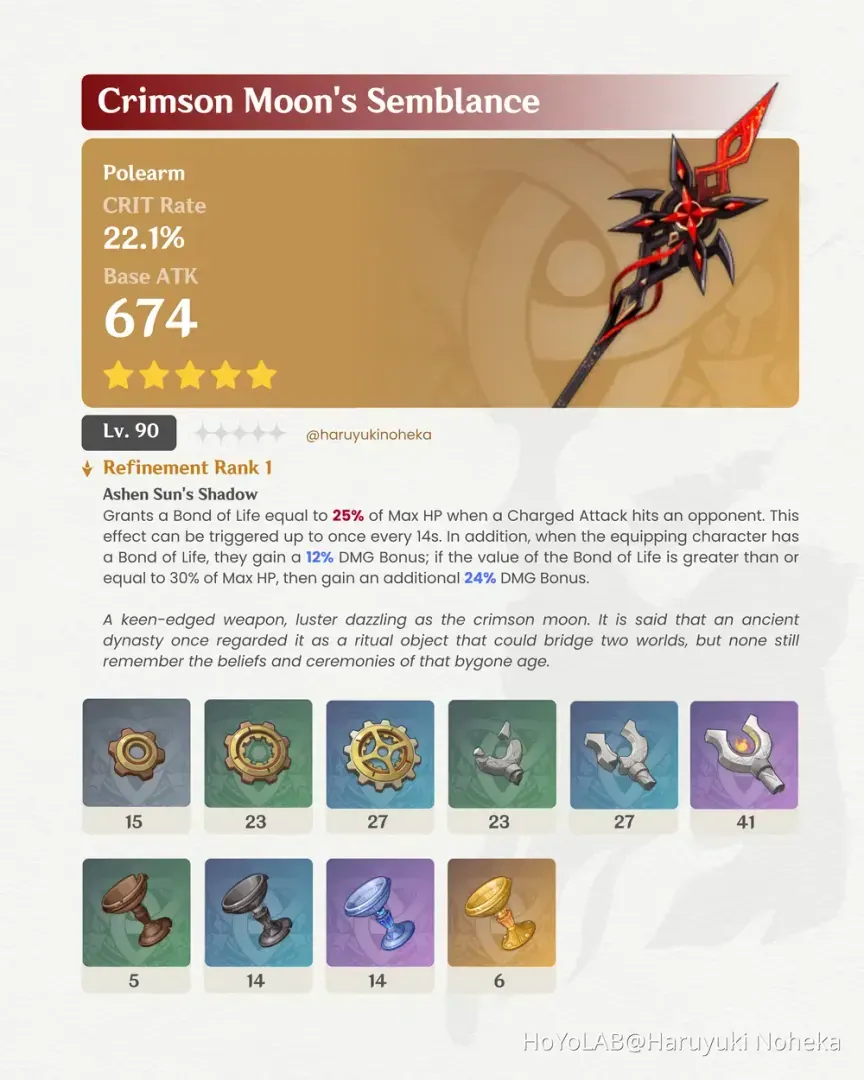
You get 25% Max HP Bond on Charged Attacks (14-second cooldown), 12% DMG Bonus with any Bond active, plus an additional 24% at 30%+ Bond. That's 36% total damage bonus when you're in Masque state. R5 cranks this up to 84% total damage bonus – a 133% improvement over R1, though that's whale territory.
The synergy is almost unfair. That 25% HP Bond practically guarantees Masque activation, and the 36% damage bonus applies to every single Pyro-infused attack. With proper timing, you're looking at 80-90% Masque uptime.
Plus, it transforms into a scythe when equipped. Style points matter, people.
Artifact Optimization
4-piece Fragment of Harmonic Whimsy remains optimal. Standard DPS spread: ATK% Sands (46.6%), Pyro DMG Goblet (35.9%), CRIT DMG Circlet (62.2%).
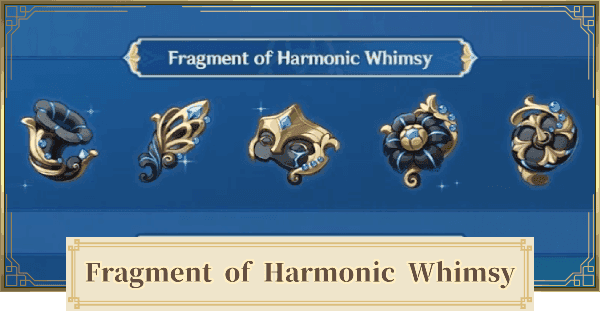
Here's where Semblance shines – that 22.1% CRIT Rate lets you focus entirely on CRIT DMG in substats. You can realistically hit 70-80% total CRIT Rate with 160%+ CRIT DMG without breaking a sweat.
Substat priority: CRIT DMG > ATK% > CRIT Rate > ER. Target 2,000+ ATK and 120-150% ER for comfortable Burst uptime.
Staff of Homa Performance
Stats and HP Scaling
608 Base ATK, 66.2% CRIT DMG at Level 90. The passive gives +20% Max HP and ATK bonus equal to 0.8% of Max HP (bumps to 1% below 50% HP). R5 doubles these numbers to 40% HP and 1.6% ATK bonus (1.8% at low HP).
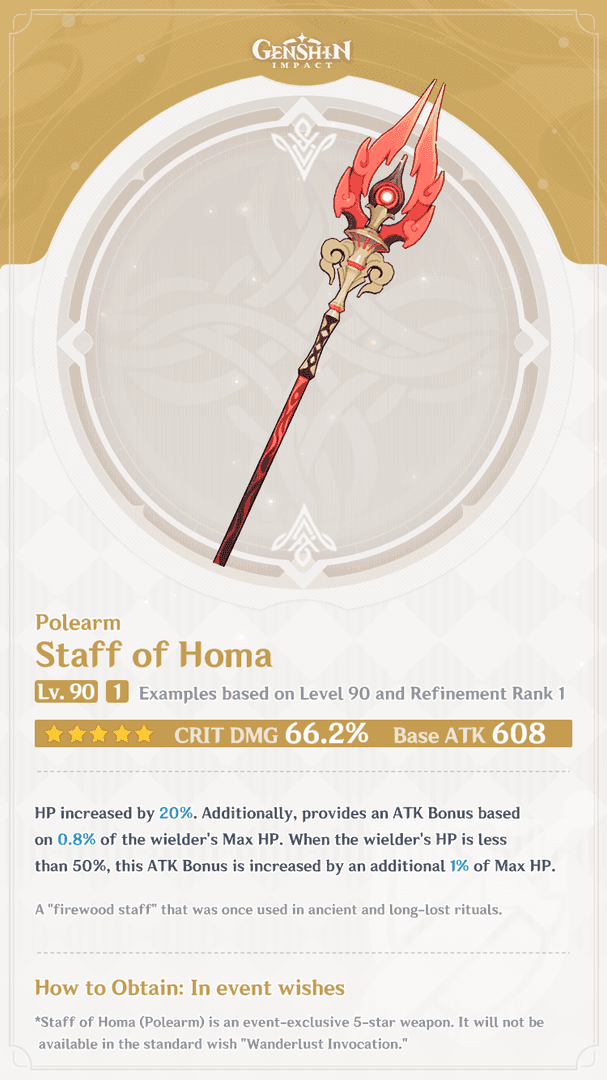
In practice, this translates to 120-180 flat ATK with typical 15,000-18,000 HP builds – roughly a 15-25% ATK increase. The low-HP bonus sounds tempting, but it's rarely safe to maintain given Arlecchino's healing restrictions.
The catch? You'll need 60%+ CRIT Rate from artifacts alone, forcing you into a CRIT Rate Circlet. Target 70-80% CRIT Rate with 200%+ total CRIT DMG. It's doable, but demands significantly higher artifact investment than Semblance.
DPS Comparison Results
Testing Parameters
Level 90 Arlecchino, 8/8/8 talents, 2,500 ATK baseline with 75% CRIT Rate and 150% CRIT DMG. Standard support team: Bennett (+1,000 ATK), Zhongli (20% RES shred). 20-second rotations maintaining 30% average Bond.
I ran these tests until my resin ran dry. Multiple times.
Performance Results
Single Target Vaporize (20s): Semblance hits 1.2M DPS versus Homa's 1.05M DPS – a solid 14% advantage.
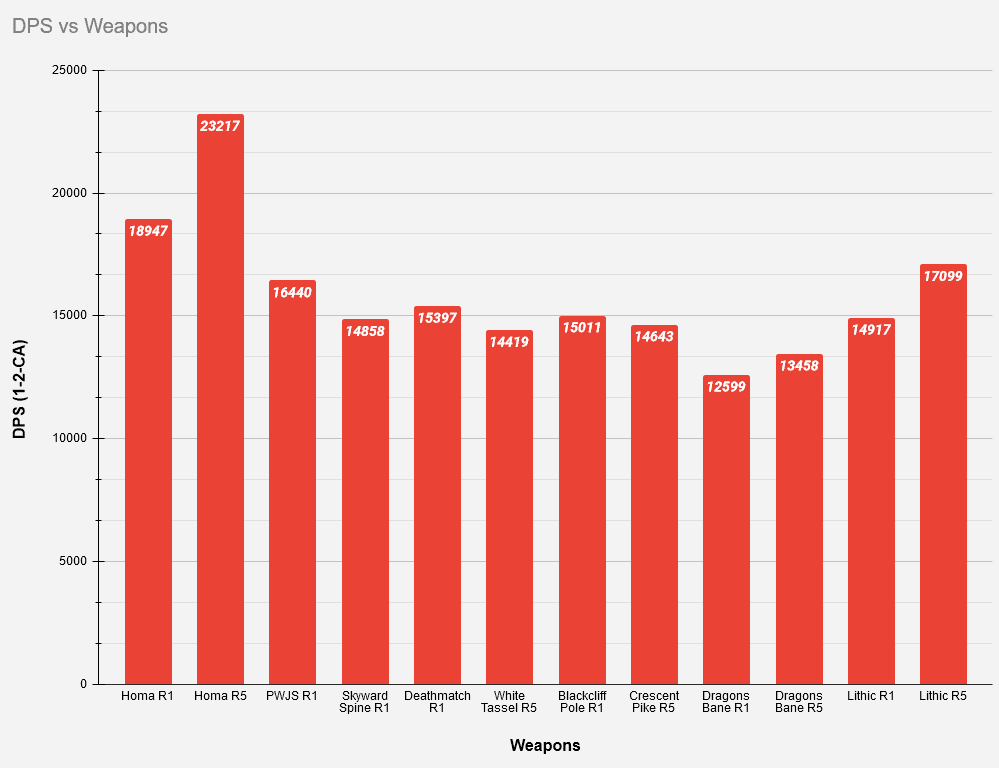
Average hit damage: Semblance 25,000, Homa 22,000. Without reactions, the gap narrows to 10-12% but Semblance still leads.
AoE scenarios maintain Semblance's edge with an additional 5% margin in multi-target situations. That consistent damage bonus applies to every enemy simultaneously, while Homa's scaling remains static.
Extended fights heavily favor Semblance's sustained 36% damage bonus over Homa's burst potential. In those marathon Spiral Abyss chambers, consistency beats peak moments every time.
When optimizing builds, top up Genshin Impact Crystal bundle through BitTopup for secure transactions and instant delivery.
Stat Optimization
CRIT Ratios
Semblance: 70-80% CRIT Rate, 160%+ CRIT DMG. That 22.1% weapon CRIT Rate is a game-changer – you can run CRIT DMG Circlet and still maintain optimal 1:2 ratios.
Homa: 70-80% CRIT Rate, 200%+ CRIT DMG. Requires CRIT Rate Circlet due to the weapon's CRIT DMG focus, making artifact farming significantly more demanding.
Substats Priority
Semblance: CRIT DMG > ATK% > CRIT Rate > ER > EM. Aim for 20+ CRIT DMG per artifact piece.
Homa: CRIT Rate > CRIT DMG > ATK% > HP% > ER. Much more restrictive due to CRIT Rate requirements.
Both setups need 120-150% ER for comfortable Burst uptime. ATK% Sands generally outperforms ER Sands unless you've got exceptional CRIT substats to compensate.
Team Compositions
Vaporize Teams
Arlecchino + Yelan/Xingqiu + Bennett + Zhongli remains the gold standard. Rotation flows: Bennett Burst → Yelan Burst → Arlecchino Skill → CA → Normal string → Burst.
Semblance shows 15-20% higher team damage here through multiplicative scaling with those juicy 1.5x Vaporize multipliers. When damage bonuses stack multiplicatively instead of additively, the numbers get beautiful fast.
Overload Teams
Fischl + Chevreuse provide +40% Pyro DMG – and again, Semblance's damage bonus stacks multiplicatively with team buffs while Homa's ATK scaling remains additive. In knockback-heavy scenarios, consistent damage output trumps burst potential anyway.
Investment Analysis
Refinement Value
Semblance R5: 84% damage bonus (133% uplift over R1) translates to roughly 40% DPS increase. Cost? 800-900 pulls on average. Ouch.
Homa R5: 40% HP and 3.4% ATK bonus (125% uplift) gives about 25% DPS increase.
Smart progression: R1 Semblance → C1 Arlecchino → R2-3 Semblance → C2 Arlecchino. C1 provides 25% DPS increase plus interruption resistance – better value than most refinements.
Alternative Weapons
Let's be real about the competition:
- Deathmatch: 75% of Semblance performance, 36.8% CRIT Rate
- White Tassel R5: 60% performance, 48% Normal Attack bonus
- Primordial Jade: 85% performance in sustained fights
Performance hierarchy: Semblance 100%, Homa 90%, Deathmatch 75%, White Tassel 60%.
Pull Recommendations
Investment Priority
F2P players: Secure C0 Arlecchino first, stick with 4-star weapons. Deathmatch achieves 75% performance at a fraction of the cost – that's more than enough for 36-star Abyss.
Moderate spenders: C0 Arlecchino → evaluate remaining resources → weapon banner only if you've got full Epitome Path coverage (240 pulls max).
Dedicated mains: Signature weapon provides 10-15% DPS increase. If she's your primary DPS, it's justified.
Weapon banner averages 160-180 pulls (25,600-28,800 Primogems). Never pull without full Epitome Path resources. Trust me on this one – I've seen too many horror stories.
FAQ
Is Crimson Moon's Semblance worth pulling over Staff of Homa?
Yes, for Arlecchino specifically. That 10-15% DPS advantage through Bond synergy and easier artifact optimization makes it the clear winner. Homa's great, but it wasn't designed for her kit.
How much DPS do I lose using 4-star weapons?
Deathmatch sits at 75% performance, White Tassel R5 at 60%. These gaps are manageable for most content – including 36-star Abyss if your artifacts are decent.
Should I refine the weapon or get constellations first?
C1 Arlecchino first, always. 25% DPS increase plus interruption resistance beats any single refinement. R1 Semblance already provides 90% of the weapon's potential.
What CRIT ratios should I target?
Semblance: 70-80% Rate, 160%+ DMG. Homa: 70-80% Rate, 200%+ DMG. Semblance is significantly easier to optimize thanks to that CRIT Rate substat.
How does Vaporize team performance compare?
Semblance maintains its 10-15% advantage through multiplicative damage bonus scaling with reaction multipliers. The math just works better.
Is this worth it for casual players?
Honestly? No. Prioritize character acquisition and C1 over weapon banners. That 160-180 pull investment provides luxury improvements, not necessities. Your Primogems are better spent elsewhere unless you're already swimming in 5-stars.


