

Understanding the MandelBrick Zero Dam Spawn Point
Zero Dam is a strategically valuable spawn location offering direct access to high-value loot zones and extraction points. The map divides into three lanes: southeastern river corridor (Lane 1), central Administrative Area (Lane 2), and western tunnel network (Lane 3). Zero Dam connects these lanes, providing tactical flexibility for vault rushes and MandelBrick collection.
The spawn's importance stems from proximity to the Administrative Area, where Guard Captain Saeed Ziaten patrols with Level 4 armor, Suppression Helmet, and Samurai Ballistic Vest. This boss offers premium loot but creates a high-risk zone. Zero Dam spawns provide immediate access to multiple Safe Boxes—the Administrative Area alone contains four accessible within 5-7 minutes normally.
For premium gear advantages, delta force credits top up through BitTopup provides instant access to competitive loadouts with secure transactions.
MandelBrick spawn mechanics use a semi-random system. Zero Dam spawns occur with consistent frequency, though exact locations vary slightly. Understanding these variations lets experienced players orient immediately without wasting seconds.
Zero Dam Location and Map Positioning

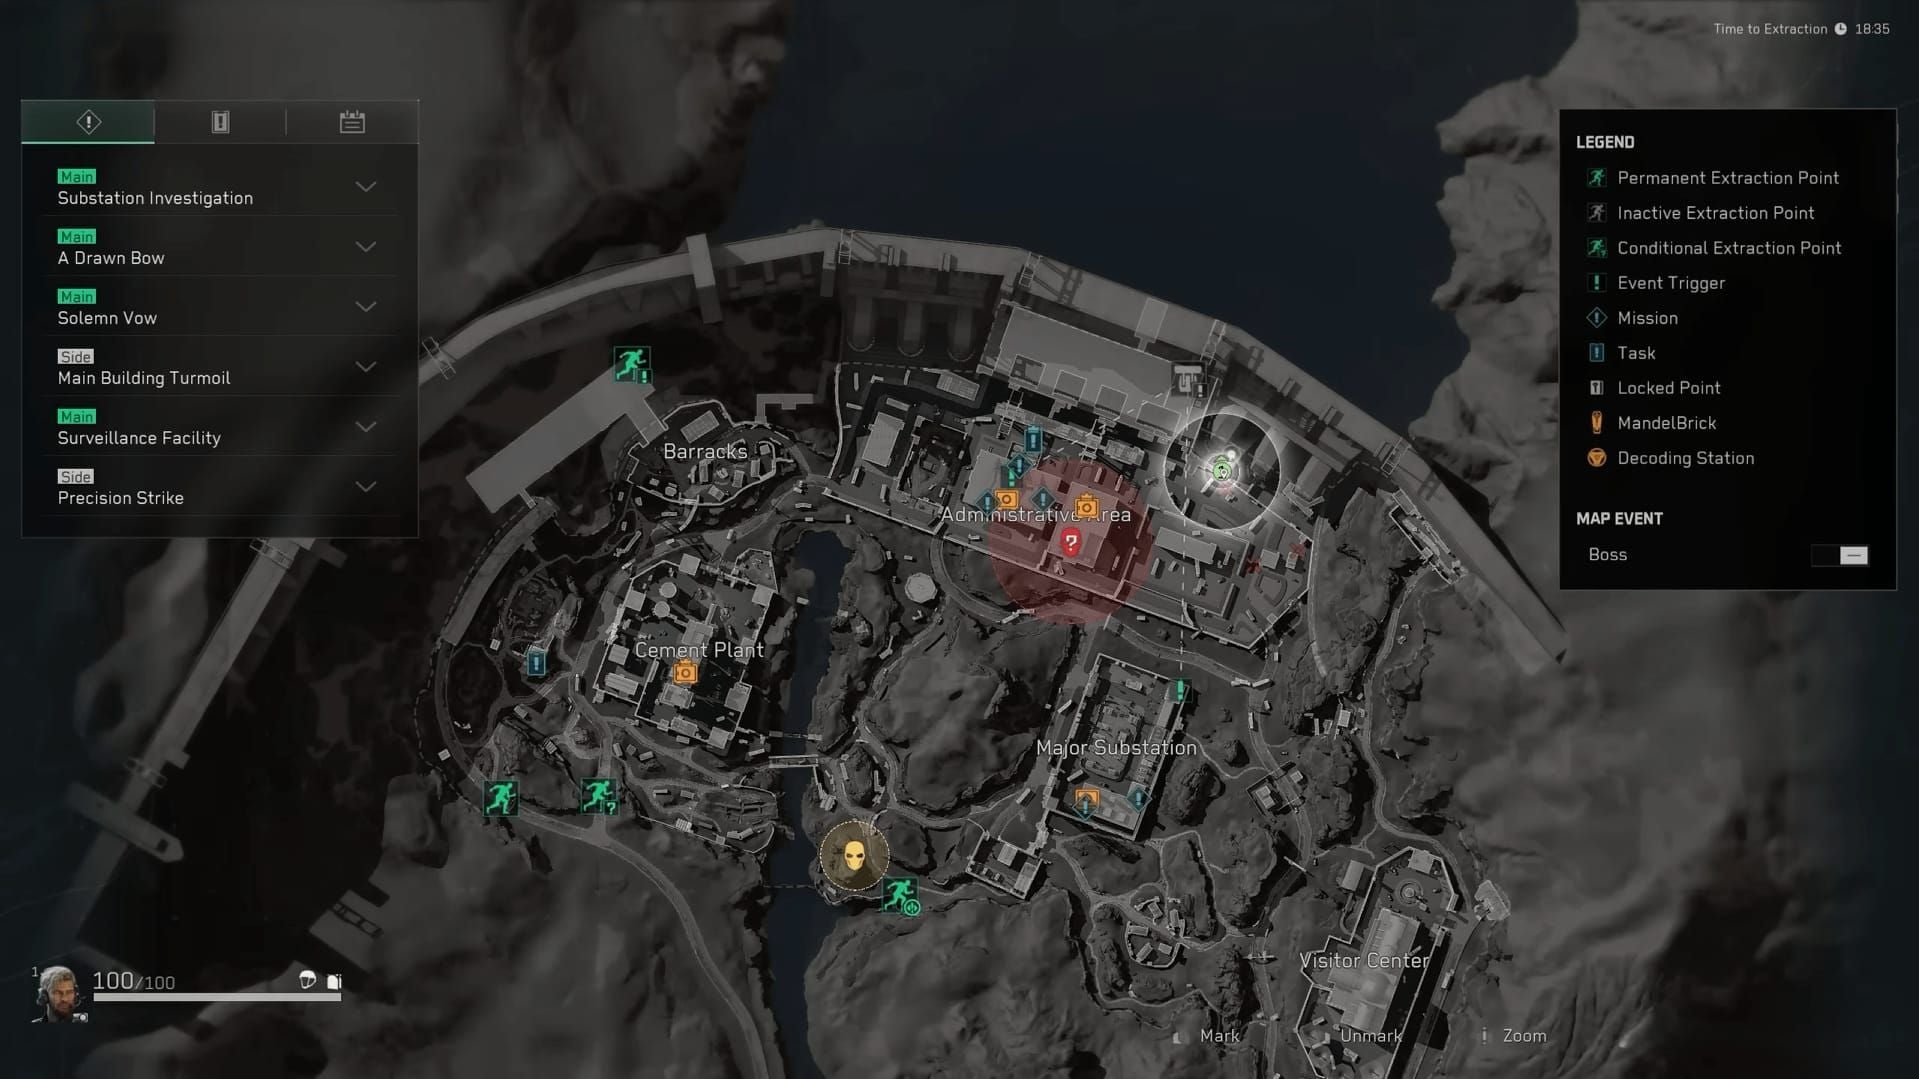
Zero Dam occupies the central-eastern section between Barracks (north) and Major Substation (south). The massive concrete dam structure serves as a prominent visual landmark visible from multiple zones, creating natural navigation advantages.
The spawn provides immediate access to three extraction points:
- Repair Pathway: East spawn, backpack loadout removed
- Dam Summit West: Weight under 30kg requirement
- Shortcut Near Road: East spawn, 50% activation chance
Zero Dam sits at moderate elevation, creating downhill sprint opportunities toward the Administrative Area. This elevation advantage translates to faster movement speeds through slide-jump techniques and momentum conservation.
Strategic Advantages of Zero Dam Spawn
Zero Dam delivers multiple competitive advantages:
- Direct line-of-sight to Administrative Area's northern entrance for immediate enemy activity assessment
- Access to five Safe Box locations within 90-120 seconds: two in Barracks (2-3 min), two in Major Substation (3-4 min), one in Administrative Area ground floor
- Optimal MandelBrick collection efficiency with spawn containers aligning to natural vault movement paths
- Confidential mode offers 2-3x higher MandelBrick yields for increased risk acceptance
Spawn Point RNG and Selection Mechanics
Zero Dam spawns occur in approximately 15-20% of matches. The spawn system distributes players evenly to prevent spawn camping and promote map-wide engagement.
The system considers squad composition, giving full squads spawn locations that accommodate multiple players without overcrowding. Solo players experience slightly different spawn probabilities, receiving spawn points that balance competitive access while maintaining fair distribution.
Why the 2-Minute Vault Rush Matters
The 2-minute vault rush establishes early-game dominance through superior loot acquisition and map control. Players reaching vault locations within 120 seconds secure high-tier equipment before opponents complete initial looting, creating immediate combat advantages that compound throughout the match.
Vault control directly impacts MandelBrick collection efficiency. Vault zones contain multiple deposit containers and analysis points. Players establishing early vault presence can copy teammate MandelBrick by approaching containers within 1 minute before analysis completion, multiplying resource accumulation without additional risk.
The competitive meta increasingly favors aggressive early-game strategies. Unlocking 8+ Safe Boxes spawns a Spec Ops Safe Box containing premium loot that justifies increased vault rush risk.
Early Game Loot Advantage Analysis
Vault locations contain concentrated high-tier loot spawns significantly outvaluing standard Safe Box contents. While the Administrative Area's four Safe Boxes require 5-7 minutes to fully loot normally, vault access provides equivalent or superior gear within 2-3 minutes when executed efficiently.
Statistical analysis shows players reaching vault locations within 2 minutes achieve 35-40% higher average loot values compared to standard looting routes. This advantage persists even accounting for increased combat encounters, as superior early-game equipment provides decisive firefight advantages.
Competitive Meta and Vault Control Importance
Current competitive strategies emphasize vault control as primary objective. Organized squads designate specific players for vault rush roles while others provide covering fire or secure alternative loot zones. This coordinated approach maximizes team efficiency and creates multiple pressure points forcing opponents into reactive positions.
Vault control establishes map presence influencing enemy movement patterns throughout the match. Opponents aware of established vault control must either contest directly (creating predictable engagement opportunities) or avoid the area (conceding valuable loot and positioning). Both outcomes favor the team securing initial vault access.
Risk vs Reward Assessment
Vault rushes carry inherent risks. Rapid movement limits combat readiness, as players prioritize speed over tactical positioning and situational awareness. This vulnerability creates ambush opportunities for opponents anticipating common vault rush routes.
Risk mitigation strategies:
- Audio monitoring for enemy footsteps
- Periodic visual sweeps during sprint intervals
- Maintaining escape route awareness throughout rush
- Mental mapping of cover positions along routes
Reward calculations change based on game mode. Confidential mode's 2-3x higher MandelBrick yields justify increased risk exposure. Assess current equipment, squad composition, and match objectives when deciding between aggressive vault rushes or conservative looting.
The Complete Zero Dam to Vault Route (Step-by-Step)
The optimal route follows a precise path through the Administrative Area, leveraging terrain features and movement mechanics to minimize travel time while maintaining combat readiness. This route consistently delivers sub-2-minute vault access with proper technique and favorable spawn positioning.
Route execution begins immediately upon spawn, orienting toward the Administrative Area's northern entrance while initiating tactical sprint. The path proceeds through the dam's eastern access corridor, crosses the central courtyard, and enters the Administrative Area through the main entrance. Navigate to vault location while avoiding Guard Captain Saeed Ziaten's patrol zone in the northern section.
For competitive advantages through premium resources, buy delta force currency at BitTopup ensures optimal loadouts with excellent customer service.
Phase 1: Initial Sprint from Zero Dam (0-30 seconds)
Upon spawning, immediately identify the dam structure's orientation and locate the eastern access corridor leading toward the Administrative Area. Initiate tactical sprint while maintaining slight rightward angle to avoid river bank's uneven terrain reducing movement speed.
Visual landmarks:
- Dam control tower (left side)
- Eastern guard post (right side)
- Administrative Area's red-roofed buildings (forward)
Stamina management begins here. Avoid unnecessary jumps or direction changes consuming stamina without meaningful time savings. Goal: reach eastern access corridor entrance with 70-80% stamina remaining.
Phase 2: Mid-Route Navigation (30-75 seconds)
Navigate the transition zone between Zero Dam and Administrative Area. The eastern access corridor contains concrete barriers and equipment crates creating navigation challenges but offering slide-jump opportunities for advanced movement.
Execute slide-jumps at corridor midpoint where slight downhill slope provides momentum boost. Approach at full sprint, initiate slide, and jump at slope apex to carry momentum through air. This saves 2-3 seconds compared to standard sprinting.
The courtyard crossing represents the route's most exposed segment. Minimize exposure time by maintaining maximum sprint speed and using central fountain structure as temporary cover if enemy contact occurs. Pre-aim toward common sniper positions while crossing for rapid defensive responses.
Phase 3: Final Approach and Vault Entry (75-120 seconds)
Navigate through Administrative Area's interior corridors to reach vault locations. Enter through main entrance and proceed directly to second floor using eastern stairwell—faster access than central stairs while avoiding Guard Captain Saeed Ziaten's primary patrol route.
Vault locations within Administrative Area include multiple second floor Safe Boxes:
- Balcony position
- North-side Server Room
- East-side PC Room
- South-side Bedroom
Prioritize Server Room and PC Room—highest concentration of premium loot with direct access to Industrial Elevator extraction point.
Vault entry timing depends on keycard possession. Standard keycards provide 20 uses (4 uses for replicated versions). Usage costs by difficulty: Easy (1 use), Normal (2 uses), Hard (4 uses). Carry up to 4 keycards per raid, expanding to 6 after Black Hawk Down objective completion.
Visual Landmarks and Navigation Checkpoints
Key checkpoints for rapid landmark recognition:
- Checkpoint 1 (10s): Dam control tower left, eastern guard post right
- Checkpoint 2 (25s): Eastern access corridor entrance, concrete barriers ahead
- Checkpoint 3 (45s): Corridor midpoint slope for slide-jump execution
- Checkpoint 4 (60s): Administrative Area courtyard fountain, red-roofed buildings surrounding
- Checkpoint 5 (90s): Main entrance interior, eastern stairwell access
- Checkpoint 6 (110s): Second floor landing, Server Room corridor visible
These checkpoints provide timing benchmarks for assessing rush performance and identifying areas requiring technique refinement.
Movement Mechanics Optimization
Movement mechanics mastery separates competent vault rushers from elite performers achieving sub-2-minute times. Delta Force's movement system rewards players understanding stamina conservation, momentum physics, and terrain exploitation techniques.
Core movement mechanics: tactical sprint (maximum speed with stamina consumption), standard sprint (moderate speed with minimal stamina drain), slide (momentum-based movement with directional control), jump (vertical movement with stamina cost). Combining these in optimal sequences creates movement speeds exceeding any single technique's individual performance.
Tactical Sprint Management and Stamina Conservation
Tactical sprint provides maximum movement speed but depletes stamina rapidly. Optimal usage focuses on flat terrain sections and slight downhill slopes where stamina efficiency remains high, reserving standard sprint for uphill sections and stamina recovery intervals.
Stamina regeneration begins immediately upon ending tactical sprint, with full recovery requiring approximately 8-10 seconds of non-sprint movement. Advanced players alternate between tactical sprint bursts and brief standard sprint intervals, maintaining average speeds near tactical sprint levels while preventing complete stamina depletion.
Monitor stamina through peripheral vision rather than direct meter observation, developing intuitive awareness based on sprint duration and terrain traversed.
Slide-Jump Techniques for Speed Boost
Slide-jumping exploits momentum physics to maintain or increase movement speed during transitions. Execute by initiating slide during tactical sprint, then jumping at slide midpoint to carry accumulated momentum through air. Especially effective on downhill slopes where gravity amplifies momentum boost.
Timing window for optimal slide-jumps: approximately 0.3-0.5 seconds after slide initiation, when momentum peaks before friction reduces slide speed. Practice this timing in low-pressure environments to develop muscle memory for consistent execution.
Directional control during slide-jumps requires subtle mouse movements adjusting trajectory without canceling momentum boost. Maintain forward directional input while using mouse movement for minor course corrections.
Terrain Exploitation and Shortcut Routes
Zero Dam to vault routes contain multiple terrain features enabling shortcut opportunities for players accepting minor fall damage or navigation risks. The eastern access corridor's barrier arrangement allows skilled players to vault over specific obstacles rather than navigating around them, saving 1-2 seconds per successful vault.
Identify shortcut opportunities during practice runs by experimenting with alternative paths and measuring time differences against standard route. Not all apparent shortcuts provide actual time savings.
Limit fall damage to 10-15% maximum health loss, ensuring sufficient health reserves for potential vault area engagements.
Equipment Weight Impact on Movement Speed
Equipment weight directly affects movement speed, with heavier loadouts reducing tactical sprint speed and increasing stamina consumption rates. Dam Summit West extraction enforces strict 30kg weight limit, demonstrating weight-based movement penalties applying universally.
Optimal vault rush loadouts minimize weight while maintaining combat viability:
- Lightweight primary weapons (SMGs, carbines)
- Minimal armor (Level 2-3 maximum)
- Essential utility items only
Avoid looting during initial vault rush unless encountering exceptionally high-value items justifying speed penalty. Complete vault access first, then conduct systematic looting with full weight awareness.
Spawn Point Comparison
Zero Dam represents one of several viable spawn points for vault rushes, each offering distinct advantages based on terrain, distance, and enemy encounter probability.
Distance Analysis to Vault from All Spawn Points
Direct distance measurements to Administrative Area vault locations:
- Zero Dam: 280-320 meters (2-minute rush achievable)
- Barracks: 180-220 meters (90-second rush possible)
- Major Substation: 240-280 meters (2-3 minute rush typical)
- Cement Plant: 420-480 meters (3-4 minute rush, vault access impractical)
- Visitor Center: 350-400 meters (3-minute rush minimum)
Barracks spawns provide shortest vault access routes but concentrate multiple players in close proximity, increasing immediate combat probability. Zero Dam offers balanced distance with reduced spawn competition.
Terrain Difficulty and Obstacle Comparison
Zero Dam routes feature moderate terrain difficulty. Eastern access corridor contains manageable obstacles that skilled players navigate efficiently through slide-jump techniques.
Barracks routes traverse relatively flat terrain with minimal obstacles, enabling maximum sprint speed maintenance. However, terrain simplicity creates predictable movement patterns that experienced opponents exploit.
Major Substation routes involve elevation changes and industrial equipment obstacles interrupting sprint rhythm and creating navigation decision points.
Combat Encounter Probability by Route
Zero Dam routes experience moderate encounter probability. Eastern access corridor serves multiple navigation purposes beyond vault rushes, distributing player traffic across various objectives.
Barracks routes demonstrate highest combat encounter rates, with multiple spawn points funneling players through common chokepoints near Administrative Area's northern entrance.
Visitor Center and Cement Plant routes offer lower encounter probabilities due to extended travel distances naturally staggering player arrival times at vault locations.
Vault Access Requirements and Door Mechanics
Vault access involves multiple security layers through keycard acquisition, door interaction mechanics, and security system understanding.
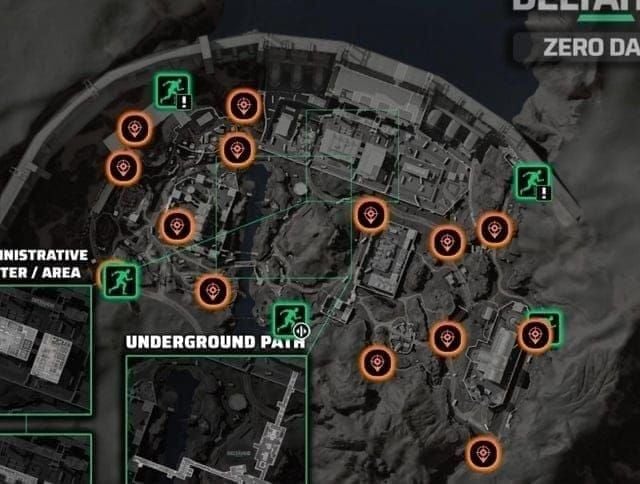
The Administrative Area contains seven keycard spawn locations: East Wing Manager's Office, West Wing Control Room, Equipment Collection Room, West Wing Infirmary, Major Substation Tech Room, Ticket Office, Central VIP Room.
Understanding Vault Security Systems
Safe Box security operates through timing-based interaction where players press designated button at precise moments during loading bar sequence. This prevents instant looting and creates vulnerability windows where players remain stationary and exposed.
Guard Captain Saeed Ziaten serves as mobile security element within Administrative Area, patrolling northern section with M249 equipped with 5.56×45mm M855A1/M995 ammunition. His Level 4 armor and Suppression Helmet make him formidable. Avoid his patrol route when possible.
Access Card Requirements and Locations
Standard keycards provide 20 uses before expiration, while replicated versions offer only 4 uses. This makes standard keycard acquisition significantly more valuable for extended looting sessions.
The 4-keycard carry limit (expanding to 6 after Black Hawk Down completion) requires strategic keycard selection. Prioritize keycards unlocking Safe Boxes along planned extraction route.
Vault Interior Layout and Loot Distribution
Administrative Area's second floor contains four Safe Box locations:
- Balcony: Exterior position with exposure risk
- Server Room: North-side interior with good cover
- PC Room: East-side with multiple entry points
- Bedroom: South-side with limited escape routes
Server Room and PC Room provide optimal loot-to-risk ratios. Prioritize these during initial vault access.
Spec Ops Safe Box spawns after unlocking 8+ standard Safe Boxes, containing highest-tier loot but requiring time investment potentially exceeding vault rush efficiency goals.
Optimal Loadouts for Vault Rushes
Loadout optimization balances movement speed requirements against combat readiness needs. Weight management represents primary consideration, as equipment weight directly impacts movement speed and stamina efficiency.
Weapon Selection for Speed and Early Combat
Primary weapon selection prioritizes lightweight options with effective close-to-medium range performance. Vault area engagements typically occur within 50 meters.
Recommendations:
- SMG Options: Lightweight platforms with high fire rates for close-quarters vault interior combat
- Carbine Options: Balanced platforms offering medium-range capability for courtyard engagements
- Avoid: Full-size rifles, LMGs, sniper rifles adding excessive weight
Secondary weapons become optional for pure vault rushes. Weight savings from eliminating secondaries often outweigh tactical flexibility they provide.
Equipment Choices That Maximize Mobility
Armor selection balances protection against weight penalties. Level 2-3 armor provides optimal survivability-to-mobility ratios.
Utility item selection:
- Mandatory: Basic medical supplies
- Recommended: Single grenade for defensive area denial
- Optional: Tactical equipment based on preference
- Avoid: Excessive ammunition, redundant utility items, non-essential consumables
Use medium backpacks accommodating essential equipment and high-value vault loot without imposing excessive movement penalties.
Minimal Gear Strategy for Maximum Speed
Minimal gear approach strips loadouts to absolute essentials, maximizing movement speed at cost of combat versatility. Suits highly skilled players relying on superior positioning and first-shot accuracy.
Minimal loadouts:
- Primary weapon only (no secondary)
- Level 2 armor maximum
- Single medical item
- No grenades or tactical equipment
- Smallest viable backpack
This achieves maximum movement speeds and fastest possible vault rush times but requires exceptional combat skill to overcome equipment disadvantages.
Common Mistakes and How to Avoid Them
Route Deviation Errors That Cost Time
Navigation mistakes represent most frequent vault rush failure point. Deviations add 10-30 seconds to vault rush times, often determining success or failure in contested scenarios.
Prevent route deviation through deliberate practice runs reinforcing correct navigation patterns. Execute 10-15 practice rushes focusing exclusively on route memorization without combat pressure.
Create mental associations between landmarks and specific actions (e.g., fountain = check left for snipers, maintain sprint right side) triggering automatically during rushed execution.
Stamina Mismanagement and Sprint Timing
Stamina depletion at critical movement moments forces extended recovery periods eliminating vault rush time advantages. Players frequently over-commit to tactical sprint during route segments where standard sprint provides adequate speed.
Implement stamina management discipline by designating specific route segments for tactical sprint versus standard sprint. Eastern access corridor's initial flat section permits standard sprint without significant time loss.
Engagement Decision-Making During Rush
Combat engagement decisions create critical time-versus-risk tradeoffs. Players frequently engage enemies posing minimal immediate threats, consuming time and resources better invested in vault access.
Engagement criteria:
- Engage: Enemies blocking direct route path, opponents with clear firing lines to your position
- Avoid: Enemies at medium-long range without immediate firing angles, opponents engaged with other players
- Assess: Enemies near vault locations (may require elimination for area control)
Vault Entry Fumbles and Security Mistakes
Safe Box interaction failures waste critical seconds and expose players to unnecessary risk. Timing errors during button-press sequence force interaction restarts doubling exposure time.
Practice Safe Box interaction timing in low-pressure scenarios. Timing window remains constant across multiple interactions, making it learnable through deliberate practice.
Prioritize Safe Box access based on loot value and extraction route alignment rather than simple proximity.
Advanced Tips from Experienced Players
Weather and Time-of-Day Route Adjustments
Night operations during Long Night event (01:00-02:00 UTC Space City Normal, 02:00-03:00 UTC Brakkesh Normal) reduce visual detection ranges but also limit rusher's ability to identify threats at distance.
Adjust movement patterns based on visibility conditions. Use reduced enemy sight lines during night operations to take more direct routes too exposed during daytime.
Weather effects like rain or fog create audio masking reducing footstep detection ranges. Exploit these conditions by maintaining aggressive sprint patterns through normally risky areas.
Solo vs Squad Rush Strategy Differences
Squad-based vault rushes enable coordinated strategies with specialized roles: point player (fastest rusher), support player (covering fire and threat elimination), security player (rear guard and extraction preparation).
Solo rushers must consolidate all roles into individual execution, requiring more conservative routing maintaining combat readiness throughout rush. Prioritize routes with good cover availability and multiple escape options.
Post-Vault Rotation and Extraction Planning
Vault access represents midpoint of successful MandelBrick runs rather than final objective. Post-vault rotation planning determines whether players successfully extract acquired loot.
Industrial Elevator extraction offers vault-adjacent extraction but requires activating levers in Administrative District 2F and Major Substation northeast, then waiting 3 minutes before reaching extraction zone within 3-minute timer window.
Alternative extraction points: River Bank (10,000 currency payment), Dam Summit West (under 30kg weight), various spawn-dependent options. Select based on current weight, available currency, and enemy activity patterns.
Dealing with Enemy Vault Rushers and Contests
Contested vault scenarios require rapid tactical assessment and decisive action. Defensive positioning advantages favor players reaching vault first, as they can establish cover positions and pre-aim common approach angles.
Use this advantage by immediately securing defensive positions upon vault arrival rather than beginning looting sequences creating vulnerability.
Measuring Your Rush Performance
Timing Benchmarks and Success Metrics
Target benchmarks for Zero Dam vault rushes:
- Elite Performance: Sub-100 seconds (top 5%)
- Competitive Performance: 100-120 seconds (top 20%)
- Proficient Performance: 120-150 seconds (average experienced player)
- Developing Performance: 150-180 seconds (learning phase)
Track secondary metrics: stamina remaining upon vault arrival, health percentage after rush completion, keycard availability.
Recording and Analyzing Your Runs
Video recording enables detailed performance analysis identifying subtle technique errors invisible during real-time execution. Review recordings at 0.5x speed to identify movement inefficiencies, route deviations, and decision-making errors.
Focus analysis on specific route segments rather than complete runs. Compare your segment execution against expert player recordings to identify technique differences.
Incremental Improvement Strategies
Priority improvement sequence:
- Route memorization: Achieve consistent navigation without map reference
- Movement mechanics: Master slide-jump timing and stamina management
- Combat integration: Develop engagement decision-making and threat assessment
- Optimization: Refine specific route segments for maximum efficiency
Address plateaus by analyzing performance data to identify specific limiting factors, then designing targeted practice exercises addressing those weaknesses directly.
Frequently Asked Questions
What is the Zero Dam spawn point in Delta Force MandelBrick?
Zero Dam is a central-eastern spawn location positioned between Barracks and Major Substation. It provides strategic access to Administrative Area vault locations within 280-320 meters, enabling 2-minute vault rushes with optimal movement techniques and routing.
How long does it take to reach the vault from Zero Dam?
Experienced players consistently reach Administrative Area vault locations from Zero Dam in 100-120 seconds using optimized routes and advanced movement mechanics. Elite performers achieve sub-100 second times, while developing players typically require 150-180 seconds.
Which spawn point is best for vault rushes in MandelBrick?
Barracks spawns offer shortest vault access distance at 180-220 meters but concentrate multiple players and increase combat probability. Zero Dam provides optimal balance of reasonable distance (280-320 meters), reduced spawn competition, and favorable terrain for consistent vault rush execution.
What movement techniques reduce vault rush time?
Slide-jumping on downhill slopes, tactical sprint management with stamina conservation, terrain exploitation through shortcut routes, and lightweight loadout optimization collectively reduce vault rush times by 20-30 seconds compared to standard movement.
Do you need special equipment to access the MandelBrick vault?
Administrative Area Safe Boxes require keycards for access, with seven spawn locations throughout the map. Standard keycards provide 20 uses while replicated versions offer 4 uses. Players can carry 4 keycards per raid (expanding to 6 after Black Hawk Down), with unlock costs varying by difficulty: 1 use (Easy), 2 uses (Normal), 4 uses (Hard).
What are the risks of rushing the vault early in MandelBrick?
Early vault rushes prioritize speed over combat readiness, creating vulnerability to ambush-focused opponents and reducing situational awareness during rapid movement. Players face Guard Captain Saeed Ziaten in Administrative Area, who carries Level 4 armor and M249 with premium ammunition. Balance speed with tactical awareness and maintain sufficient health for vault area engagements.
Ready to dominate MandelBrick with premium gear? Visit BitTopup for instant Delta Force credits and unlock the best loadouts for your vault rushes. Fast delivery, secure transactions, and exclusive deals for competitive players!


