

Introduction: The State of the Meta in Version 6.1
Okay, let's be real here – Version 6.1 didn't just shake things up when it dropped on October 22, 2025. It completely flipped the table.
The Luna II mechanics? They're not just some fancy new coating on the same old Abyss formula. We're talking about fundamental changes that make your carefully crafted hypercarry teams look... well, kinda outdated. The November 16 Spiral Abyss rotation brought Lunar-Bloom reactions that boost Dendro teams by 20-30%, while Lunar-Charged does the same for Pyro and Electro DPS.
But here's the kicker – Floor 12 enemies now have 375% increased HP. Yeah, you read that right. Bosses are sitting pretty at over 4M health each. Your old 90-second clear times? Those are ancient history now.
What really caught my attention (and probably yours too, if you've been banging your head against Floor 12) is how Moonsign Level 2 works. You need at least 2 Nod-Krai characters to activate Ascendant Gleam, which grants +120 EM and amplified Lunar damage bonuses. This completely changes team building philosophy – we're moving away from pump everything into one character toward balanced compositions.
The damage scaling is fascinating: Lunar reactions scale 100% from your highest damage dealer, 50% from second, and just 1/12 from others. Smart, right? It rewards thoughtful team construction over brute force.
For those looking to optimize their rosters through strategic pulls, Genshin Impact Genesis Crystals Top Up through BitTopup offers competitive pricing and instant delivery. The platform's secure payment processing and 24/7 customer support make it the preferred choice for building meta teams.
Understanding the Luna II Abyssal Moon Blessing
Here's where things get spicy. Luna II blessing isn't just another damage multiplier – it's a complete reaction overhaul.
Lunar-Bloom creates enhanced Dendro cores that actually CRIT (finally!), scale with party stats, and detonate across 2-meter radius zones in just 1.2 seconds while completely bypassing enemy DEF. When Nefer triggers these with Nod-Krai teammates, we're looking at 75% damage boosts over standard Bloom reactions.
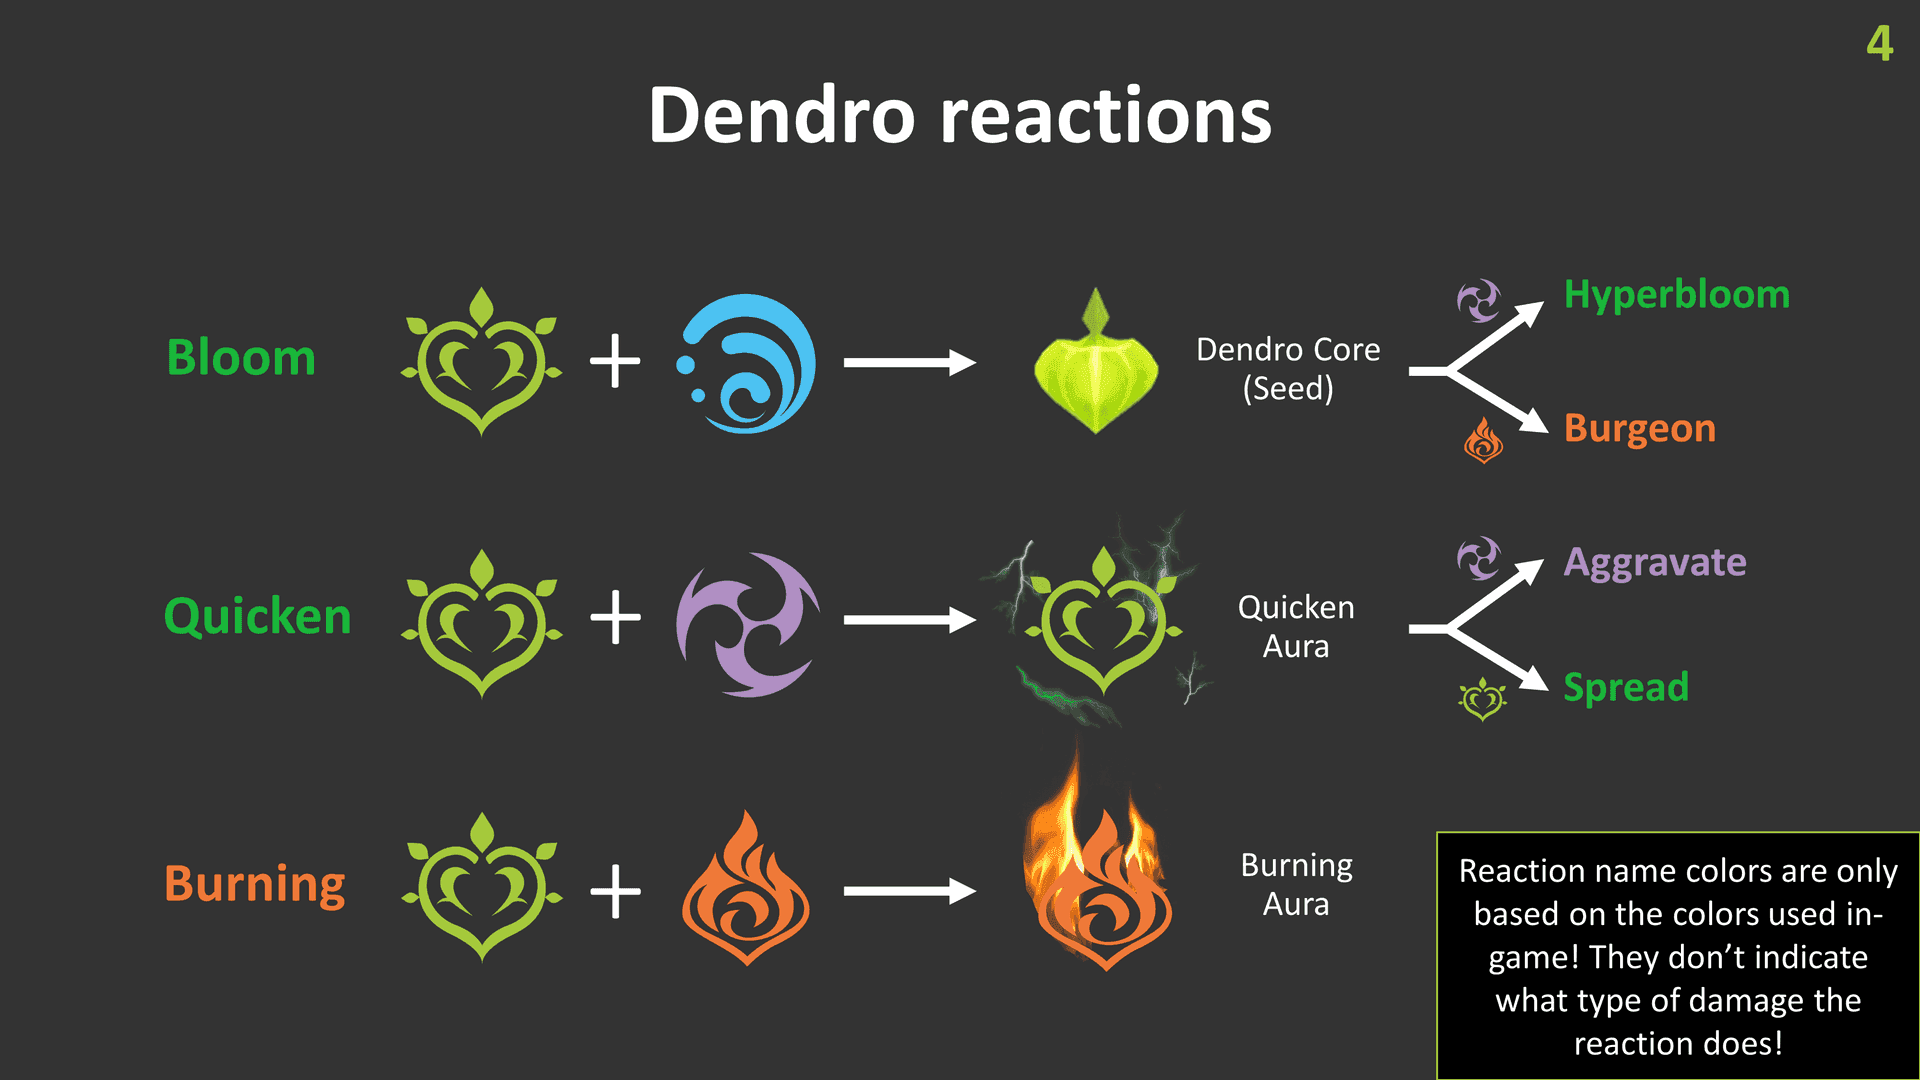
Lunar-Charged reactions? They're giving Pyro and Electro DPS 20-30% multiplicative bonuses through Moonsign mechanics. But – and this is crucial – energy management becomes absolutely critical. Most DPS characters need 160-180% ER, while Sub-DPS units require 180%+ for consistent rotations.
Trust me, I learned this the hard way during my first few Floor 12 attempts.
Tier List Methodology & Criteria
Let me break down how I'm evaluating these characters, because methodology matters when you're investing months of resin into someone.
I'm looking at 20-second rotation performance in Floor 12 scenarios – not some theoretical perfect world where enemies stand still and let you combo them. Real performance under pressure. SS-Tier represents 14 five-star and 2 four-star characters that are genuinely meta-defining, outperforming lower tiers by 20-30% in actual clear times.
The evaluation criteria prioritize sustained damage output within Luna II constraints. Shield-breaking capabilities matter more than ever – Frostnight Herra's Gloomveiled state requires 50 damage instances to break, while Fireblade Shock Troopers demand specific Electro-Charged sequences within 30-second windows.
I'm using the standard 1:2 CRIT ratio (50% Rate/200% DMG) with 160-180% ER as baseline for DPS comparisons. All five-star characters are evaluated at C0 with signature weapons or competitive four-star alternatives. Four-star characters assume C6 availability – because let's face it, if you've been playing for a while, you probably have them maxed.
Investment costs factor heavily into my recommendations. We're talking 2000-3000 resin for A-Tier performance levels. That's not nothing.
Genshin Impact 6.1 Main DPS Tier List
SS-Tier: The Current Kings & Queens of Damage
Mavuika (5★ Pyro) – The undisputed queen of Lunar-Charged Vaporize.

She's not just strong; she's reshaping how we think about Pyro DPS. Her synergy with Bennett's ATK buffs and Xilonen's RES shred creates something beautiful. You'll want 2000+ ATK, 60-70% CRIT ratio using Crimson Witch 4pc with ATK%/Pyro DMG/CRIT main stats.
Her signature weapon A Thousand Blazing Suns paired with Obsidian Codex 4pc provides 15-20% damage increases over F2P alternatives. Worth the investment? Absolutely, if you're serious about Abyss performance.
Nefer (5★ Dendro) – The Lunar-Bloom specialist we didn't know we needed.

This character generates enhanced Dendro cores through Hydro interactions and consumes Seeds for Charged Attack multipliers. Build requirements are specific: 1000+ EM, 60-70% CRIT Rate, 150-180% CRIT DMG using Reliquary of Truth 4pc combined with Night of Sky's Unveiling 4pc.
What makes her special? Nod-Krai teammates like Lauma activate passive bonuses that boost EM and reduce stamina consumption. She's not just meta – she's meta-defining.
Flins (5★ Electro) – Electro-Charged excellence personified.
His Thunderous Symphony requires 2000-2200 ATK, 60-70% CRIT Rate, 160-180% ER. Here's something interesting: Bloodsoaked Ruins and Night of Sky 4pc combination actually prioritizes ATK% over Electro DMG for optimal scaling. C2 reduces ER requirements to 140-160%, but honestly? C0 performance is already SS-Tier with proper support.
For maximizing pulling potential, Buy Genshin Impact Primogems Cheap through BitTopup's streamlined platform offers instant delivery and competitive rates. The service's reliability ensures safe transactions while building ideal team compositions.
S-Tier: Highly Competitive Options
Neuvillette (5★ Hydro) – Still the versatile powerhouse.
He maintains his position across Vaporize, Bloom, and Electro-Charged teams using Heart of Depth 4pc with HP%/Hydro DMG/CRIT stats. Those self-healing Charged Attacks provide sustainability that's genuinely valuable in the current meta. Single-target limitations in multi-wave scenarios occasionally hurt his performance, but he's still incredibly reliable.
Arlecchino (5★ Pyro) – Bond of Life burst damage at its finest.
She delivers exceptional damage through Crimson Witch 4pc and ATK%/Pyro DMG/CRIT optimization. Mono-Pyro compositions really showcase her strengths, though multi-wave scenarios can reduce effectiveness compared to sustained damage dealers like Mavuika.
Nahida (5★ Dendro) – The comeback story of 6.1.
Her rise in the meta through enhanced Dendro application synergies has been remarkable to watch. Deepwood Memories 4pc with 1000+ EM and EM/EM/CRIT stats enables powerful reaction support. C2's 250 EM burst provides substantial team benefits, but even C0 performance justifies S-Tier placement.
A-Tier: Situationally Strong Picks
Hu Tao (5★ Pyro) remains strong in Vaporize compositions with Xingqiu or Yelan support. Crimson Witch 4pc and HP%/Pyro DMG/CRIT optimization still work beautifully. Her single-target specialization limits universal application, but she maintains relevance in appropriate matchups.
Ayaka (5★ Cryo) delivers powerful Freeze burst damage through Blizzard Strayer 4pc with ATK%/Cryo DMG/CRIT DMG builds. Energy requirements and positioning demands create consistency challenges in the current meta, but when she works, she really works.
Best Sub-DPS and Off-Field Damage Dealers
Yelan (5★ Hydro) achieves SS-Tier status through consistent off-field Hydro application. She requires 180% ER for sustained performance, but Golden Troupe 4pc with HP%/Hydro DMG/CRIT stats enables Vaporize and Bloom reactions while providing substantial personal damage.
Her versatility across multiple team archetypes makes her invaluable for account progression. Honestly? If you don't have Yelan yet, she should be high on your priority list.
Ineffa (5★ Electro) delivers SS-Tier off-field Electro for Lunar-Charged compositions. She triggers through Emblem of Severed Fate 4pc with ER%/Electro DMG/CRIT optimization. Her synergy with Flins and Aino creates powerful Electro-Charged cores capable of 600% damage multipliers.
Fischl (4★ Electro) at C6 delivers A-Tier performance through Oz's consistent Electro application. Golden Troupe 4pc and ATK%/Electro DMG/CRIT stats work perfectly. F2P accessibility and Hyperbloom enabling capabilities make her essential for budget compositions.
Xiangling (4★ Pyro) maintains A-Tier status in National team variants through high ER Pyronado builds using Emblem 4pc with ER%/Pyro DMG/CRIT optimization. Energy requirements demand careful battery management, but proper execution rewards you with substantial AoE damage.
Top Supports, Healers, and Shielders
Floor 12's aggressive damage patterns have elevated sustain units beyond traditional support roles. Frostnight Herra's Gloomveiled state inflicts continuous damage requiring healing or shielding, while Fireblade Shock Troopers' energy drain mechanics (10 Energy per 0.5 seconds) demand survivability during extended engagements.
Bennett (4★ Pyro) – Still the GOAT.
He maintains SS-Tier status through unmatched ATK buffing and healing capabilities. C6 enables Pyro infusion synergies, while 200% ER and Noblesse 4pc with ER%/HP%/Healing Bonus stats ensure consistent uptime. F2P accessibility and universal team compatibility make him irreplaceable.
Kazuha (5★ Anemo) provides SS-Tier support through -40% RES shred via Viridescent Venerer 4pc with EM/EM/EM stats. Enemy grouping and elemental mastery sharing benefit virtually all team compositions. Worth every primogem.
Xilonen (5★ Geo) delivers SS-Tier RES shred and defensive support through Archaic Petra 4pc with HP/Geo DMG optimization. Healing and shield capabilities combined with offensive buffs create superior value compared to pure defensive options.
Kokomi (5★ Hydro) delivers S-Tier healing and Hydro application through Ocean-Hued 4pc with HP%/Healing Bonus optimization. Bloom team sustainability and consistent elemental enabling justify investment despite damage limitations.
Best Teams for Luna II Spiral Abyss (Floor 12)
First Half Recommendations (AoE Focus)
Lunar-Bloom Team: Nefer/Lauma/Aino/Nahida maximizes sustained reaction damage through 20-second rotations.

Execute: Nahida NA/Burst > Aino Skill/Burst > Nahida Skill > Lauma Skill/Burst > Nefer Skill + 2 CA (dash cancel) + Burst. This composition generates enhanced cores while consuming Seeds for multiplicative damage bonuses.
Electro-Charged Team: Flins/Ineffa/Yelan/Sucrose delivers 600% Electro-Charged damage requiring 2+ Nod-Krai for Ascendant Gleam activation.
Rotation: Aino Skill > Flins Skill > Ineffa Burst > Sucrose Burst. Shield-breaking capabilities handle Fireblade Shock Troopers within 30-second windows.
F2P Lunar-Bloom Variant: Dendro Traveler/Barbara/Aino/Sucrose provides accessible entry into Lunar mechanics. While damage output decreases compared to five-star variants, proper execution achieves 36-star clears through consistent reaction triggers.
Second Half Recommendations (Boss/Single-Target Focus)
Pyro Vaporize Team: Mavuika/Xingqiu/Bennett/Kazuha delivers reliable single-target damage through 18-second cycles.
Execute: Bennett Burst+Skill > Kazuha Burst > Xingqiu Burst > Mavuika Skill + NA combo + Burst. Lunar-Charged bonuses enhance Pyro DPS by 20-30% when properly executed.
Enhanced Vaporize: Mavuika/Furina/Bennett/Xilonen maximizes damage potential through layered buffs and RES shred.
Rotation: Bennett Burst+Skill > Xilonen Skill > Furina Burst+Skill > Mavuika Skill + NA combo > Mavuika Burst in Bennett field.
National Core: Xiangling/Xingqiu/Bennett/Sucrose adapts to Electro-Charged bonuses while maintaining accessibility. Rotation: Bennett Burst > Sucrose Skill/Burst > Xingqiu Burst > Xiangling Burst+Skill. Energy management through Bennett battery enables consistent performance.
Investment Guide: Who to Build Next?
High Value vs High Cost Characters
Let me give you the real talk on investment priorities.
F2P Priority List:
- Bennett (4★) - Universal ATK buffer and healer requiring minimal investment for maximum impact
- Xingqiu (4★) - Essential Hydro applicator enabling multiple reaction types
- Fischl (4★) - Consistent Electro application and Hyperbloom triggering at C6
- Aino (4★) - Accessible Moonsign enabler for Lunar mechanics
Mid-Investment Targets:
- Kazuha (5★) - Universal support with grouping and RES shred
- Nahida (5★) - Dendro amplifier with rising meta relevance
- Yelan (5★) - Premium Hydro applicator with personal damage
Artifact domain priorities should target 4pc set completion before substat optimization. Night of Sky's Unveiling and Silken Moon's Serenade domains provide essential pieces for Lunar mechanics, while traditional sets like Viridescent Venerer and Emblem of Severed Fate maintain universal value.
Weapon investment follows similar efficiency principles. Signature weapons provide 15-20% damage increases over F2P alternatives, but they're not make-or-break for most content.
Verdict: Preparing for Version 6.2
Version 6.1's Luna II mechanics have established new team-building paradigms that emphasize elemental diversity and balanced damage distribution. The 20-30% bonuses from Lunar reactions reward players who invest in proper Nod-Krai synergies while maintaining traditional reaction fundamentals.
Character investment should prioritize versatility and multi-team excellence over narrow specialization. Bennett, Kazuha, and Yelan provide universal value across team archetypes, while specialized units like Nefer and Flins excel in specific compositions.
The meta's emphasis on sustained damage and energy management favors consistent performers over burst-dependent characters. This trend will likely continue into 6.2, so plan accordingly.
FAQ
Q: Who is the best overall DPS character in Genshin Impact 6.1? Mavuika leads as top DPS through Lunar-Charged Vaporize synergies, requiring 2000+ ATK and 60-70% CRIT ratio with Crimson Witch 4pc. Her compatibility with Bennett and Xilonen creates powerful team compositions for both AoE and single-target scenarios.
Q: Are Lunar-Bloom teams worth building for F2P players? Absolutely. F2P Lunar-Bloom variants using Dendro Traveler/Barbara/Aino/Sucrose provide accessible entry into the meta. Proper execution achieves 36-star Abyss clears through consistent reaction triggers.
Q: How important are Nod-Krai characters for the current meta? Essential. You need 2+ for Moonsign Level 2 activation, which enables 20-30% damage bonuses and Ascendant Gleam effects. They're high-priority investments if you're serious about current content.
Q: Which support character provides the best value for investment? Bennett remains the highest-value support through universal ATK buffing and healing capabilities. His C6 enables Pyro infusion synergies while requiring only 200% ER and Noblesse 4pc for optimal performance.
Q: How do energy requirements change in Version 6.1? They've increased significantly. DPS characters need 160-180% ER and Sub-DPS require 180%+. Floor 12's extended encounters and energy drain mechanics demand careful battery management and Favonius weapon usage.
Q: Is it worth pulling for signature weapons in the current meta? Signature weapons provide 15-20% damage increases over F2P alternatives but aren't essential for 36-star clears. R5 four-star weapons achieve 80-90% efficacy, making them viable long-term solutions.


