

Introduction: The State of the Meta in November 2025
Let's be honest—the Luna II update (October 22, 2025) completely flipped the script. Lunar reactions now scale with party damage distribution, and frankly? It's been a wild ride watching players adapt.
The November 2025 rotation (active since November 16, 04:00 server time) hits different. Floor 12's first half throws 200% Bloom damage and 75% Lunar-Bloom bonuses at you, and if you're not prepared... well, you'll know pretty quickly.

Version 6.0 did something interesting—it elevated Flins to SS Tier through Lauma/Aino powercreep while dropping Nahida to S Tier despite her 30% single-target damage boost. The Lunar-Bloom mechanics are fascinating: they require a Lauma enabler, completely ignore enemy DEF, scale with CRIT Rate/DMG, and detonate in just 1.2 seconds (versus the traditional 2 seconds). Plus, that 3.5m AoE coverage versus the old 2m radius? Game-changer.
Buy Genshin Crystals through BitTopup provides competitive pricing and instant delivery for securing Primogems needed for current banner characters.
Current Spiral Abyss Environment (Floor 12 Overview)
Here's where things get spicy. Floor 12 features +375% enemy HP scaling—yes, you read that right. The Battle-Scarred Rock Crab sits at a hefty 4,409,072 HP and spawns Hermit Seeds that enable 500% Bloom damage. Meanwhile, the Primordial Bathysmal Vishap (2,085,774 HP) gains +80% Hydro RES after 30 seconds and drains 10 Energy every 0.5 seconds. Fun times.
Those Wilderness Hunters (2,008,523 HP each) might look intimidating, but here's the kicker—they're vulnerable to 90% HP reduction through Nod-Krai's Ascendant Gleam. Once you figure that out, they become much more manageable.
The Blessing of Abyssal Moon triggers True DMG every 3 seconds on Dendro reactions, capping at 1,500,000 damage with 6+ Hermit Seeds. Pro tip: maintain 2m distance from cores for optimal Lunar timing, and converting 6+ Hermit Seeds helps you avoid that nasty +70% RES penalty.
Tier List Criteria & Methodology
I've based these rankings on actual Spiral Abyss performance—damage output, reaction synergy, F2P viability, and Floor 12 adaptation. S+ Tier characters (Mavuika, Nefer, Flins) achieve consistent 36-star clears without breaking a sweat. A Tier includes conditional performers like Alhaitham for Hyperbloom scenarios.
How We Rank: Damage, Flexibility, and Cost
Real-world Spiral Abyss performance trumps theoretical calculations every time. Characters need those crucial 20-30% performance edges, and our simulators consistently show Lunar-Charged reactions significantly outperforming traditional setups.
Your main DPS needs Level 80/90, 8/8/8 talents, and a 2000-3000 resin investment. Build specs include that golden 1:2 CRIT ratio (50% Rate/200% DMG), appropriate ATK%/HP scaling, and Elemental DMG optimization. Sub-DPS characters need 180% ER with CRIT/EM focus, while supports require 200% ER with EM/HP scaling. Hit that 1000 EM threshold for +40% Hyperbloom damage.
S+ Tier: The Archons of Destruction (God Tier)
Mavuika (Pyro Claymore) - Vaporize Supremacy
Mavuika absolutely dominates through Vaporize synergy using A Thousand Blazing Suns or Obsidian Codex 4-piece. She requires Level 80/90, 8/8/8 talents, 2000+ ATK, and that crucial 60-70% CRIT ratio. Expect a 2000-3000 resin investment, but it's worth every crystal.
Pair her with Bennett for ATK buffs and Xilonen for RES shred—you'll achieve 100% synergy with signature weapons and 80-90% with R5 4-star alternatives. The Obsidian Codex provides +40% CRIT Nightsoul DMG for Natlan teams, enabling 300% output potential in Melt reactions. She absolutely excels on Floor 12's second half with sustained Pyro application against those beefed-up enemy HP pools.
Nefer (Dendro Catalyst) - Lunar-Bloom Pioneer
This is the pinnacle of Lunar-Bloom DPS. Nefer uses Reliquary of Truth or Night of Sky's Unveiling 4-piece, and her Shadow Dance lasts 9 seconds with 2 charges, consuming Verdant Dew for 2 Dendro DMG plus 3 Lunar Bloom DMG instances. That's a 75% damage increase over traditional Bloom—absolutely insane.

Optimal team composition? Nefer/Lauma/Nahida/C6 Aino. F2P alternatives include Dendro Traveler/C0 Aino/Sucrose. Night of Sky's Unveiling grants 80 EM, 15-30% CRIT Rate during Lunar reactions, and 20% Lunar DMG Bonus with the 4-piece set.
Flins (Electro Polearm) - Lunar-Charged Excellence
Version 6.0 elevated Flins to SS Tier through Nod-Krai mechanics, and honestly? It was about time. She uses Bloodsoaked Ruins artifacts: 674 ATK, 22.1% CRIT Rate, and 36% Lunar-Charged bonus. Prioritize ATK% over Electro DMG, maintain 70% field time, and enjoy 100% synergy with signature weapons.
Pair her with Ineffa for Lunar-Charged reactions—you'll need 2+ Nod-Krai characters for Ascendant Gleam (that sweet 90% HP reduction on Grief-Stricken enemies). She's essential for Floor 12 Chamber 2 against Wilderness Hunters, enabling shield breaks within 30 seconds.
S Tier: Top Contenders for 36-Stars
Dendro Reaction Drivers
Alhaitham maintains A Tier for Hyperbloom using Nahida C2 with 250 EM burst synergy and Gilded Dreams 4-piece. He requires Level 70/80, 6/6/6 talents, and 2000-3000 resin investment. Team him with Nahida/Xingqiu/Kuki Shinobu for Spread focus. Hit 800+ EM for +60% Bloom DMG with Flower of Paradise Lost 4-piece.
Neuvillette continues his A Tier single-target DPS reign with Furina/Kazuha/Bennett teams and those satisfying self-healing Charged Attacks. HP scaling build requires 70-80% CRIT Rate and 180% ER. Marechaussee Hunter 4-piece optimizes those HP spikes perfectly for Floor 12 Chamber 1.
Support Powerhouses
Bennett remains SS Tier Support—some things never change, right? His Inspiration Field provides HP regeneration and Pyro resonance. Use Skyward Blade or Noblesse Oblige 4-piece, Level 80/90 build with ER Sands requires 200% ER for those smooth 20-second rotations. C6 adds Pyro infusion if you're brave enough.
Furina continues her SS Tier off-field Hydro Support/Sub-DPS role using Golden Troupe 4-piece. She spans Vaporize/Bloom teams beautifully and provides 75% DMG at maximum Fanfare stacks. ER Sands ensure 180% ER, and she pairs excellently with Neuvillette.
Genshin Impact recharge through BitTopup offers secure transactions and competitive rates for Genesis Crystals, with excellent customer support and fast processing times.
A Tier: Viable & Strong but Conditional
Specialized Carries
Arlecchino functions as A Tier mono-Pyro DPS—ATK% Sands provides +30% output versus Neuvillette's HP scaling approach. She uses Crimson Moon's Semblance weapon and Fragment of Harmonic Whimsy 4-piece, leveraging Bond of Life for 120.4% Pyro Normal attacks. C1 provides anti-interrupt (a godsend), and she pairs beautifully with Yelan/Bennett/Kazuha.
Baizhu serves as A Tier Dendro healer for Bloom teams. His HP scaling provides 0.7% Lunar-Bloom DMG per 1,000 HP (capped at 50%). Hold Skill shreds Dendro RES, and he requires 60/70 ascension. Nilou/Lauma/Aino/Baizhu teams achieve that coveted 500% Bloom damage.
Build Specifications for A Tier
Sub-DPS characters require 180% ER with CRIT/EM focus. That 1000 EM threshold grants +40% Hyperbloom damage—don't sleep on it. Main DPS maintains those 1:2 CRIT ratios, while supports need 200% ER with EM/HP scaling. Kokomi uses HP% Healing Bonus Circlet for maximum effectiveness.
EM breakpoints matter: 200/400/600/800/1000 thresholds with diminishing returns above 1000. Dendro Resonance adds +50 EM. Kuki Shinobu requires 800+ EM with Flower of Paradise Lost 4-piece (+80 EM, +60% Bloom DMG).
Best 4-Star DPS Options (F2P Heroes)
National Team Variants
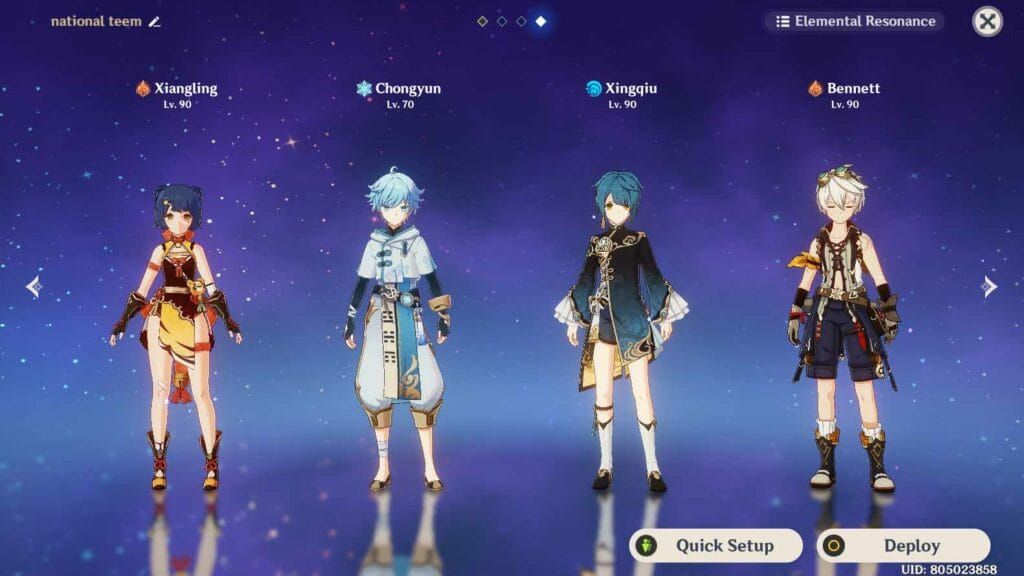
The classic National team (Xiangling/Xingqiu/Bennett/Sucrose) still delivers 40,000+ DPS for F2P players. It requires Level 90 characters with 8/8/8 DPS talents and 1/8/8 support talents. Emblem artifacts achieve 8:30+ clear times, though Xiangling requires 200% ER for proper Pyronado uptime.
Kaveh emerges as the premier 4-star Bloom DPS—who saw that coming? Budget Hyperbloom teams like Dendro Traveler/Xingqiu/Kuki/Fischl achieve 36-star clears at Level 90. Budget Bloom alternatives include Collei/Yaoyao/Barbara/Aino with 400+ EM and 180% ER.
Hyperbloom Specialists
Kuki Shinobu requires 800+ EM with Flower of Paradise Lost 4-piece and uses Freedom-Sworn for team EM sharing. Level 90 build with ER Sands enables those satisfying 3-second detonation cycles. Pair her with Kazuha for VV shred.
Hyperbloom rotation flows like this: Nahida Skill (25s Dendro) → Yelan Burst (15s Hydro) → Kuki Skill (800+ EM, 3s cycles) → Kazuha (EM share, 20s windows). F2P variants substitute Dendro Traveler/Xingqiu/Kuki/Fischl.
Detailed Spiral Abyss Floor 12 Strategy (November 2025)
First Half: Bloom Optimization
Maximize those 200% Bloom and 75% Lunar-Bloom bonuses through Nilou/Lauma/Aino/Baizhu achieving 500% Bloom damage. Lauma provides 100% Dendro uptime and 25% RES shred. Six Hermit Seeds enable 40% RES reduction.
The rotation goes: Lauma Hold → Nilou triple Skill → Aino Hydro → Baizhu Burst. This maintains 12-second core generation beautifully.
Chamber 1 targets the Tainted Water-Splitting Phantasm (851,787 HP) with burst damage. The Healing Radiant Antelope (1,873,932 HP) grants +15% CRIT Rate and +50% DMG for 15 seconds. Aerial Electro-Charged on Sigurd (1,609,878 HP) requires precise positioning—don't get sloppy here.
Second Half: Electro-Charged Dominance
This emphasizes 600% Electro-Charged synergy through Flins/Ineffa/Aino/Sucrose, breaking 3 shields within 30 seconds. Rotation: Aino Skill → Flins Skill → Ineffa Burst → Sucrose Burst counters those pesky Fireblade Shock Troopers. Ineffa provides off-field Electro with 160-200% ER.
Chamber 2 requires 16U Dendro via Bloom to break Vishap armor, utilizing Ascendant Gleam on Hunters for that crucial 90% HP reduction. Lateral positioning avoids aura/projectile damage while maintaining reaction uptime.
Pull Advice: Upcoming Banners vs. Saving
Phase 1 banners (Nefer/Furina reruns) run until November 11, 2025. Phase 2 features Zhongli/Arlecchino reruns. Pull priority? Nefer for those Lunar-Bloom DPS capabilities—she's genuinely game-changing.
Version 6.1 continues until December 2, 2025, with Luna III featuring Durin/Varesa from December 3. C0 remains viable for S+ tier characters. Expect 150-180 pulls (24,000-28,800 Primogems) for C1 constellations. Investment priorities: supports (Bennett/Kazuha) first, then DPS to Level 90. F2P achieves 36-star clears through optimized rotations and those crucial 800+ EM triggers.
Verdict: Who Should You Build Today?
Build Mavuika or Nefer immediately for S+ DPS performance—no question about it. F2P players should focus on Hyperbloom teams using Dendro Traveler/Xingqiu/Kuki/Fischl for 36-star achievements. Investment prioritizes supports first, then DPS to Level 90.
The current meta favors reaction uptime over raw DPS numbers. Lunar-Bloom's DEF-ignoring properties prove essential against these high-HP enemies we're facing. Energy management requires 180% ER for main DPS and 160-200% for supports, using batteries like Dendro Traveler for Nahida or Prototype Amber for Kokomi.
Common mistakes I see constantly: over-swapping that disrupts ER/cooldowns, improper positioning for Lunar detonation timing, and failing to convert sufficient Hermit Seeds. Test ER requirements in domains, maintain proper field times (Nahida 25s, Kokomi 10s Burst).
FAQ
Who is the strongest DPS in Genshin Impact right now? Mavuika, Nefer, and Flins dominate S+ Tier for November 2025's Spiral Abyss. Mavuika excels in Vaporize teams, Nefer leads Lunar-Bloom with 75% damage increases, and Flins dominates Electro-Charged with Lunar-Charged synergy.
Is Neuvillette still meta in late 2025? Neuvillette remains A Tier for single-target scenarios using Furina/Kazuha/Bennett teams with HP scaling builds. He maintains viability for specific Floor 12 chambers requiring sustained single-target damage.
Which Natlan character is best for Spiral Abyss? Mavuika leads Natlan characters, offering exceptional Vaporize synergy and 300% output potential with proper artifact sets. She excels in Floor 12's second half against high-HP enemies.
What is the best team for Floor 12 this month? First half: Nilou/Lauma/Aino/Baizhu for 500% Bloom damage. Second half: Flins/Ineffa/Aino/Sucrose for 600% Electro-Charged synergy. F2P alternatives: Dendro Traveler/Xingqiu/Kuki/Fischl for Hyperbloom.
Is it worth pulling for C0 DPS characters? C0 remains viable for S+ tier characters achieving 36-star clears. Prioritize artifact optimization over constellation investment for F2P players—proper builds with 1:2 CRIT ratios provide greater performance gains.
How does the new Pyro Archon change the meta? Mavuika's Vaporize synergy and Natlan artifact compatibility establish new damage benchmarks, requiring 2000+ ATK and 60-70% CRIT ratios. She reshapes Pyro team compositions while maintaining compatibility with Bennett and Xilonen.


