

Luna IV 6.3 Phase 2 Changes
February 16, 2026 reset begins Luna IV 6.3 Phase 2, running until March 16, 2026, at 03:59 AM. Stonehold Moon blessing auto-triggers Lunar-Crystallize True DMG every 3 seconds, creating passive damage for budget teams without extra investment.
Floor 12's second half: 75% damage boost for Lunar-Charged and Lunar-Crystallize reactions. Floor 11: 60% Hydro DMG Bonus and 60% Geo DMG Bonus via Ley Line Disorder.
Rewards per floor: 50 Primogems + 20,000 Mora (3 stars), 50 Primogems + 20,000 Mora (6 stars), 100 Primogems + 20,000 Mora (9 stars). Full clear: 600 Primogems total.
Buy Genshin Impact Genesis Crystals top up for primogems through BitTopup for character acquisitions.
Lunar-Reaction Mechanics
Lunar-Charged: Requires Ineffa, Hydro, and Electro simultaneously on enemies. Deals Electro DMG scaling off Elemental Mastery, ignores enemy DEF. Ineffa appears only through specific Abyss blessings—reaction works exclusively in designated cycles.
Lunar-Crystallize: Activated by Stonehold Moon blessing on 3-second intervals. Passive activation maintains damage during rotation downtime and cooldowns.
The 75% amplification on Floor 12's second half transforms Lunar-Charged into primary damage source for teams lacking 5-star DPS.
Floor 12 Second Half Enemy Lineup
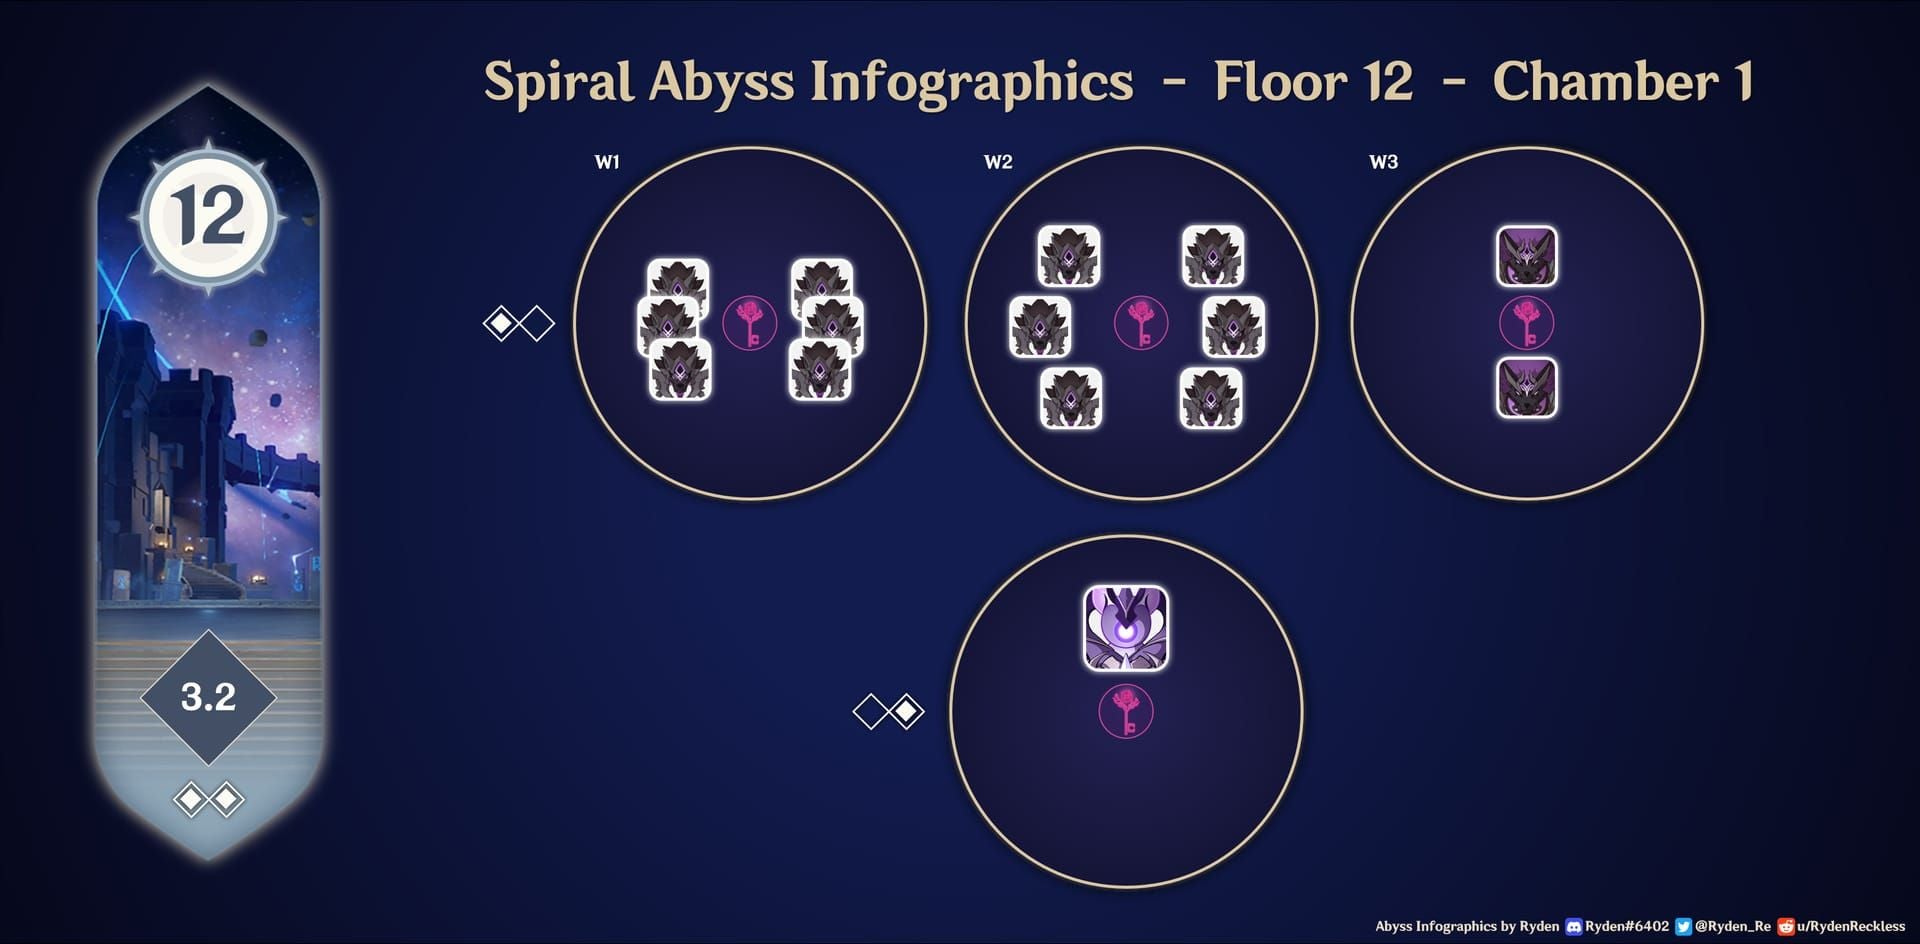
Chamber 1 (Level 95):
- 5 waves: 3 Fisher of Hidden Depths each
- Final wave: 1 Frostnight Herra
- Time requirements: 180s (1★), 300s (2★), 420s (3★)
- Fisher enemies have high mobility, teleport frequently
- Frostnight Herra has Cryo shields requiring Pyro
Chamber 2 (Level 98):
- Wave 1: 2 Sternshield Crabs
- Wave 2: 1 Emperor of Fire and Iron + 4 Wilderness Hunters
- Crabs demand shield-breaking efficiency
- Emperor requires interrupt resistance and single-target burst
Chamber 3 (Level 100):
- 1 Lord of the Hidden Depths: Whisperer of Nightmares
- 1 Statue of Marble and Brass
- Dual-boss configuration tests multi-target damage
- Whisperer cycles through invulnerability phases
Budget Team 1: National Vaporize
Xiangling (Primary DPS):
- 160-200% ER
- 4pc Emblem of Severed Fate
- The Catch weapon
- Talents: 9/9/9
Xingqiu (Hydro Enabler):
- 180-200% ER
- Hydro DMG Goblet
- Sacrificial Sword or Favonius Sword
- 4pc Emblem
Sucrose (VV Support):
- 200+ EM
- 4pc Viridescent Venerer
- Thrilling Tales of Dragon Slayers
- Provides 40% Pyro RES shred + grouping
Bennett (Healer/Buffer):
- 200+% ER
- C1 recommended
- 1,200+ base ATK
- 4pc Noblesse Oblige
National Team Rotation (20s cycle)
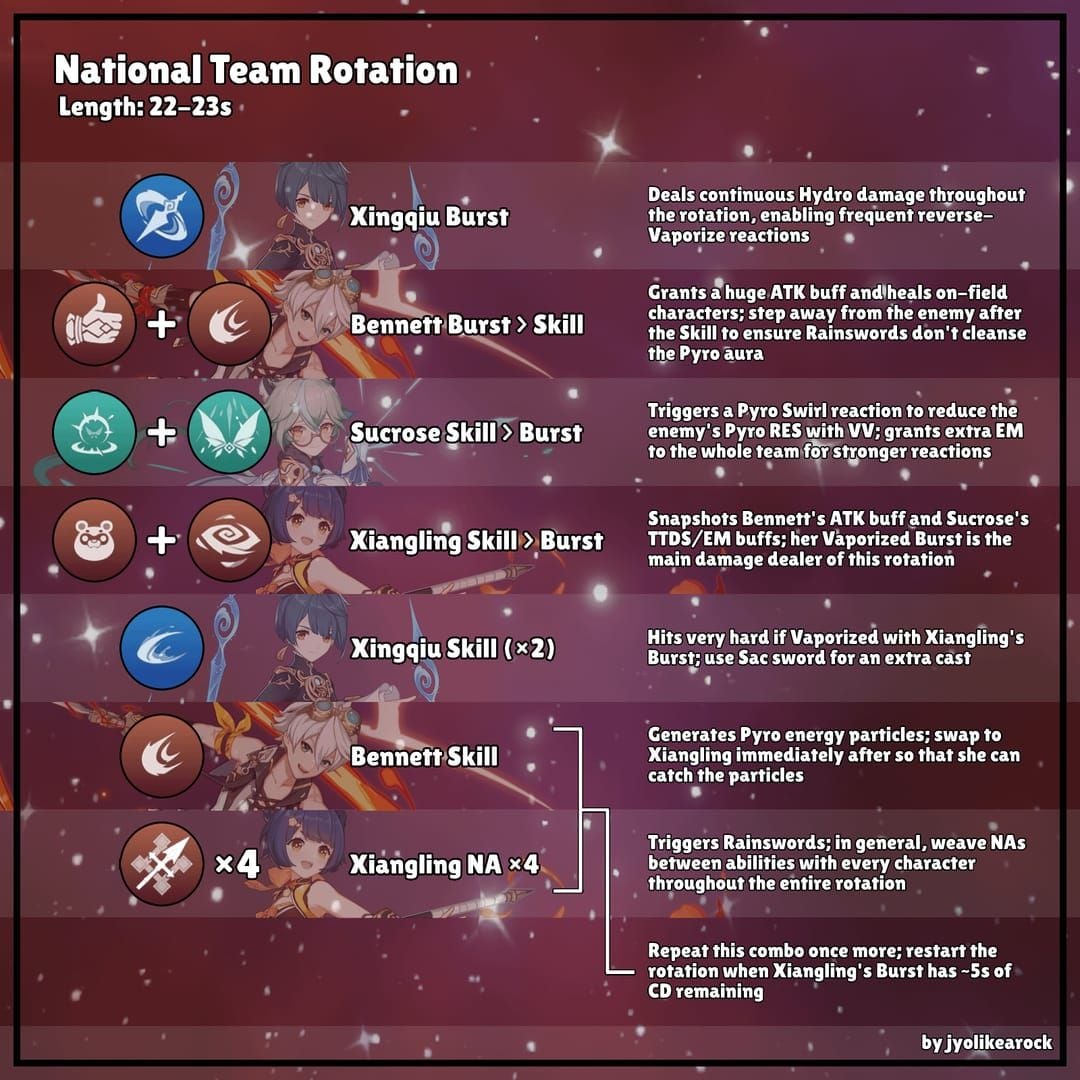
- Bennett Burst (establish ATK buff zone)
- Sucrose Skill/Burst (VV shred + grouping)
- Xingqiu Burst (Hydro application)
- Xiangling Burst + Skill (snapshot Bennett buff)
Energy funneling: Catch Pyro particles on Xiangling during Bennett Skill cooldown. Time Xingqiu Skill with Burst cooldown.
Common errors:
- Activating Xiangling Burst outside Bennett circle (-20% damage)
- Failing to Swirl Pyro before Hydro application
- Not grouping enemies before damage sequence
Budget Team 2: Hyperbloom
Kuki Shinobu (Hyperbloom Trigger):
- 800+ EM
- 4pc Gilded Dreams
- Iron Sting weapon
- Sole investment priority
Xingqiu (Hydro Enabler):
- 180% ER
- Same build as National team
Dendro Traveler (Dendro Enabler):
- 180-200% ER
- Focus on Dendro application frequency
- Personal damage irrelevant
Sucrose (Grouping/EM Share):
- 200+ EM
- 4pc VV (doesn't amplify Hyperbloom but provides grouping)
- EM sharing via A4 passive
Hyperbloom Rotation
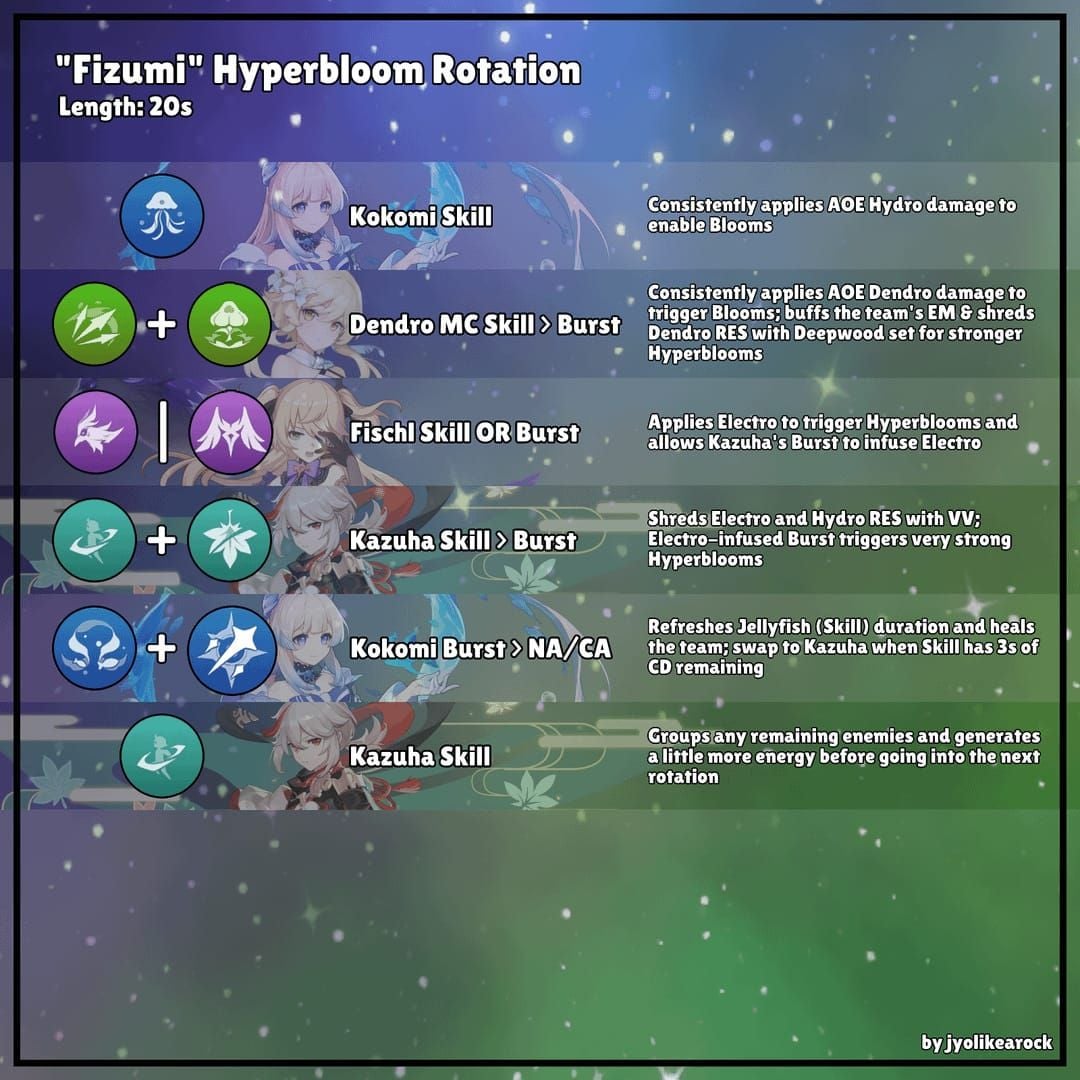
- Dendro Traveler Burst (establish Dendro field)
- Xingqiu Burst (create Dendro Cores via Bloom)
- Kuki Shinobu Skill (trigger Hyperbloom on existing Cores)
- Sucrose Skill (grouping + EM share, minimal field time)
Hyperbloom damage scales exclusively off Kuki's EM and level—CRIT stats irrelevant.
Floor 11 Hydro/Electro Optimization
Chamber 1 (Level 88):
- Defense progress: 20/40/60%
- 6 Large Pyro Slimes, 6 Large Cryo Slimes, 18 Hilichurl Fighters, 3 Mek Specialists
Chamber 2 (Level 90):
- Time requirements: 60/180/300s remaining
- 1 Grounded Hydroshroom, 1 Grounded Geoshroom, 1 Secret Source Automaton, 2 Veteran Fatui Skirmishers
Taser Team (Floor 11 optimized):
- Sucrose (200+ EM, 4pc VV)
- Fischl or Beidou (160-180% ER, Emblem sets)
- Xingqiu (Hydro application)
- Rotation: Fischl Skill → Beidou Burst → Xingqiu Burst → Sucrose field time
60% Hydro DMG bonus amplifies Xingqiu's Rain Swords significantly. Electro-Charged spreads AoE damage across grouped enemies.
Top up Blessing of the Welkin Moon in Genshin Impact online through BitTopup for consistent Primogem income.
Investment Priorities
Talent levels:
- Support characters: 8/6/6 baseline
- Primary DPS: 9/9/9
- Bennett: Burst level 8+ only (scales with base ATK)
Artifact main stats (priority order):
- ER Sands for energy-hungry characters
- ATK% or EM Sands for damage dealers
- Elemental DMG Goblets for DPS
- CRIT Rate/DMG Circlets (1:2 ratio)
ER breakpoints:
- Xiangling: 160-200%
- Xingqiu: 180-200% (without Sac Sword)
- Bennett: 200+%
- Dendro Traveler: 180-200%
CRIT optimization:
- 60% CRIT Rate minimum before investing CRIT DMG
- Target 1:2 ratio (60/120 or 70/140)
EM thresholds:
- Kuki Shinobu: 800+ (Hyperbloom trigger)
- Sucrose: 400+ (VV shred + EM share)
- Xiangling/Xingqiu: Prioritize ATK/CRIT over EM
Artifact Farming Priority
4pc Emblem of Severed Fate (highest resin efficiency):
- Xiangling, Xingqiu, Beidou all use optimally
- Also drops Shimenawa's Reminiscence
4pc Viridescent Venerer (mandatory for Anemo):
- 40% elemental RES reduction irreplaceable
- Sucrose needs only EM main stats
4pc Gilded Dreams (Hyperbloom):
- Kuki Shinobu best-in-slot
- Domain also drops Deepwood Memories for Dendro supports
4pc Noblesse Oblige (Bennett):
- Team-wide ATK% buff
- Main stats only, substats irrelevant
Common Mistakes
Over-investing wrong characters:
- Leveling Normal Attack talents on supports
- Farming CRIT artifacts for Kuki Shinobu (Hyperbloom ignores CRIT)
Ignoring ER requirements:
- Forces extra Skill casts for particles
- Collapses rotation consistency
Poor elemental timing:
- Sucrose must Swirl Pyro before Xingqiu applies Hydro
- Incorrect sequencing reduces damage 30-40%
Ignoring Abyss blessings:
- Running Geo teams on Floor 11 despite 60% Hydro bonus
- Not aligning team elements with Ley Line Disorders
Neglecting shield breaking:
- Cryo for Electro shields
- Pyro for Cryo shields
- Hydro for Pyro shields
Advanced Techniques
Pre-funneling energy: Generate particles before completing previous chamber for immediate Burst availability.
Iframe timing: Use Burst animations to avoid damage without dedicated shielders. Xingqiu Burst provides extended iframes.
Enemy grouping: Position near chamber centers to draw enemies. Use Anemo crowd control for scattered targets.
Reset strategies: Recognize unsalvageable attempts early (unfavorable teleports, bad invulnerability timing).
Time management: Complete Chamber 1 with 450+ seconds remaining for Chamber 3 buffer time.
Resource Management
Resin costs: Fully functional National team requires 3-4 weeks condensed resin farming (Emblem, VV, Noblesse domains). Focuses on correct main stats, not optimized substats.
Primogem rewards:
- 600 per Abyss cycle
- 1,200 monthly (including Floors 9-10 reset)
- Combined with dailies/events: targeted character every 2-3 patches
Character acquisition timing: Align with Abyss cycles favoring specific elements. Current Luna IV 6.3 Phase 2 favors Hydro/Electro—prioritize Xingqiu constellations and Kuki Shinobu.
Weapon banner: Save Primogems for characters. 4-star weapons (The Catch, Favonius, Sacrificial) provide 80-90% of 5-star performance at zero cost.
BitTopup offers competitive Genesis Crystal pricing for Welkin Moon and Battle Pass purchases, accelerating progression without large spending.
FAQ
What is the exact reset time? February 16, 2026, at 04:00 AM server time. Cycle runs until March 16, 2026, at 03:59 AM.
How does Lunar-Reaction work? Lunar-Charged requires Ineffa + Hydro + Electro simultaneously, deals Electro DMG scaling off EM, ignores DEF. Lunar-Crystallize auto-triggers every 3s via Stonehold Moon blessing. Both receive 75% damage boost on Floor 12 second half.
Can I clear Floor 12 with only 4-stars? Yes. National team (Xiangling, Xingqiu, Sucrose, Bennett) and Hyperbloom team (Kuki, Xingqiu, Dendro Traveler, Sucrose) achieve 3-star clears with proper ER (160-200%), correct main stats, and optimized rotations.
Minimum ER requirements? Xiangling: 160-200%, Xingqiu: 180-200%, Bennett: 200+%, Dendro Traveler: 180-200%. Ensures consistent Burst uptime every 20s rotation.
F2P weapon recommendations? The Catch (Xiangling), Sacrificial/Favonius Sword (Xingqiu), Thrilling Tales (Sucrose), any ER sword (Bennett). Provides 85-90% of premium weapon performance.
How much EM for Kuki Shinobu Hyperbloom? 800+ EM required. Achievable via 4pc Gilded Dreams with EM main stats (Sands/Goblet/Circlet), EM substats, and Iron Sting weapon.


