

Nefer Character Overview & Role Analysis
Kit Breakdown
Here's what you need to know about Nefer right off the bat: she's a 5-star Dendro Catalyst from Nod-Krai who specializes in something called Lunar-Bloom reactions. Think of her as the main DPS you've been waiting for if you're into reaction-heavy gameplay.
Her Elemental Skill Senet Strategy: Dance of a Thousand Nights is where things get interesting. It replaces her Charged Attacks with these stamina-free Phantasm Performance attacks that can actually CRIT—which is huge for Lunar-Bloom damage. No more worrying about stamina management during your rotation.

Now, here's where it gets a bit complicated (and honestly, this is where miHoYo really wants you to pull for her teammates). Her Ascension 1 passive A Wager of Moonlight requires two Nod-Krai allies to activate Ascendant Gleam. Without this? You're missing out on converting Dendro and Bountiful Cores into Seeds of Deceit. These seeds last 15 seconds and give you Veil stacks—up to 100 EM worth.
Her other passive, Daughter of the Dust and Sand, adds Verdant Dew after Lunar-Bloom reactions. The scaling's pretty generous at 0.4 ratio for EM over 500 points, capping at +200 ATK.
Level 90 stats are solid: 12,704 HP, 344 ATK, 799 DEF, with 38.4% CRIT DMG as her ascension stat. Her Burst Sacred Vow: True Eye's Phantasm delivers AoE Dendro damage and consumes those Veil stacks for enhanced effects. It costs 60 energy, so you'll want around 130% ER.
For immediate Nefer acquisition, buy Genesis Crystals gift cards through BitTopup—they offer competitive pricing and instant delivery for Phase 1 banner pulls.
Element & Weapon Type
She's a Dendro Catalyst who scales heavily with EM through those Lunar-Bloom mechanics I mentioned. Her passive converts EM over 500 into ATK at a 0.4 ratio (capped at 200 ATK). So your priority becomes: EM > CRIT Rate > CRIT DMG.
Being a Catalyst user gives her access to some fantastic EM-focused options. Reliquary of Truth is her signature with 88.2% CRIT DMG and unique buffs. But honestly? 4-star alternatives like Dawning Frost and Blackmarrow Lantern can achieve around 88% of her signature's performance when refined properly.
Primary Role Assessment
In the right team—specifically Lunar-Bloom compositions with Nod-Krai allies—she's easily SS-tier Main DPS. Without Ascendant Gleam though? Her damage drops 20-30% to A-tier performance. That's a significant difference.
She's also decent for exploration (A-tier) thanks to Shadow Dance mobility, and her Conspiracy of the Golden Vault passive gives 25% bonus Nod-Krai expedition rewards. Nice touch.
Best Day-1 Team Compositions for Nefer
Main DPS Teams
Let's talk premium first: Nefer/Lauma/Kokomi/Aino. This is the dream team that'll make your wallet cry but your damage meters sing. Lauma enables Ascendant Gleam plus provides CRIT and DMG buffs, Kokomi handles off-field Hydro and healing, while Aino activates those crucial Moonsign mechanics.
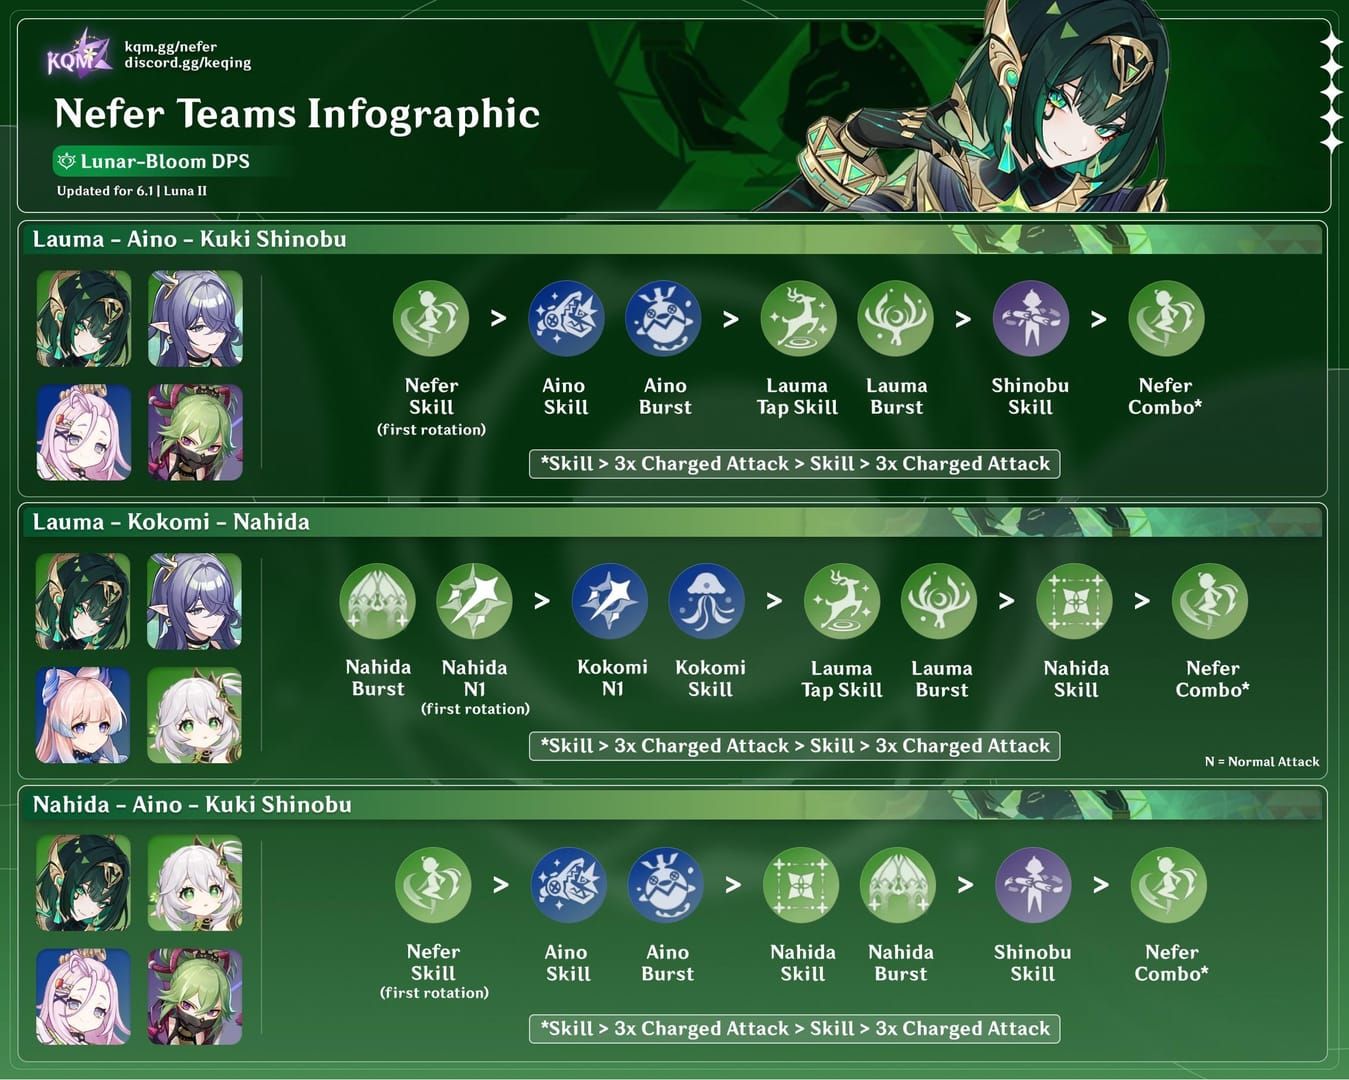
We're talking 20% higher DPS than alternatives here. This team can clear Abyss 36-star in 8-10 minutes once you've got the rotation down.
Speaking of rotations—here's what you're looking at: Nahida Normal > Burst for Dendro application, Aino Skill > Burst for Hydro setup, Nahida Skill extension, Lauma Skill > Burst for core generation, another Aino Skill for additional Hydro, then Nefer Skill (double charge) > Charged combos with dash cancels > Burst consuming those Veil stacks. Keep it to 20-second cycles to maintain Verdant Dew.
Want some variations? Yelan can replace Kokomi for single-target situations (just watch your positioning). Furina works instead of Kokomi for multi-target scenarios plus team DMG buffs via Fanfare—though you'll need additional healing like Baizhu.
Support/Sub-DPS Setups
Not everyone's going to have multiple Nod-Krai characters day one. Enter the Hyperbloom variant: Nefer/Nahida/Furina/Kuki Shinobu.
Yes, you'll lose 20-30% personal damage compared to Lunar-Bloom setups, but you gain team flexibility. Nefer drives core generation while Shinobu triggers Hyperbloom reactions.
Rotation's simpler too: Nahida Skill/Burst for Dendro, Furina Skill/Burst for Hydro and buffs, Shinobu Skill for Electro, then Nefer Skill (double) > Charged combos > Burst.
For builds: Nefer wants 2-piece EM sets, Nahida gets Deepwood 4-piece, Furina runs Golden Troupe 4-piece, and Shinobu uses Flower of Paradise 4-piece.
If you want comfort over damage, replace Kokomi with Zhongli. You'll maintain the Nefer/Lauma/Aino core while getting shield plus RES shred.
F2P Friendly Options
Budget conscious? Try Nefer/Dendro Traveler/Xingqiu/Aino. Traveler generates cores, Xingqiu provides reliable Hydro, and Aino enables partial Ascendant Gleam. You'll clear Abyss floors 9-11 with 3-star ratings, though you'll need 180% ER on your supports.
Build-wise: Traveler with Favonius Sword plus Deepwood 4-piece, Xingqiu with Sacrificial Sword, and Nefer with Blackmarrow Lantern or Dawning Frost focusing on EM/CRIT balance.
Alternative option: Nefer/Sucrose/Yaoyao/Aino. Sucrose provides EM buffs plus VV 4-piece RES shred, Yaoyao offers Dendro Resonance (+50 EM party-wide) plus healing. Minimal resource requirements for exploration and early Abyss.
Weapon Recommendations & Tier List
5-Star Weapon Analysis
Reliquary of Truth is her signature for good reason: 542 base ATK, 88.2% CRIT DMG. The Essence of Falsity passive grants 8% CRIT Rate baseline, 80 EM for 12 seconds after Skill use, and 24% CRIT DMG for 4 seconds after Lunar-Bloom damage.
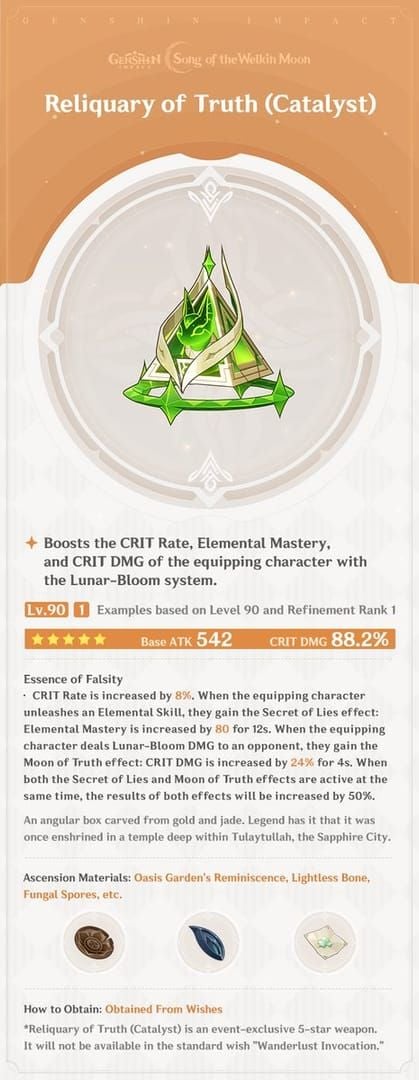
When both buffs are active? You're looking at a 50% increase—124% CRIT DMG and 120 EM total. This thing practically eliminates artifact farming requirements since you can run EM main stats while still hitting CRIT caps.
Day-1 performance shows a 15-20% advantage over alternatives. For ascension materials, you'll need Oasis Garden series, Lightless Bone series, and Fungal Spores. Budget 325,000 Mora plus 908 Mystic Enhancement Ore for Level 90.
Genshin recharge no region lock services through BitTopup ensure seamless weapon banner access with competitive rates and 24/7 support.
4-Star Alternatives
Don't sleep on Dawning Frost: 510 base ATK, 55.1% CRIT DMG. At R5, the passive gives 72-144 EM on Charged hits and 48-96 EM on Skill hits for 10 seconds. It's craftable and achieves roughly 88% of Reliquary's performance.
Blackmarrow Lantern's another solid choice: 454 base ATK, 220.5 EM. R5 provides 48% Bloom damage, 12% Lunar-Bloom damage, plus 12% Lunar-Bloom under Gleaming Moon. Matches Dawning Frost's 88% signature performance in EM builds.
Nightweaver's Looking Glass has 264.6 EM substat and 40% Lunar-Bloom damage, but lacks CRIT support. It underperforms by 11-14% in balanced builds—only consider for pure EM focus.
Budget Options
Tome of the Eternal Flow for EM focus, Cashflow Supervision for ATK% hybrid builds. But honestly? Blackmarrow Lantern's your best craftable option. Prioritize R5 refinement for maximum passive benefits—you can get 5 weapon billets from weekly bosses and events.
Reliquary of Truth Artifact Deep Dive
Set Bonuses Explained
Night of the Sky's Unveiling 4-piece is what you want: 80 EM from 2-piece, then 15-30% CRIT Rate plus 10% party Lunar damage per active effect under Gleaming Moon from 4-piece. With proper uptime, this outperforms alternatives by 10-15% in Lunar-Bloom teams.
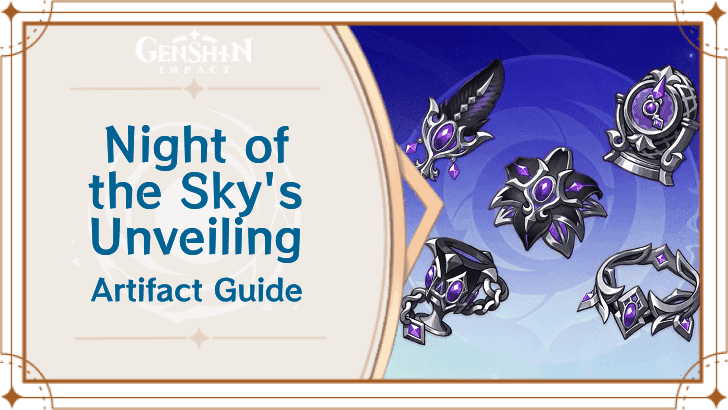
Here's the catch—Gleaming Moon requires Nod-Krai allies. Without them, this set becomes significantly less valuable than universal alternatives like Gilded Dreams. But for Day-1 optimization with Lauma and Aino? Unmatched synergy.
Stat Priority Guide
Main stats: EM Sands, EM Goblet, CRIT DMG or Rate Circlet depending on your weapon. With Reliquary, go CRIT Rate circlet for 40-50% Rate pre-buffs. With EM weapons, CRIT DMG circlet works better.

Substats follow this priority: EM > CRIT Rate/DMG > ER > ATK%. You're targeting 500+ EM for passive conversion, 40-50% CRIT Rate pre-buffs, 220%+ CRIT DMG, and 130% ER. Remember, EM over 500 converts to ATK at 0.4 ratio with a 200 ATK cap.
Farming Strategy
Domain costs 20 resin per run and works with Condensed Resin. Farm during artifact XP events and prioritize EM main stats first. Expect 2-3 weeks of dedicated farming for a functional 4-piece.
Pro tip: The domain favors Dendro and Hydro characters, so use your Nefer teams for efficiency while practicing rotations.
Alternative Artifact Sets Comparison
Temporary Sets for Early Game
Gilded Dreams works well: 80 EM from 2-piece, 14% ATK per same-element plus 50 EM per different element after reactions from 4-piece. Perfect for mixed teams without Nod-Krai synergy during early progression.
Instructor 4-piece is interesting for support roles: 80 EM from 2-piece, 120 team EM for 8 seconds after reactions from 4-piece. Works in F2P teams where supports trigger the effect off-field.
Mix-and-Match Strategies
2-piece combinations can work temporarily. Gilded Dreams plus Wanderer's Troupe gives 160 EM total for pure reaction builds with EM weapons. Gilded Dreams plus Instructor nets 200 EM when triggered, though positioning matters.
Performance Comparisons
Night of the Sky's Unveiling hits 100% baseline in optimal teams. Gilded Dreams manages 85-90% in mixed teams. 2-piece combinations? 75-80% effectiveness. Instructor 4-piece on supports can boost team performance by 10-15% via EM sharing.
Day-1 priority: Any 4-piece with EM main stats beats optimized 2-piece combinations. Main stat priority exceeds set bonus value during early progression.
Talent Priority & Leveling Guide
Skill Priority Order
Elemental Skill is your absolute priority—it's 70%+ of her damage output. Level this to 8 immediately. You'll need 9 Teachings of Elysium, but it's worth every resource. Those dual charges plus Shadow Dance mechanics are the cornerstone of her kit.
Elemental Burst comes second. Level to 6 initially, then 8 after maxing Skill. At 60 energy cost with a supplemental role, it's less critical than Skill.
Normal Attack? Lowest priority. Keep it at level 1 until C3 gives you +3 levels automatically. Shadow Dance replaces standard attacks with Phantasm Performance anyway.
Resource Allocation
Getting to 8/8/8 talents costs roughly 1.5M Mora and 63 Guide to Elysium. Farm Lightless Capital domain on Tuesday, Friday, and Sunday with Condensed Resin for efficiency.
Boss materials: 18 Tattered, 30 Immaculate, and 36 Frost-Etched Warrants from Nod-Krai Fatui. Weekly boss drops: 18 Rook Samples from The Game Before the Gate—expect 6-9 weeks of farming.
Stopping Points
Level 8 Skill is optimal for most players. You get substantial damage without Crown investment. Level 6 Burst is sufficient for rotation completion. Crown the Skill first if you're pursuing maximum optimization, though it rarely justifies the resource cost for casual players.
Constellation Value Analysis
C1-C3 Impact
C1 Planning Breeds Success adds 60% EM as Lunar-Bloom base damage. That's roughly a 25% DPS increase—highest value per pull in her constellation lineup.
C2 Observation Feeds Strategy extends Veil duration by 5 seconds, boosts Phantasm damage to 140%, and provides 200 EM at max stacks. Improves rotation flexibility significantly. Great optimization value.
C3 gives +3 Elemental Skill levels. Since Skill contributes 70%+ of her damage, this is a significant boost that also saves you a Crown investment.
C4-C6 Considerations
C4 provides 25% faster Verdant Dew gain and 20% Dendro RES reduction. Marginal benefits with minimal DPS improvement—honestly not worth the pull cost.
C5 adds +3 Burst levels but contributes less than 1% DPS gain due to Burst's supplemental role.
C6 The Die is Cast converts Phantasm Performance to full Lunar-Bloom reactions plus adds 85-120% EM as AoE damage. This is a massive 60-65% DPS spike and essential for endgame Abyss optimization.
Investment Recommendations
Priority order: Weapon > C1 > C2 > C6. Reliquary provides 17% stronger performance than alternatives even at C0. C0R1 is sufficient for all content while maintaining reasonable investment. Skip C3 and C5 unless you're going for C6.
Day-1 Investment Strategy
Resource Planning
Pre-farming requires roughly 2,520 resin over 6 weeks. Weekly bosses (540-1,080), talent domains (800-1,200), weapon materials (600-800). Ascension costs 420,000 Mora, 168 Moonfall Silver, and 46 Radiant Antler.
Farm Hiisi Island (4-5 clears with 48-hour respawn) and Frostnight Herra boss (12-15 kills at 40 resin each).
Total Mora for complete development: 7,049,500. Source this from Ley Lines, events, daily commissions, and discounted weekly bosses.
Priority Checklist
Day-1 priorities: 1) Pull C0R1, 2) Farm local specialties, 3) Hit artifact domains for EM main stats, 4) Test Abyss Floor 9. Allocate roughly 1,000 resin for basic functionality.
Get her to 80/90, Skill to 8, and equip a functional 4-piece with correct main stats. That's your baseline.
Long-term Considerations
Avoid Crown investment until C3 gives you +3 Skill levels automatically. Team synergy investments like Lauma acquisition matter more than individual optimization beyond functional thresholds. Reserve constellation pulls for future banners unless you're committed to C6.
Common Mistakes & Optimization Tips
Build Pitfalls
Don't try to force her into Nilou teams—she's incompatible with quick Bloom triggers and reduces core availability for Seeds conversion. Use off-field Hydro like Xingqiu or Yelan for controlled generation instead.
Target 130% ER for consistent Burst uptime. And this is crucial—include Lauma and Aino as mandatory teammates. Without Nod-Krai allies, her damage literally halves due to no Ascendant Gleam.
Team Synergy Errors
Assign Deepwood 4-piece to supports like Lauma or Nahida, not Nefer—it interferes with core absorption. Prioritize EM amplifiers over ATK buffers like Bennett due to her EM scaling focus.
Maintain 20-second rotation cycles for proper Veil and Verdant Dew uptime. Shorter rotations waste potential.
Resource Waste Prevention
No Crown on Normal Attack until C3. Accept functional artifacts with correct main stats before chasing perfect substats. Skip C4 and C5 unless you're pursuing C6—minimal performance gain versus team completion or future character investment.
FAQ
Q: What are the best team compositions for Nefer in Genshin 6.1? Premium setup: Nefer/Lauma/Kokomi/Aino for maximum damage. F2P option: Nefer/Dendro Traveler/Xingqiu/Aino. Both require Nod-Krai allies for Ascendant Gleam activation.
Q: Is Reliquary of Truth worth pulling for Day-1 optimization? Absolutely—15-20% DPS advantage over 4-star alternatives. That said, Dawning Frost and Blackmarrow Lantern achieve 88% of signature performance for budget builds.
Q: Which talents should I prioritize for Nefer? Elemental Skill to 8 first since it's 70%+ of her damage, then Burst to 6-8. Keep Normal Attack at level 1 until C3 gives you +3 automatic levels.
Q: How much EM should Nefer have for optimal performance? Target 500+ EM for passive ATK conversion through EM main stats on Sands and Goblet. EM over 500 converts to ATK at 0.4 ratio, capping at +200 ATK.
Q: Can Nefer work without Nod-Krai teammates? She loses 20-30% damage without Ascendant Gleam activation. She's viable in Hyperbloom teams but significantly better with Lauma and Aino for core conversion mechanics.
Q: What's the minimum investment needed for Nefer Day-1 viability? Ascend to 80/90, Skill to 8, 4-piece artifacts with EM main stats, and at least one Nod-Krai ally. Roughly 1,000 resin investment—clears Abyss 9-11 comfortably.


