

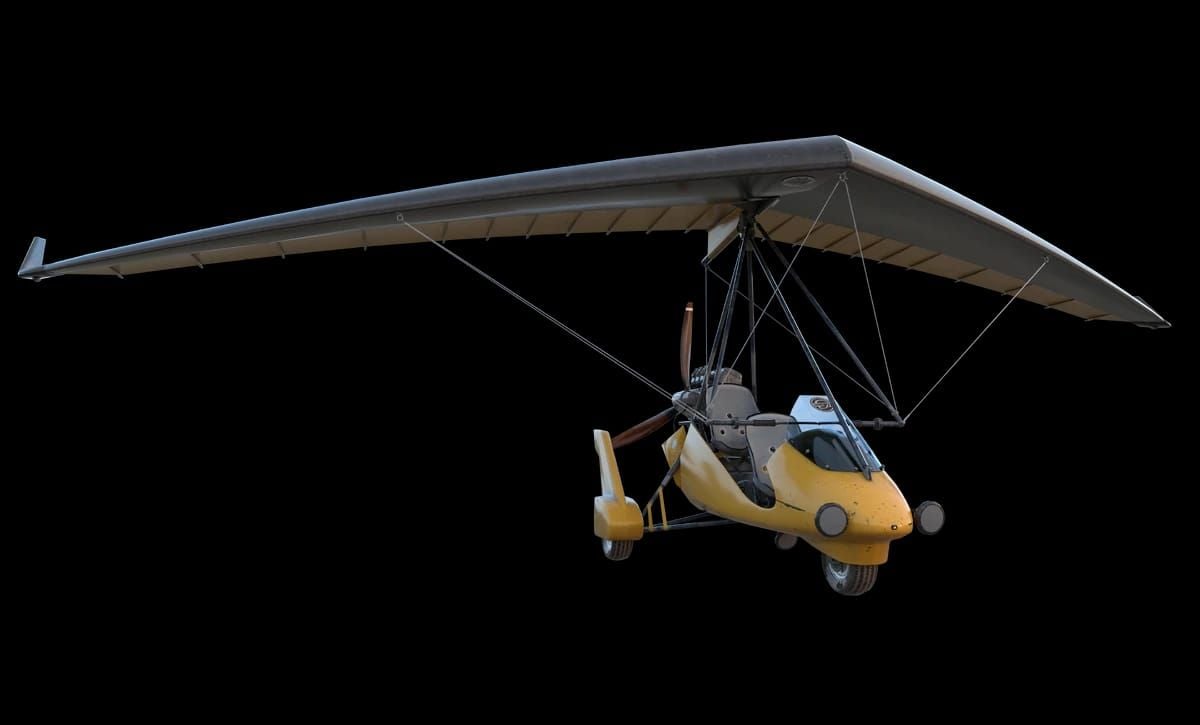
What's New with Gliders in PUBG Mobile 3.6
The 3.6 update (January 15 - March 5, 2026) adds Motor Gliders as game-changing mobility vehicles. These aerial transports enable direct point-to-point travel across mountains, rivers, and contested zones—bypassing terrain obstacles entirely.
Technical specs:
- 1000 HP health pool
- 110 km/h maximum speed
- Indestructible tires
- 65 km/h takeoff speed requirement
- Fuel tank must be filled pre-flight (5-10 seconds)
At 110 km/h, gliders cross 1000 meters in 33 seconds—significantly faster than ground vehicles navigating terrain. Full tanks support 2-3 minutes sustained flight. Enhance your arsenal through PUBG Mobile UC recharge on BitTopup for season pass content and exclusive vehicle skins.
Key Differences from Other Mobility Items
Unlike parachutes, ziplines, and cable cars with fixed paths, gliders enable dynamic mid-flight route adjustments. You control navigation, responding to zone shifts, enemy positions, or threats in real-time.
Critical distinctions:
- Appear on enemy minimaps when in detection range
- Exposed cockpit leaves pilots vulnerable to direct fire
- Indestructible tires eliminate common immobilization tactics
- Grounded gliders work as temporary cover
Why Gliders Change the Rotation Meta
Traditional strategies prioritize early vehicle acquisition and safe zone positioning. Gliders disrupt this by enabling late rotations from high-value loot locations. Squads can extend looting in hot zones, then deploy gliders for rapid zone entry.
Vertical mobility unlocks new high-ground access. Positions requiring lengthy climbs become instantly accessible via glider landing. Competitive teams secure elevated final circles earlier than ground-bound opponents. Defensive players now monitor both ground approaches and aerial threats simultaneously.
Complete Glider Spawn Point Map
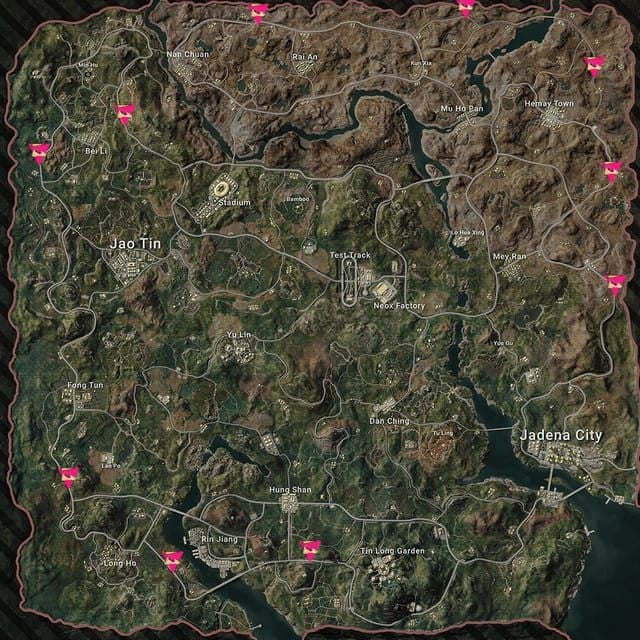
Erangel & Miramar spawn system:
- 40 potential locations, 10 gliders spawn per match
- Each location has 0.25 (25%) spawn chance
- Alternative: 10 fixed locations with 100% spawn rate
Vikendi, Taego, Rondo & Deston:
- 10 guaranteed locations each
- 100% spawn rate
- Enables reliable rotation planning
Northern Region Locations (High-Priority)
Stalber: Near warehouse complex, quick access for town center teams.
Kameshki: Southern exit position, facilitates escapes when zone shifts.
Quarry: Western rim spawn with elevation advantage. Downhill acceleration reduces distance needed for 65 km/h takeoff. Teams from Severny or Yasnaya frequently contest this mid-game.
Central Frozen Kingdom Spawns
Pochinki: Eastern apartments spawn enables rotations in any direction from this high-traffic zone.
Rozhok: Between town and compounds, accessible from multiple angles.
School: Southern field spawn. High-risk, high-reward due to hot drop popularity. Requires winning initial engagements but grants mobility advantage.
Southern Region and Coastal Locations
Primorsk: Warehouse district spawn facilitates inland rotations from coastal city.
Military Base: Near main buildings and southern bridge. Controls both ground vehicle passage and glider access at chokepoint.
Bridge spawns: Strategic chokepoint control positions.
Hidden Low-Competition Spots
Mylta-Mylta Power: Between-POI spawn, rarely contested early.
Farm complexes: Isolated warehouse spawns offer safer acquisition for survival-focused teams.
These peripheral spawns often remain available through mid-game. Buy PUBG UC cheap through BitTopup for premium map markers highlighting strategic spawn locations.
How to Identify and Secure Spawns
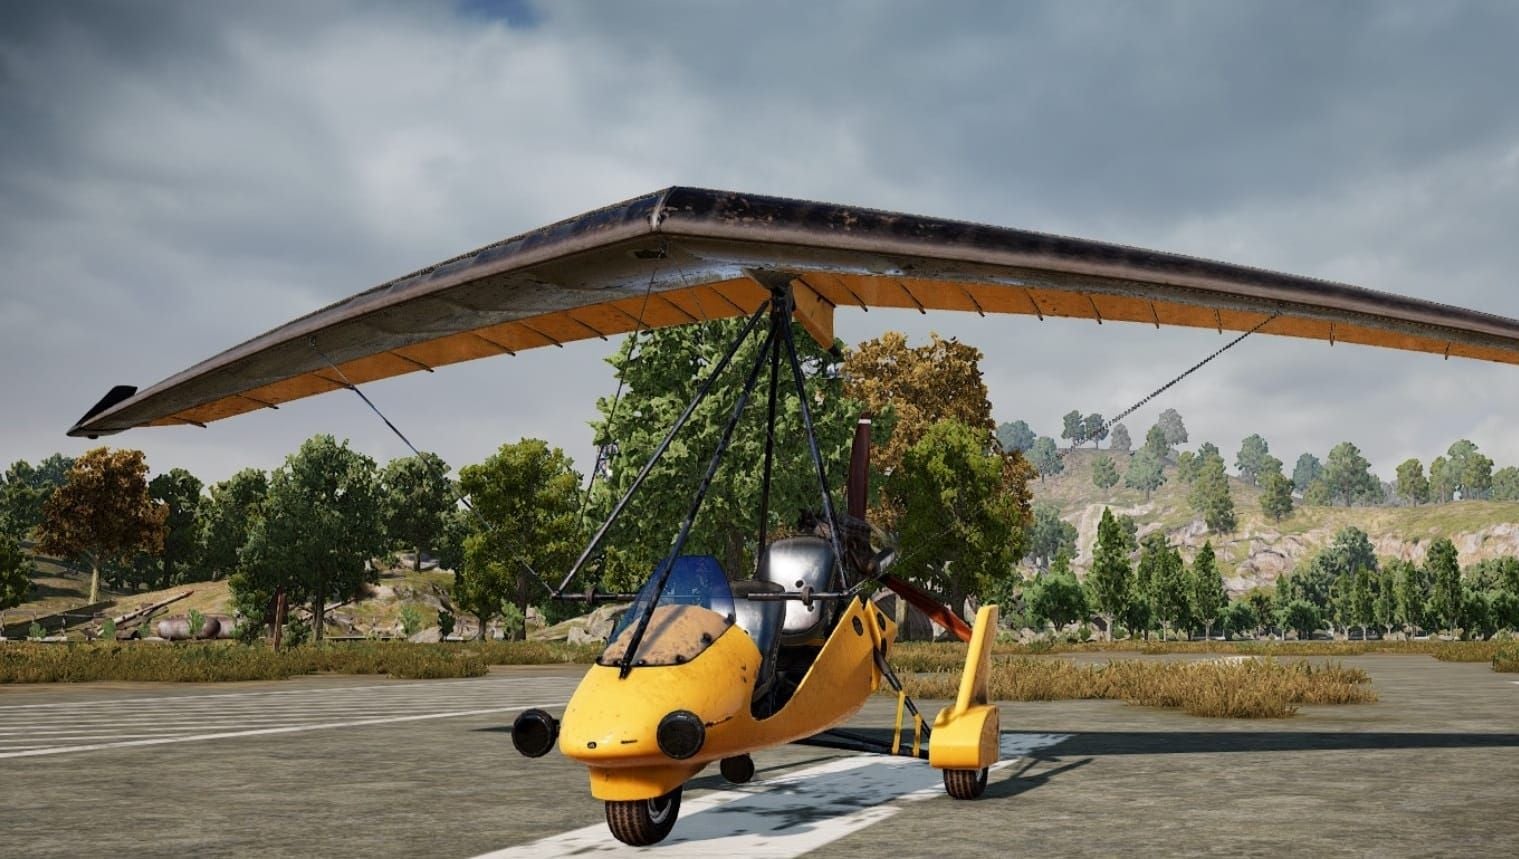
Visual identification: Distinctive aircraft model with visible propeller and wing structure. Spawns in open areas with sufficient takeoff space—avoid dense buildings or heavy forest.
Map markers: Glider icons show potential spawn locations (not confirmed availability). Memorize high-priority spawns to reduce map-checking time.
Minimap detection: Displays nearby gliders within range using vehicle icons. Requires proximity—pre-planned routes toward known spawns prove more efficient.
Timing Your Landing for Early Access
Land near spawns, not directly on them. Secure weapons first—unarmed glider pilots become easy targets.
Optimal landing strategy:
- Touch down at nearby buildings
- Quick loot basic weapons (30-45 seconds)
- Move to glider spawn
On Erangel/Miramar (0.25 spawn chance), identify 2-3 backup spawns within landing zone. Vikendi, Taego, Rondo, Deston (100% rate) allow confident single-target approaches.
Contested vs Safe Spawns
High-traffic (Pochinki, School, Military Base):
- Multiple team convergence
- Suits aggressive players seeking early eliminations
- High elimination risk before acquisition
Safe peripheral spawns:
- Lower risk, longer initial rotations
- Minimal opposition
- Trades early action for guaranteed mid-game positioning
Optimal Rotation Strategies
Early Game: Loot-to-Glider Pathways
Extend looting time in high-value locations. Thoroughly search buildings while monitoring circle, then deploy gliders for rapid zone entry.
Optimal pathway: Loot until 60-90 seconds before zone closure, then move to nearest spawn. Provides buffer for unexpected combat or unavailability.
Mid Game Zone Transitions
Second through fourth circles create highest glider value. 110 km/h speed crosses 2000+ meters within two minutes, covering most mid-game requirements.
Best practice: Launch from zone edges toward central positions, gain altitude for extended glide. Minimizes fuel consumption while maximizing coverage.
Late Circle Usage: Fly vs Ground
Fifth circle onward reduces effectiveness due to decreased zone size and increased player density. Aerial exposure becomes critical liability.
Reserve gliders for:
- Blue zone damage forcing immediate movement
- Pinned by enemy fire with no ground escape
- Emergency repositioning after squad wipes
Ground movement proves superior when already positioned favorably. Glider noise and visibility alert all nearby enemies.
Emergency Scenarios and Bailouts
Identify glider spawns near current position before emergencies arise. When forced to emergency rotate, one member provides covering fire while others sprint to glider. Use smoke grenades during 5-10 second fueling window.
Glider vs Vehicle Comparison
Speed and Efficiency
110 km/h glider speed enables direct routing. 2000-meter straight-line flight takes ~65 seconds. Ground vehicles travel 2500-3000 meters accounting for roads/terrain, requiring 90-120 seconds.
Vehicles spawn more frequently than gliders on Erangel/Miramar. Guaranteed glider spawns on other maps eliminate this advantage.
Noise and Detection Risk
Gliders produce engine noise audible at 300+ meters. Ground vehicles benefit from terrain masking—buildings, hills, forests block sound.
Visual detection heavily favors ground vehicles. Gliders at 100+ meters altitude appear against sky, visible from extreme distances. Ground vehicles blend with terrain.
Terrain Adaptability
Frozen Kingdom's mountains create vehicle routing challenges. Steep slopes, ice patches, narrow passes force lengthy detours. Gliders bypass entirely.
Water crossings: Gliders cross in seconds at altitude, eliminating bridge chokepoints and slow boat traversal.
Situational Advantages
Use gliders when:
- Crossing water
- Bypassing mountains
- Long-distance rotations with clear destination
- Escaping ground encirclement
Use vehicles when:
- Staying mobile within zones
- Late circles
- Prioritizing stealth
- Full squad transport
Advanced Flight Techniques
Maximizing Distance and Altitude
Altitude correlates with glide distance. Each 100 meters provides ~800-1000 meters glide when engines cut.
Optimal profile: Initial climb to 200-300 meters, then level for cruise. Balances range extension against exposure. Adjust based on enemy density—higher in sparse areas, lower in contested zones.
Landing Precision
Approach at 60-80 km/h for finer control. Identify landing spot 10-15 seconds before touchdown.
High-ground landings: Steeper descent angles prevent overshooting. Cut engine early, use momentum for final approach. Reduces noise during critical landing phase.
Combat Maneuvers Under Fire
Initiate serpentine patterns—alternating left-right turns every 2-3 seconds. Add altitude changes for vertical unpredictability.
1000 HP withstands ~15-20 assault rifle hits. Monitor vehicle health, prepare emergency landing below 300 HP. Controlled crashes beat mid-air explosions.
Squad Coordination
Staggered takeoffs (5-10 second intervals) prevent collisions and distribute landings across 50-100 meters. Designate landing zones before takeoff.
Lead pilot calls out threats—enemy positions, incoming fire, alternative sites. Trailing members adjust routes based on reconnaissance.
Common Mistakes to Avoid
Misconception: Gliders Respawn
Gliders don't respawn during matches. Once taken or destroyed, spawn points remain empty. Deny enemy access by destroying unused gliders near their rotation paths.
Flying Too High
Excessive altitude (400+ meters) extends exposure without proportional benefits. Most engagements occur below 200 meters. Moderate altitude (150-250 meters) balances range, speed, vulnerability.
Poor Landing Zone Selection
Landing in open fields without cover creates 2-3 second dismount vulnerability. Always land near rocks, buildings, or terrain features.
Avoid landing directly on enemy positions solo. Land 50-100 meters away, approach on foot with weapons ready.
Timing Failures
Late-circle usage (sixth onward) rarely succeeds due to concentrated enemies and limited zone size. Risk-reward heavily favors ground movement.
Don't use gliders when already positioned favorably. Reserve for necessary rotations, not recreational flights revealing your position.
Counter-Strategies: Defending Against Gliders
Spotting Incoming Gliders
Audio detection: Engine noise carries 300+ meters, giving 15-20 seconds notice. Higher-pitched propeller whine differs from ground vehicle rumbles.
Visual scanning: Focus on sky sectors. Designate one squad member for aerial watch. Gliders appear as small dark shapes against sky.
Best Weapons and Positions
Assault rifles and DMRs most effective. 1000 HP requires ~15-20 hits (5.56mm) or 12-15 hits (7.62mm). Lead targets based on speed and distance.
Elevated positions provide optimal firing angles. Rooftops, hills, multi-story buildings serve as ideal anti-air platforms.
Predicting Landing Zones
Glider trajectory reveals intentions 10-15 seconds before landing. Reposition for ambush—move to cover near predicted spot, prepare grenades, coordinate crossfire.
Common zones: compounds near circle centers, elevated positions, cover-rich areas. Monitor high-probability zones when hearing approaches.
Weather and Environmental Impact
Snowstorm Effects
Reduces visibility to 100-150 meters, concealing approaches. Favors aggressive rotations as visual detection becomes nearly impossible beyond close range.
Wind noise partially masks engine sounds, reducing detection from 300+ to 150-200 meters. Exploit storms for high-risk rotations.
Wind Patterns
Headwinds reduce speed and increase fuel consumption. Tailwinds provide speed boosts and extended range. Crosswinds demand constant correction.
Check wind direction pre-takeoff via flags, smoke, environmental indicators. Plan paths utilizing tailwinds when possible.
Visibility Challenges
Fog and rain reduce visual range, complicating navigation and landing. Rely on map orientation and compass headings. Approach landings cautiously—reduce speed earlier, prepare for unexpected enemy presence.
Pro Tips from Top Players
Conqueror-Level Tactics
Use gliders for aggressive third-party engagements. Deploy when detecting distant combat, arrive as fight concludes but before winners heal/loot.
Role designation: One member scouts ahead via glider, lands at intended position to clear threats. Remaining squad follows via ground vehicles to secured position.
Tournament Spawn Prioritization
Memorize guaranteed spawns on Vikendi, Taego, Rondo, Deston. Incorporate into drop strategies for mobility regardless of RNG.
On Erangel/Miramar, identify 3-4 backup spawns, check systematically. Destroy unused gliders near enemy rotation paths for denial.
Rank Push Strategies
Prioritize survival and placement over kills. Use gliders for safe rotations avoiding ground chokepoints. Reach circle centers early, secure optimal positions.
Placement system rewards top-10 heavily. Gliders provide escape options when caught unfavorably—tactical retreats preserve squad integrity for better final placement.
Maximize Experience with BitTopup
BitTopup provides secure, efficient UC top-up for premium content and seasonal rewards. Competitive pricing ensures maximum value.
Purchase UC for Season Pass and Skins
3.6 introduces limited-time glider skins via season pass and direct purchase. BitTopup's streamlined process delivers UC within minutes for immediate access.
Premium pass requires UC investment but provides substantially more rewards than free-tier. Calculate desired rewards, purchase appropriate UC quantities.
Best Value UC Packages
Multiple package sizes accommodate different budgets. Larger packages offer better per-UC pricing. Evaluate intended purchases—season pass, skins, crate keys—then select size covering needs with minimal excess.
Monitor promotional periods for bonus UC with specific packages. Timing major acquisitions around promotions maximizes value.
Secure Fast Top-Up Process
Encrypted payment processing and verified account delivery. Delivery completes within 5-15 minutes. Multiple payment methods accommodate regional preferences. Customer service assists with transaction questions or technical issues.
FAQ
Where are all glider spawn points in 3.6?
Erangel/Miramar: 40 potential locations, 10 spawn per match at 0.25 probability, plus 10 guaranteed at 100%. Vikendi, Taego, Rondo, Deston: 10 guaranteed each at 100%. Spawns concentrate near major POIs and strategic rotation paths.
How do gliders work in 3.6?
Require 65 km/h takeoff speed via ground acceleration or downhill momentum. Fill fuel tank before flight. Reach 110 km/h max with 1000 HP and indestructible tires. Enable player-controlled aerial navigation until fuel depletion or intentional landing.
Best rotation strategy using gliders?
Early game: extend looting, use gliders for rapid zone entry. Mid game: direct routing to circle centers or high-ground, bypass chokepoints. Late game: reserve for emergencies only—aerial exposure becomes critical liability.
Are gliders better than vehicles?
Situational. Gliders excel at water crossings, mountain bypassing, long-distance rotations, escaping encirclement. Vehicles superior for mobility within zones, late-circle ops, stealth approaches, full squad transport.
How to counter enemies using gliders?
Audio detection gives 15-20 seconds warning. Designate aerial watch, scan sky sectors. Use ARs/DMRs from elevated positions, lead targets. 1000 HP requires 15-20 hits. Predict landing zones by monitoring descent, position for ambush.
Maximum flight distance?
Depends on altitude and fuel. Each 100 meters altitude provides ~800-1000 meters glide. Launching from 200-300 meters with full tank enables 2000-3000 meter coverage. Fuel supports 2-3 minutes sustained flight.


