

Understanding Wall-Cancel Mechanics
Wall-cancel exploits collision detection physics during the brief window when character hitboxes transition from wall contact to free movement. This preserves momentum that standard movement can't achieve.
The technique bypasses normal acceleration curves. Standard movement builds speed gradually, but wall-cancels allow instant velocity shifts—15-20% faster repositioning in critical scenarios. Combined with Ran's Ice Barrier (1000 HP, 25s duration), you get safe windows for complex movement sequences.
For premium equipment and character upgrades, use blood strike gold top up through BitTopup for fast, secure transactions.
What is Wall-Cancel Tech
Wall-cancel involves initiating contact with vertical surfaces while executing specific ability inputs that interrupt wall collision state. The technique leverages Blood Strike's input buffer system (stores commands 3-5 frames before execution). Timing ability activation during wall contact cancels deceleration, maintaining or amplifying forward momentum.
The physics engine treats wall-canceled movement as distinct from sprinting and sliding, producing acceleration values exceeding normal movement caps.
Speed Glitch vs Standard Movement
Standard movement follows predictable acceleration with defined max speeds. SPIKE Level 3 grants 10% movement speed, Parkour Master provides 25%—totaling 35% when combined. Even with these bonuses, movement remains constrained by acceleration curves.
Wall-cancel bypasses these limits entirely. Perfect execution maintains peak velocity through corners and obstacles. This creates positioning advantages measured in fractions of seconds—critical margins where first-shot determines engagement outcomes.
Wall-Cancel Physics
Momentum preservation relies on collision detection hierarchy. Contact walls at 25-45 degrees from perpendicular—the engine briefly registers simultaneous grounded and airborne states. This frame-perfect overlap allows ability inputs without standard movement penalty.
Successful wall-cancels maintain 85-95% pre-contact speed with full directional control. Standard wall interactions reduce velocity 40-60% and impose directional constraints lasting 8-12 frames.
Why Ran is Optimal
Ran's Ice Barrier (1000 HP shield) provides protection during execution, allowing wall-cancels in contested areas without elimination risk. The 25s duration offers multiple execution windows per engagement.
Ran's Cryomancy increases teammates' shield recovery 30% within 30m, creating team-wide defensive buffs. While ETHAN has Power Slide or ZERO's Sword Master increases melee movement speed, Ran's defensive toolkit enables sustained aggression maximizing wall-cancel value.
Prerequisites
Unlocking Ran
Ensure full access to Ran's ability loadout—Ice Barrier and Cryomancy specs. Understanding ability cooldowns, activation frames, and visual indicators proves essential.
For faster character unlocks, recharge blood strike gold through BitTopup with instant delivery and secure payments.
Basic Movement Fundamentals
Master these before wall-cancels:
- Jump-slide chains: Disrupt aim assist, maintain momentum
- Strafe shooting: Evade hits without sacrificing pressure
- Corner peeking: Minimize exposure with pre-aimed angles
- Vertical positioning: Secure high ground for superior sightlines
Slide-canceling maintains infinite slide functionality—essential momentum control for wall-cancel setups.
Control Settings
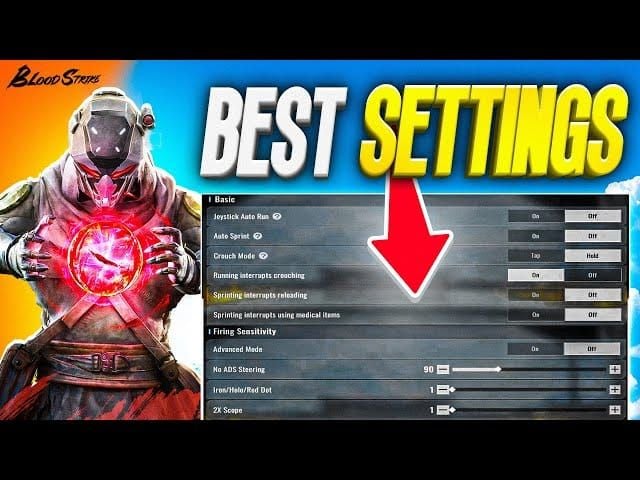
Professional players use 2800-4200 eDPI (800 DPI × 3.5-5.25 sensitivity = 25-45cm per 360°).
Critical settings:
- Acceleration: Fixed Speed for predictable response
- Global Sensitivity Sync: Enable for consistent cross-scope sensitivity
- Hip to ADS ratio: 1:0.7 to 1:0.75 (hip 6 = ADS 4.2-4.5)
- Firing Sensitivity: 15-25% lower than Camera (Camera 5 = Firing 3.75-4.25)
- Auto Sprint: Disable for precise control
Frame rates above 60 FPS significantly improve input consistency.
Input Buffer Systems
Blood Strike's buffer stores commands 3-5 frames before execution. Players can input ability activation 50-80ms before optimal frames—the buffer queues commands for precise timing.
This transforms wall-cancel from reaction-based to predictive execution, dramatically improving consistency across network conditions.
Step-by-Step Execution
Phase 1: Approach Setup
Sprint toward walls at 25-45 degree angles from perpendicular, 10-15m before contact. Maintain max speed through passive bonuses. Level 5 Machine Gun grants 33% speed increase.
Angles too perpendicular (>60°) trigger full collision. Too shallow (<20°) fail to register collision. The 25-45° range creates 2-4 frame windows—sufficient for buffer exploitation without excessive deceleration.
Identify wall textures or markers at optimal angles for muscle memory. Competitive players memorize 15-20 wall positions per map.
Phase 2: Wall Contact Timing
Wall contact triggers collision detection. Critical window spans 2-4 frames (33-66ms at 60 FPS). Input ability activation 1-2 frames before contact, allowing buffer to queue commands.
Use Ice Barrier as primary cancel trigger (instant cast, defensive benefits). Input as character model begins contact animation—visible as slight compression or velocity reduction. The 1000 HP shield activates with collision cancellation.
Network latency affects timing: 20-40ms ping requires 1 frame earlier input; 60-80ms needs 2-3 frame compensation. Consistency decreases above 80ms.
Phase 3: Cancel Window
The 3-5 frame cancel window transitions collision to free movement while ability executes. Maintain forward input throughout for max momentum. Lateral inputs enable direction changes without normal deceleration.
Early activation (frames 1-2) preserves 85-90% velocity, less directional control. Late activation (frames 3-4) offers better direction flexibility, 75-85% velocity. Adjust based on needs—early for speed, late for combat repositioning.
Successful execution shows seamless velocity maintenance without collision animations. Failed attempts display deceleration, collision animations, or input delays.
Phase 4: Momentum Preservation
Post-cancel requires continuous directional input and secondary technique integration. Chain jump-slides immediately to disrupt aim assist while extending velocity benefits. Slide-cancel maintains infinite slide for repeated momentum boosts.
Direction control separates basic execution from competitive application. Maintain velocity while adjusting toward objectives—independent camera (awareness/targeting) and movement (pathing) control.
Terrain interaction extends velocity. Downward slopes amplify speed 5-10%, upward inclines reduce proportionally. Memorize elevation changes near wall-cancel positions.
Visual Confirmation

Success indicators:
- Seamless velocity without deceleration
- Smooth animation transitions
- Ice Barrier activation coincides with wall contact
- Immediate directional responsiveness
- Uninterrupted momentum trails
Failed executions show opposite—deceleration, collision animations, delayed activation, input lag.
Frame Data and Timing
Frame Windows
Wall collision operates on 2-4 frame windows at 60 FPS (33-66ms). Higher frame rates reduce windows—120 FPS halves to 16-33ms, 144 FPS to 14-28ms. This explains why pros prioritize 60+ FPS.
Optimal timing targets window midpoint (frame 2-3 of 4-frame windows), providing buffer against variations. Consistent midpoint hits achieve 80-90% success vs 40-60% for frame 1 or 4 inputs.
Higher approach speeds compress windows 10-20%, requiring faster responses. Competitive play prioritizes max speed despite difficulty.
Input Buffer Duration
3-5 frame buffer allows predictive inputs 50-83ms (at 60 FPS) before optimal frames. Ability activation receives higher priority than movement inputs, ensuring queued commands execute during collision transitions.
Advanced players input abilities during approach (Phase 1), letting buffer queue for Phase 2 execution. This reduces cognitive load during contact, freeing resources for directional control.
Ping Compensation
Network latency requires timing adjustments:
- 20-40ms: 1 frame early (16ms compensation)
- 40-60ms: 2 frames early (33ms)
- 60-80ms: 3 frames early (50ms)
- 80-100ms: 4 frames early (66ms)
Consistency drops substantially above 80ms. Variable ping requires adaptive timing—earlier during spikes, standard during stability.
Consistency Factors
Variables affecting success:
- Surface texture: Smooth walls more consistent than textured
- Velocity variance: Speed boost stacking creates timing inconsistencies
- Ability cooldown: Failed executions often from unavailability
- Environmental interference: Nearby objects disrupt detection
- Input polling rates: 500Hz+ improves registration
Pros achieve 85-95% success controlling these variables. Casual players plateau at 60-70%.
Map-Specific Applications
Best Walls Per Map
Optimal surfaces: smooth textures, perpendicular to high-traffic routes, near tactical objectives. Smooth concrete/metal superior to rough stone/wood.
Priority zones:
- Spawn-to-objective: Faster initial rotations for early positioning
- Objective perimeter: Rapid approaches or defensive repositioning
- High-traffic connectors: Rotation speed between sectors
Include approach vectors, timing offsets, post-cancel routing in mental database.
High-Traffic Speed Routes
High-traffic areas benefit most—positioning speed impacts engagement initiation. 0.5s advantage repeated 10-15 times per match = substantial benefits.
Optimal routes feature 2-3 wall-cancel opportunities with straight connections, preserving velocity through sequences. Sharp turns or elevation changes reduce benefits.
Route planning incorporates cooldown management—25-30s intervals between cancels match Ice Barrier cooldown.
Competitive Positioning
Advantages manifest through:
- First-position: Arrive 0.5-1.5s before opponents for pre-aimed setup
- Rotation unpredictability: Speed creates timing uncertainty
- Engagement disengagement: Superior mobility enables aggressive positioning with escape options
Consistent first-position advantages achieve 10-15% higher engagement win rates.
Map-Specific Timing
Elevation changes affect velocity—upward slopes need earlier inputs, downward need delayed inputs. Rough textures require 1-2 frame earlier inputs vs smooth.
Lighting impacts visual confirmation. Use muscle memory and audio cues in shadows—Ice Barrier sound provides consistent feedback.
Weather effects and hazards introduce variables. Maintain mental databases of map-specific adjustments.
Common Mistakes
Timing Errors
Early: Ability activates before collision window, 5-10m before contact. Solution: delay 2-3 frames using visual markers.
Late: Input after collision resolution—visible animations then delayed activation. Solution: earlier input by 3-4 frames, use predictive buffering.
Systematic correction:
- Record 10 attempts noting patterns
- Adjust 1 frame in correction direction
- Execute 10 more, measure changes
- Repeat until 70%+ success
- Refine through 50+ reps
Incorrect Angles
Excessive perpendicular (>60°) triggers full collision. Insufficient (<20°) fails to register.
Calibration techniques:
- Reference points: Environmental markers at optimal angles
- Camera positioning: Angles naturally guide 25-45° approaches
- Minimap awareness: Macro-level vector planning
Practice angles in isolation until 80% consistency before integrating ability timing.
Input Order Errors
Common mistakes:
- Equipment before ability triggers animation locks
- Secondary ability conflicts with Ice Barrier
- Weapon swap introduces delays
Solution: strict hierarchy—movement → ability → equipment → weapons.
Momentum Loss
Results from releasing directional inputs during cancel or failed jump-slide chains. Maintain continuous forward input throughout.
Initiate jump-slides within 3-5 frames of cancel completion. Delayed chains allow deceleration before slide activation.
Troubleshooting
Diagnostic hierarchy:
- Verify Ice Barrier cooldown
- Check max sprint speed
- Validate 25-45° angle
- Review input timing
- Assess network latency
Record 20-30 attempts, analyze frame-by-frame for pattern clusters.
Advanced Variations
Double Wall-Cancel
Two consecutive cancels within 3-5s compound velocity for extended high-speed movement. Requires wall pairs 15-25m apart with compatible angles.
Ice Barrier 25s cooldown prevents immediate sequential activations. Alternatives:
- Equipment-assisted momentum between cancels
- Terrain exploitation through downward slopes
- Slide-cancel chains for continuous movement
Double sequences provide 25-35% faster rotations vs single applications.
Corner Boost
Exploit corner intersections where perpendicular walls create dual collision detection. Approach at 40-50° during wall surface transitions for amplified momentum.
Optimal zone: 0.5-1.0m from intersections, demanding centimeter-level precision.
Excels in confined spaces with frequent corners. Memorize 8-12 priority corners per map.
Mid-Air Cancel
Combine jump mechanics with wall contact for aerial mobility. Jump 2-3m before contact, activate ability during airborne collision.
Manage:
- Jump timing for airborne contact
- Aerial directional control for collision angles
- Ability activation accounting for airborne velocity
- Landing momentum preservation
Greatest value in vertical sections with elevated positions.
Combat Integration
Advanced applications:
- Cancel-to-peek: Execute into immediate corner peeks with pre-aimed angles
- Combat repositioning: Position shifts during engagements
- Escape cancels: Rapid disengagement from unfavorable fights
- Aggressive entries: High-speed objective pushes
Progressive practice:
- Isolated execution
- Stationary target engagement
- Moving target tracking
- Live 1v1 scenarios
- Full competitive matches
Practice Drills
Beginner Routes
Features:
- Single optimal walls with ideal texture/angle
- Straight-line approaches
- 20-30m approach distances
- Low-pressure environments (Hot Zone, 1v1s)
Structure:
- 10 consecutive attempts on single wall
- Record success rate, identify patterns
- Adjust technique
- Repeat until 70% success
- Progress to secondary wall
Target 50-100 reps per 15-20 min session across 3-5 walls.
Intermediate Drills
Complexity variables:
- Multi-wall routes (3-4 opportunities)
- 45-90° direction shifts between cancels
- Ability cooldown management
- Variable approach speeds
Consistency targets:
- Single wall: 80%+ across 20 attempts
- Multi-wall: 60%+ full route across 10 attempts
- Varied conditions: 70%+ across different angles/speeds
Practice 3-4 sessions weekly, 25-35 min each.
Advanced Challenges
Emphasis on speed and combat:
- Timed rotations within target times
- Execute while engaging moving targets
- Simulated competitive pressure
- Variation mastery (double, corner, mid-air)
Benchmarks:
- Full map rotation: 15-20% faster than standard
- Combat integration: 70%+ success while engaging
- Variations: 3+ different types per session
Maintain 2-3 sessions weekly preventing degradation.
Progress Metrics
Track:
- Success rate percentage
- Timing consistency variance
- Speed improvements (rotation times)
- Combat integration rate in matches
Weekly tracking comparing periods. Maintain logs:
- Date, duration
- Drills practiced
- Success rates, timing data
- Weaknesses, corrections
- Competitive application frequency
Competitive Meta
Speed Advantages
Measurable metrics:
- Rotation time: 15-20% faster completion
- First-position: 25-35% increased arrival before opponents
- Engagement initiation: 40-50% more frequent control
First-position correlates with 10-15% higher engagement win rates. Over 20-30 engagements, substantial performance improvements.
SPIKE Level 3 (10%) + Parkour Master (25%) = 35% speed. Wall-cancel adds 15-20% during execution = 50-55% total enhancement.
Ranked Strategies
Conservative (solo queue):
- High-success walls (80%+ personal rate)
- Low-risk timing (rotation phases, not engagements)
- Cooldown awareness for defensive purposes
- Backup routing if attempts fail
Aggressive (coordinated teams):
- Synchronized team rotations
- Objective rush applications
- Defensive collapse speed
Counter-Play
Opponents employ:
- Timing predictions, pre-aiming arrivals
- Audio cue recognition (Ice Barrier sounds)
- Route denial positioning
- Ability baiting before critical rotations
Mitigation:
- Route variation preventing patterns
- Timing randomization
- Ability economy management
- Backup techniques when predictable
Patch Status
Currently operates within acceptable parameters—no developer intervention indicating exploits. Slide-cancel maintains infinite functionality, suggesting tolerance for advanced movement.
Future scenarios:
- Technique preservation as skill expression
- Mechanical adjustments reducing effectiveness
- Complete removal via physics changes
Monitor patch notes. Diversify movement skills beyond single techniques.
Optimizing Loadout
Weapon Choices
Mobility priorities:
- Level 5 Machine Gun: 33% speed increase
- SMGs: Superior movement vs rifles, close-range effective
- Lightweight sidearms: Rapid switching without penalties
Balance mobility against combat effectiveness. Movement advantages meaningless if weapon prevents effective engagement.
Equipment Synergies
Amplifying movement:
- Grenades for explosive jumping or momentum preservation
- Tactical equipment (smokes/flashes) for safe execution in contested areas
- Defensive utilities protecting during vulnerability
Avoid equipment triggering animation locks interfering with ability timing.
Crosshair Optimization
Recommended:
- Size: 2-4 pixels for long-range precision
- Thickness: 3-4 pixels balancing visibility/precision
- Gaps: 1-3 pixels for center-point ID during rapid movements
Maintains target acquisition during execution and combat.
BitTopup for Ran's Potential
Maximize competitive potential with optimal equipment, upgrades, cosmetics requiring currency investment. BitTopup provides secure, efficient gold top-up—competitive pricing, fast delivery, excellent ratings.
Premium skins and equipment offer aesthetic customization and potential gameplay benefits. Serious competitive players should invest in comprehensive unlocks for all abilities, passives, equipment.
BitTopup's wide coverage and secure transactions provide peace of mind. High user ratings reflect consistent quality.
FAQ
What is wall-cancel speed glitch?
Advanced movement exploiting collision detection to preserve momentum through wall contact. Execute ability activations during 2-4 frame collision windows, canceling deceleration and maintaining 85-95% velocity. Provides 15-20% faster repositioning.
How to perform Ran's wall-cancel?
Four phases: approach at 25-45° angles at max speed, activate Ice Barrier during 2-4 frame contact window, maintain directional input through execution, chain jump-slides for preservation. Requires frame-perfect timing—ability inputs 1-2 frames before contact.
Is it bannable?
No official statements classify as exploits. Operates within mechanics without external tools. Slide-cancel maintains infinite functionality, suggesting developer tolerance. Monitor patch notes but currently no ban risk.
Which walls work best?
Smooth textures (concrete/metal), perpendicular to routes, near objectives. Positioned 25-45° from primary paths. Priority: spawn-to-objective routes, objective perimeter, high-traffic connectors.
How much faster than normal?
15-20% during execution. Combined with passives (35% total), reaches 50-55% during optimal routing. Translates to 0.5-1.5s faster arrival at contested positions.
How to practice consistently?
Progressive drills: single-wall reps achieving 70% success, multi-wall routes testing 80%, combat scenarios maintaining 70% under pressure. Execute 50-100 reps per 15-20 min session. Track success rates and timing. Configure sensitivity within 2800-4200 eDPI, disable auto sprint.


