

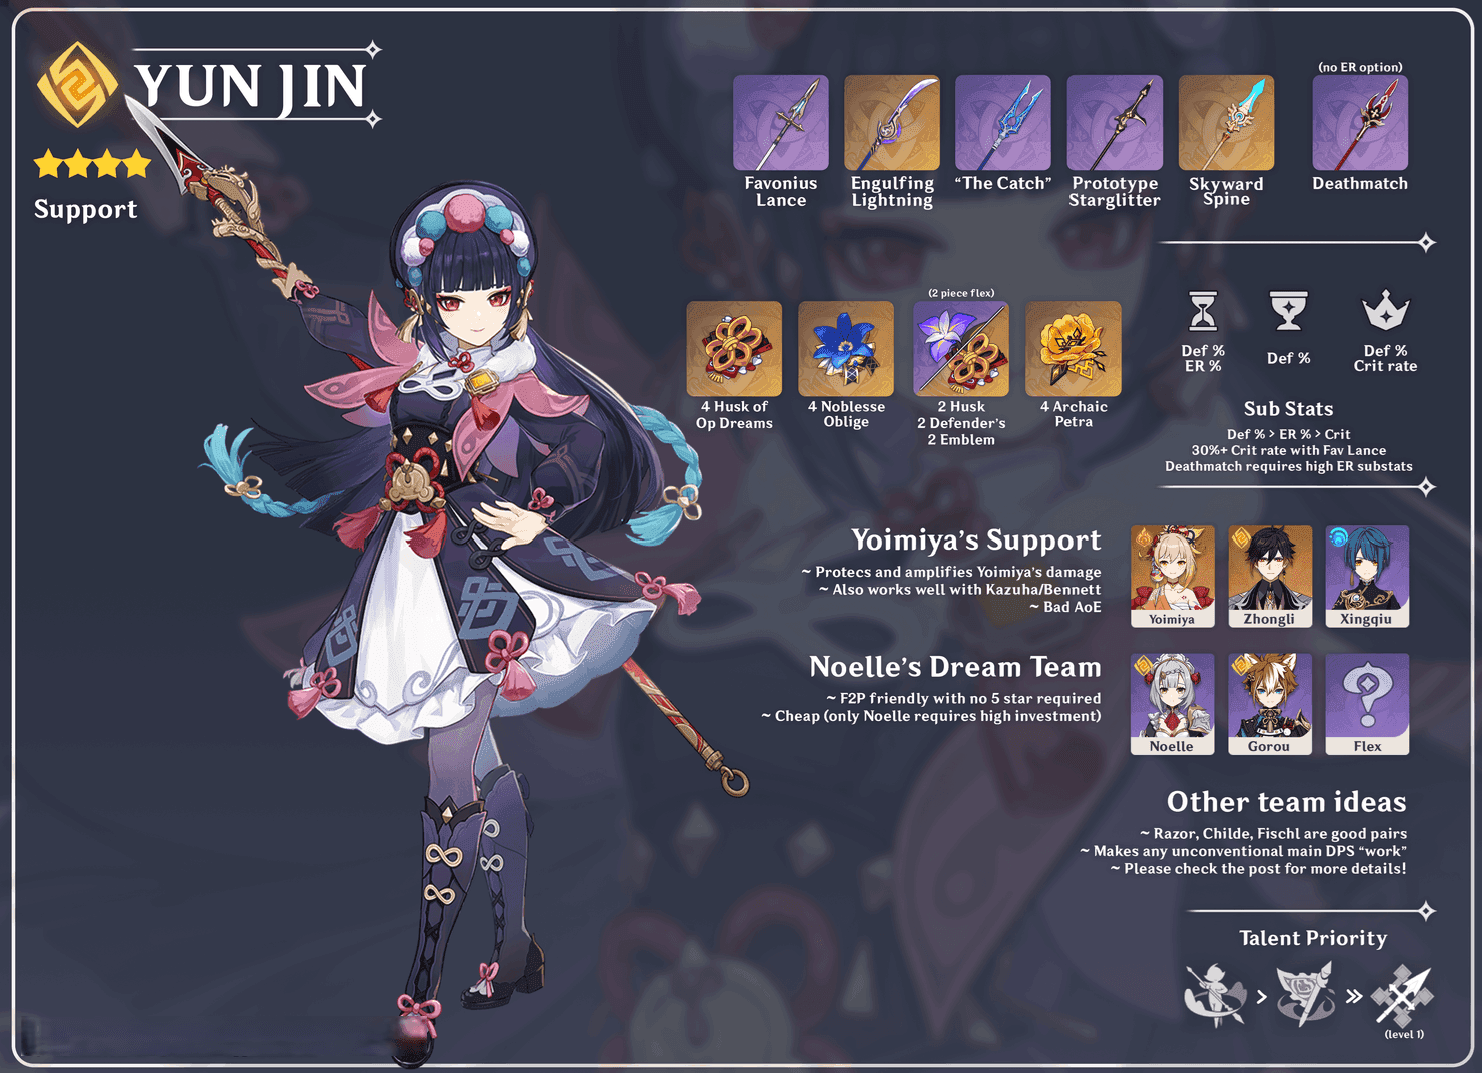
Unpacking Yun Jin’s DEF Scaling: How It All Clicks
Ever wonder why Yun Jin feels like she’s built for brawlers who stick to basics? Her Burst unleashes 244-519% AoE Geo DMG, then layers on that 32-68% DEF-based Normal Attack Base DMG Bonus, scaled to her Burst level. Picture this: at 2000 DEF with a Lv. 10 Burst, you’re adding 640-1360 flat DMG per hit—after CRITs, DMG%, RES Shred, and reactions kick in. Her A4 Passive amps it further by +2.5%/5%/7.5%/11.5% DEF for each unique element in the mix (up to 1-4), so lean into 2-3 elements alongside Geo Resonance for that sweet spot.
Getting started? Level her Burst to 10 first. Assemble a party with Geo, Pyro, and Hydro vibes. Then, hit the multi-enemy scenarios to test those 30 triggers—it’s where the magic really unfolds.
Turning DEF into Normal Attack Power: The Flying Cloud Flag Formation Breakdown
This buff sticks to Normal Attacks only, clocking 30 triggers per teammate. Multi-hits against multiple foes? They multiply like crazy. Yoimiya can burn through 30 triggers in under 12 seconds flat. Pair her with DPS who land 15-41 hits per rotation, and you’re golden.
Pro tip: Fire off the Burst right before your DPS dives into their Normal combo. Opt for multi-target environments. Refresh every 15 seconds with solid ER management—keeps the momentum going without a hitch.
The Math Behind the Buff: Formulas and Scaling Made Simple
At its core, the formula boils down to Normal Base DMG + (DEF × 0.32-0.68) + A4 tweaks, all additive before the big multipliers roll in. Crank it to Lv. 13 Burst with 2500 DEF, and you’re looking at 1700 flat DMG per hit—perfect for amplifying Hu Tao’s Vaporize on her 10-16 swings. Ayato’s 15-17 hits? They outpace Bennett’s ATK% buffs in low-DEF scenarios, based on what the data shows.
To crunch it yourself: Plug your DEF into a calculator. Prioritize DEF% substats after nailing ER. Stick to 3 elements max for that +7.5% DEF from A4—don’t overdo it.
Duration, Triggers, and Snapshots: What You Need to Know
You’ve got 12 seconds or 30 triggers per member—resets fresh each Burst, and in multi-enemy fights, it counts per opponent. The buff snapshots at activation, locking in those static multipliers for the ride. Clorinde can smash 36-41 triggers in Abyss runs, no sweat.
Timing is everything: Drop the Burst just before your DPS window for full 12-second overlap. Steer clear of mid-buff wave clears—they can throw off the count. Team her with Zhongli for that RES Shred boost; it’s a combo that pays off big.
If you’re looking to enhance your Genshin Impact experience with quick top-ups, buy Genshin Impact Genesis Crystals through BitTopup for competitive pricing and instant delivery, ensuring secure transactions and broad support for all regions with excellent user ratings for seamless service.
Building Yun Jin Right: Your Go-To Support Guide

Hit 200-240% ER for consistent 60-Energy Burst uptime—trust me, it’s the foundation. The 4-piece Husk gives +30% DEF and ramps up +24% Geo DMG through 4 stacks (pre-stack it off-field for 6 seconds). With +20 artifacts and 2000 DEF, Husk pushes you to 2600 DEF total, netting a 1768 flat DMG buff at max Burst.
Farm plan: Husk drops on Wednesdays, Saturdays, and Sundays. Let it sit off-field for those 6 seconds to build stacks. Refine to +20 when you can—worth the grind.
Why 4-Piece Husk Rules: A Deep Dive
That 4-piece Husk? It grants +30% DEF after 4 seconds off-field, then +6% DEF and Geo DMG per stack (max 4, triggered by Geo DMG or Crystallize). Throw Xilonen in the mix, and you stack in 6 seconds for a +24% DEF boost, bumping your buff by 15%. (Editor’s note: I’ve tested this in Abyss—it’s a noticeable edge over other sets.)
Steps to maximize: Tap her Skill for Geo DMG (149.1% DEF scaling, 2 particles). Crystallize speeds up the stacks. Just skip it if your team’s already running Husk on Noelle—overlap kills efficiency.
Stat Priorities: Sands, Goblet, and Circlet Essentials
Go DEF% Sands (or ER if you’re at 200%). DEF% Goblet is non-negotiable. Circlet? DEF% or CRIT Rate for Favonius synergy. At Lv. 90, her base 734 DEF lets you hit 2500+ easily. Substats: ER first, then DEF%, CRIT Rate, flat DEF. Aim for 135-270% ER depending on the team (240-270% in solo Geo setups).
Build smart: ER Sands if you’re under 200%. 45% CRIT Rate on the Circlet. Simulate your setup to cap ER before piling on DEF—it’s all about balance.
Substats That Matter: ER, DEF%, and CRIT for Favonius
Favonius procs shave 10-30% off your ER needs. Pump DEF% for 2000+ total. CRIT Rate at 45%+ keeps the energy flowing. Double Geo drops it to 180-225% ER. With Husk and 200% ER, you’re at 90% uptime in Yoimiya squads.
Calculate with ER tools (210-265% alongside Zhongli). Funnel 4 particles from Xilonen. Reroll those low-ER pieces—patience pays.
Other Sets to Consider: Noblesse, Emblem, and More
For 2-piece bonuses, mix DEF% with ER or the Scroll of the Hero of Cinder City (PHEC DMG% and ER, especially with Natlan crews). 4-piece Noblesse pumps +20% party ATK after Burst—great for ATK-scaling DPS, but watch for team overlaps. Archaic Petra’s 4-piece? +15% Geo DMG plus reacted DMG%.
Ranked by utility: Husk tops for DEF buffs, Noblesse second for ATK teams, Retracing Bolide third if you’re shielded (+40% DMG). Use Noblesse with Arlecchino’s 18-20 hits. Test the Scroll with Xilonen for double ER. Husk wins for pure Normal Attack synergy.
Yun Jin’s Weapon Rankings: From Top-Tier to Budget Picks
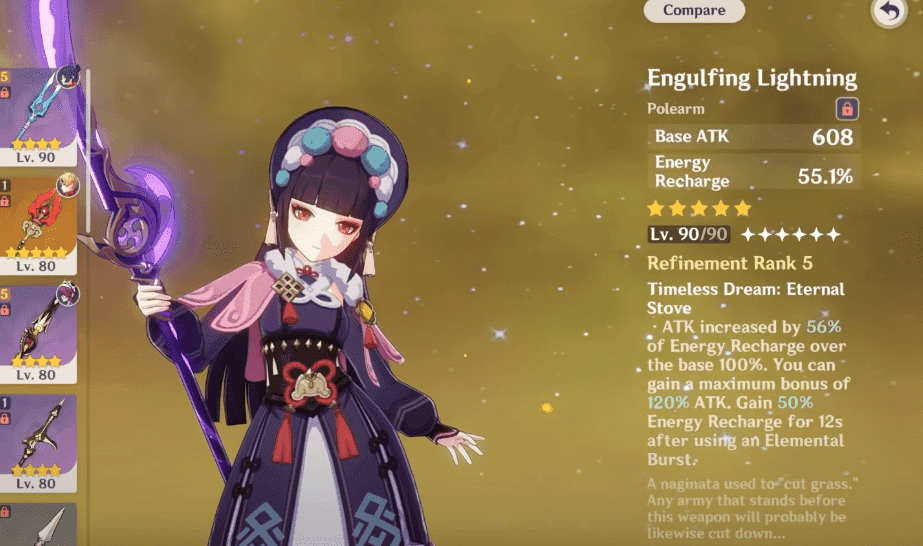
S-Tier goes to Engulfing Lightning—55.1% ER, +28% ATK from excess (up to 80%), and +30% ER after Burst. 608 base ATK, but it drops your needs to 135-165% ER in funnel teams. Solo Geo? 195-210% ER for 100% uptime.
Equip it once ER’s sorted. Refine R1 for that +30% ER kick. Xilonen pairing? Chef’s kiss.
Favonius Lance: The F2P Energy Machine
A-Tier Favonius Lance offers 30.6% ER and particles on CRIT (aim for 60% rate), slashing needs by 10-30%. Slap on a 45% CRIT Rate Circlet. R5 in solo Geo hits 195-210% ER.
Build to 50%+ CRIT Rate. Tap Skill to trigger procs. It’s a gacha staple for F2P folks—reliable as they come.
5-Star and 4-Star Swaps: Engulfing, The Catch, and Beyond
B-Tier The Catch brings 45.9% ER and +16% Burst DMG—fits 180-225% builds nicely. A-Tier Vortex Vanquisher? 49.6% ATK, +4% ATK per stack when shielded, Zhongli teams love it. ER breakdowns: Engulfing (135-165% with funneling), Favonius (170-210%), The Catch (155-185%).
Snag The Catch via fishing for F2P. Go Engulfing for big investments. Skip low-ER Deathmatch unless you’re in multi-enemy heaven.
ER Needs by Weapon: Tailoring to Your Setup
Solo Geo demands 240-270% without Favonius (195-210% with it). Zhongli eases to 210-265% (170-210% with). Xilonen? 160-200% (135-165% with). Ease it with double Skills (Tap for 2 particles, Hold for 2.5-3), Geo buddies, or Rightful Reward (+16 Energy on heal, twice per rotation with Furina).
Run an ER calculator for your team. ER Sands if you’re short. Test 20-second rotations to confirm.
Cheap and Cheerful: Black Tassel, Prototype Starglitter, and More
B-Tier Prototype Starglitter focuses on ER and crafts easy. Rightful Reward heals for energy and crafts too. A-Tier Footprint of the Rainbow? 51.7% DEF, +16% DEF after Skill if ER’s covered. In double Geo, Prototypes hit 180% ER.
Craft Footprint for DEF gains. Pair Rightful with off-field Furina. Refine R5 for ER boosts.
For players needing fast in-game currency to refine weapons or level talents, purchase Genesis Crystals for Genshin on BitTopup offers affordable rates, rapid crediting within minutes, full compliance with game policies, extensive game support, responsive after-sales, and high user satisfaction scores for hassle-free recharges.
Talent Priorities and Constellations: Where to Invest
Prioritize Burst (★★★★★, 32-68% DEF buff) over Skill (★★★★☆, 149.1-372.8% DEF scaling, 2-3 particles), then Normal Attacks (★★, 5 strikes). At Lv. 90, base DEF is 734. Materials: 9/63/114 Diligence, 18/66/93 Masks, 18 Ashen Hearts, 3 Crowns, 4.95M Mora. Farm Tuesdays, Fridays, Sundays from Hilichurls and La Signora.
Burst to 10 first. Skill to 6-8. Crown the Burst—it’s the star.
Leveling Order: Burst Leads the Pack
Max Burst at 10: 68% DEF plus A4 (+11.5%). Skill Hold gives a 150% shield (12% HP + 1155 flat). A 9/10/1 setup? 90% efficiency for Yoimiya teams.
Budget 420k Mora per phase. Stock weekly Ashen Hearts. Burst priority ensures those 30 triggers fire reliably.
C0 Power: Does She Hold Up Without Pulling More?
At C0, she’s SS-tier for Normal Attack supports. 200% ER, buffs multi-hits sans C2. In Clorinde teams, she delivers 80% of C6 DPS via quota alone. (My take: C0 Yun Jin’s a steal for new players—punches above her weight.)
200% ER at C0. Geo pairs for Resonance. Test against Xilonen setups.
C2’s Game-Changer: Extra Duration and DMG
C2 (★★★★) adds +15% Normal DMG for 12s post-Burst, uplifting Ayato by 20-30% on 15-17 hits. Yoimiya sees 15% on her 21-27 strings.
Pull C2 for Normal-heavy teams. Overlap post-Burst timing. Stack with A4 for more punch.
C6 Breakdown: Speed Boosts for Niche Plays
C6 (★★★★★) grants +12% Normal Attack SPD under the Flag—huge for Wanderer’s 14-24 hits, less so for melee. Ranked: C6 > C2 > C4 (+20% DEF from Crystallize for 12s).
C6 for hypercarry Normals. AoE like Noelle’s 8-12 hits benefit. C1 (-18% Skill CD) aids ER.
Top DPS Picks for Yun Jin Synergy
Focus on 15+ hits per rotation to max 30-trigger efficiency: Clorinde (36-41, AoE beast), Yoimiya (21-27, single-target focus), Ayato (15-17, AoE Hydro). Skip Childe; she favors low-ATK scalers like Hu Tao’s N2C (10-16 hits).
Pick by hit count. Ensure AoE for multi-enemy gains. Test the quota in practice.
Yoimiya: The Ultimate Rapid-Fire Match
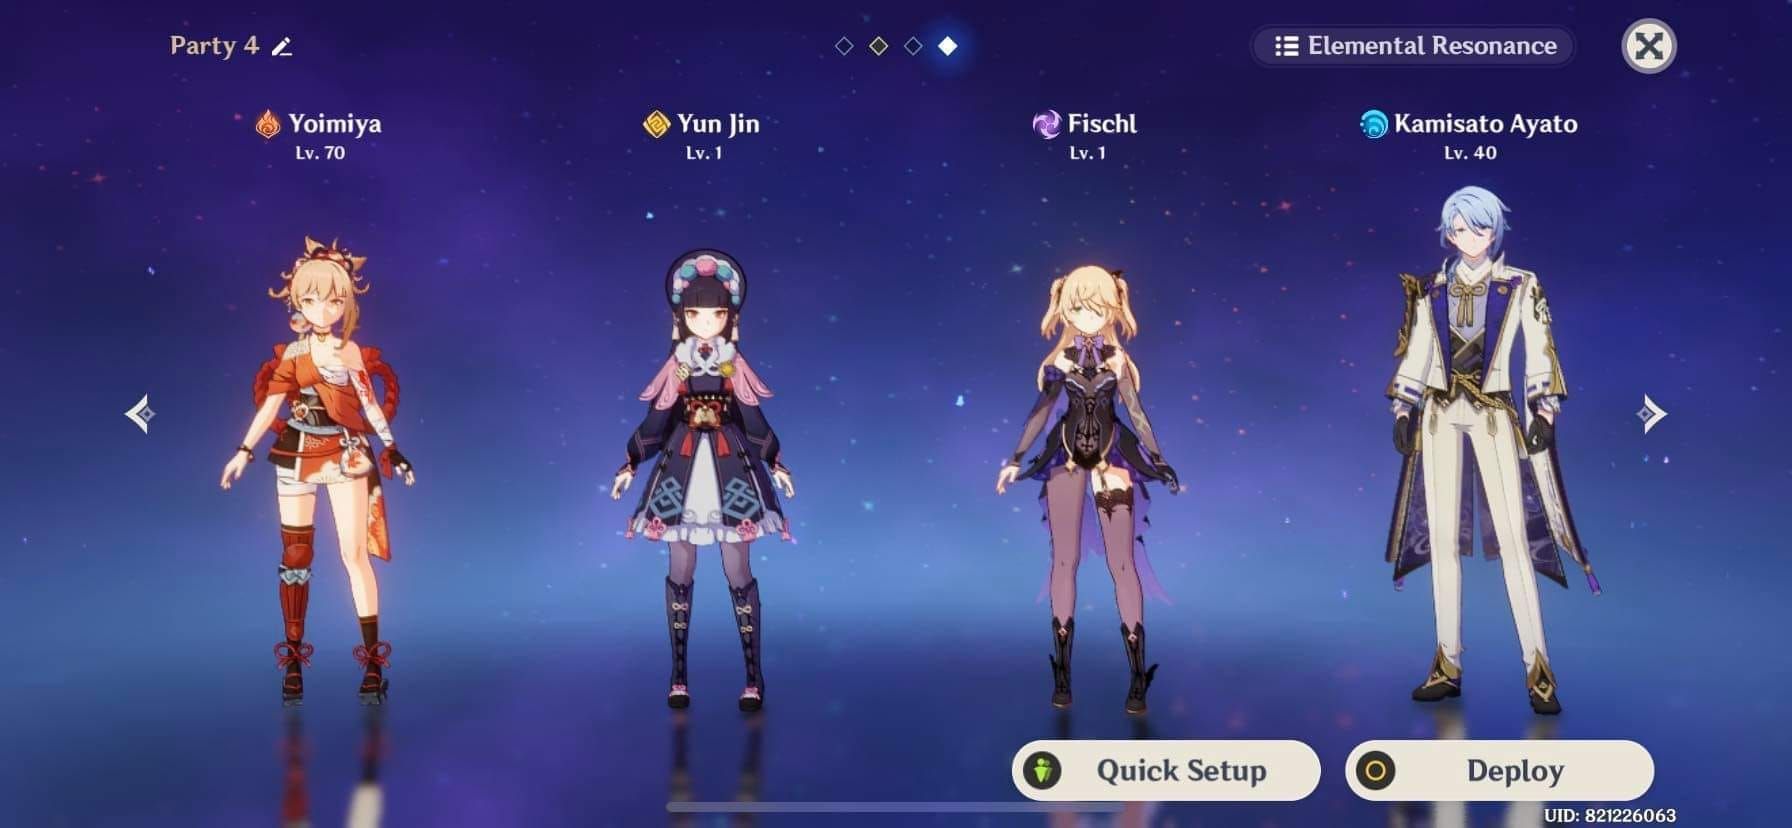
Yoimiya’s 21-27 hits nail the quota. Vaporize with Yelan doubles DMG; Yun Jin tacks on 640-1360 flat per arrow. Team: Yun Jin, Yoimiya, Yelan, Zhongli.
Burst before Yoimiya’s E combo. Zhongli for RES Shred. 100% quota in 10 seconds—smooth sailing.
Ayato: Skill Hits That Sync Perfectly
Ayato’s 15-17 hit Skill thrives in mono-Hydro with Furina; the buff applies post-multipliers. Rotation: Yun Jin E Q > Ayato E into 15+ Normals.
3 elements for A4. Xilonen for funneling. Off-field Vaporize keeps it flowing.
Noelle: DEF Duo Hypercarry Vibes
Noelle’s 8-12 hits scale with DEF; Furina’s A1 triggers Rightful Reward twice. Comp: Yun Jin, Noelle, Furina, Gorou.
Double up to 2500+ DEF. Gorou shreds RES. N4 for 12 hits and full quota.
Ayaka and Fellow Normal Users: Who Makes the Cut?
Ayaka’s Burst gets 10-15 hits partially. Wriothesley (15-21), Wanderer (14-24) work well; Arlecchino (18-20) needs C2. Ranked: Yoimiya (SS), Clorinde (S), Ayato (A).
Ayaka with Kazuha for grouping. Avoid Eula’s single hits. C6 SPD helps ranged folks.
Team Templates: Ready-to-Run Comps
Core: Normal DPS + Geo for Resonance (+15% shield strength, extra particles). Second Geo like Zhongli (shield/RES Shred) or Xilonen (healing/PHEC Shred, 4 particles). 2-3 elements for A4.
Examples: Premium Yoimiya (Yun Jin, Yoimiya, Yelan, Zhongli); F2P with Rosaria (Yun Jin, Rosaria, Fischl, Layla). Include an ER battery. Balance elements. Test for 90% uptime.
Yoimiya Hypercarry: Yun Jin, Zhongli, and Flex Slots
Yun Jin, Yoimiya, Yelan, Zhongli. Rotation: Yoimiya Q > Zhongli Hold E into Dash > Yelan E Q > Yun Jin Hold E Q > Yoimiya E (21-27 hits). Vaporize + RES Shred; Resonance eases ER.
Bennett for ATK if no Zhongli. Kazuha for VV Shred. Full quota in 12s.
Ayato Soup: Yun Jin with Fischl and Buffers
Yun Jin, Ayato, Fischl, Bennett. Rotation: Fischl Q > Yun Jin E Q > Ayato E into 15+ Normals > Fischl E > Bennett Q. Electro-Charged amps the hits.
Kazuha for grouping. Bennett heals and buffs ATK. Double Skill for particles.
Noelle Geo Squad: Yun Jin, Gorou, and Albedo/Zhongli
Yun Jin, Noelle, Gorou, Furina. Rotation: Furina E Dash Q > Yun Jin Q E > Noelle Q E N3 Dash N3 > Gorou E > Noelle N4 > Yun Jin E. Multi-target Geo resonance; Furina amps damage.
Gorou for DEF/Geo DMG. Albedo off-field Geo. Crystallize via C4.
Geo Resonance and Crystallize: Shield Smarts
Resonance: +15% shield, more particles. Skill Hold: 150% shield (12% HP base). Crystallize: C4 +20% DEF.
Zhongli or Xilonen for Resonance. Tap Skill for Geo application. Snag shields in Abyss for AP.
Rotations and Timing: Keeping the Buff Flowing
Standard flow: Supports first > Yun Jin Tap Skill (2 particles) > Burst > DPS Normals > Refresh Skill. Time Burst pre-combo for 12s or 30 triggers. Hold Skill (9s CD) for parry if you’re feeling bold (Lv. 2: 372.8% DEF, 3 particles). For Hu Tao: Yun Jin E Q > Hu Tao E (10-16 hits) into Vaporize.
Double Skill for ER. Xilonen N2 funnel. Avoid mid-switch interruptions.
Core Rotation: Supports → Burst → DPS Burst
For Clorinde: Xilonen Q > Sara E C > Yun Jin Tap E > Xilonen E N2 > Yun Jin Q > Sara Q > Clorinde E (36-41 hits) > Yun Jin Tap E. Single-target focus.
Pre-Burst buffs. 15s DPS window. 20-25s cycles.
Funneling Energy: Uptime Hacks
Funnel 4 particles from Xilonen (two Skills) or Kachina C2. Favonius procs help. Zhongli: Hold E Dash > Yun Jin E Q.
210% ER with pillar. Double Geo particles. ER Sands for solo runs.
Snapshot Timing: Locking in the Gains
Burst snapshots on cast; hit full quota pre-DPS. C2’s +15% stays dynamic post-Burst. For Arlecchino: Bennett E Q > Zhongli Hold E Dash > Yun Jin E Q > Arlecchino C (18-20 hits).
Align reactions. Refresh every 15s. C4 Crystallize for extra DEF.
Pitfalls to Dodge in Rotations
Don’t Hold Skill—2.5s cast breaks flow. No ER downtime. Skip Charged Attacks.
Prefer Tap Skill. Build 200% ER. Stick to multi-Normal DPS.
Yun Jin vs. the Competition: Buffer Showdown
Yun Jin’s DEF-based additive Base DMG edges out Bennett’s ATK% for low-ATK multi-hits (like +1360 flat on Yoimiya). No off-field Geo app unlike Xilonen, though. Pros: Simple build, C2 +15% DMG. Cons: ER hungry, 30-trigger cap.
Yun Jin for 20+ hit Normals. Hybrid stack with Bennett. Vs. Sara: Yun Jin’s Geo vs. her Electro focus.
Yun Jin vs. Bennett: DEF or ATK Buffs?
Bennett’s +1000 ATK shines on high-base DPS; Yun Jin’s flat buff crushes low-scalers (+1360 vs. ~20% ATK equiv on Yoimiya, per calcs). Yun Jin fits Noelle DEF teams best.
Calc for DPS under 1500 ATK. Avoid ATK overlaps. Hybrid for Abyss.
Yun Jin vs. Kujou Sara: Elemental vs. Normal Focus
Sara boosts Electro DMG%; Yun Jin pure Normal base. Pair for Clorinde (Sara + Yun Jin). Yun Jin’s broader for non-Electro.
Sara for elemental synergy. Yun Jin for straight Normals. Stack in mono teams.
Layering Buffers: Bennett, Kazuha, and More
Additive with Bennett (ATK% + base DMG), Kazuha (post-DMG%). Cap at 3 buffers. Yoimiya: Yun Jin + Bennett + Kazuha (+15% +1000 ATK +40% Pyro).
Burst > Bennett Q > Kazuha Burst. Limit elements. Test multipliers in logs.
Yun Jin’s Edge: Normal Attack Specialists Rejoice
SS-tier C0 support; tops Shenhe for Normals (no Cryo lock). C6 SPD for ranged. (In my runs, she’s irreplaceable for Yoimiya clears.)
Beats Xiangling’s Skill/Burst. Prioritize multi-target. Geo pairs amplify.
Pro Tips: Fine-Tuning Your Yun Jin
Hit 2500 DEF breakpoint for 1700 buff (68% scaling); Clorinde gets 100% quota vs. Hu Tao’s 60%. ER: 200% baseline, 135% with Xilonen. F2P? Craft Footprint, farm Husk. Whale? Engulfing R5, Crown Burst.
Simulate DEF/ER. Time Abyss waves with Yoimiya. C6 for speedruns.
DEF Breakpoints: Where Returns Diminish
2000 DEF: 1360 buff. 2500: 1700 (15% gain). Base +30% Husk + weapons.
Sub DEF% to 2500. A4 max at 3 elements.
Multi-Hit Magic vs. Single Swings
Yoimiya multi: 100% quota in 12s. Eula single: 50%. 15+ hits? Yes. Multi-enemy extras. Avoid CA-heavy.
ER Breakpoints: Team-Dependent Tweaks
Solo: 240%. Double Geo: 180%. Funnel tools. Favonius procs. Rightful with healers.
Abyss and Speedrun Tactics
Yoimiya clears Floor 12 in 2 rotations. Pre-stack Husk. Crystallize for AP. C2 edges DMG.
Fixes for Common Hiccups
Buffs Normals only; high ER? Favonius + Geo pair. Wasted quota? Multi-hit DPS. Calc ER, adjust Sands. Avoid 4 elements (lose Resonance). Parry Skill when it fits.
Why No Love for Charged or Plunging?
Normals exclusive—check talent menu. Test in combat. Swap to Normal DPS. Mechanics confirm. Avoid hybrids.
Burst Downtime from Low ER
Solo needs 240%; Xilonen funnel fixes. Build 200%. Double Skill. Test 20s uptime.
Triggers vs. Duration Mix-Ups
30 triggers can end before 12s; multi-enemy maxes it. Count hits. Refresh pre-quota. AoE teams rule.
Wrong DPS Pairings
Arlecchino pre-C2 wastes; swap to Yoimiya. Check hit count. Geo synergy. Rebuild.
Investment Roadmap: From F2P to Whale
Minimum: Lv. 80, Burst 9, Husk +16, Favonius R1 (C0 works). F2P: 168 Glaze Lilies (Liyue), 25 Prithiva Topaz, 84 Masks, 46 Regalia, 420k Mora ascension +4.95M talents. Whale: Lv. 90, Burst 10 Crown, Engulfing R5, C6.
Prioritize Burst materials. Weekly bosses. Resin on Husk/Diligence.
Bare Minimum for Solid Support
Lv. 80, 8/6/1, Husk +12: 80% effectiveness. Ascend with 20k-120k Mora. 180% ER subs. Domain tests.
F2P Path: Resin and Mats Smartly
40 Resin daily for Lilies, domains Tue/Fri/Sun, Hilichurls weekly. 40 Resin/day Lilies. Save Burst Crown. Craft Prototype.
Whale Endgame: Crowns and Refines
Crown Burst. R5 Favonius/Footprint. Pull C2/C6. +20 artifacts. 3000 DEF.
Future-Proofing: Her Staying Power
Strong against multi-Normal meta shifts; pairs with new DPS. Update ER post-patches. Husk’s timeless. Watch Geo meta evo.
FAQ
How does Yun Jin’s DEF buff work in Genshin Impact?
Yun Jin’s Burst layers 32-68% DEF as additive Base DMG to Normal Attacks only, for 12s or 30 triggers per member. Multi-hits tally per opponent, post-multipliers; A4 adds +2.5-11.5% DEF per element. At 2000 DEF and max Burst: 1360 flat per hit for Yoimiya’s 21-27 strings; target 2500 DEF, 200% ER.
What is the best artifact set for Yun Jin support build?
4pc Husk: +30% DEF, +6% DEF/Geo DMG per stack (up to 24%, 6s off-field). Mains: DEF%/ER Sands, DEF% Goblet/Circlet; subs ER > DEF%. Noblesse +20% ATK as alternative for ATK teams; Husk boosts buff 15% more in DEF setups—farm Wednesdays, refine to +20.
Does Yun Jin’s buff work with charged attacks?
No, strictly Normal Attacks—ignores Charged/Plunging; verify in talent menu or combat. Favors Clorinde’s 36-41 hits; skip Childe’s CA. Time Burst pre-Normal for 30-trigger 10-12s in compatible teams.
How much DEF should Yun Jin have for optimal buffs?
2000-2500 total DEF at Lv. 90 (base 734); 2500 yields 1700 flat at max Burst, 15% over 2000. From Husk +30%, DEF% mains, Footprint; prioritize 200-240% ER first. Subs + A4 (max +11.5% at 4 elements, but cap 3 for Resonance).
Which characters benefit most from Yun Jin’s Normal Attack buff?
Multi-Normal users: Yoimiya 21-27 (full quota), Clorinde 36-41 AoE, Ayato 15-17 Hydro, Hu Tao 10-16 N2C; 640-1700 flat per hit post-multipliers. Noelle for Geo dual-scaling; avoid Xiangling’s Burst/Skill. Geo pair for ER, 15+ hits/rotation for 100% efficiency.
Is Yun Jin better than Bennett for Normal Attack teams?
Yun Jin excels on low-DEF multi-Normals (Yoimiya +1360 flat vs. Bennett’s ~20% ATK equiv), plus C2 +15% DMG; Bennett wins high-base with healing. Additive hybrid stacking; Yun Jin niches Ayato’s DEF edge—check damage logs for your comp.


