

What Exactly is Fontemer Unihorn?
Here’s the deal: Fontemer Unihorn is that 4-star ascension material you absolutely can’t avoid if you’re building any of Fontaine’s premium characters. It’s locked behind the Millennial Pearl Seahorse - an Electro world boss that showed up in Version 4.1 and immediately became a resin sink for anyone serious about their Fontaine roster.

Unlike some materials that have multiple sources, this one’s got zero alternatives. Boss or bust. And honestly? That’s both frustrating and refreshingly straightforward. No hunting around different domains or weekly bosses - just you, the seahorse, and however much resin you’re willing to sacrifice.
For players planning major pulls, having your Chronicled Wish banner top up ready through BitTopup makes sense before diving into the farming grind. Nothing worse than getting a new character and realizing you’re weeks away from actually using them.
Finding the Millennial Pearl Seahorse (It’s Trickier Than You’d Think)
The boss location threw me off initially - it’s not just underwater, it’s in a hidden cave system that feels like a mini-dungeon. Here’s the actual route that works:
Step-by-Step Navigation:
Hit the Liffey Region Statue of the Seven
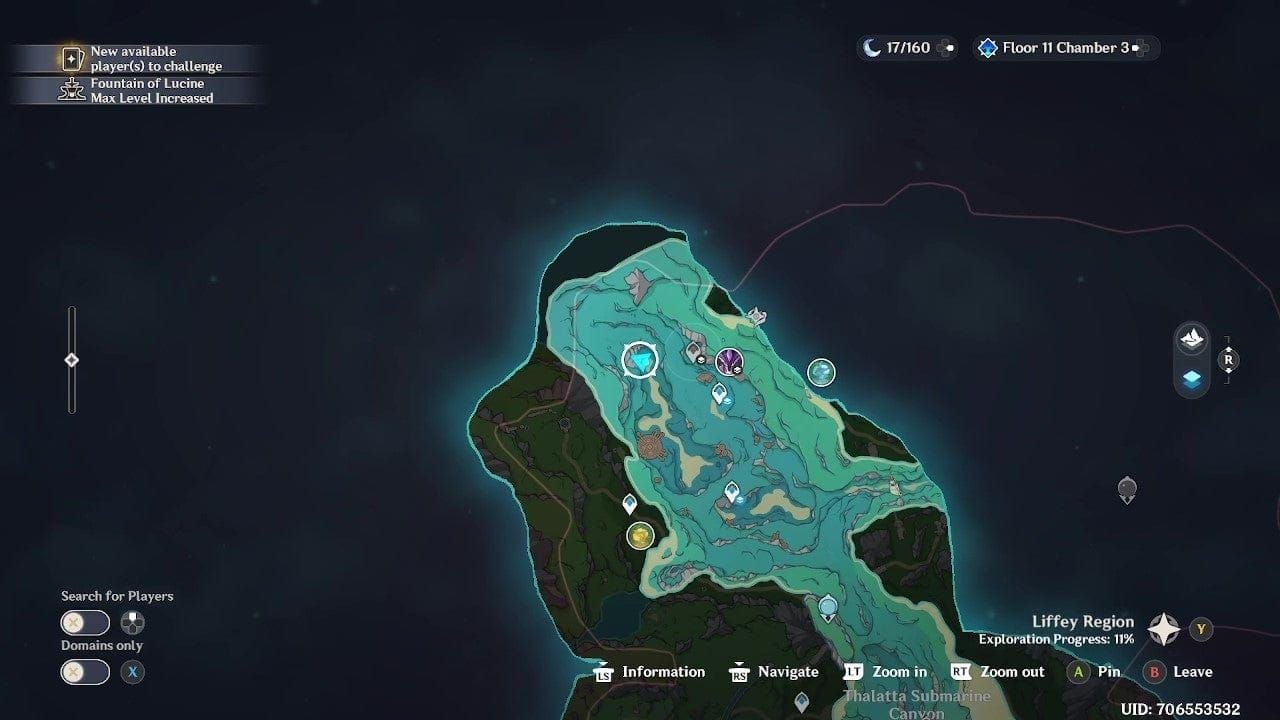
Swim northwest until you spot a massive underwater cave opening
Follow the winding path to a glowing water current ring
Let the current carry you through the tunnel system (don’t fight it)
Boom - boss arena with a waypoint you’ll definitely want to unlock
That underground waypoint becomes your best friend. The current system is actually pretty clever - it’s like the game’s way of saying yeah, we know swimming here manually would suck.
Pro tip from experience: The boss shows up on your map’s underwater section, but the entrance isn’t always obvious from surface level. Look for the cave opening, not just the boss marker.
Combat Strategy (Because This Boss Has Attitude)
The Millennial Pearl Seahorse revolves around its Xenomare Pearl - basically an Electro shield protecting its weak spot. Here’s where element choice matters big time.

What Works: Pyro, Cryo, Dendro absolutely shred the shield What Doesn’t: Electro DPS (obviously), though Electro supports can still function
The real game-changer? Those three Resonant Coral Orbs that spawn during special phases. Destroy all three simultaneously and the main shield just… disappears. It’s satisfying when you nail the timing.
Team Comps That Actually Work:
Ranged Focus: Yoimiya, Ganyu, Lyney (essential for airborne phases)
Hyperbloom Setup: Surprisingly effective against Electro mechanics
Comfort Pick: Zhongli + any ranged DPS + reaction support
I’ve found Baizhu particularly useful here - healing plus Dendro application covers two bases efficiently. And honestly, after farming this boss dozens of times, comfort matters more than you’d think.
Character Requirements (The Math You Need to Know)
Three characters need Fontemer Unihorn, and they’re all worth the investment: Neuvillette (5-star Hydro powerhouse), Clorinde (5-star Electro DPS), and Chevreuse (4-star Pyro support who’s way better than her rarity suggests).
Each character demands exactly 46 Unihorns total:
Ascension 2: 2 Unihorns
Ascension 3: 4 Unihorns
Ascension 4: 8 Unihorns
Ascension 5: 12 Unihorns
Ascension 6: 20 Unihorns
Complete Level 90 Shopping List:
46× Fontemer Unihorn (the star of the show)
168× Lumitoile
Full elemental gem set (1 Sliver → 6 Gemstones)
Transoceanic materials (84 total pieces)
420,000 Mora
Clorinde players get a bonus here - the boss drops Vajrada Amethyst (Electro gems), so you’re double-dipping on efficiency. Smart resource management like this is why planning your pull fund Genesis Crystal top up through BitTopup’s platform makes sense for long-term account building.
Farming Efficiency (The Resin Reality Check)
40 Original Resin per fight. That’s the price of admission, and it adds up fast when you need 46+ materials per character.
Drop Rates by World Level:
WL 7-8: Guaranteed 2+ Unihorns (sometimes 3)
Lower WLs: 1-2 Unihorns (not recommended for serious farming)
The 3-minute respawn timer is actually generous compared to some world bosses. Your limiting factor isn’t boss availability - it’s resin management.
Bonus Drops Worth Noting:
5-star artifacts (Gladiator’s Finale, Wanderer’s Troupe)
Adventure EXP and Mora
Vajrada Amethyst materials
Quick observation: Archer characters trivialize this fight. Being able to precisely target the Xenomare Pearl during airborne phases cuts fight time significantly.
Achievement Hunting (For the Completionists)
Collezione Di Sabbia Achievement: This one’s specific - you need to break the Xenomare Pearl by directly attacking the airborne boss during its Hoarthunder charge. Not by destroying the ground orbs. Ganyu’s charged shots or Nahida’s targeted skills work perfectly.
Fulgura Frango Achievement: Speed-kill the boss while it’s reconstructing its shield. Requires either overwhelming DPS or teams that bypass shield mechanics entirely.
These achievements aren’t just bragging rights - they force you to understand the boss mechanics at a deeper level, which makes regular farming more efficient.
Resource Planning (The Big Picture)
The Adventurer’s Book tracks this boss under the ‘Bosses’ tab - use it for respawn timing and quick navigation. The consistent mechanics make this one of Fontaine’s most predictable farming encounters, which is honestly refreshing.
Pre-Farming Checklist:
Unlock that underground waypoint (seriously, do this first)
Build teams with Pyro/Cryo/Dendro for shield breaking
Include ranged DPS for airborne management
Stock up on resin (Fragile Resin becomes your friend)
Here’s something to consider: with 46 Unihorns per character and potential future Fontaine releases, calculate your total needs before going all-in. Strategic resource allocation beats random farming every time.
FAQ
How many Fontemer Unihorns does each character actually need? 46 total per character, broken down as: 2 + 4 + 8 + 12 + 20 across ascensions 2-6. Every character using this material needs the exact same amount - no exceptions.
Where’s this boss hiding exactly? Underwater cave system in Liffey Region. Teleport to the Statue of Seven, swim northwest to the cave entrance, follow the path to the water current ring, and let it carry you to the arena. There’s a permanent waypoint inside.
What’s the most efficient team setup? Pyro/Cryo/Dendro for shield breaking (avoid Electro DPS). I recommend ranged DPS like Ganyu or Yoimiya, Zhongli for comfort, and Baizhu for healing plus Dendro application. Hyperbloom teams work surprisingly well too.
How long between boss respawns? 3 minutes flat. Each kill costs 40 resin. It’s actually one of the fastest-respawning world bosses, so your bottleneck is resin, not waiting around.
Any other ways to get Fontemer Unihorn? Nope. This boss is your only source - no weekly bosses, no shop purchases, no alternative farming methods. It’s boss farming or nothing.
Does World Level affect the drops significantly? Absolutely. World Levels 7-8 guarantee at least 2 Unihorns per kill with chances for 3. Lower levels might only give you 1-2. Always fight at your highest available World Level for maximum efficiency.


