

Why The Catch Still Dominates in 2025
Look, I’ve been covering Genshin builds for years now, and The Catch remains one of the smartest investments you can make. Zero primogems required.
At Level 90, you’re getting 510 Base ATK and a hefty 45.9% Energy Recharge. But here’s where it gets interesting – that R5 passive Shanty delivers 32% Elemental Burst DMG and 12% Elemental Burst CRIT Rate. We’re talking about a weapon that was literally designed for characters like Raiden and Xiangling.

The synergy with 4-piece Emblem of Severed Fate? Chef’s kiss. That ER converts directly into Burst DMG bonus while keeping your rotations smooth as butter.
For premium currency needs, Genshin Impact PayPal top up through BitTopup offers secure transactions with competitive rates and instant delivery.
Character Tier List (My Personal Rankings)
S-Tier: Raiden Shogun absolutely devours this weapon. She needs 250-300% ER anyway, and that passive amplifies her Musou Isshin damage like crazy.
A-Tier: Xiangling’s Pyronado becomes a monster with this thing. I’ve seen 40k+ ticks consistently.
B-Tier: Zhongli (burst support builds), Rosaria (if you’re running her as burst DPS), Thoma (though honestly, there are better options for him).
Here’s something that might surprise you – R5 The Catch actually outperforms several R1 5-star weapons for burst-focused builds. Yeah, you read that right.
The Material Grind (Buckle Up)
Getting the weapon itself:
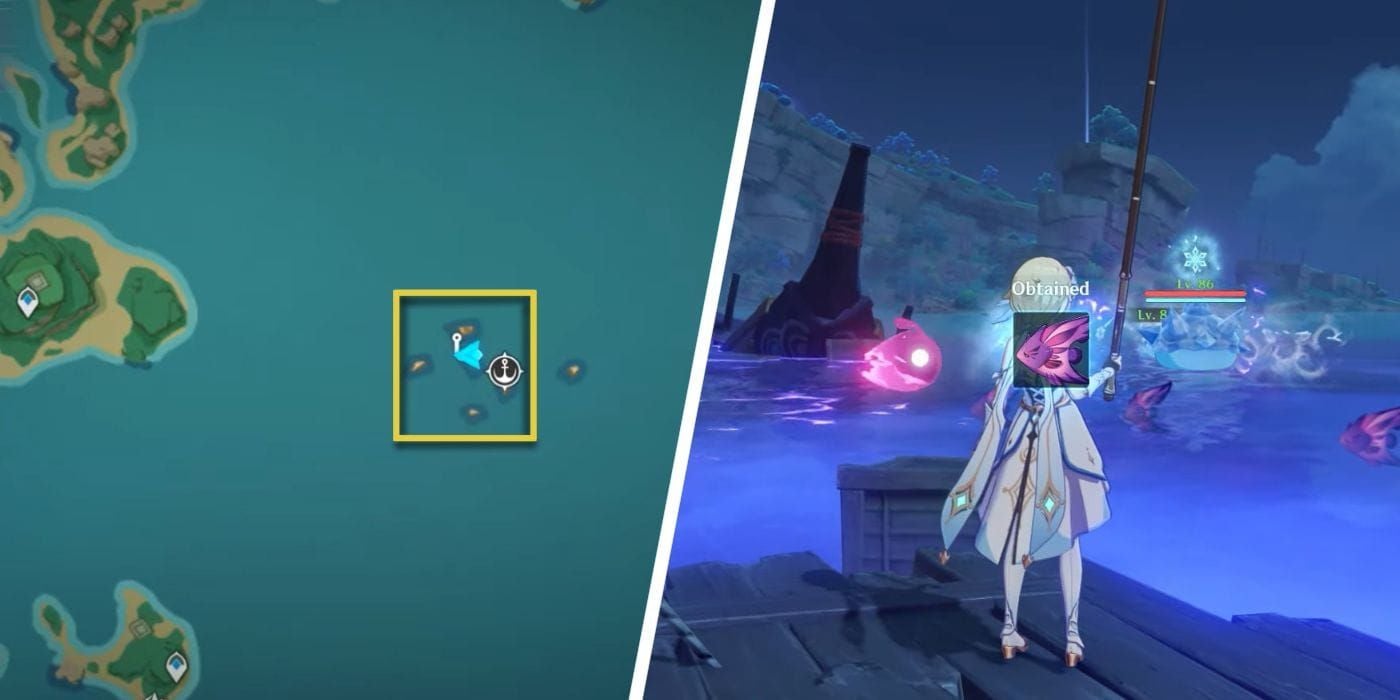
6 Raimei Angelfish (these little guys only show up at night, and they’re picky about location)
20 Golden Koi
20 Rusty Koi
For that sweet R5 refinement:
Another 12 Raimei Angelfish (18 total – this is where it gets tedious)
40 Pufferfish
40 Bitter Pufferfish
Each Ako’s Sake Vessel costs 3 Raimei Angelfish, 10 Pufferfish, 10 Bitter Pufferfish. Solo farming? You’re looking at 2-3 weeks. Co-Op? Cut that down to 1-2 days if you’ve got friends.
My Optimized Fishing Route (Tested Extensively)
After countless hours perfecting this, here’s what actually works:
Phase 1: Raimei Angelfish Hunt (18:00-6:00 ONLY)
Head to those electrified waters near Tatarasuna. Pro tip: clear out the Electro Hypostasis and any Nobushi hanging around first – they’ll mess with your fishing spots. False Worm Bait is non-negotiable here.
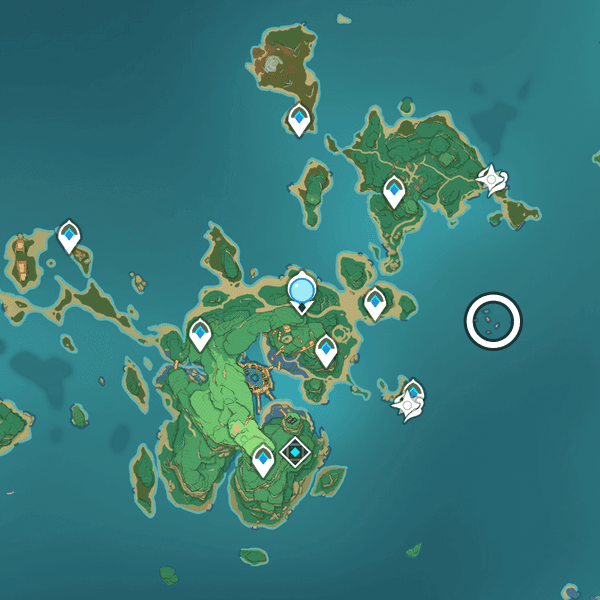
Phase 2: Koi Collection (Liyue Circuit)
Bishui Plain is your goldmine – 4-6 reliable spots. Then hit Dihua Marsh and the areas around Liyue Harbor. Golden and Rusty Koi love the same spots, which is convenient. Fake Fly Bait works best.
Phase 3: Pufferfish Sweep
This is where you cover ground. Mondstadt’s Cider Lake, Liyue coastal areas, Inazuma’s shallow waters. Both pufferfish variants respond well to Fake Fly Bait.
The complete circuit takes about 45-60 minutes if you know what you’re doing. Create waypoint markers at confirmed spots – trust me on this one.
Fishing Mechanics That Actually Matter
Bait Strategy (Don’t Mess This Up)
False Worm Bait: Slime Condensate + Berry. This is your Raimei Angelfish lifeline – nothing else works.
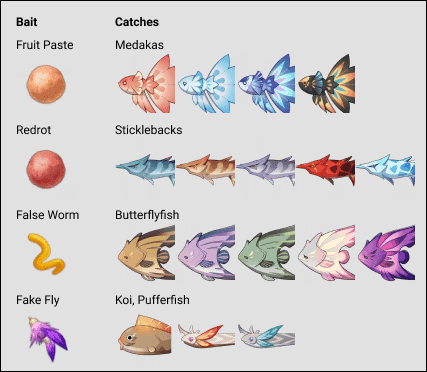
Fake Fly Bait: Slime Condensate + Horsetail. Your go-to for everything else.
Buy the recipes from Nantuck for 3 Medaka each. Also grab that Fishing Line Stabilizer (3 Medaka) – it expands your success zones significantly.
Equipment and Timing Tricks
The Narukawa Ukai rod (Inazuma’s fishing rod) genuinely improves your Raimei Angelfish catch rates. Bring Thoma along for that 20% double catch chance in Inazuma – every bit helps.
Remember: Raimei Angelfish are night owls. 18:00-6:00 game time, no exceptions.
For seamless progression, UID only top up Genshin Impact through BitTopup provides hassle-free transactions using only your game UID.
Raiden Shogun + The Catch: A Match Made in Celestia
The Build That Works
4-piece Emblem of Severed Fate is mandatory.
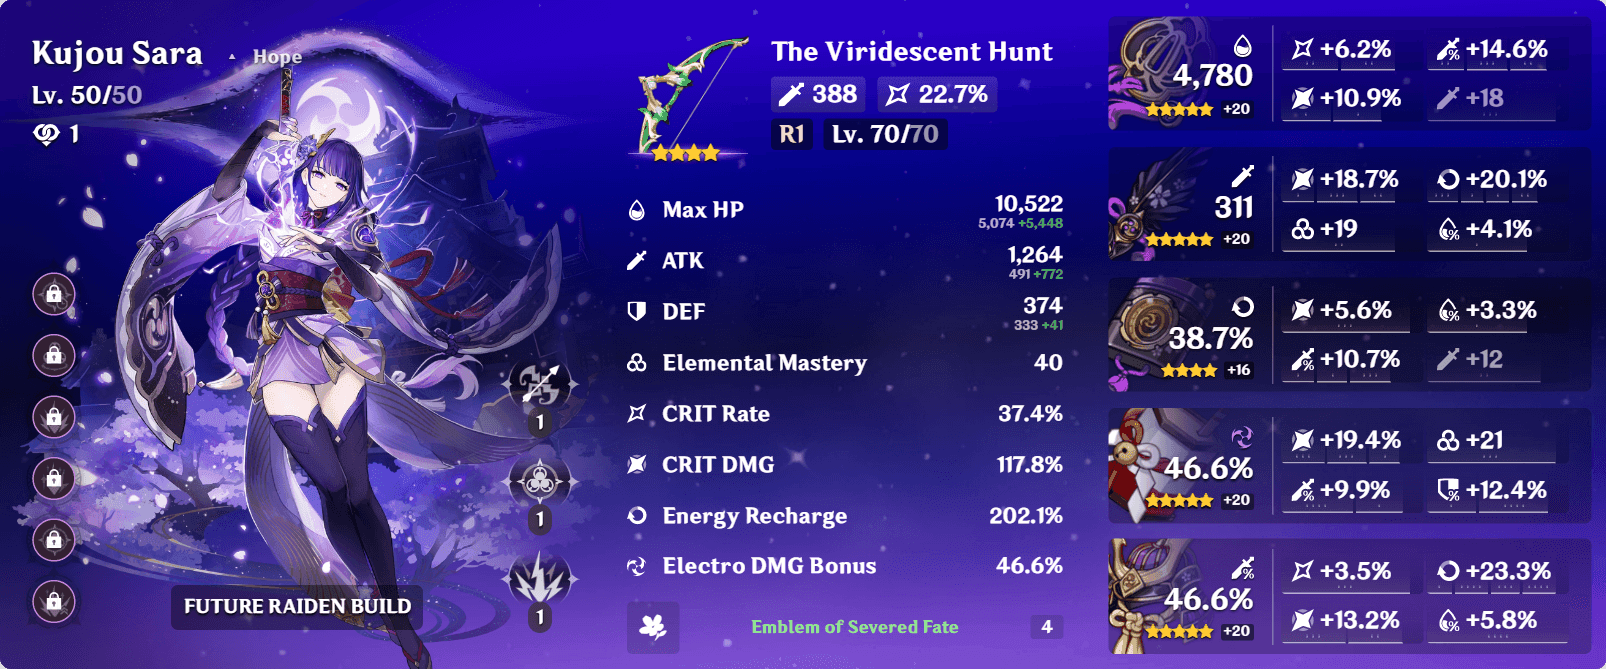
That 20% ER bonus plus the 25% Burst DMG conversion creates perfect synergy with The Catch’s ER substat.
Priority order (and I mean it):
Hit 250-300% Energy Recharge total
Maintain that 1:2 CRIT Rate:CRIT DMG ratio
Stack ATK% where possible
Electro DMG% goblet (obviously)
Team comp thoughts: National Raiden with Xiangling/Xingqiu/Bennett remains undefeated. Hypercarry with Sara/Kazuha/Bennett if you want to see bigger numbers. The Catch provides the ER foundation that makes these rotations actually work.
Xiangling: The Other Half of This Equation
Here’s where The Catch really shines in practice.
4pc Emblem again – ER% or ATK% Sands depending on your substats, Pyro DMG% Goblet, CRIT circlet. Aim for 180-200% ER minimum and at least 60% CRIT Rate.
The weapon’s passive directly amplifies Pyronado damage while ensuring you can actually cast your burst on cooldown. C1 helps with energy costs; C4 extends duration for even more passive value.
Advanced Strategies (For the Dedicated)
Co-op Efficiency Tips
Fish in other players’ worlds to completely bypass those annoying respawn timers. Focus on the rare fish first, then rotate between multiple friend worlds. This single strategy reduces farming time from weeks to literal days.
Mistakes I See Constantly
Wrong bait usage wastes so much time – match False Worm to Raimei Angelfish, period. Fake Fly for everything else.
Ignoring the night-only spawns will delay your progress indefinitely.
Planning insufficient ER makes The Catch less effective despite its built-in ER substat.
The Competition (Spoiler: There Isn’t Much)
Engulfing Lightning provides about 100% damage baseline versus The Catch R5’s 85-90% output. But we’re talking $200+ versus free acquisition here.
Other F2P options like Prototype Starglitter? They lack The Catch’s damage-focused passive entirely.
The weapon remains future-proof as Energy Recharge continues gaining value with each new high-cost burst character release.
FAQ (The Questions I Get Asked Weekly)
How long does it actually take to get The Catch? Solo farming: 2-3 weeks because of those 72-hour respawn timers. Co-Op: 1-2 days if you’re efficient about world-hopping.
What fish do I need again? Initial weapon: 6 Raimei Angelfish, 20 Golden Koi, 20 Rusty Koi. R5 refinement adds 12 more Raimei Angelfish, 40 Pufferfish, 40 Bitter Pufferfish.
Is The Catch still good for Raiden in 2025? It’s the optimal F2P choice, delivering 85-90% of Engulfing Lightning’s performance at zero cost. That 45.9% ER and 32% Burst DMG at R5 remain incredibly relevant.
Best fishing spots for each material? Raimei Angelfish: Tatarasuna’s electrified waters (night only, seriously). Koi: Liyue’s Bishui Plain and Dihua Marsh are most reliable. Pufferfish: All regions work, but Cider Lake is consistently good.
How do I refine to R5? Purchase 4 Ako’s Sake Vessels from the Inazuma Fishing Association. Each costs 3 Raimei Angelfish, 10 Pufferfish, 10 Bitter Pufferfish.
Best artifacts with The Catch? 4-piece Emblem of Severed Fate converts ER into Burst DMG while providing that 20% ER bonus. It’s perfect synergy for maximum damage output – I haven’t found anything better.


