

PUBG Mobile 4.0 Mortar Overview and Changes
What is the Mortar in PUBG Mobile
Think of the Mortar as your personal artillery unit. It launches projectiles in a beautiful arc over buildings, hills, whatever’s in the way - no line of sight required. Unlike your typical spray-and-pray weapons, this beast demands some serious math skills. You’re calculating trajectories, distances, timing… it’s like geometry class, but with explosions.
The real beauty? Area denial. Plant yourself behind cover and make entire zones uninhabitable for enemy squads.
For enhanced PUBG Mobile experience with UC for weapon upgrades and battle passes, PUBG Mobile UC recharge online through BitTopup ensures quick transactions with competitive pricing and instant delivery.
Key Changes in 4.0 Update
The Mortar Madness update - and yes, that’s the actual name - completely rewrote the playbook. We’re talking full trajectory calculation systems that actually make sense, adjustable range settings (thank god), and area control that’ll make campers think twice.
The communication markers got a serious upgrade too. No more screaming OVER THERE! into your mic while your teammates stare blankly at the map. The damage and reload times? Perfectly balanced, as all things should be. (Editor’s note: I’ve been waiting months to use that reference appropriately.)
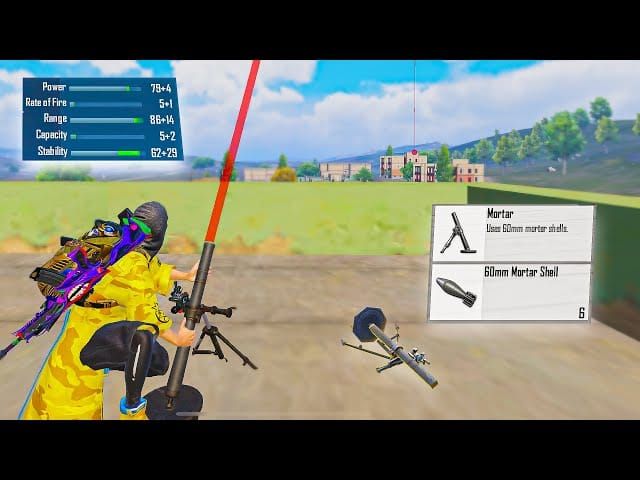
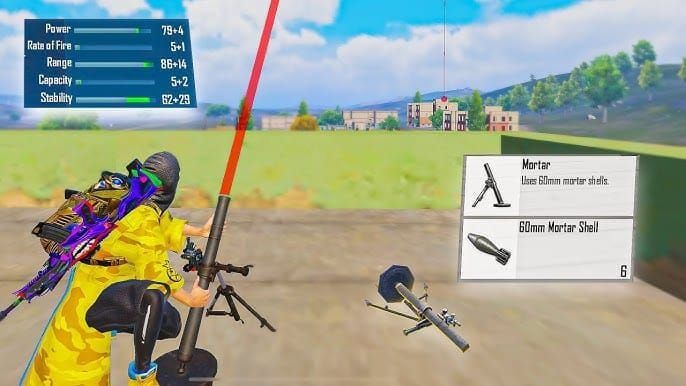
Mortar Specifications and Stats
Damage: High explosive within the primary blast radius - we’re talking serious hurt. Damage drops off at the edges, but it’ll still ruin someone’s day. Vehicles? Consider them scrap metal. Soft cover? More like soft suggestions.
Limitations: Here’s where reality hits. Extended reload times that feel like forever when you’re under fire. Limited ammo capacity means every shot counts. Range restrictions keep things fair. And that setup time? You’re vulnerable as a newborn during deployment.
How to Use Mortar: Step-by-Step Guide
Basic Mortar Controls
Deployment Process:
Hit up your throwables inventory, grab that Mortar
Enter targeting mode - you’ll see a trajectory preview (pretty neat, actually)
Adjust range with the distance slider
Confirm your target through the map interface
Fire away and pray your math was right
The interface gives you real-time feedback on your trajectory arc, estimated impact time, and blast radius. It’s like having a personal ballistics computer - which, let’s be honest, is exactly what it is.
Aiming and Trajectory System
Trajectory Factors: The game uses grid-based distance measurement with automatic elevation compensation. Wind resistance is minimal at max range, and there’s automatic obstacle clearance path calculation. Sounds fancy, right?
Here’s the thing though - you need to develop serious spatial awareness. The trajectory preview system works great in simple terrain, but throw in some complex geography with multiple firing solutions? That’s where experience separates the pros from the wannabes.
Firing Sequence and Timing
Critical Timing Elements: Projectile travel time varies wildly based on distance and angle. You’re essentially predicting where enemies will be, not where they are. That extended reload vulnerability? Plan your defensive positioning accordingly.
Audio cues are your friend here. Listen for deployment sounds, launch indicators, and impact warnings. Both teams get these cues, so use them wisely.
Mortar Range Calculation and Distance Estimation
Range Calculation Methods
Grid Reference System: Each map grid square equals 100 meters. Corner-to-corner diagonal calculations, elevation markers for height advantages, landmark reference points for quick estimation - it’s all there.
Visual Techniques: Building height comparisons work great for medium-range targets. Vehicle size references for close-range. Terrain features for long-range shots. Movement timing analysis for those pesky dynamic targets.
Map Grid Reference System
Standard grid squares measure 100 meters per side with 25-meter precision sub-divisions. (Editor’s note: I spent way too much time verifying these measurements, but accuracy matters when you’re lobbing explosives.)
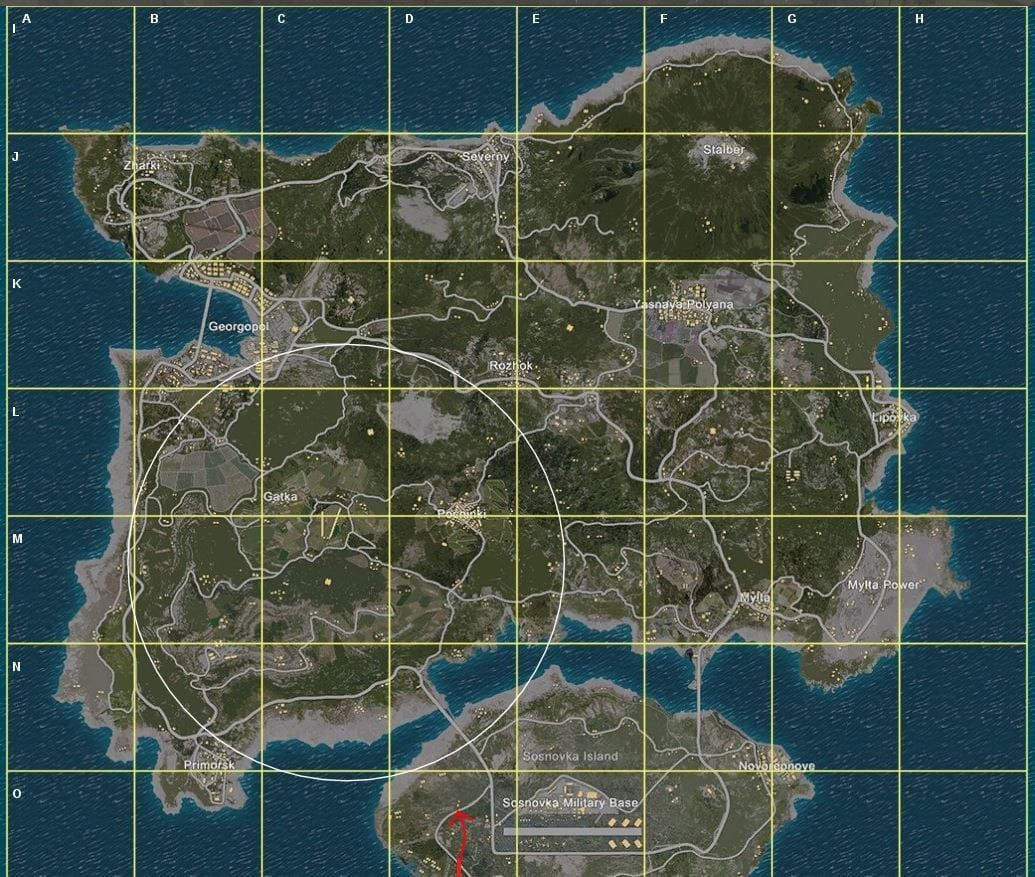
Coordinate sharing enables team-based targeting with elevation contour integration. Practice grid reading during those quiet exploration phases - you’ll thank me later when you’re calculating distances under pressure.
Visual Distance Estimation Tips
Reference Point Method: Build your personal reference library. That three-story building? Roughly 15 meters. That sedan? About 4.5 meters. Practice during exploration phases and verify against grid measurements.
Movement-Based Calculation: Time enemy movement across known distances, calculate their speed for position prediction. Account for terrain obstacles and adjust for different movement speeds - walking, running, vehicles all have different timing.
Best Mortar Loadouts and Equipment Combinations
Solo Mortar Loadouts
Primary Configuration: Assault rifle for medium-range defense, SMG or shotgun for close-quarters protection, mortar rounds plus smoke and frag grenades, enhanced healing items, scope attachments, and suppressors.

Equipment Priority: Level 2+ armor minimum for survival. Backpack expansion for ammunition. Helmet protection against counter-snipers. Ghillie suit if you can find one - concealment is life.
For loadout optimization with premium items and battle pass rewards, cheap PUBG UC topup through BitTopup provides cost-effective solutions with reliable service and instant delivery.
Squad Support Loadouts
Mortar Specialist: Maximum ammunition capacity, minimal close-combat armament, enhanced optics for targeting, smoke grenades for repositioning. You’re the artillery, not the assault team.
Team Support: Spotter with high-powered scopes, security detail with automatic weapons, dedicated medic, communication coordinator managing targets and timing. It’s like a well-oiled military machine.
Aggressive Push Loadouts
Mobile Configuration: Compact firearms for rapid movement, focused ammunition for specific objectives, minimal armor for speed (controversial, I know), smoke screens plus stun grenades for tactical advantage.
Perfect for building clearance with precision strikes, vehicle destruction missions, zone control during transitions, and counter-ambush fire support.
Team Coordination and Mortar Strategies
Communication Protocols
Framework: Target designation using grid coordinates, landmarks, or priorities. Timing coordination with countdown sequences. Safety protocols with position updates and danger zones. Damage assessment for impact evaluation and follow-up strikes.
Role-Specific Communication: Spotter reports positions, movement, and priorities. Operator updates ammunition status, positioning, and limitations. Assault team coordinates timing, cover, and exploitation. Command makes selection, priority, and adjustment decisions.
Synchronized Attacks
Attack Sequence: Reconnaissance for target identification and analysis. Positioning for deployment and movement coordination. Preparation with calculations and timing confirmation. Execution with simultaneous strikes and advances. Exploitation through follow-up and consolidation.
The timing here is everything. Calculate mortar flight time, coordinate team movement, predict enemy response, plan follow-up strikes. Miss any of these elements and your coordinated attack becomes a coordinated disaster.
Support Role Execution
Responsibilities: Area denial through strategic bombardment. Suppression fire reducing enemy effectiveness. Breach support creating entry opportunities. Defensive operations protecting key positions.
Target Priorities: High-value targets like snipers, heavy weapons, vehicles. Chokepoint control. Building clearance support. Emergency extraction fire support.
Map-Specific Mortar Positioning and Tactics
Erangel Mortar Spots
Primary Positions: Military Base Hills for southern approach coverage. Pochinki Outskirts for urban bombardment. Georgopol Container Yards for port control. Prison Island Cliffs for bridge control.
These elevated positions extend your range significantly. Natural cover reduces detection risk. Multiple withdrawal paths keep you alive. Proximity to loot spawns doesn’t hurt either.
Sanhok Jungle Tactics
Positioning: Canopy concealment, ridge line advantages above the jungle floor, river valley control, compound overwatch for assault support.
Environmental Factors: Limited sight lines require closer coordination. Jungle noise masks deployment sounds. Dense cover enables rapid repositioning. Close-range precision with reduced safety distances - be careful not to blow yourself up.
Livik Close-Range Strategies
Applications: Building clearance precision strikes, vehicle destruction in confined spaces, chokepoint bombardment, emergency team support.
Safety Protocols: Minimum range enforcement (seriously, don’t kill yourself), enhanced accuracy requirements, increased communication frequency, clear abort procedures.
Counter-Mortar Strategies and Defense
Identifying Mortar Threats
Detection: Listen for those distinctive firing sounds. Watch for trajectory traces and muzzle flash. Enemy positioning patterns often give them away. Intercepted coordination communications are gold.
Warning Signs: Enemies maintaining distance while engaging. Unusual positioning suggesting preparation. Extended engagements without assault attempts. Coordinated movements indicating spotter-operator relationships.
Evasion Techniques
Movement: Unpredictable patterns prevent prediction. Exploit hard cover. Rapid repositioning during flight windows. Use terrain for overhead protection.
Positioning: Keep your team dispersed. Pre-plan escape routes. Establish counter-positions that limit mortar effectiveness. Prioritize concealment to reduce observation opportunities.
Counter-Attack Methods
Direct Assault: High-speed approaches minimize mortar effectiveness. Flanking maneuvers avoid fire zones. Suppression fire reduces operator effectiveness. Multi-axis coordinated advances split their attention.
Counter-Bombardment: Triangulate positions through trajectory analysis. Execute precision strikes on enemy positions. Maintain sustained pressure preventing repositioning. Evaluate impact and plan follow-up strikes.
Common Mortar Mistakes and How to Avoid Them
Positioning Errors
Critical Mistakes: Exposed locations vulnerable to snipers and assault teams. Limited escape routes - always have an exit strategy. Predictable position patterns that enemies can anticipate. Inadequate cover during operations.
Best Practices: Pre-select multiple positions. Prioritize concealment with natural and artificial cover. Optimize range to maximize your engagement envelope. Choose locations that support your tactical objectives.
Timing Mistakes
Common Errors: Premature firing before target confirmation - patience, grasshopper. Delayed response allowing enemy escape. Misaligned team coordination. Inadequate movement prediction during projectile flight.
Improvement: Regular practice drills (yes, even in PUBG). Clear timing protocols. Enhanced situational awareness. Adaptive adjustment training.
Communication Failures
Problems: Unclear target designation leads to wasted shots. Inadequate safety protocols risk friendly fire. Poor coordination wastes opportunities. Information overload reduces clarity.
Solutions: Standardized terminology and procedures. Redundant communication methods. Frequent position and status updates. Defined command hierarchy - someone needs to be in charge.
Advanced Mortar Techniques and Pro Tips
Predictive Targeting
Methods: Movement analysis for speed and direction calculation. Behavioral pattern recognition - most players are predictable. Tactical pressure forcing movement into predicted locations. Zone dynamics for positioning advantages.
Advanced Calculations: Lead time computation for moving targets. Probability zones for maximum hit chance. Multi-strike coordination covering escape routes. Real-time adaptive targeting based on enemy response.
Zone Control Tactics
Strategies: Chokepoint denial preventing movement. Safe zone pressure forcing disadvantageous positions. Bridge control for map dominance. High ground denial - because high ground wins games.
End-Game Applications: Final circle positioning advantage. Building clearance forcing evacuation. Vehicle destruction eliminating transportation options. Psychological pressure through bombardment threat.
End-Game Mortar Usage
Final Circle Considerations: Reduced safety margins require enhanced precision. Maximum impact potential from high enemy density. Limited repositioning options. Critical timing for match-winning strikes.
Victory Strategies: Position denial preventing optimal occupation. Elimination focus on remaining players. Synchronized final assaults. Adaptive tactics for changing dynamics.
Frequently Asked Questions
How do you calculate mortar range accurately in PUBG Mobile? Use the map grid system - 100 meters per square. Count squares between positions, multiply by 1.4 for diagonal shots. For close-range reference: buildings equal 10-15 meters, vehicles equal 4-6 meters.
What is the most effective mortar loadout for squad play? Dedicated specialist carries maximum ammunition, assault rifle, smoke grenades, and medical supplies. Support team provides high-powered scopes, automatic weapons, and communication equipment.
How much damage does the mortar deal and what is its blast radius? Direct hits eliminate level 2 armor players. Edge damage deals 30-60% health. Blast radius spans 8-10 meters, with maximum damage within 3-4 meters of impact center.
What are the best defensive strategies against enemy mortars? Listen for firing sounds, watch trajectory traces, maintain unpredictable movement, use hard cover, keep your team dispersed, execute rapid flanking to neutralize operators.
Which maps offer the best mortar positioning opportunities? Erangel offers diverse elevated positions with long sight lines. Sanhok provides excellent concealment and close-range precision opportunities. Miramar enables long-range bombardment but limited concealment. Livik’s compact size requires careful positioning.
How do you coordinate mortar strikes with team advances effectively? Establish target priorities through reconnaissance, calculate flight time for synchronization, use countdown sequences, maintain position updates preventing friendly fire, plan follow-up strikes for maximum effectiveness.


