

What Is the Initial D x Racing Master (SEA) Collab?
The event runs March 26 – April 22, 2026 (UTC+8) — 27 days, every one of which matters if you're going for the AE86. NetEase timed this alongside Racing Master SEA's 1st Anniversary, so two major reward pools are live simultaneously. That's a resource-splitting problem we'll address directly in the F2P section.
The Toyota Sprinter Trueno AE86 Initial D Ver. (Takumi Fujiwara) is the headline reward — Takumi's iconic tofu-delivery car from the Mount Akina downhill scenes. It's officially confirmed as free-pull eligible, so the unlock path is genuinely accessible.
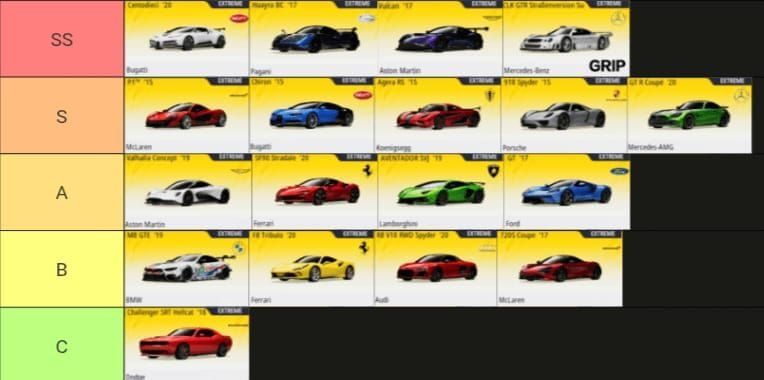
All Featured Initial D Cars
| Car | Driver | Pull Eligible? | Competitive Tier |
|---|---|---|---|
| Toyota AE86 Trueno Initial D Ver. | Takumi Fujiwara | ✅ Free pull eligible | Drifting / Technical |
| Mazda RX-7 FD3S | Keisuke Takahashi | ✅ Free pull eligible | Competitive |
| Nissan Skyline R32 GT-R | Nakazato | In pool | Competitive |
| Honda NSX | Go Hojo | In pool | Most competitive |
Beyond cars: AE86 liveries, Initial D performance parts, exclusive decals, and character cards. The Creator Event (March 26 – April 20) rewards up to 4,800 diamonds for car review or moment recreation content — a massive free resource most players ignore entirely.
Step-by-Step: How to Unlock the AE86 Fast
Order matters here. Skipping Step 2 early costs you event currency you can never recover.
Step 1 — Log In Daily, Claim the Login Calendar
Daily login grants diamonds, cosmetic frames, and free pulls targeting the Initial D pool. Missed days don't carry over. Set a reminder and treat this as non-negotiable.
Step 2 — Complete the First Initial D Story Stage on Day 1
Do this immediately. Community reports confirm it unlocks event currency and activates the mission board. Every day you delay is lost mission progress. The stage isn't hard — it's a gate, not a challenge.
Step 3 — Use Every Free Daily 10-Pull on the AE86/RX-7 Banner
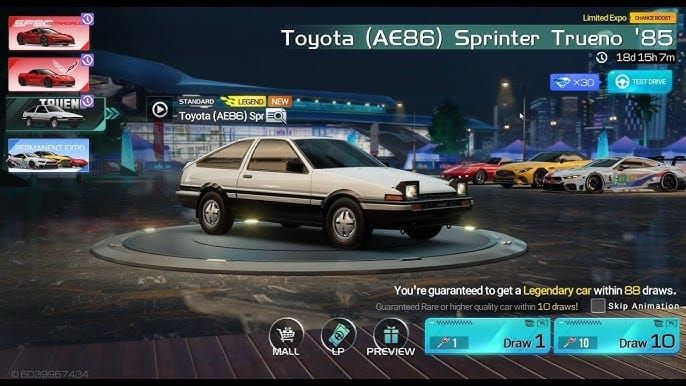
Don't split pulls across multiple banners. Concentrate all free daily 10-pulls on the AE86/RX-7 limited banner. Each pull also accumulates exchange tickets for the event shop, so even unlucky pulls build toward a shop fallback.
Step 4 — Farm Missions, Races, and Login Rewards
Consistent F2P play across the full 27 days yields an estimated 2,100–3,500 gems (community-observed). Returning players should hit the achievement tree first — it can inject 2,000–3,000 gems before you touch event missions.
Priority order:
- Daily login rewards
- Initial D mission board completions
- Collab race events (especially double-reward windows)
- Weekly achievement milestones
- Creator event (up to 4,800 diamonds if eligible)
Step 5 — Exchange Shop or Banner Pity?
Once you've built exchange tickets from banner pulls, you have a choice. Short answer: use free pulls on the banner first, then redirect tickets to the exchange shop for permanent upgrades like ECU materials and limited blueprints. Those outlast the event. Cosmetics don't.
Pity System Explained
Most guides either skip this or repeat vague information. Here's what's actually known.
Hard Pity: ~70 Pulls
Community testing across multiple accounts consistently observes a hard pity of approximately 70 pulls for a guaranteed AE86 on the limited banner. It's not officially stated in patch notes or the Racing Master SEA wiki — treat it as a reliable benchmark, not a developer guarantee.
Soft Pity: Unverified
Soft pity activation point is unconfirmed. Community estimates vary. Don't build your spending plan around a threshold you can't verify.
Does Pity Carry Over After April 22?
Almost certainly not. This is standard practice for limited-time banners in Racing Master SEA, and community experience strongly supports it. If you're at 50 pulls when the event ends, those pulls don't count toward anything future.
Practical implication: Don't start pulling unless you can realistically reach 70 within the event window. Partial pity that expires is pure waste.
Pity vs. Exchange Shop
| Path | Resource Cost | Reliability | Best For |
|---|---|---|---|
| Banner (pity route) | ~70 pulls / ~7,000 gems est. | Guaranteed at hard pity | Players who can commit fully |
| Exchange Shop | Collab tokens + top-up points | Deterministic | Targeting specific parts/blueprints |
| Free daily pulls | 0 cost | RNG-dependent | Everyone — always do these |
F2P Viability: Can You Get the AE86 Without Spending?
Honest answer: yes, the base AE86 is obtainable F2P — but it requires consistent play across the full event window and some banner luck. The math is tight.
At roughly 100 gems per pull, reaching ~70-pull hard pity costs around 7,000 gems. F2P players earning 2,100–3,500 gems through the event fall short of guaranteed pity through gems alone. But the free daily 10-pulls are separate from gem-purchased pulls — they accumulate toward pity and exchange tickets simultaneously. A player who logs in every day and completes all missions has a realistic shot at the base AE86 through a combination of free pulls, early banner luck, and exchange shop blueprints.
Realistic F2P Outcomes
- Best case: Early banner luck (sub-30 pulls) + free daily pulls = AE86 unlocked without spending
- Average case: Free pulls + exchange tickets = base AE86 via shop blueprints by event end
- Worst case: No early luck + incomplete mission farming = partial progress, no guaranteed AE86
One thing the community is clear on: F2P players can't hit 70-pull pity AND reach Anniversary T5 milestone rewards in the same month. The overlapping 1st Anniversary event competes for the same gem pool. Pick your priority on Day 1 and commit.
If the AE86 is out of reach, redirect collab tokens toward ECU materials and permanent upgrade blueprints in the exchange shop. These have lasting value. The AE86 at ECU 0 is still usable in ranked and beats many standard cars — even a partial unlock has real value.
Event Currency: Full Resource Breakdown
| Source | Estimated Yield | Notes |
|---|---|---|
| Daily login rewards | High consistency | Official — diamonds + free pulls confirmed |
| Initial D mission board | Significant | Activate via story stage first |
| Collab race events | Variable | Higher during bonus windows |
| Weekly achievements | Moderate | Don't skip these |
| Creator event | Up to 4,800 diamonds | Content creation required |
| Achievement tree (returning players) | 2,000–3,000 gems | One-time injection |
| Total F2P estimate | 2,100–3,500 gems | Community-observed range |
One habit that matters more than it sounds: manually claim event rewards every day. They don't auto-claim. Missing two or three days of collection meaningfully hurts your total.
Spending Strategy: Most Efficient Top-Up Order
If you're a few pulls short of pity, spending order matters. Random pack purchases are the worst approach.
Recommended priority:
- First-recharge pack — highest gem-per-dollar value, one-time only
- Monthly pass — consistent daily gem income across the event window
- Direct banner pulls — only after exhausting the above two
This sequence is community-validated. The first-recharge pack and monthly pass together deliver significantly better value than buying pulls outright.
For players looking to close the gap between F2P earnings and the ~70-pull threshold, a Racing Master (SEA) top up discount through BitTopup offers competitive pricing with fast delivery — worth checking before committing to a larger gem purchase.
One hard rule: don't spend gems on fuel outside double-reward events. The value ratio is terrible and it's one of the most common ways players burn resources they needed for pity.
All Max Rewards in the Initial D Collab
Cars
- Toyota AE86 Trueno Initial D Ver. (Takumi) — main reward, free pull eligible
- Mazda RX-7 FD3S (Keisuke) — free pull eligible
- Nissan Skyline R32 GT-R (Nakazato) — in pool
- Honda NSX (Go Hojo) — in pool
- Lamborghini Aventador SVJ 19 — Anniversary milestone T5 reward (760 HP, Extreme class)
Cosmetics
- AE86 liveries including the carbon fiber hood special edition (community notes this as visually superior to the base AE86)
- Initial D-themed exclusive decals
- Character cards (Takumi, Keisuke, others)
- Cosmetic frames from daily login calendar
Performance & Upgrade Items
- Initial D-themed car parts
- ECU materials (prioritize these in the exchange shop)
- Limited blueprints for collab cars
- Chrome badges via exchange shop
Milestone Notes
- Anniversary T5 (Aventador SVJ 19 voucher): confirmed official
- T5–T6: reachable by hardcore F2P with perfect play (~3,000–3,500 gems needed, community estimate)
- T7 meta car + signature livery: not F2P achievable, requires significant spending
AE86 Performance: Stats, Class & Best Use
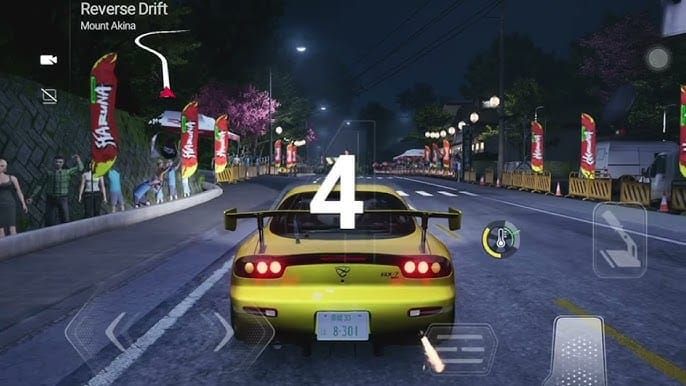
Don't pull the AE86 expecting a ranked meta car. Pull it because it's Takumi's AE86 and drifting down a technical downhill in it feels exactly like it should.
The AE86 is a nimble technical drifter, not a straight-line speed machine. Community testing consistently places it as excellent on tight, downhill technical tracks — courses that reward car control over raw horsepower. Against RX-7s and NSXs in open ranked, it struggles.
AE86 vs. Other Initial D Cars
| Car | Strengths | Weaknesses | Best Mode |
|---|---|---|---|
| AE86 Trueno | Technical drifting, downhill | Straight-line speed | Drift events, technical circuits |
| RX-7 FD3S | Strong competitive credentials | Less iconic for drift fans | Rating bracket ranked |
| NSX | Most competitively viable overall | Less thematic appeal | Standard ranked |
| R32 GT-R | Balanced performance | Mid-tier in current meta | Mixed modes |
If competitive ranked is your priority, the Honda NSX is the strongest pick among the four. RX-7 is second. The AE86 wins if you love the franchise or want a dedicated drift build.
Post-Unlock Tuning
Collab cars receive a temporary full upgrade ECU buff during the event — you'll feel the car at its peak while it runs. After April 22, use ECU materials farmed from the exchange shop to maintain that performance level. Prioritize ECU upgrades over cosmetic parts; the gap between ECU 0 and ECU max is significant in competitive play.
Critical Mistakes to Avoid
Splitting gems across both events. Trying to hit Anniversary T7 AND AE86 pity as F2P is mathematically impossible. Decide your priority on Day 1.
Delaying the story stage. Not completing the first Initial D story stage immediately means lost mission farming time. Every day counts.
Spending tokens on cosmetics first. The exchange shop has high-value items (ECU materials, limited blueprints) and low-value ones (cosmetics, consumables). Spending tokens on cosmetics early and then being unable to afford blueprints is an irreversible mistake.
Pulling on a combined banner when direct exchange is available. The combined banner has a 50/50 mechanic. If you can target the AE86 directly through exchange shop blueprints, that deterministic path is often more efficient.
Ignoring the Creator Event. Up to 4,800 diamonds for a car review or moment recreation. Most players skip this entirely and leave thousands of diamonds unclaimed.
If you're planning to top up to close a resource gap, getting a Racing Master (SEA) cheap gem recharge before the event ends is smarter than waiting — pity doesn't carry over, and unused gems from a monthly pass roll into the next month anyway.
FAQ
How many pulls to guarantee the AE86? Community testing observes approximately 70 pulls as the hard pity threshold. Not officially confirmed — treat it as a reliable benchmark, not a developer guarantee.
Is the AE86 free? The base AE86 is free-pull eligible and obtainable through consistent F2P play. Max-tier cosmetic and performance variants require cumulative top-up points and aren't achievable without spending.
Does pity carry over after April 22? Almost certainly not. Community experience strongly indicates pity resets when the limited banner closes. Don't start pulling unless you can realistically finish before April 22, 2026 (UTC+8).
What happens to unused event currency after the event? It expires. Spend everything before April 22 — there's no future use for collab-specific tokens.
Is the AE86 worth pulling if I don't care about ranked? Absolutely. It's usable in ranked even at ECU 0, outperforms many standard cars, and the community consistently describes it as genuinely fun to drive. For drift events and technical circuits, it's one of the most rewarding cars in the game.
Most important thing F2P players should do on Day 1? Complete the first Initial D story stage to unlock event currency and the mission board. Then claim your daily login reward and use your free 10-pulls on the AE86/RX-7 banner. Everything else follows from having the mission board active as early as possible.
Details based on officially confirmed information and community-observed data as of the March 26, 2026 launch. Pity thresholds and gem estimates reflect community testing and may not match official mechanics. Check official Racing Master SEA patch notes and in-game announcements for updates before April 22, 2026.


