

Understanding Rondo Map Hot-Drop Mechanics
Here’s the thing about hot-dropping on Rondo – it’s not your typical PUBG experience. We’re talking about the largest mobile map at 8x8 km with 100 players, which changes everything. The sheer scale means you can’t just wing it anymore.
Success boils down to three core principles: landing speed, loot efficiency, and being ready to fight within seconds. Flight path analysis? Absolutely crucial. You need to calculate that drop timing perfectly to beat opponents to Stadium or Jadina City. Miss by even five seconds, and you’re already behind.
The metrics that actually matter: land within 10 seconds of zone opening, grab Level 2+ armor within 30 seconds, eliminate at least one enemy squad before your first rotation, and maintain 75%+ health for early movement. Sounds intense? It is. But the map’s size gives skilled players massive advantages over those playing passively.
For enhanced gameplay, PUBG UC recharge online through BitTopup provides instant access to premium items and battle passes. BitTopup’s lightning-fast delivery and competitive pricing ensure you’re equipped with the latest cosmetics and gameplay advantages before entering those intense hot-drop zones.
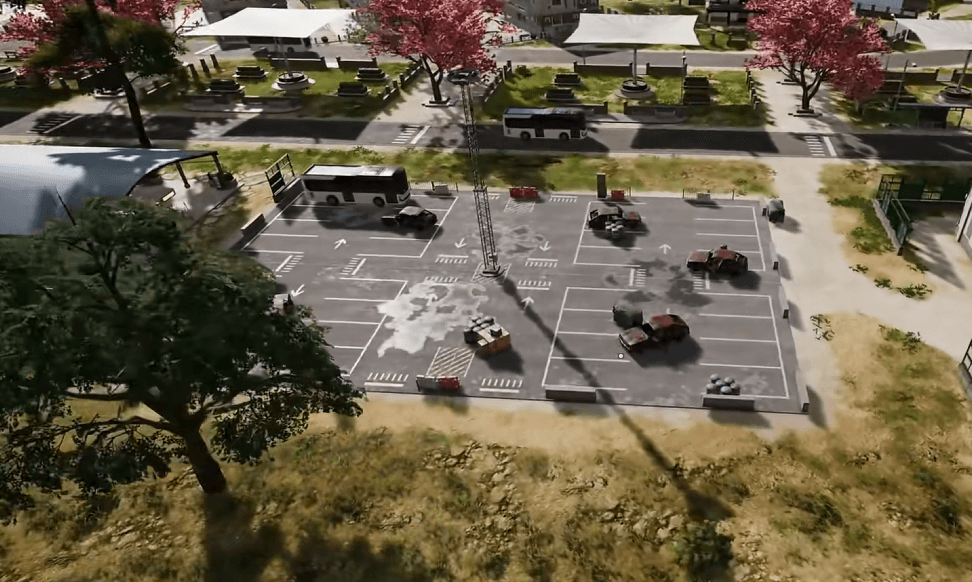
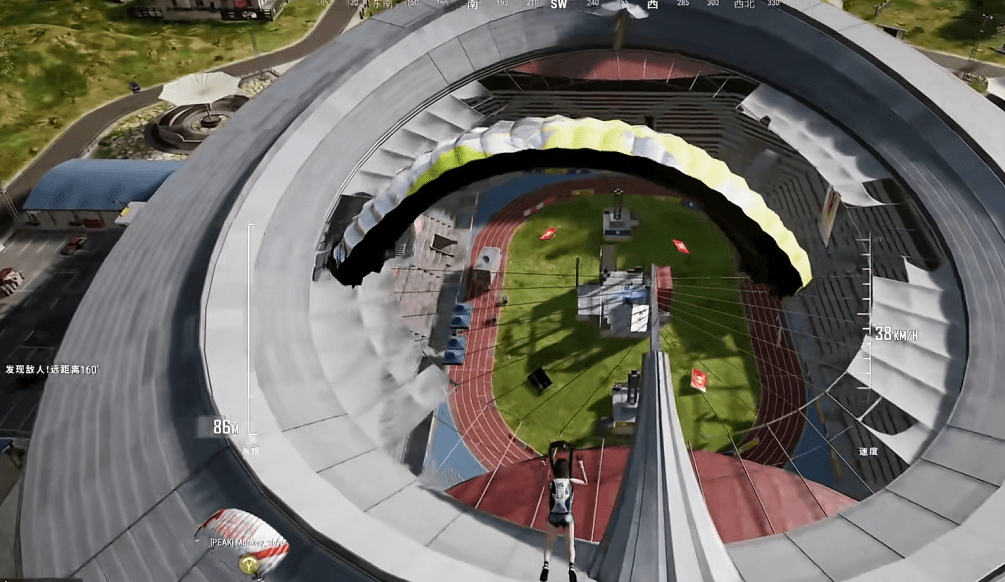
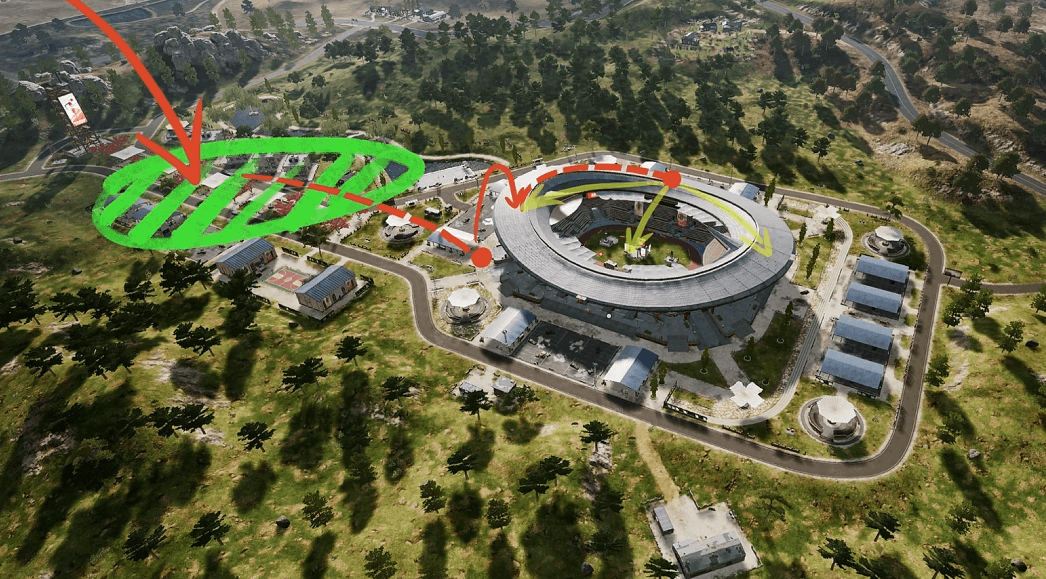
Stadium Hot-Drop Complete Strategy
Stadium’s circular layout creates something special – and by special, I mean absolutely chaotic multi-directional combat with some of the best loot density you’ll find. The key? Don’t stick together like glue.
Your squad needs to employ what I call divide and conquer. Spread across different sections to control multiple angles. Why? Because staying clustered is asking for a squad wipe from a single well-placed grenade.
Priority landing zones and loot routes:
Main Field: Hit those weapon spawns first – assault rifles and SMGs are your lifeline
North Stands: Armor and medical supplies with perfect overwatch positioning
South Entrance: Ammo and throwables before you rotate out
Equipment Rooms: High-tier attachments and utility items (if you have time)
Combat here requires constant movement. That open circular design? It’s both a blessing and a curse. Static camping simply doesn’t work when enemies can approach from literally any direction. Control those entrance tunnels for ambush tactics, but don’t get comfortable – mobility is survival.
Jadina City Hot-Drop Mastery
Now this is where things get interesting. Jadina City’s densely packed high-rises and those revolutionary escalator systems completely change vertical combat. I’ve been playing PUBG for years, and these escalators enable repositioning that’s simply impossible in traditional maps.
Think about it – surprise ambushes from unexpected angles, rapid escapes when things go south, and superior multi-level positioning that keeps enemies guessing.
Landing priorities: Go for the tallest central buildings first (maximum loot density), then mid-level structures with escalator connections, and finally ground-level areas near vehicle spawns for emergency rotations.
Loot priority emphasizes the JS9 SMG – it’s Rondo-exclusive with incredibly stable recoil – plus Level 2+ armor, medical supplies, and throwables for those confined spaces you’ll inevitably fight in.
For sustained Rondo success, PUBG Mobile UC lightning delivery from BitTopup ensures access to premium weapon skins and character upgrades. BitTopup’s instant delivery system means you can focus on perfecting strategies rather than currency management.
Combat strategies center on mobility over static positioning. Constantly move between floors using those escalators – make yourself a difficult target while maintaining offensive pressure. The dense urban environment makes camping ineffective against mobile opponents who know how to use the building networks.
Stadium vs Jadina City: Strategic Comparison
Combat Environment: Stadium offers that open, circular layout promoting rotational gunfights with medium-to-long range engagements. Jadina City? Pure vertical, multi-level urban warfare emphasizing close-quarters combat and tactical positioning.
Loot & Player Density: Stadium concentrates high-tier loot centrally, but rapid elimination due to open combat means you better be good. Jadina City features dense, multi-floor distribution requiring systematic clearing – sustained high density with prolonged engagements.
Rotation & Skills: Stadium’s central position enables flexible rotation in any direction, but you need superior aim and team coordination. Jadina City’s southeastern location demands planned northwestern rotations, building clearing expertise, and escalator mastery.
Your choice depends on team composition. Aggressive teams with strong aim? Stadium’s intense open combat is perfect. Tactical squads who excel at coordination? Jadina City’s complex urban environment is your playground.
Safe Early Rotation Planning
Rondo’s massive 8x8 km scale demands strategic vehicle acquisition and zone prediction. Here’s where most players mess up – they underestimate the importance of early transportation.
Neox Factory serves as the premier vehicle location with guaranteed spawns, moderate loot, and positioning flexibility for various zone configurations. It’s not the most exciting drop, but it’s strategic.
Rotation strategy: Land Neox Factory for immediate vehicle access, secure basic equipment within 2-3 minutes, analyze the zone for optimal paths, then utilize vehicle mobility for advantageous positioning. Begin that first zone rotation with 90 seconds remaining – trust me on this timing.
Timing considerations: Monitor vehicle condition for sustained rotations and identify multiple path options for adaptive movement. The 6-seater Pico Bus offers excellent squad mobility with its Kinetic Energy Recovery system for extended range through efficient braking.
Historical data indicates higher final zone probability in central areas, making early positioning toward Tin Long Garden or Yu Lin advantageous for long-term success. (Yes, I’ve tracked this data – occupational hazard of being a strategy editor.)
Advanced Rotation Strategies
The Signal Jammer Backpack enables unconventional Blue Zone rotations for sneaky flanking and unexpected positioning. EMP Zones create both obstacles and opportunities – these electronic-disabling areas force vehicle abandonment and iron sight combat, creating chaos that skilled teams can exploit.
Destructible terrain applications: Create new paths through soil and mud using pickaxes, grenades, or vehicle explosions. This provides emergency escape options and custom cover creation when traditional routes become compromised.
Team coordination roles: Scout for route safety assessment, Support for vehicle acquisition and maintenance, Combat for engagement leadership, Medic for health management. The Emergency Cover Flare summons instant triangular bunkers for open-field protection during aggressive rotation timing.
Path selection criteria: assess enemy density, utilize elevation and natural cover, plan backup transportation, anticipate future circle positions for optimal advantage.
Common Hot-Drop Mistakes to Avoid
Critical errors: Static camping in Jadina City enables escalator-based ambushes from mobile opponents. Landing coordination failures in Stadium – teams too close become vulnerable to single grenades, excessive spread prevents mutual support.
Loot inefficiency mistakes: Backtracking through cleared areas (huge time waste), collecting low-value items before essentials, poor inventory management, excessive time in single locations. Rotation timing errors prove fatal – delayed decisions mean Blue Zone damage or encountering heavily armed early rotators.
EMP Zone failures: Continuing electronic equipment use in disabled areas. Successful adaptation requires immediate tactical adjustment: iron sights, vehicle abandonment, close-quarters preparation. Escalator misuse includes predictable patterns and failure to utilize vertical advantages.
New Rondo Features and Tactical Applications
EMP Zone effects: Disables electronic reticles forcing iron sights, neutralizes vehicles, deactivates equipment (Markets, Recall Towers, Signal Jammers), creates strategic chaos for tactical exploitation.
Escalator system: This revolutionizes urban combat in Jadina City, enabling tactical maneuvers impossible in traditional PUBG environments. It creates entirely new meta strategies for building control and vertical positioning.
Destructible terrain: Destroy soil, mud, and bamboo using various methods (concrete and stone remain indestructible). This enables custom cover creation, path development, and enhanced defensive positioning through environmental control.
New equipment: JS9 SMG (Rondo-exclusive with stable recoil, ideal for tight corridors), Emergency Cover Flare (instant bunker deployment), Stun Gun (temporary enemy immobilization), Battle Ready Kit (complete health and energy restoration).
Tools and Resources for Success
Shop System: Basic and Premium stores provide strategic advantages. Earn currency by collecting gold bars or selling attachments. Premium stores at fixed positions like Lo Hua Xing offer airdrop-level loot including MG3 weapons and Level 3 armor.
AI Guards: Require combat skills for premium equipment access. Regular guards drop JS9 weapons, commanders provide MG3 airdrop weapons.
Vehicle variety includes the 6-Seater Pico Bus (electric with Kinetic Recovery), Coupe SUV Blanc (storage compartment), and traditional options at Neox Factory.
Performance metrics: Track survival rate, kill efficiency, loot quality within 5 minutes, rotation timing. Practice routines include landing precision, loot route memorization, combat positioning, and team coordination. Develop map knowledge through systematic location study and Training Mode muscle memory development.
FAQ
Where should I land at Stadium for maximum loot? Main field center for immediate weapons, then north stands for armor and medical supplies. Use that divide and conquer strategy – squad members spread across sections controlling multiple angles, preventing single team elimination.
What’s the best Jadina City loot route? Skyscraper rooftops with escalator access. Prioritize the JS9 SMG for close-quarters, systematically clear buildings using escalators for vertical movement. Focus on Level 2+ armor and medical supplies. Avoid static camping – mobile opponents counter fixed positions easily.
How do I rotate safely after hot-dropping? Secure a vehicle from Neox Factory before zone closure, begin rotation with 90 seconds remaining, plan multiple paths. The 8x8 km size makes vehicles critical. Use Signal Jammer Backpack for Blue Zone rotations or Emergency Cover Flares for open-field protection.
Stadium or Jadina City for hot-dropping? Stadium suits teams with superior aim and positioning skills – intense rotational gunfights in an open layout. Jadina City favors tactical squads with building clearing expertise, close-quarters combat skills, and escalator mastery. Stadium offers faster loot but higher elimination risk.
What new weapons should I prioritize? JS9 SMG excels in close-quarters with stable recoil for tight spaces. Emergency Cover Flares provide instant rotation protection, Stun Gun enables tactical immobilization, Battle Ready Kit offers complete health restoration for endgame moments.
How do I avoid common hot-drop mistakes? Never camp statically in Jadina City – escalator-mobile opponents easily counter this. Maintain proper Stadium squad spacing, avoiding clustered eliminations while ensuring mutual support. Plan rotation timing proactively due to the massive scale. Adapt immediately to EMP Zones by switching to iron sights.


