

Guoyapos Airport Overview: What Makes Season 4's Map Unique
Guoyapos Airport launched January 8, 2026 at 6PM EST, operating on 72 tick rate servers. The map combines vast open runways with dense interior spaces, creating dynamic engagement scenarios. The 35-minute raid duration with 12-player capacity creates unique pacing—early spawns concentrate players around high-value zones, while mid-raid rotations spread combat across the facility.
For competitive advantages through premium gear, purchase Arena Breakout bonds fast delivery through BitTopup to access top-tier loadouts immediately.
Map Zones and Layout
The Terminal Building serves as the central hub with multi-story CQB environments. Surrounding hangars provide medium-range engagement spaces. The runway creates dangerous open-area crossings. The Cargo Area northeast contains dense container stacks ideal for ambush tactics. The Control Tower offers elevated sightlines but requires exposed ascent. Maintenance Tunnels provide underground rotation routes with limited escape options.
Environmental Features
Metal structures create unique sound propagation—footsteps echo dramatically inside hangars. Crouch-walking provides 60% noise reduction, critical when navigating acoustically sensitive areas. Aircraft wreckage across the runway provides concealment rather than protection. Weather conditions affect visibility—fog reduces sniper effectiveness beyond 100 meters.
Season 4 Changes
Lockdown mode variants alter risk-reward calculations. Standard Lockdown requires 150k+ Koens gear value with 20k Koens entry fee. Premium Lockdown demands 300k+ Koens gear value and 50k Koens entry. Encrypted Files spawn in Terminal buildings—collecting triggers a 10-minute broadcast revealing your position for 30 seconds.
Spawn Points and Early Game Positioning

Your spawn location determines your first 90-120 seconds. Southern spawns position you near Grain Trade Center. Northern spawns favor Terminal Building access. Eastern spawns require careful runway crossings.
First 60 Seconds: Optimal Movement
Southern spawns: Crouch-walk northwest 150m to Grain Trade Center in 90-120 seconds. Contains 2 ammo boxes lootable in 20-30 seconds, yielding 60-120 rounds.
Northern spawns: Assess Terminal Building entry points. Side entrances preferable over main entrance. Delay entry 2-3 minutes to let initial spawn fights resolve.
Eastern spawns: Use southern perimeter route adding 90 seconds travel time. Direct runway crossings expose you to multiple sightlines.
Audio Cues for Enemy Detection
Gunfire within first 60 seconds indicates spawn-fight clusters. Single shots suggest scav elimination, sustained automatic fire signals PvP combat. Footsteps in metal structures carry 40-50 meters. Door-opening sounds provide proximity warnings 30-40 meters away.
Early Engagement vs. Avoidance
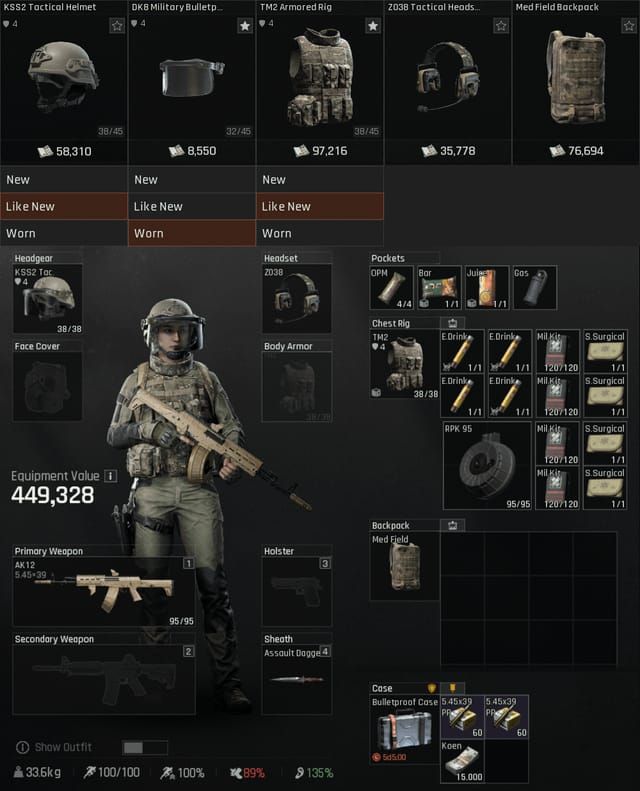
Engaging within first 3 minutes carries maximum risk with minimal reward. Budget loadout players should prioritize avoidance. SEK Composite Body Armor (70 durability, 5% movement penalty, 15-25k Koens) + Sentry 308 Armored Rig (60 durability, 20 storage slots, 6% movement penalty, 8-12k Koens) = 130 durability for 23-37k Koens—sufficient for one or two engagements, not prolonged battles.
Terminal Building Survival Tactics
The Terminal Building features multiple floors, numerous rooms, countless angles. Northridge Hotel section contains 8 safes, attracting heavy player traffic.
Floor-by-Floor Breakdown

Ground floor: Wide-open ticketing areas with minimal cover. Favor long-range engagements. Use as transition spaces, not defensive locations.
Second floor: Dense room-to-room combat. MPX (850 RPM, 9x19mm AP6.3 T3 ammo, 679.68 damage, 424.8 penetration, 70-80k Koens) excels in tight quarters.
Third floor: VIP lounges contain premium loot but limited escape routes. Always identify extraction route before looting.
High-Traffic Chokepoints
Main stairwell intersections create natural chokepoints. Central elevator requires flipping 2 switches in Control Tower—mechanical noise announces your movement. Doorways between major sections funnel movement into predictable paths.
Corner-Checking Procedures
Slice angles incrementally rather than wide-peeking entire rooms. Use weapon's point-fire accuracy for corners under 5 meters. MPX's 850 RPM allows multiple hits before opponents react. Audio pre-firing viable when footsteps clearly indicate enemy positions.
VIP Lounge Strategy
Assess risk before committing—recent combat nearby indicates victorious players looting casualties. Grab most valuable items within 20-30 seconds, then exit. Position yourself near doorways, never fully commit to looting animations without securing immediate area.
Runway and Open Area Movement
The runway represents most dangerous open terrain. Aircraft wreckage provides only concealment during crossings—plan routes between these positions.
Common Sniper Positions
Control Tower: 360-degree sightlines across entire airport. Assume occupied during 10-25 minute windows.
Hangar rooftops: Secondary positions with limited but powerful angles covering specific runway sections.
Parking Structure: Northwest of terminal, covers western runway approaches. Players extracting via Northern Outpost frequently encounter snipers here.
Cover-to-Cover Movement
Tactical pacing (faster than crouch-walk, slower than sprint) provides optimal balance between speed and audio signature. Zigzag patterns reduce sniper accuracy but extend exposure time—use only when crossing unavoidable open sections. Smoke grenades transform dangerous crossings into manageable risks.
Sprint vs. Tactical Pace
Sprint only when already under fire and reaching cover represents only survival option. Audio signature announces position to every player within 100+ meters. Tactical pace serves as default runway movement speed. Crouch-walking across runways too slow except when approaching specific ambush positions or extraction points.
Hangar Bay Combat Guide
Hangar bays create unique combat environments where vertical positioning, sound propagation, and close-quarter weapon selection determine outcomes. Valley Beach Villa contains 10 weapon crates alongside 2 safes.
AK-74N (630 RPM, 5.45x39mm Level 5 BP ammo, 60-round magazines) provides excellent hangar performance through balance of fire rate, magazine capacity, and stopping power.
Hangar Entry and Breach Tactics
Side entrances and maintenance access points offer alternative entry with reduced encounter probability. Observe from external positions for 60-90 seconds to detect activity. Grenades highly effective for clearing suspected camping positions near entrances—enclosed space amplifies explosive damage.
Vertical Gameplay
Catwalks provide superior angles over ground-level players but create predictable positions. Constantly reposition after engagements. Ascending to catwalks exposes you during climb—always clear ground level thoroughly first. Use catwalks for reconnaissance and opening shots, then relocate to ground positions.
Sound Propagation
Hangar acoustics amplify footsteps, reloads, healing sounds to extreme levels. Every action broadcasts your position. Time activities during enemy engagement windows when they're distracted. Echo effect makes directional audio challenging—when uncertain, assume enemies closer than they sound.
High-Value Container Locations
Valley Port contains 1 safe and 7 weapon boxes in administrative section. Lootable in 2-3 minutes, yielding 80-150k Koens. Prioritize crates in secured rooms over open-floor positions. The Stables contains 1 upstairs safe requiring 2011 key, yielding 50-80k Koens.
Optimal Loot Routes
The Grain Trade Center-Stables-Motel route yields 200-400k Koens in 12-15 minutes. The Motel contains 3 safes requiring 2011 keys, yielding 150-250k Koens in 3-4 minutes.
For maximizing earnings, recharge Arena Breakout bonds secure payment through BitTopup enables immediate access to keys, premium ammunition, and quality gear.
Low-Risk Route: Perimeter Run
Follows airport's outer edge, accessing Campus Services (2 safes) and Sewage Plant (3 safes). Expected returns 100-200k Koens with 70%+ survival rates. Early-raid execution (0-10 minutes) allows looting before players rotate outward. Enables Drainage Pipe extraction (active 0-10 minutes, prohibits backpacks).
Medium-Risk Route: Terminal and Cargo Mixed
Access Northridge Hotel's 8 safes during 10-20 minute windows. Follow with cargo area weapon crates. Northern Outpost extraction (active 10-20 minutes, requires 1 enemy kill, max 2 players) aligns perfectly with this route's timing.
High-Risk Route: Full Interior Clear
Comprehensive terminal clearing accessing all 8+ safes generates 300-500k Koens but requires 20-25 minutes and premium gear. Access Bridge (activates at 25 minutes) provides exit for players completing full clears.
Time-Based Adjustments
0-10 minutes: Spawn-fight chaos concentrated around high-value central locations. Access perimeter locations or wait for combat to resolve. Drainage Pipe extraction rewards efficient looting.
10-20 minutes: Optimal looting conditions. Initial spawn fights concluded, surviving players spread across map. Northern Outpost extraction serves players maximizing this timeframe.
20-35 minutes: Players converging on extraction points. Loot quality diminishes. Prioritize quick exits over thorough clearing.
Scav AI Behavior and Boss Encounters
AI patrol cycles every 3-5 minutes. Time movements between cycles to reduce AI encounters. Regular scav patrols follow fixed routes—maintaining 50+ meter distances while crouch-walking typically prevents aggro.
Regular Scav Patrol Patterns
Terminal scavs: Patrol ground floor in groups of 2-3, completing circuits every 4-5 minutes. Time entry between patrol cycles.
Hangar scavs: Position statically near loot concentrations. Require clearing before safe looting.
Runway scavs: Patrol in pairs along perimeter, rarely venture into open tarmac.
Airport Scav Boss
Spawns in terminal VIP sections or major hangar locations 5-10 minutes into raids. Distinctive voice lines and coordinated guard movements signal presence. Guards employ aggressive flanking tactics. Boss carries 150-300k Koens in equipment value, but combat noise attracts third-party players.
Boss Engagement Loadout
Demands armor with 200+ durability. Budget loadouts with 130 combined durability inadequate. AK-74N with 60-round magazines and Level 5 BP ammunition provides excellent capability. Carry 4+ medical items including healing and bleeding treatment.
Solo vs. Squad Boss Tactics
Solo: Exploit AI limitations through positioning. Isolate individual guards using corners and doorways. Eliminate guards one-by-one before confronting boss.
Squad: Coordinated crossfire overwhelms AI. Designate targets, establish overlapping fields of fire. Execute kills in 30-60 seconds.
Post-boss looting demands speed. Grab highest-value items within 20-30 seconds, then relocate.
Extraction Point Analysis
Guoyapos Airport features 13 extraction points with varying activation requirements and timing windows.
All Extraction Locations
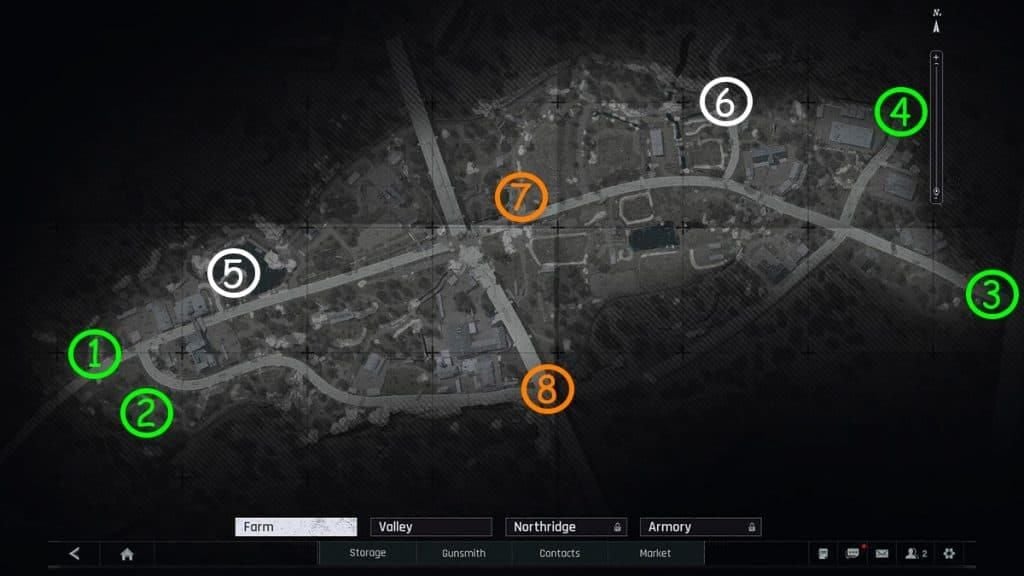
Boulder Wall: Fixed extraction without special requirements. Most reliable but most camped.
Hunter's Path: Requires backpack discard. Reduces camping appeal.
Central Elevator: Requires flipping 2 switches in Control Tower. Multi-step activation reduces usage frequency.
Drainage Pipe: Active 0-10 minutes, prohibits backpacks.
Northern Outpost: Active 10-20 minutes, requires 1 enemy kill, max 2 players.
Access Bridge: Activates at 25 minutes.
15-minute cluster extracts: Destination Extract, Recycling Station Truck, Road Meet-Up Point, Road to the Port, Western Path. All feature 20-second timers.
Parking Lot Helicopter: Active 1 minute after raid start, requires 2 dogtags.
Valley Helipad: Requires 2 dogtags.
Southern Blockade: Requires 2000 Koens payment.
Pre-Extraction Camping Spots
20-second timer on cluster extracts creates camping opportunities. Players position 30-50 meters from zones. Deploy smoke grenades immediately when activating. Scan rooftops, catwalks, tower positions before approaching. Throw grenades into suspicious positions before activation.
Emergency Backup Extraction
Know all 13 locations and requirements. Set mental timers—begin exit at 28-30 minutes for buffer time. If all nearby extractions compromised, consider aggressive engagement of campers rather than crossing open terrain to distant extractions.
Recommended Loadouts
Budget Loadout (62-90k Koens Total)
Armor: SEK Composite Body Armor (15-25k Koens, 70 durability, 5% movement penalty) + Sentry 308 Armored Rig (8-12k Koens, 60 durability, 20 storage slots, 6% movement penalty) = 130 durability for 23-37k Koens.
Weapon: MPX (70-80k Koens, 850 RPM, 9x19mm AP6.3 T3 ammo) for terminal combat or BM59 for versatile engagements.
Consumables: 120+ rounds, 4+ medical items, 1 smoke grenade, 5000+ Koens in secure container.
Mid-Tier Loadout (150-200k Koens Total)
Armor: 180-220 durability through quality chest and rig combinations (60-90k Koens).
Weapon: AK-74N (120-150k Koens, 630 RPM, Level 5 BP ammunition, 60-round magazines).
Consumables: 6+ medical items including advanced healing, 200+ rounds.
High-End Loadout (400k+ Koens Total)
Armor: 250+ durability (150-200k Koens).
Weapon: Best-in-class options with premium ammunition and full attachments.
Consumables: 2-3 smoke grenades, extensive medical supplies.
Essential Consumables
Smoke grenades: Essential for extraction security. Budget one minimum, premium loadouts carry 2-3.
Medical supplies: Include both bleeding treatment and health restoration. Bleeding damage kills more players than direct combat wounds.
Ammunition: Budget loadouts need 120+ rounds, aggressive premium loadouts need 200+ rounds.
Common Mistakes
Control Tower Misconception
Exposure during ascent and limited escape routes create tactical disadvantages. Enemies below control only exit path. Only access for Central Elevator switches—otherwise avoid.
Timing Errors
Terminal density peaks during 10-20 minute windows. Motel looting optimal during 12-18 minute window. Begin extraction approach at 28-30 minutes, not 33-34 minutes.
Loadout Mistakes
Movement penalties above 15% significantly impact rotation speed. Budget armor (130 durability) supports 12-15 minute runs with 1-2 engagements. Extended 20+ minute raids require mid-tier armor (180-220 durability).
Audio Discipline
Sprinting inside terminal buildings and hangars announces position to every player within 100+ meters. Move to cover before reloading. Never heal in exposed positions—relocate 30-50 meters from engagement sites.
Advanced Tips
Weather and Time-of-Day Impact
Fog reduces visibility beyond 100 meters, favoring close-range loadouts. Clear weather empowers long-range engagements. Night raids dramatically reduce visual detection ranges. Rain creates audio masking, reducing footstep detection ranges.
Grenade Usage
Hangar throws require accounting for vertical space and metal surface ricochets. Extraction security grenades should target camping positions 3-5 seconds before activating timers. Offensive grenades during combat create opportunities for aggressive pushes.
Squad Communication Callouts
Develop floor-specific callouts: Terminal-2-Admin indicates second floor administrative section. Hangar callouts reference specific structures: Hangar-3-Catwalk-North. Include cardinal directions for orientation consistency.
Post-Raid Analysis
Track survival rate—below 40% indicates overly aggressive approaches. Calculate profit-per-raid by dividing total earnings by raids conducted, then subtract average loadout costs. Analyze engagement win-rate to identify combat skill gaps.
FAQ
What are the safest loot routes on Guoyapos Airport?
Grain Trade Center-Stables-Motel route yields 200-400k Koens in 12-15 minutes. Perimeter route covering Campus Services and Sewage Plant provides 100-200k Koens with 70%+ survival rates.
Where do PMCs spawn?
Southern spawns near Grain Trade Center, northern spawns favor Terminal Building, eastern spawns require runway crossings. First 90-120 seconds critical for identifying nearby players through audio cues.
How do you extract safely?
Observe from 100+ meters for 60-90 seconds before approaching. Deploy smoke grenades during 20-second timers. Time approach for 28-30 minutes into raids.
What's the best loadout?
Budget: SEK armor + Sentry rig (130 durability, 23-37k Koens) + MPX (70-80k Koens). Total 62-90k Koens. Include 120+ rounds, 4+ medical items, 1 smoke grenade, 5000+ Koens.
How long should you stay in raids?
Budget runs complete in 12-15 minutes. Comprehensive clears require 20-25 minutes with premium gear. Begin extraction at 28-30 minutes regardless of completion.
What are high-value loot spots?
Motel (3 safes, 150-250k Koens), Northridge Hotel (8 safes), Valley Beach Villa (2 safes, 10 weapon crates), Valley Port (1 safe, 7 weapon boxes), The Stables (1 upstairs safe, 50-80k Koens). All safes require 2011 keys.
Ready to dominate Guoyapos Airport with the best loadouts? Get your Koen instantly at BitTopup—the fastest, most secure way to top up your Arena Breakout account. No grinding, just pure tactical gameplay. Visit BitTopup now and gear up in minutes!


