

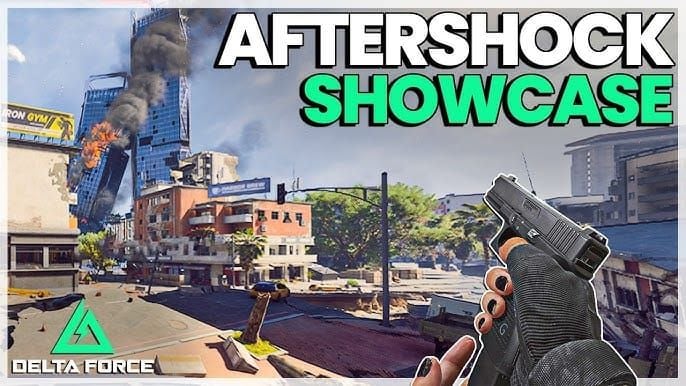
Aftershock Map Overview: Season 8's Earthquake Terrain
Aftershock centers on two CBD skyscrapers surrounded by mid-rise commercial buildings, residential blocks, and seismic-damaged infrastructure. Earthquake events split roads mid-match, forcing real-time route adjustments and creating ambush chokepoints. Seismic disruptions generate 15-20 second dust clouds—critical windows for repositioning or aggressive pushes.
For competitive advantage in Season 8, secure premium operators and equipment through Delta Force Bonds top up via BitTopup for immediate Battle Pass rewards and Vlinder unlock at level 15.
The 95% destructible building percentage changes everything. Small arms shatter glass instantly, creating sightlines. Explosives transform buildings into tactical tools—collapsing structures create cover while punishing stationary positions. This directly counters roof camping when exploited properly.
Key Geographic Features:
- Two CBD skyscrapers (primary navigation landmarks)
- 4-6 story commercial buildings with flat rooftops (prime camping territory)
- Residential zones with wooden construction (faster destruction, less vertical advantage)
- Metal-reinforced industrial warehouses (superior cover, limited escape routes)
Memorize building silhouettes for split-second decisions. CBD skyscrapers feature distinctive antenna arrays; residential blocks show characteristic balcony patterns.
Player Density & Engagement:
- Early game: High density around CBD/loot zones, 30-40% lobby eliminated within 90 seconds
- Mid-game: Dispersed positioning, decreased frequency but increased lethality
- Late-game: 2-3 building clusters, forced vertical combat
Earthquake Mechanics: Road splits create instant barriers, trapping squads outside safe zones. Seismic warnings provide 3-5 second preparation windows. Dust clouds obscure vision for 15-20 seconds—aggressive teams push through for surprise attacks, defensive squads reposition. Thermal optics gain significant value.
Best Entry Points: Hot Drops vs Safe Landings

High-Risk High-Reward Locations:
CBD Skyscrapers: Maximum risk/reward. Top floors contain premium weapons, armor, tactical equipment. Attracts 4-6 squads immediately. Successful drops require coordinated splits—one secures weapons, others establish defense. Vertical mobility determines survival; control stairwells to eliminate trapped opponents.
Commercial District Blocks: Slightly reduced loot, high traffic. 4-6 story buildings offer multiple entry/escape routes. Rooftop access grants immediate high ground but invites third-party attacks.
Industrial Warehouses: Concentrated loot, confined spaces. Metal construction provides superior cover but limited windows restrict awareness. Survivors face resource disadvantages vs CBD teams.
Safe Landing Zones:
Residential Periphery: Moderate loot, safe landings. Wooden construction enables rapid clearing with explosives. Lower heights reduce camping viability. Prioritizes survival over early kills.
Suburban Clusters: 1-2 competing squads maximum. Loot supports minimum viable loadouts—basic armor, primary weapons, essential equipment.
Isolated Compounds: Guaranteed safe landings, minimal loot. Suits extended rotation strategies. Vehicle spawns enable rapid repositioning.
Squad Coordination: Designated fraggers land first, securing weapons to eliminate unarmed opponents. Support players land seconds later at adjacent buildings for crossfire. Staggered approach prevents squad wipes. Callouts identify weapon spawns, enemy positions, structural threats within 30 seconds.
Solo Optimization: Avoid CBD entirely. Prioritize residential periphery and suburban zones. Monitor distant gunfire to avoid rotating into active engagements.
Safe Rotation Routes: Early, Mid, Late Game

Rotation deaths exceed combat eliminations on Aftershock. Each phase demands distinct strategies.
Phase 1 (2-4 Minutes Post-Landing):
- Building-to-building movement using ground cover
- Earthquake-split roads create natural barriers
- Time movements between nearby gunfire exchanges
- Avoid vehicles—engine noise attracts attention 200+ meters
Phase 2 (30-45 Players Remaining):
- Aftershock circles favor CBD-centric positions 60% of matches
- Rotate toward CBD outskirts, secure building control before late-game compression
- Avoid chokepoints—narrow passages between clusters
- Alternative residential routes add 30-60 seconds but eliminate ambush risks
- Use smoke grenades across exposed sections
- Never rotate in straight lines—zigzag patterns complicate sniper targeting
Phase 3 (Below 20 Players):
- Final circles compress into 2-3 building clusters
- Secure positions early—late arrivals face established defenders
- Mid-level floors balance defense with rotation flexibility
- Rooftops provide visibility but create predictable targets
- Avoid buildings showing explosive damage to load-bearing elements
Emergency Rotations:
- Prioritize speed over stealth—zone damage escalates rapidly
- Vehicle usage becomes mandatory for distant rotations
- Drive directly toward nearest safe zone edge
- Abandon vehicles 50-100 meters before entry
- Consume healing items while moving
- Stagger squad healing so one player maintains full mobility
Roof Camper Problem: Why Vertical Threats Dominate
Common Camping Positions:
CBD Skyscraper Rooftops: Maximum elevation, 360-degree visibility. Target mid-game rotations. Untenable during late game as circles shift.
Commercial Building Rooftops (4-6 Stories): Optimal positions. Sufficient height for local dominance without excessive sniper exposure. Corner positions with waist-high barriers favored.
Residential Rooftops: Opportunistic camping. Lower heights limit effectiveness. Target specific rotation routes.
Psychological Advantage: Height creates pressure on ground players. Upward angles complicate aiming; campers enjoy downward shots with full target visibility.
Neutralization: Treat as tactical problems requiring methodical solutions. Establish roles—spotters identify positions, fraggers prepare assault routes. Structured approach eliminates panic.
Common Mistakes:
- Immediate engagement from disadvantageous positions
- Underestimating camper peripheral vision during flanks
- Ignoring tactical equipment (flashbangs, grenades, smokes)
Identify Roof Campers Before Engagement
Visual Detection:
- Systematic rooftop scanning in 90-degree sweeps during movement pauses
- Silhouette recognition against skylines
- Scope glint confirms active targeting beyond 100 meters
Audio Cues:
- Rooftop footsteps produce echoed sound patterns
- Metal roofing generates characteristic noise
- Equipment sounds (reloading, grenade pins, healing) reveal presence
- Configure audio for maximum directional accuracy
Reconnaissance Tools: Vlinder's Butterfly Rescue Drone (55-meter radius) scouts suspected positions without exposure. Unlock at Battle Pass level 15.
Accelerate progression through Delta Force in-game currency recharge via BitTopup for immediate operator access.
Thermal optics penetrate dust clouds, identify heat signatures through limited cover.
Environmental Clues:
- Open upper-floor doors indicate recent presence
- Fully looted ground floors with untouched upper levels suggest roof positions
- Systematic floor-by-floor looting indicates thorough clearing without camping
Proven Tactics to Eliminate Roof Campers
Direct Assault:
- Single campers vulnerable to coordinated stairwell pushes
- Ascending players hear descending footsteps earlier
- Deploy flashbangs before rooftop exits (8-10 second disorientation)
- Throw at ceiling angles for maximum coverage
- Smoke grenades at stairwell exits, push immediately
Indirect Elimination:
- Frag grenades from ground positions targeting corners and central areas
- Wooden rooftops require 4-6 grenade launcher hits for total collapse
- C4 on lower floors creates catastrophic failures
- Press [6] to equip, place at wall-floor junctions and support columns
- 3-second arming sequence requires tactical positioning
- Single C4 collapses wooden structures; 2-3 charges penetrate concrete
Flanking:
- Access neighboring building rooftops for lateral angles
- Ground-level flanking while maintaining suppressive fire from predictable positions
- Requires map knowledge of rooftop access points
Suppression & Rotation:
- Sustained fire forces defensive postures
- Coordinate squad fire for continuous pressure
- Zone pressure + suppression forces abandonment
- Campers choose between zone damage or exposure
Anti-Camping Loadout:
- RPGs (2-3 rockets): Single impact compromises non-reinforced walls; 3-4 breach metal
- Maximum grenades (3-4 frags)
- Assault rifles with controllable recoil for stairwell + rooftop combat
- Avoid sniper-heavy loadouts
Building Control Without Becoming a Target
Active Control:
- Rotate positions within structures every 30-60 seconds
- Prevents opponent prediction
- Establish multiple exit routes before defensive positioning
- Identify stairwells, windows for emergency drops, structural weak points
Defensive vs Camping:
- Defenders monitor safe zones, prepare proactive abandonment
- Campers ignore rotations until zone damage forces movement
- Engage selectively—high-value eliminations only
- Limit engagements to 15-20 seconds before repositioning
Mobility Preservation:
- Maintain retreat path awareness
- Reserve smokes/flashbangs for emergency disengagements
- Circle positioning overrides height advantage always
- Abandon positions immediately when zones shift away
Third-Party Pressure: When multiple squads focus fire, height becomes liability. Execute planned retreats before escape routes close.
Optimal Equipment & Operator Selection
Weapon Loadouts:
- Primary: Assault rifles with vertical recoil patterns, 3-4x optics
- Secondary: Shotguns/SMGs for stairwell combat (under 10 meters)
Tactical Equipment:
- 3-4 frag grenades minimum
- Flashbangs for aggressive play (8-10 second disorientation)
- Smokes for defensive rotations
- C4 mandatory for building control (2 charges guarantee metal breaches)
Operators:
- Vlinder: Butterfly Rescue Drone (55-meter radius reconnaissance)
- Mobility enhancements for rapid vertical movement
Season 8 Meta:
- Assault rifles: 600-750 RPM, moderate fire rates, controllable recoil
- Marksman rifles for 200+ meter sightlines, counter-sniper operations
Loot Priority & Resource Management
High-Value Zones:
CBD Skyscrapers: Full loadouts in 60-90 seconds uncontested. 80%+ contest probability. Time extends to 3-4 minutes with combat.
Commercial Districts: Basic loadouts in 90-120 seconds. 40-50% contest probability. Balanced time efficiency.
Industrial Warehouses: 60 seconds uncontested. 30-40% contest probability. Concentrated loot, confined spaces.
Priority Order:
- Armor (minimum Level 2 before combat)
- Healing: 4-6 bandages, 2-3 med kits, 1-2 trauma kits
- Ammunition: 180-240 rounds primary, 60-90 secondary
- Grenades over excessive ammo
Common Mistakes to Avoid
Rotation Timing:
- Initiate with 60-90 seconds remaining, not final 30 seconds
- Add 30-50% time buffers for detours and obstacles
- Account for earthquake-created barriers
Over-Commitment:
- Establish disengagement triggers before combat (damage thresholds, time limits)
- Survival + positioning > elimination counts
- Recognize losing fights early
Audio Dismissal:
- Invest in quality headphones
- Configure for maximum directional accuracy
- Sound provides earlier threat detection than visual
Environmental Awareness:
- Assess building damage states before positioning
- Avoid structures with compromised support columns or extensive wall damage
Inventory Management:
- Establish templates for balanced resource distribution
- Prioritize high-value items, avoid hoarding excessive ammo
- Develop rapid assessment skills
FAQ
What are the safest rotation routes on Aftershock? Avoid main roads and CBD paths. Use residential periphery and building-to-building ground movement. Rotate during earthquake dust clouds (15-20 seconds) and between distant gunfire. Maintain 60-90 second safe zone buffers.
How do you counter roof campers? Detect via visual scanning, audio cues, environmental clues. Eliminate indirectly using grenades and structural collapse. Deploy flashbangs before vertical pushes (8-10 seconds). Use C4 on lower floors—single charge collapses wood, 2-3 penetrate concrete. Maintain suppressive fire forcing abandonment.
Where are the best entry points? CBD skyscrapers: premium loot, 80%+ contests. Commercial districts: moderate loot, 40-50% contests (recommended for consistency). Residential periphery: safe landings, basic loadouts.
What equipment counters vertical campers? RPGs (2-3 rockets), 3-4 frag grenades, flashbangs, C4. Assault rifles with controllable vertical recoil and 3-4x optics. Avoid sniper-heavy loadouts.
How to identify roof campers before engaging? Systematic rooftop scanning in 90-degree sweeps. Listen for elevated footsteps and equipment sounds. Spot scope glint beyond 100 meters. Observe open upper-floor doors and loot patterns. Deploy Vlinder's drone (55-meter radius).
When should you rotate? Initiate with 60-90 seconds remaining on timers. Abandon high ground immediately when circles shift. Early rotations enable advantageous positioning vs disadvantageous entries under fire.
Dominate Season 8 with instant CP recharge through BitTopup! Unlock exclusive operators, weapon skins, and Battle Pass advantages. Fast, secure, trusted by competitive players worldwide. Get your edge on Aftershock now!


