

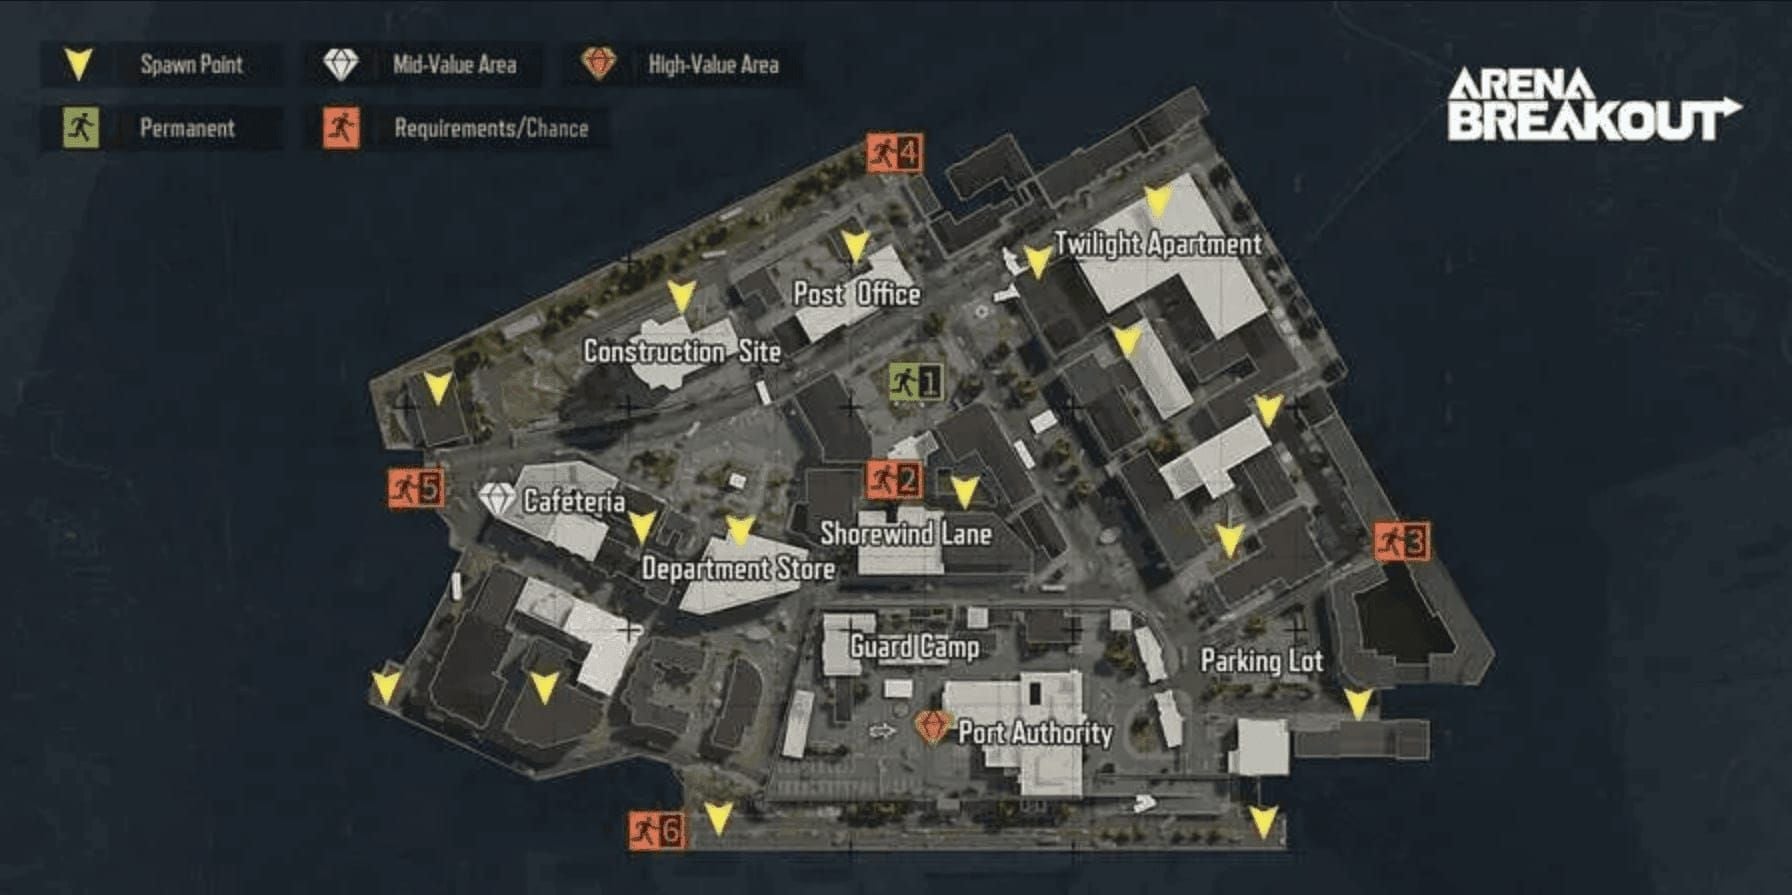
Understanding the Airport Loot Loop System
The Airport loot loop (unlocked at Level 25) is Season 4's most efficient Koen farming method. This 35-minute raid supports 12 players on 72 tick rate servers, creating predictable PvP patterns you can exploit.
The core circuit—Grain Trade Center-Stables-Motel—covers 800 meters and yields 200-400k Koens in 12-15 minutes. Strategic use of 2011 keys (30-50k Koens) unlocks 4-6 high-value safes. Investment returns in one successful run.
Season 4 launched January 8, 2026 at 6PM EST with refined loot distribution favoring methodical looters over PvP players. For uninterrupted farming, Arena Breakout Mobile Bonds top up at BitTopup offers secure transactions and instant delivery.
Why Airport Works for Koen Farming
Airport concentrates high-value loot in compact zones:
- Grain Trade Center: 2 ammo boxes yield 60-120 rounds in 20-30 seconds
- Stables: Upstairs safe (2011 key) yields 50-80k Koens in 12-18 seconds
- Motel: 3 safes (2011 keys) yield 150-250k Koens in 3-4 minutes, plus 4 weapon boxes and 2 medical crates
This density eliminates risky cross-map rotations. Compared to alternatives: Northridge Hotel has 8 safes (500-800k) but attracts heavy traffic. Sewage Plant's 3 safes yield only 100-180k. Valley Beach Villa produces 300-500k but requires extended looting time.
Season 4 Changes
Key adjustments favor the Grain Trade-Stables-Motel route:
- Safe loot values increased 15-20% vs Season 3
- Weapon crate looting time reduced from 12-20s to 8-15s
- AI patrol cycles standardized to 3-5 minute intervals
- Central terminal now attracts 50-60% of players (minutes 0-10)
AI detection reduced via crouch-walking: 60% footstep reduction limits awareness to 15-20m vs standard 35-40m range.
15-Minute Timeline Breakdown
Minutes 0-2: Crouch-walk 150m northwest to Grain Trade Center (90-120s). Most players rush central terminal.
Minutes 2-6: Loot Grain Trade ammo boxes, move to Stables. Upstairs safe yields 70-100k Koens.
Minutes 6-10: Motel intensive phase. Three safes require 3-4 minutes, producing 150-250k Koens. Add weapon boxes and medical crates.
Minutes 10-15: Extract via Outpost (200m northwest, 85-90% success rate) or Southern Blockade (2000 Koen payment, 90-92% success rate).
Expected Returns
200k baseline: Conservative runs with partial safe spawns, skip secondary loot, extract minute 10-12.
400k ceiling: All safes spawn max value, efficient looting of all sources. Requires all 3 Motel safes at max (250k), Stables max (80k), Grain Trade (40k), weapon crates (30k).
Realistic average: 280-320k Koens per successful run = 1.1-1.6 million Koens/hour.
Complete Step-by-Step Loot Route
Starting Position (0-2 Minutes)
Southern spawns provide optimal access. Immediately crouch-walk northwest—reduces footstep detection 60%, limits AI awareness to 15-20m. The 90-120s movement window coincides with central terminal rush (50-60% of players).
Monitor audio: gunfire from central terminal confirms PvP distraction. Silence requires heightened caution.
Grain Trade Center (2-4 Minutes)
Enter from south, scan for AI. Target 2 ammo boxes first: 60-120 rounds in 20-30s, worth 15-25k Koens resale.
Ammo types: 7.62x39mm, 5.45x39mm, 9x19mm in 30-60 round quantities.
Quick sweep for medical supplies (5-10k Koens) but limit to 15-20s. Exit northwest to Stables maintaining crouch-walk.
Stables (4-7 Minutes)
Approach from southeast. Upstairs safe (2011 key) yields 50-80k Koens in 12-18s—highest Koen-per-second ratio.
Safe contents: currency stacks, valuable keys, rare barter items. Prioritize currency and high-value keys first.
Downstairs weapon box: 8-15s looting. Skip if contents under 5k Koens. Exit northwest to Motel.
Motel (7-11 Minutes)
Critical value extraction: 3 safes (2011 keys) yield 150-250k Koens in 3-4 minutes. Approach from southeast, scan for players.
Loot safes systematically, 12-18s each. Priority order: currency stacks, rare keys (50k+), high-value barter items, ammunition, medical supplies.
4 weapon boxes (8-15s each) and 2 medical crates provide supplementary value. If approaching minute 11 with safes complete, skip remaining containers for safe extraction.
Extract Selection (11-15 Minutes)
Outpost (200m northwest): 10-15 minute window, backpack retained, 5-10% camp rate, 85-90% success. Optimal for 300k+ runs.
Southern Blockade: 2000 Koen payment, 3-5% camp rate, 90-92% success. Best for 150-200k runs where payment is 1-1.3% of value.
Avoid Drainage Pipe (no backpack) and Hunter's Path (backpack discard) unless emergency. Access Bridge activates minute 25—too late.
High-Value Loot Spawn Locations
Motel Safe Patterns

3 safes operate independently, 85-90% spawn rates:
- Safe #1 (ground floor, east): 60% currency spawns, 40-70k Koens
- Safe #2 (second floor, west): 40% currency, 30% keys, 30% barter items
- Safe #3 (ground floor, west): 35% rare key spawns worth 80-150k Koens
Weapon boxes: 70-75% spawn rates. Attachments (scopes, suppressors, magazines) at 45% rates, worth 8-15k each. Complete weapons at 15% rates, worth 20-35k.
Stables Optimization
Upstairs safe: 90-95% spawn rate, most reliable container. 70% currency spawns (50-80k range), 15% medical supplies, 15% barter items.
Downstairs weapon box: 65-70% spawn rate. 55% ammunition spawns (60-90 rounds, 12-18k value), 30% attachments (5-10k).
5-second assessment protocol: approach, quick-scan, decide if 8-15s full loot justifies time. Skip if under 8k total value.
Grain Trade Efficiency
2 ammo boxes: 95%+ spawn rates, virtually guaranteed. 5.45x39mm and 7.62x39mm at 40% each, 9x19mm at 20%. 60-120 round range reflects single vs double-stack spawns.
Dual purpose: immediate resupply and 15-25k resale value in 20-30s (200-400g weight).
Loose loot: 30-40% medical supply spawns, 15-20% barter items. Only pursue if ammo boxes yield under 80 rounds.
Hidden Spots
Utility shed (between Stables-Motel): 50-55% spawn rate, 40m off route, 25-30s detour. 60% weapon attachments, occasional rare scopes (25-40k). Use if ahead of schedule.
Cache near Outpost: 40-45% medical supply spawns, 10-15s looting. Minimal extraction impact.
PvP Hot Lane Identification
What Are Hot Lanes
High-traffic corridors connecting spawns to premium loot. Primary hot lane: southern/eastern spawns to central terminal (200m danger zone, 50-60% of players, minutes 0-10).
Secondary hot lanes: central terminal to Northridge Hotel and Valley Beach Villa (20-30% traffic, minutes 8-15).
Grain Trade-Stables-Motel circuit operates in northwestern peripheral zone with 5-10% player traffic.
Peak PvP Times (Minutes 3-8)
Maximum intensity as players converge on central terminal. Sustained gunfire, grenades, callouts indicate active combat.
Circuit farmers exploit this distraction at Stables/Motel. 800+ meter separation from central terminal provides acoustic isolation.
Minute 8 marks transition—PvP survivors rotate to secondary locations. Increase audio awareness minutes 8-12.
Corridors to Avoid
- Direct spawn-to-central terminal routes (150-250m, constant movement minutes 0-8)
- Central terminal to Northridge Hotel corridor (active minutes 8-15)
- Motel to Southern Blockade direct route (15-20% traffic vs 5-10% via Outpost)
Audio Cues
Footsteps: 25-30m detection for standard movement (3-5s warning). Crouch-walking reduces to 15-20m. Sprint footsteps: 40-50m detection.
Weapon handling: Reloading, switching, healing at 20-25m range. Reloading = temporary vulnerability.
Gunfire: Within 50m = immediate threat assessment. 100-150m = distant engagement. Beyond 200m = central terminal PvP confirmation.
Strategic Timing for Safe Looting
Early Raid (0-5 Minutes)
Maximum aggression as players rush loot. Central terminal: 50-60%, Northridge/Valley Beach: 30-35%, circuit: 5-10%.
Prioritize stealth over speed. Crouch-walking costs 30-40s but prevents AI/player detection. Avoid all gunfire—your 70-100k loadout = 25-35% of expected profits.
Mid-Raid (5-10 Minutes)
Productive looting phase. Central terminal PvP concludes by minute 8, survivors rotate minutes 8-10.
Maintain audio checks every 30-45s during Motel looting. If threats within 50m, cease looting and prepare defensive positioning.
Motel's interior provides multiple exits. Secure collected loot over completing remaining containers—200k partial run with extraction beats 350k run ending in death.
Late Raid (10-15 Minutes)
Different risk profile. Remaining players carry significant loot, making them cautious. Extract camping viable: Outpost 5-10%, Southern Blockade 3-5%.
Approach extracts in 30-40m increments, scanning for campers. Campers position 15-30m from activation zones.
If campers detected, evaluate alternatives. Southern Blockade's 2000 Koen payment = 0.5-1% of 200-400k runs, economically viable with better camp rates.
Decision Framework
150k+ by minute 8: Prioritize extraction over full Motel phase. Loss risk exceeds potential gain.
Under 100k by minute 8: Poor spawns/disruptions. Extend looting, add utility shed, thoroughly loot weapon boxes. Lower value reduces loss risk.
Extract timing: 300k+ runs justify early extraction minute 10-12 via Outpost. 150-200k runs can extend to minute 13-14.
Alternative Routes
Low-Risk Solo Route
Sewage Plant-Grain Trade-Stables, eliminating Motel. Sewage Plant's 3 safes yield 100-180k in 2-3 minutes. Total: 180-280k in 12-15 minutes.
Sewage Plant: 8-12% player traffic vs Motel's 15-20%. Extract via Drainage Pipe (0-10 minute window): discard backpack (8-12k loss), secure items in rig. 92-95% success rate.
High-Efficiency Route
Grain Trade-Stables-Motel-Valley Beach Villa for experienced players. Valley Beach Villa adds 300-500k in 5-7 minutes. Total: 500-900k potential.
Requires 18-22 minutes, pushing to minute 20-25 window. Success rates drop to 70-75% vs standard 85-90%. Only attempt if Motel complete by minute 9-10 with no nearby players.
Emergency Escapes
Grain Trade encounters: Retreat southeast to map boundary (200m, minimal traffic). Circle back to Stables via southern route, adds 3-4 minutes.
Stables encounters: Exit northwest, bypass Motel, proceed to Outpost. Sacrifices 150-250k Motel potential but preserves 70-100k collected + 70-100k loadout.
Motel encounters: Evaluate player numbers. Solo players can be challenged with superior positioning. Groups of 2+ require immediate evasion—exit opposite side, sprint to Outpost.
Spawn Adaptations
Northern spawns: Reverse route (Motel-Stables-Grain Trade). Motel looting minutes 2-6 increases encounter risk from 15-20% to 25-30%.
Eastern spawns: Immediate direction commitment. Gunfire from central terminal = proceed to Grain Trade. Silence = delay 60-90s.
Western spawns: Optimal for Sewage Plant route. Complete Sewage minutes 0-3, transition to Grain Trade-Stables minutes 3-8, extract minutes 8-12. Produces 250-350k with 88-92% success.
Optimal Loadout
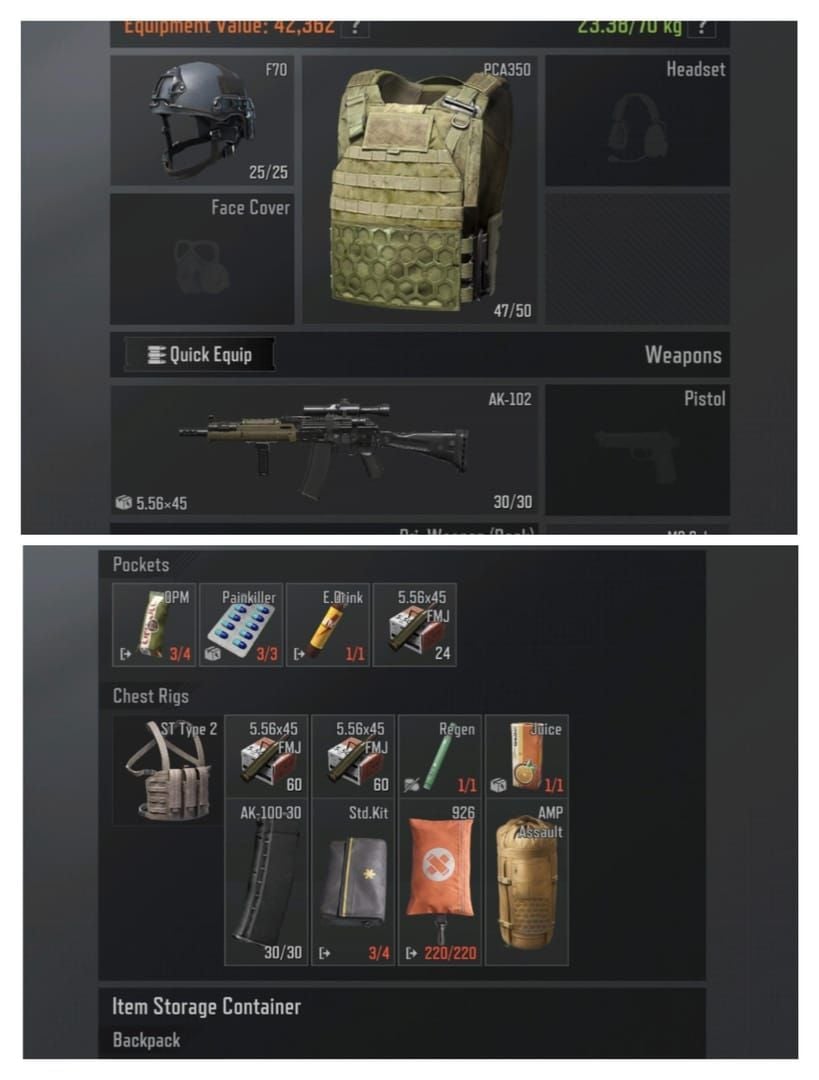
Budget Core (Sub-50k)
SEK Composite Body Armor Tier 4: 70 durability, 15-25k Koens, 5% movement penalty. Defeats most AI and budget players.
Sentry 308 Armored Rig: 60 durability, 20 slots, 8-12k Koens, 6% movement penalty. Combined 11% penalty = optimal balance.
Headwear: 3-5k budget options. Circuit's stealth approach minimizes head-on engagements. Allocate savings to weapon/ammo.
For consistent farming, Arena Breakout Bonds instant recharge through BitTopup ensures quick loadout replenishment between runs.
Backpack and Armor
30-slot backpack: 12-15k Koens, 8% movement penalty. Adequate for circuit loot (25-35 slots used). Accommodates 3 safe loots (9-12 slots), 4-6 weapon boxes (8-12 slots), ammo (2-3), medical (2-3), plus 3-5 opportunistic pickups.
Tier 4 armor: Defeats 85-90% AI weapons, 60-70% budget players. Tier 5 costs 45-65k (200-300% increase) for only 5-10% improvement—diminishing returns.
Weapon Choice
MPX: 850 RPM, 9x19mm AP6.3 Tier 3 ammo. Complete loadout 70-80k including weapon, ammo, attachments. 679.68 damage, 424.8 penetration defeats Tier 3 armor.
AK-74N: 630 RPM, 5.45x39mm Level 5 BP ammo, 60-round mags. Similar cost (under 100k total). Lower RPM reduces ammo consumption by 3-5k per run. Larger mags suit defensive holds.
Avoid snipers/DMRs: 15-20% movement penalties contradict circuit's stealth philosophy. 12-15 minute timeline requires constant movement.
Essential Items
Medical: 2 bandages (1k each), 1 medkit (3-4k), 1 painkiller (2-3k) = 8-11k total. Motel's 2 medical crates provide resupply.
Ammo: 120-150 rounds across 2-3 mags + 1 spare in rig. Handles 2-3 AI encounters (30-45 rounds) and 1 player engagement (45-60 rounds). Grain Trade ammo boxes resupply.
Utility: 1-2 grenades (3-5k each). Smoke for retreats, flashbangs for aggressive pushes. Skip expensive thermal scopes/advanced equipment.
Advanced Optimization
Speed Looting
Consistent pattern: open, scan value-descending (currency > keys > barter > ammo > medical), grab high-value first, fill remaining space. 3-5s assessment prevents grabbing low-value items blocking high-value pickups.
Safes: Currency in top-left, keys in top-right, barter in middle, ammo/medical in bottom. Positional consistency enables 2-3s faster looting.
Weapon boxes: Scopes/suppressors (15-25k) in left columns, mags/grips (8-15k) in center, basic attachments (3-8k) in right. Grab left first, assess center.
Inventory Management
Organize real-time after each container. Spend 2-3s arranging by value density (Koens/slot): high-value (10k+) top rows, medium (5-10k) middle, low (under 5k) bottom.
Enables instant decisions when finding better items. If inventory full, immediately discard bottom-row items. Without organization, waste 10-15s assessing.
Use rig's 20 slots for guaranteed-keep items: currency, rare keys, highest-value barter. Accessible even if forced to discard backpack. Preserves 80-120k in worst-case scenarios.
When to Skip Loot
Develop Koen-per-second threshold. Weapon box under 8k at minute 9+ with 200k+ secured? Skip it. 8-15s looting yields 533-1000 Koens/second, below circuit target of 1100-1600 Koens/second.
Loose loot under 5k requires 3-5s (1000-1666 Koens/second). Makes sense minutes 2-8 between locations, but minutes 9-12 approaching extraction reduces efficiency.
Safe looting always justified: 50-80k in 12-18s = 2777-6666 Koens/second. Even minimum safes (30-40k) exceed target. Never skip safe access with 2011 keys and time.
Extract Selection by Value
300k+ runs: Outpost despite 5-10% camp rate. 85-90% success × 300k = 255-270k expected value. Closer proximity (200m vs 350m) saves 90-120s for faster cycling.
150-200k runs: Southern Blockade. 2000 Koen payment = 1-1.3% of value. 90-92% success rate + improved camp rates justify extra movement time.
Under 100k runs: Drainage Pipe if within 0-10 minute window. Discard backpack (8-12k loss), secure items in rig. 92-95% success maximizes limited loot preservation.
Common Mistakes
Overlooting
Most common failure: extending Motel beyond minute 11-12, reducing extraction time. Attempting all 4 weapon boxes + 2 medical crates after safes invests 6-8 minutes for 40-60k.
Math error: 40-60k in 6-8 minutes = 5000-10000 Koens/minute. Fresh circuit = 13333-26666 Koens/minute. Lose 3333-16666 Koens/minute by overlooting.
Hard limits: Minute 11 with safes complete = immediate extraction. Minute 10 with 2 safes = loot third quickly, skip others.
Ignoring Audio
Players focused on looting miss footsteps at 25-30m (8-12s warning). Missing cues results in surprise encounters where enemy holds initiative.
Forced audio checks: after opening each container, pause 2-3s before looting. Open-listen-loot-listen rhythm adds 4-6s per container but prevents most surprises. 20-30s investment across 5-6 containers costs less than single death (70-100k loadout + 150-300k loot).
Recognize AI vs player patterns: AI footsteps follow predictable patrol rhythms. Player footsteps show irregular pacing, stops, direction changes.
Poor Route Adaptation
Rigidly following Grain Trade-Stables-Motel despite player activity. Gunfire from Stables at minute 4 should trigger adaptation: skip Stables, go Motel, return to Stables minutes 9-11.
Flexibility maintains productivity while avoiding combat. Route sequence matters less than accessing all locations safely.
Contingency sequences: Grain Trade-Motel-Stables, Motel-Stables-Grain Trade, or Stables-Motel-Grain Trade based on spawn/audio.
Loot Spawn Misconceptions
Many believe looting speed affects spawn quality or timing produces better loot. Season 4 uses predetermined spawn tables at raid start—speed/timing don't influence quality.
Misconception causes unsafe rushing, believing getting there first improves loot. Actual advantage: reduced competition, not improved spawns.
Another misconception: using 2011 key on one safe reduces other safe spawn probability. Reality: each safe operates independently. Always check all safes with 2011 keys.
Economic Strategy
Koen Management
Maintain 500k reserve before upgrades/luxury items. Funds 5-7 runs (70-100k per loadout), buffers losing streaks. Without reserves, desperation farming with inadequate loadouts reduces success from 85-90% to 60-70%.
60-30-10 rule: 60% to reserve (until 500k), 30% to loadout improvements, 10% to consumption. Once at 500k, shift to 40-40-20.
Track per-run profitability across 10-run samples. Below 200k average indicates execution problems. Above 300k confirms mastery, justifies aggressive loadout investments.
Insurance Decisions
Insurance costs 8-12% of loadout (5.6-12k for 70-100k loadouts), returns items in 60-70% of deaths. Expected value: 0.15 death rate × 0.65 return × 85k loadout = 8.3k return vs 8.8k cost. Slightly negative for budget loadouts.
Provides variance reduction—smooths losing streak impact. Players with under 300k reserves should insure. Above 500k can skip and absorb losses.
Never insure items you'll discard. Running Drainage Pipe (backpack discard)? Don't insure backpack.
Loadout Upgrades
Tier 4 to Tier 5 armor: Only after 500k reserves and 300k+ average across 10 runs. Costs 25-35k additional, improves survival 3-5% (85-90% to 88-93%). Applied to 300k runs = 9-15k additional expected value—marginally profitable.
Weapon upgrades: Moving to 120-150k premium weapons improves PvP but only matters in 10-15% of runs with player encounters. Budget weapons remain optimal for pure farming.
Backpack upgrades: 30 to 40-slot costs 10-20k additional, enables 15-20% more capacity. Circuit's 12-15 minute timeline rarely fills 30 slots. Only relevant for high-efficiency route to Valley Beach Villa.
BitTopup for Continuous Operations
Players experiencing reserve depletion can supplement through BitTopup's secure platform. Competitive pricing on Arena Breakout Bonds with instant delivery enables immediate loadout funding.
High user ratings and excellent customer service provide reliability. Fast delivery ensures quick recovery from losing streaks without extended downtime.
Strategic Bond purchases work best when reserves drop below 200k—threshold where loadout quality suffers. Purchasing 300-500k Koens worth restores full capacity, prevents negative spiral. BitTopup's secure transactions protect your account while providing economic foundation for sustained operations.
FAQ
How much Koen per hour in Airport Season 4?
Experienced farmers achieve 1.1-1.6 million Koens/hour using Grain Trade-Stables-Motel circuit with 12-15 minute completions and 85-90% success. Assumes 200-400k per successful run, 3-4 runs/hour accounting for lobby time and deaths. New farmers expect 600-900k/hour during learning phase.
Minimum level and equipment to start?
Airport unlocks at Level 25. Minimum equipment costs 70-100k total: SEK Tier 4 armor (15-25k), Sentry 308 rig (8-12k), 30-slot backpack (12-15k), MPX/AK-74N (25-35k), medical (8-11k), 2011 keys (30-50k). Budget 150-200k for first 2-3 attempts accounting for learning deaths.
Best extract for circuit farmers?
Southern Blockade: 90-92% success, 3-5% camp rate, 2000 Koen payment (minimal for 200k+ runs). Outpost: 200m from Motel, 85-90% success, 5-10% camp rate, better for 300k+ runs where time savings enable faster cycling.
How to avoid PvP hot lanes?
Central terminal attracts 50-60% of players minutes 0-10—avoid this 200m corridor entirely using peripheral routes. Secondary hot lanes: central terminal to Northridge Hotel (minutes 8-15) and Valley Beach Villa (minutes 10-18). Grain Trade-Stables-Motel operates in northwestern peripheral zone with 5-10% traffic.
What changed in Season 4 loot?
Safe values increased 15-20% vs Season 3. Weapon crate looting decreased from 12-20s to 8-15s. AI patrols standardized to 3-5 minute intervals. Central terminal player attraction increased from 40-45% to 50-60%, concentrating PvP away from peripheral routes.
Is 2011 key worth 30-50k investment?
Provides access to 4-6 safes yielding 200-350k total (Stables: 50-80k, Motel: 150-250k). Returns investment in single successful run, usable across multiple raids until death. Expected value: 0.85 success × 275k average = 233.75k vs 40k cost = 193.75k net profit per run.


