

Understanding S4 Airport Map Meta
Airport in Season 4 operates on 72 tick rate servers with 12 players across 35-minute raids. S4 launched January 8, 2026, 6PM EST, introducing AI patrol cycles every 3-5 minutes and 13 extraction points with varying activation windows.
Close Encounters concentrated loot at Northridge Hotel (8 safes), Sewage Plant (3 safes), and Valley Beach Villa (2 safes, 10 weapon crates), leaving peripheral areas safer. AI patrols follow predictable 3-5 minute rotations. Crouch-walking reduces footstep detection by 60% to 15-20 meters—critical for navigating undetected.
For currency efficiency, Arena Breakout Mobile Bonds top up through BitTopup provides secure transactions and competitive pricing.
Why Safe Spawns Matter
Safe spawns offer three advantages: distance from high-traffic zones, proximity to low-requirement extracts, and access to medium-value loot. Southern spawns near Grain Trade Center position you 150 meters from first objective with minimal exposure.
Economic comparison: Grain Trade-Stables-Motel yields 200-400k Koens in 12-15 minutes with minimal gear investment, while contested zones like Northridge demand 150-200k Koen loadouts with lower survival rates.
Defining 'Safe' vs 'Hot' Spawns
Safe spawns meet four criteria:
- 200+ meters from major landmarks
- Direct access to extracts activating within 10-15 minutes
- Natural cover along movement routes
- Minimal overlap with player traffic patterns
Southern perimeter spawns satisfy all criteria with 150-meter crouch-walks completed in 90-120 seconds. Hot spawns near Valley Port or Campus Services place you within 100 meters of high-value boxes, forcing immediate combat.
The Grain Trade-Stables-Motel Safe Loop
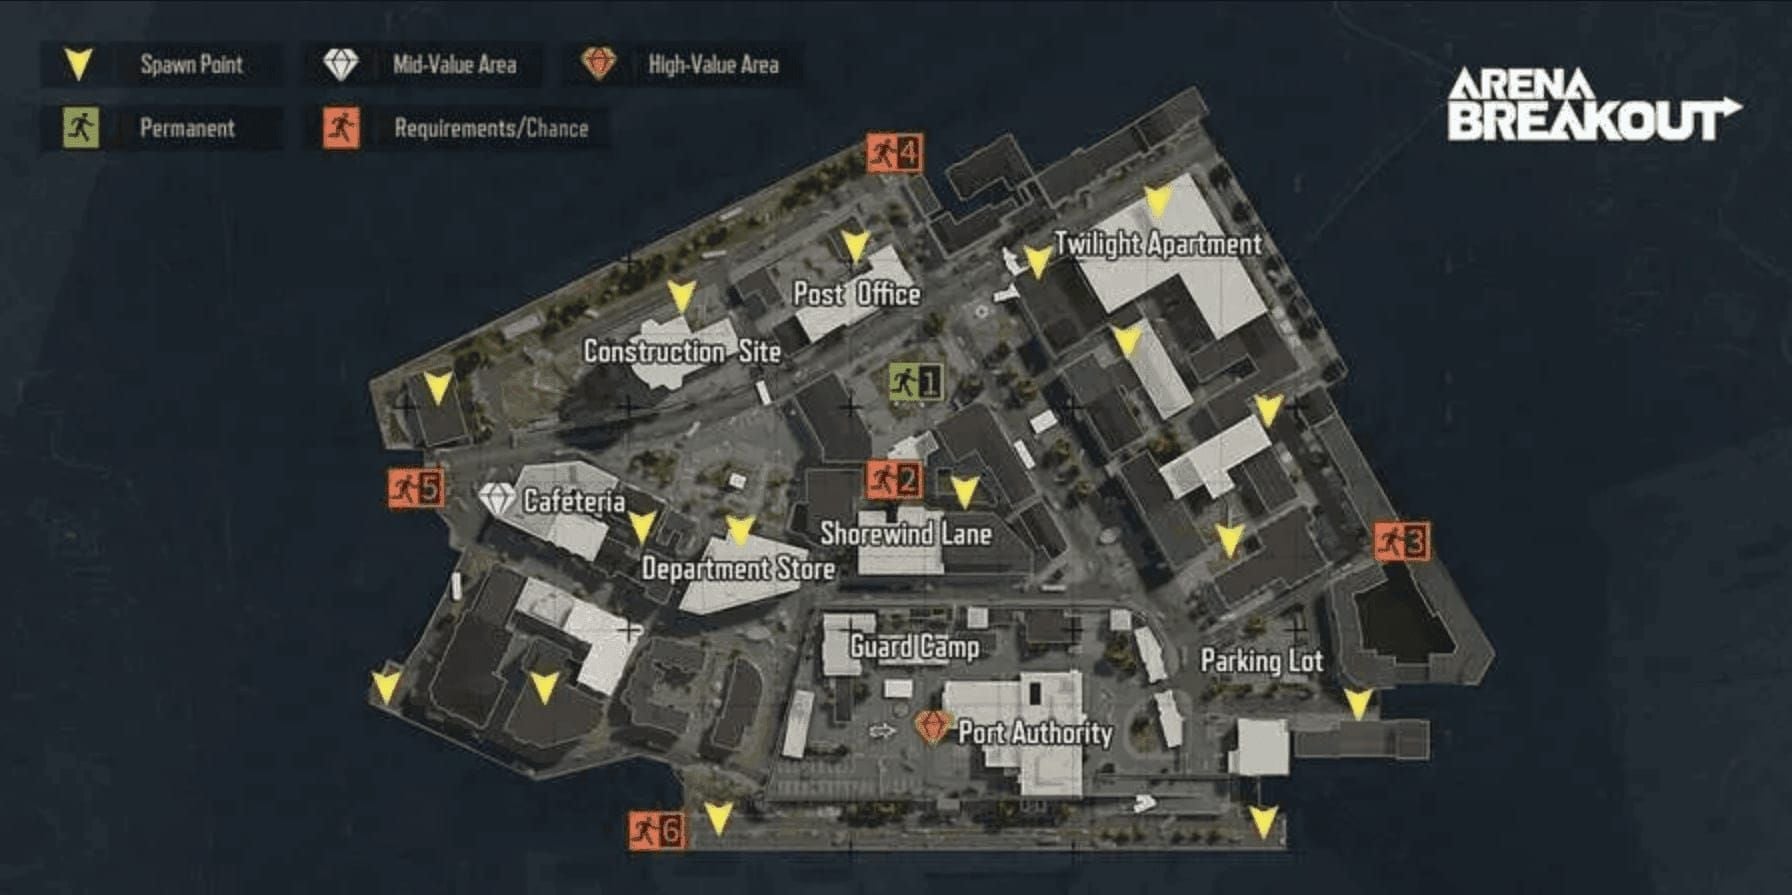
This circuit combines four small safe spawns with predictable yields and direct Outpost extract access 200 meters northwest of Motel. Requires 2011 keys (30-50k Koens) unlocking 4-6 safes across multiple raids.
Southern Spawn to Grain Trade Center
Crouch-walk 150 meters northwest (90-120 seconds) to Grain Trade Center. Two ammo boxes yield 60-120 rounds in 20-30 seconds. Elevated structure provides sight lines toward Stables and Motel for intelligence gathering.
If you detect player activity, consider Drainage Pipe extract (0-10 minutes, no backpack allowed).
Stables Safe
Crouch-walk to Stables' upstairs safe. 2011 key unlocks in 12-18 seconds, yielding 50-80k Koens in cash, medical supplies, or attachments. Position near windows during unlock for situational awareness.
Stables is the circuit's highest-risk segment—AI patrols pass within 30 meters, and players moving between Valley Port and Northridge use it as a landmark. Complete safe interaction and move immediately to Motel.
Motel Triple Safe
Three safes requiring 2011 keys yield 150-250k Koens in 3-4 minutes—the circuit's primary profit center. Multiple entry/exit points maintain tactical flexibility.
Unlock safes sequentially from nearest to farthest relative to extract direction. The 10-15 minute Outpost window aligns with 12-15 minute circuit completion, minimizing exposure.
Outpost Extract
Located 200 meters northwest of Motel, optimal activation 10-15 minutes into raid. This timing allows circuit completion without rushing while avoiding post-minute 20 player density.

Approach using cover, scanning for extract campers. Activation requires 3-5 seconds continuous presence—position with cover at your back and sight lines toward approach vectors.
Optimal Loadout for Safe Runs
Budget loadout balances protection against AI/opportunistic players while minimizing gear investment.
Armor Configuration
SEK Composite Body Armor: Tier 4 protection, 70 durability, 15-25k Koens, 5% movement penalty
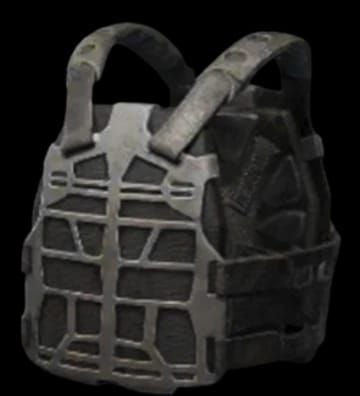
Sentry 308 Armored Rig: 60 durability, 20 inventory slots, 8-12k Koens, 6% movement penalty
Total: 35-37k Koens, stops 5.45x39mm and 9x19mm AI rounds, 11% combined movement penalty
Weapon Selection
MPX: 850 RPM, 9x19mm AP6.3 Tier 3, 679.68 damage, 424.8 penetration, 70-80k Koens total. Ideal for close-quarters, forgiving handling.
AK-74N: 630 RPM, 5.45x39mm Level 5 BP, 60-round mags, under 100k Koens. Superior range and penetration for outdoor engagements.
Medical Supplies
Allocate 10-15k Koens: bandages, tourniquets, one surgical kit for blacked limbs. Carry 2011 key in secure container (30-50k Koens, 4-6 uses). Budget 5-10k Koens for backup ammo and grenades.
Solo Extract Strategy
Solo operators prioritize invisibility over combat, leveraging crouch-walking and AI timing to complete loops without firing.
Movement Discipline
Maintain awareness of 15-20 meter detection radius. Pause at 25-30 meters from Stables/Motel to listen for interior activity. Avoid weapon crate looting (8-15 seconds, extended audio range) unless area confirmed clear.
Extract Timing Windows
Drainage Pipe (0-10 minutes, no backpack): Suits abbreviated circuits when player activity threatens. 50-80k Koen yield from Stables plus ammo justifies early exit.
Outpost (10-15 minutes, backpack allowed): Full circuit completion, 200-400k Koen maximum yield. Time Motel entry to finish three safes by minute 12-13, allowing 2-3 minutes for 200-meter movement.
Emergency Protocols
If player contact at Stables, assess engagement viability. Against single comparable opponent, MPX/AK-74N provides defensive capability. Against multiple/superior enemies, disengage toward Southern Blockade (requires 2000 Koens) or Hunter's Path (requires backpack discard).
Access Bridge (minute 25) provides late-game option but significantly increases encounter probability. Use only when earlier extracts failed and loot justifies extended risk.
Duo Extract Loop Coordination
Duos provide overlapping security and accelerated looting but require disciplined communication to prevent friendly fire and maintain stealth.
Spawn Splitting vs Staying Together
Within 50 meters: Maintain formation. Lead player advances while second provides overwatch from 20-30 meters behind.
100+ meters apart: Rally at Grain Trade Center. Solo movement reduces detection vs two players crossing open terrain.
Leapfrog Movement
Between Stables and Motel: Player One advances while Player Two overwatches, then Player Two advances past Player One. Ensures continuous 360-degree awareness.
During safe unlocks, non-looting player positions near entry points with sight lines toward approach vectors. Security player's sole responsibility is threat detection during 12-18 second Stables unlock and 3-4 minute Motel sequence.
Northern Outpost Alternative
Activates 10-20 minutes, requires one kill, maximum two players—perfect for duos. If timing extends beyond 10-15 minute Outpost window, Northern Outpost accommodates both players.
Coordinate required kill using player with most ammo, conserving second player's loadout for potential engagements.
Reading Enemy Spawn Patterns
Understanding spawn distribution predicts high-probability enemy locations based on your spawn.
Spawn Distribution Logic
12 players across designated zones with minimum separation. Southern spawns indicate northern spawns (Valley Port/Campus Services) occupied, creating north-to-south movement after 5-8 minutes. This aligns with your circuit completion, making 10-15 minute Outpost extract optimal for avoiding minute 15-20 convergence.
Early Game Sound Cues
Weapon fire (2-3 minutes): Sustained automatic = AI elimination, short bursts = player combat. Mark mental exclusion zones—if combat near Valley Port, prioritize speed through Stables.
Distant footsteps: Sprinting players rushing loot or responding to threats. Avoid these areas.
Route Adjustments
If player activity near Motel during Stables phase, extract via Drainage Pipe (if within 0-10 minutes) or hold at Stables until Outpost window. 50-80k Koens from Grain Trade + Stables justifies extract without Motel.
Alternatively, loop to Campus Services (2 safes) or Sewage Plant (3 safes) if primary route compromised. Flexibility separates experienced operators from rigid players.
Advanced Tips for Extract Success
Optimal Raid Duration
Southern spawns: 12-15 minutes for full circuit and Outpost extract, minimizing exposure to 15-20 minute convergence.
Eastern/western spawns: 18-22 minutes with alternative circuits (Valley Beach Villa, Valley Port), extracting via Valley Helipad (requires 2 dogtags) or 15-Minute Cluster extracts (minute 15, 20-second timers).
Common Mistakes
Overloading inventory: Movement penalties prevent combat disengagement. Loot priority: cash/valuables first, attachments second, ammo third, weapons only if space permits.
Ignoring raid timer: Set checkpoints—Grain Trade by minute 3-4, Stables by 7-8, Motel by 12-13, Outpost by 14-15. Prevents forced late-raid extracts.
Success Rates by Spawn
Southern perimeter: 70-80% survival (experienced players). Optimal positioning for circuit and multiple extract options.
Eastern/western: 55-65% due to increased travel and player traffic intersection.
Northern (Valley Port): 40-50% for risk-averse players. Adjacent to high-traffic zones.
Season 4 Specific Considerations
Close Encounters Impact
Event concentrated loot at Northridge, Sewage Plant, Valley Beach Villa, drawing traffic away from Grain Trade/Stables. Reduced encounter probability along circuit by 20-30% vs pre-S4.
However, extract phases more dangerous as geared survivors move toward exfiltration minutes 18-25. 10-15 minute Outpost window even more critical.
Updated AI Patrol Routes
S4 increased Scav presence near Stables/Motel by 15% with 3-5 minute cycles. Listen for AI voice lines/footsteps before building entry. Eliminating AI generates noise attracting players and consumes ammo.
Timing window: If AI passes your position, you have 3-5 minutes before next patrol. Time Stables/Motel entries immediately after patrols pass.
Community Optimizations
Grain Trade roof position: Northwest external staircase access. Spend 30-60 seconds scanning Stables/Motel for movement before continuing.
Backup 2011 key: Doubles investment to 60-100k Koens but ensures second circuit completion if first raid ends in death. Break-even at 40% survival rate.
For currency management and consistent gear access, Arena Breakout Bonds recharge online through BitTopup offers fast delivery and secure transactions.
FAQ
What are the safest spawn points on Airport S4?
Southern perimeter spawns near Grain Trade Center. 150-meter crouch-walk to first objective, minimal high-traffic exposure, optimal for Grain Trade-Stables-Motel loop and Outpost extract within 10-15 minutes.
How long should I stay in Airport raid?
12-15 minutes for southern spawns completing full circuit. Allows Outpost extract before 15-20 minute convergence when encounter probability spikes.
What loadout is best for safe farming?
SEK Composite (15-25k) + Sentry 308 Rig (8-12k) = Tier 4 protection, minimal movement penalty. MPX (70-80k) for CQB or AK-74N (under 100k) for versatility. Total under 120k Koens for positive risk-adjusted returns.
How do I extract safely solo?
Crouch-walk (15-20m detection radius), complete circuit in 12-15 minutes, extract at Outpost during 10-15 minute window. Avoid opportunistic looting extending raid duration. Prioritize survival over max loot.
What are emergency extract options?
Drainage Pipe (0-10 min, no backpack), Southern Blockade (2000 Koens), Hunter's Path (discard backpack), Northern Outpost (10-20 min, 1 kill, max 2 players), Access Bridge (minute 25 last resort).
How has S4 Close Encounters changed spawn meta?
Concentrated loot at Northridge/Sewage/Valley Beach drew aggressive players away, reducing peripheral circuit encounters 20-30%. Extract phases more dangerous as geared survivors move toward exfiltration minutes 18-25.
Ready to dominate Arena Breakout Mobile S4? Top up safely at BitTopup for exclusive currency deals and secure transactions. Upgrade your loadout and maximize extract success today!


