

Understanding PUBG Mobile 4.2 Command Wheel System
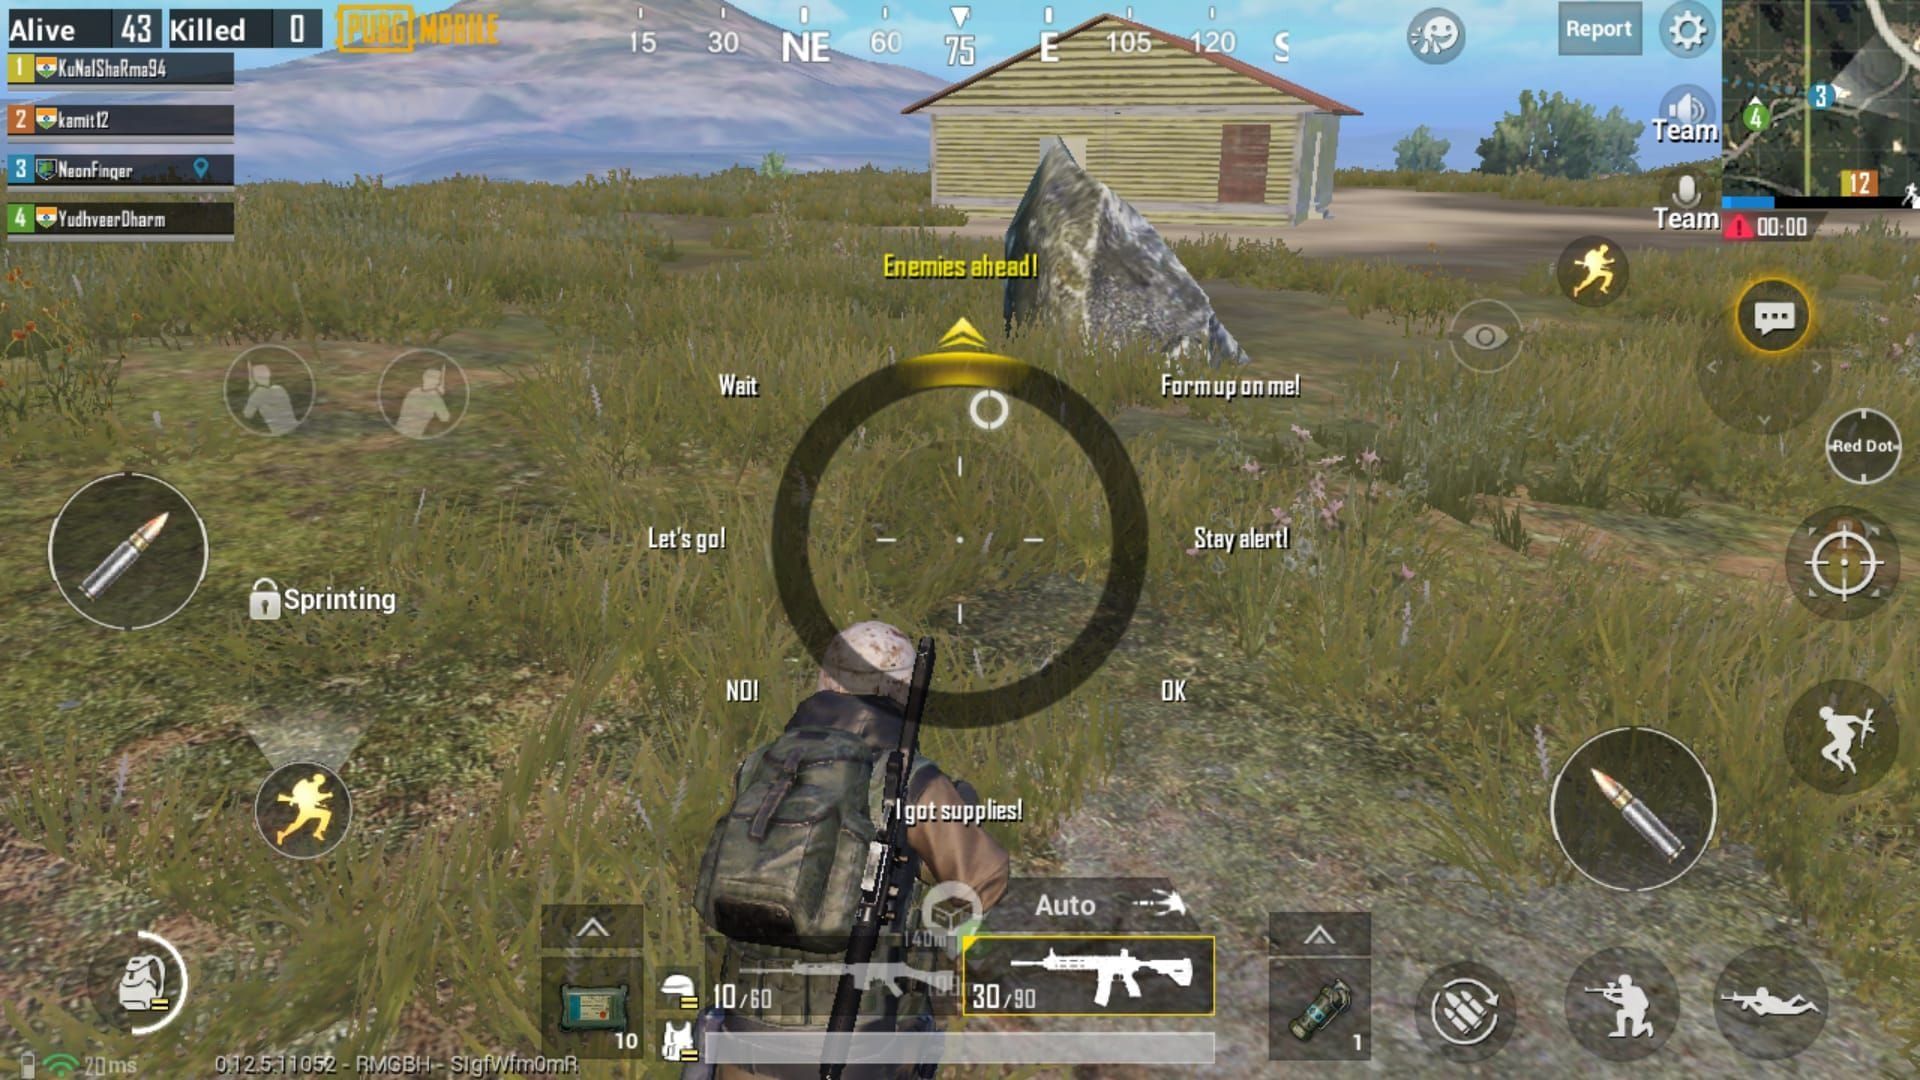
PUBG Mobile 4.2 launched January 7, 2026, featuring Barkle AI Ally—available on Erangel and Livik through March 10, 2026. Access the command wheel by holding the bottom-right ally icon for 0.3 seconds. Unlike voice chat, the visual interface eliminates language barriers during critical moments.
Barkle follows at 5-meter distance, responds within 3-meter range. Recruit one per match by landing within 20 meters of green icons (visible from 50 meters), completing recruitment in 1-2 seconds. For premium skins and event passes, PUBG Mobile UC top up through BitTopup ensures instant delivery.
What's New in Version 4.2 Communication Features
Access setup: Main Lobby > Settings > Controls > Customize > AI Ally Commands. Tap and hold icons for 0.5 seconds, drag to clock positions.
Eight Barkle abilities:
- Attack: 15-25 HP damage every 2 seconds, auto-targeting, instant cooldown
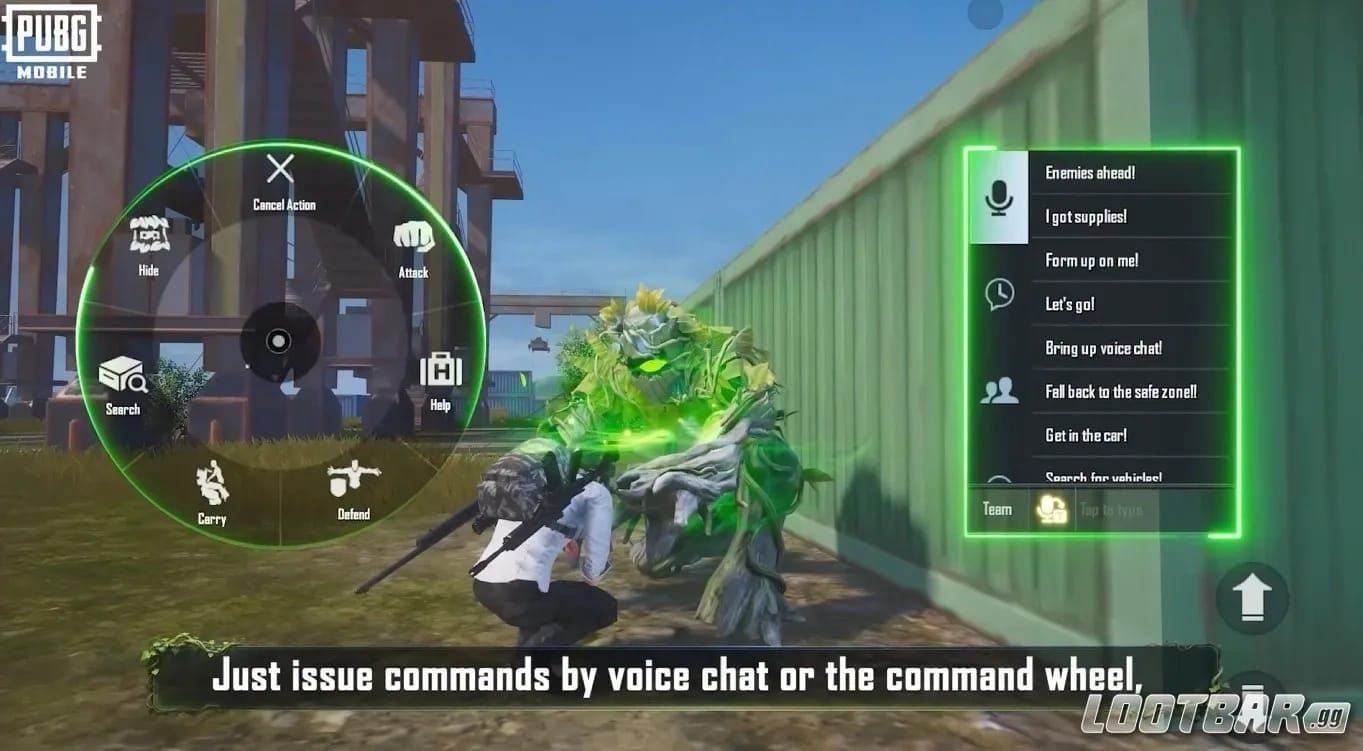
- Defend: 180-degree barrier, 200-300 HP durability, 15-20 second cooldown
- Search: 30-meter radius, 95-98% accuracy for Level 3 gear, 30-45 second cooldown
- Carry: 3-second transport, 45-60 second cooldown
- Recall: Auto-activates at 75 meters in 2-3 seconds, 25-30 second manual cooldown
- Revive: Auto-triggers within 50 meters, restores 200 HP + 25% damage resistance + 50% damage boost
- Heal: Passive HP transfer
- Hide: Foliage concealment
Screen optimization:
- 5.5-6 inch screens: 100-120% sensitivity
- 6.5+ inch screens: 80-100% sensitivity
Why Barkle Benefits from Optimized Commands
Proper configuration reduces input delay from 0.6-0.8 seconds to 0.2-0.4 seconds—often the margin between securing Level 3 gear or elimination.
Command frequency per match:
- Search: 8-12 times
- Attack: 6-10 times
- Defend: 4-6 times
- Hide: 3-4 times
- Carry: 1-2 times
Search detects items 15 meters vertically with 95-98% accuracy, critical for Pochinki's multi-story buildings. The 30-45 second cooldown demands strategic timing—most hot drop engagements conclude within 1:30.
The 6 Essential Commands for Hot Drop Dominance
Hot Drop Command Wheel Configuration
Optimal positions:
- 3 o'clock: Search (prime position, used at 0:30)
- 2 o'clock: Carry (rapid repositioning at 1:00-1:30)
- 4 o'clock: Defend (emergency cover)
- 1 o'clock: Attack (sustained suppression)
- 5 o'clock: Hide (concealment during rotations)
- 6 o'clock: Recall (proximity maintenance)
This places the three most critical commands within dominant thumb's natural arc for 0.2-0.3 second activation.
Search at 3 o'clock covers entire building clusters in Pochinki, marking Level 3 helmets, vests, backpacks in western 2-story buildings and central garage.
Carry at 2 o'clock enables repositioning 40-50% faster than manual sprinting. Reach western 2-story from northeast 3-story rooftop before enemy squads establish positions.
Defend at 4 o'clock blocks 2-3 full AR magazines, buying 4-6 seconds for regrouping. The 15-20 second cooldown provides 2-3 uses during extended firefights.
Attack Command Tactical Applications
Attack at 1 o'clock delivers sustained suppression. Barkle's 15-25 HP damage every 2 seconds with auto-targeting applies pressure on healing/reviving enemies.
Best deployed after securing weapons at 0:40-0:50. Position Barkle near windows/doorways, issue Attack while flanking from alternate angles. AI prioritizes nearest visible enemy, reliable for holding staircases.
Damage output: 450-750 HP over 60 seconds—equivalent to eliminating 2-3 unarmored opponents. Competitive players report 30-40% higher elimination rates combining personal gunfire with Barkle Attack.
Hide and Recall for Survival Optimization
Hide at 5 o'clock conceals Barkle, preventing enemies from tracking player locations. Critical when rotating from Pochinki at 3:00-4:00 match time.
Recall auto-activates at 75 meters in 2-3 seconds, 25-30 second cooldown. Manual commands at 6 o'clock allow preemptive repositioning before auto-trigger.
The 50-meter auto-Revive range requires keeping Barkle close. Recall every 20-25 seconds ensures positioning for 3-4 second revive that restores 200 HP plus damage buffs.
Step-by-Step Command Wheel Setup for Barkle
Accessing Command Wheel Settings
- Navigate: Main Lobby > Settings > Controls > Customize > AI Ally Commands
- Tap and hold command icon for 0.5 seconds until highlighted
- Drag to desired clock position, release when indicator turns green
- Test in Training Mode before ranked matches
Practice full hot drop sequence (Search > Carry > Defend > Attack) until achieving sub-0.4 second activation.
Optimal Button Placement for Quick Access
Right-handed players: High-priority commands at 2-4 o'clock (natural thumb rest) Left-handed players: Mirror to 8-10 o'clock Low-frequency commands: 12 o'clock and 6 o'clock (vertical thumb movement)
Device-specific:
- 5.5-6 inch: Compress critical commands into 2-4 o'clock cluster, 100-120% sensitivity
- 6.5+ inch: Spread 1-5 o'clock, 80-100% sensitivity
Separate Attack and Defend by 2+ clock positions to prevent misclicks.
Customizing Command Priority by Drop Location
Hot drops (Pochinki, Bootcamp, Georgopol): Search-Carry-Defend priority. Immediate Search at 0:30 for Level 3 gear, Carry for building-to-building rotation.
Mid-tier (Rozhok, Mylta): 3 o'clock Search, 2 o'clock Defend, 4 o'clock Attack, 1 o'clock Carry. Moderate density favors defensive positioning.
Edge-of-map: 3 o'clock Attack, 2 o'clock Carry, 4 o'clock Defend, 7 o'clock Search. Minimal threats prioritize mid-game rotation and proactive engagement.
Hot Drop Communication Strategy with Command Wheel
Pochinki Hot Drop Command Sequence
Precise timeline:
- 0:15: Land northeast 3-story rooftop
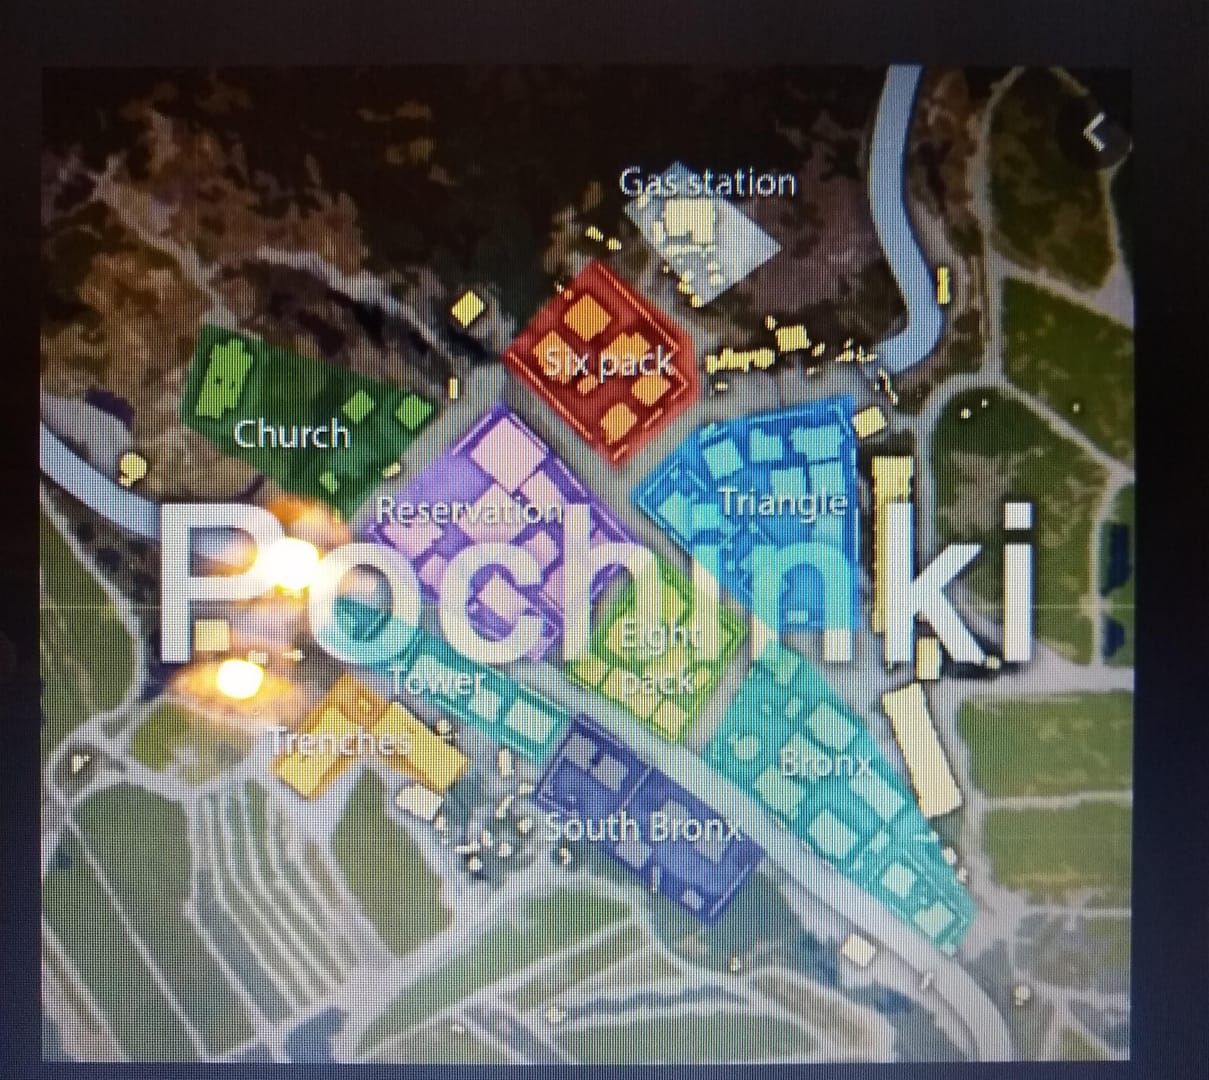
- 0:20: Recruit Barkle (green icon visible from 50 meters during descent)
- 0:30: Issue Search after securing rooftop weapon
- 1:00: Execute Carry to western 2-story building
- 1:15: Second Search for western compound cluster
- 1:30: Secure Level 3 gear
Barkle's 30-meter Search from northeast 3-story covers central garage, eastern 2-story cluster, western compounds. Yellow markers display through walls within 1-2 seconds.
Carry's 3-second transport saves 5-7 seconds versus manual sprinting, arriving before enemy squads complete looting.
First 30 Seconds Critical Sequence
0:00-0:30 survival steps:
- Parachute deploy at 0:05 targeting northeast 3-story
- Land at 0:15 within 20 meters of Barkle's green icon
- Grab nearest weapon (SMG/AR rooftop spawns)
- Recruit Barkle at 0:20 (1-2 second interaction)
- Issue Search at 0:30
Never recruit before securing weapons—the 1-2 second animation leaves you vulnerable. Search before entering buildings to avoid wasting 3-5 seconds checking empty rooms.
Mid-Fight Adjustments
1:30-3:00 engagement tactics:
Defend becomes critical in crossfire. Position Barkle's 180-degree barrier facing primary threat, absorbing initial volleys while repositioning.
Attack works best against static enemies—healing players, rooftop snipers, reviving squads. Issue Attack, then flank from perpendicular angles. Auto-targeting draws fire, creating 2-3 second windows for uncontested damage.
Carry at 2:00-2:30 enables tactical retreats when third-partied. Mark safe compounds 40-60 meters away, execute 3-second transport while squad provides cover. 45-60 second cooldown = one emergency escape per engagement.
Peaky Blinders Event Complete Overview (Jan 9–Feb 5)
Runs January 9–February 5, 2026. Shelby Trials across four scenarios on Erangel and Livik. Thomas Shelby Mythic Outfit requires 500 Lucky Coins through Lucky Spin pity system.
Daily missions: Reset 00:00 UTC, 15-25 Lucky Coins per task Weekly missions: 50-75 Lucky Coins for cumulative objectives 28-day accumulation: 420-700 Lucky Coins through daily participation
Shelby Trials requirements:
- Trial 1: 3 successful Defend commands during hot drops
- Trial 2: 5 Search commands marking Level 3 gear
- Trial 3: 10 Attack command eliminations
- Trial 4: 2 Carry commands during top-10 situations
Event Timeline and Daily Reset Schedule
Daily missions (00:00 UTC): 3-5 tasks, 5 Lucky Coins each
- Hot drop survival 90 seconds: 1-2 Pochinki matches
- Mark 10 items with Search: 2-3 matches
- Deal 500 damage with Attack: 4-5 matches
Weekly missions (Mondays 00:00 UTC):
- Complete 20 Primewood Genesis matches: 50 Lucky Coins
- Achieve 5 top-10 finishes with Barkle: 75 Lucky Coins
February 5 deadline requires ~18 Lucky Coins daily. Missing 3+ consecutive days necessitates UC purchases. Buy PUBG UC recharge online via BitTopup for instant delivery.
Reward Tiers and Unlock Requirements
Lucky Spin milestones:
- 50 coins: Peaky Blinders weapon skins (Tommy Gun, Kar98k)
- 100 coins: Vehicle skins (vintage car designs)
- 200 coins: Emotes and voice lines
- 350 coins: Arthur Shelby outfit
- 500 coins: Thomas Shelby Mythic Outfit (kill effects, lobby animations)
Each spin: 60 UC or 10 Lucky Coins. Guaranteed reward every 10 spins. Pity system ensures mythic outfit at 500 coins.
420-700 free Lucky Coins from missions reduce UC spending by 2,520-4,200 UC versus pure spins.
Exclusive Barkle voice lines: Unlock at 150 Lucky Coins (Peaky Blinders quotes during commands).
Optimized Peaky Blinders Event Grind Route
Route Map Checkpoint Locations
Efficient grind route: Pochinki hot drop + Shelby Trials checkpoints
Trial locations:
- Trial 1: Pochinki central garage (Erangel), Midstein (Livik)
- Trial 2: Rozhok church, Blomster
- Trial 3: School, Crabgrass
- Trial 4: Georgopol containers, Bjorhamn
Each checkpoint: 15-20 second interaction. Prioritize checkpoints within first circle.
Optimal path example: Pochinki drop → Rozhok (Trial 2) → Georgopol (Trial 4) before 5:00 circle closure. Completes 3 trials + hot drop mission = 25-35 Lucky Coins.
Time-Efficient Mission Completion
Stack objectives. Pochinki hot drop with Barkle completes:
- Hot drop survival
- Recruit Barkle in 5 matches
- Deal damage with Attack commands
Search at 0:30 progresses Mark 50 items while securing Level 3 gear for Equip full Level 3 in 10 matches.
Prioritize weekly missions (50-75 coins) over daily 5-coin tasks. Achieve 5 top-10 finishes (75 coins) naturally completes during skilled hot drops. Deal 5000 damage with Attack (50 coins) synergizes with aggressive command wheels.
Avoid inefficient missions like Play 30 Classic Mode matches (25 coins for 10-15 hours). 5 hours of focused Pochinki drops yields 40-60 Lucky Coins through stacked completion.
Combining Event Tasks with Hot Drop Practice
Set session goals: Complete 10 Pochinki drops with 90-second survival (daily mission) while practicing Search-Carry-Defend sequence (Shelby Trials). Each successful drop = 5-10 Lucky Coins + muscle memory improvement.
Target command usage per match:
- Search: 8-12
- Attack: 6-10
- Defend: 4-6
Below these benchmarks? Review command wheel positioning.
Squad coordination: Designate Barkle specialist for command execution while teammates focus on eliminations. Completes Squad wins in Primewood Genesis (50 coins) + individual missions simultaneously. 30-40% faster Lucky Coin accumulation versus solo.
Advanced Command Wheel Optimization Tips
Building Muscle Memory for Instant Communication
Requires 50-100 repetitions per sequence for sub-0.4 second activation. Dedicate 30-minute Training Mode sessions executing Search-Carry-Defend-Attack without visual confirmation. Close eyes after third repetition to force muscle memory.
Command combos:
- Hot Drop Opener: Search (0:30) > Carry (1:00) > Search (1:15)
- Emergency Defense: Defend > Hide > Recall (executable in 1.5-2 seconds)
Track activation times via screen recording. Identify hesitation points when switching between high-frequency (Search/Attack) and low-frequency (Hide/Recall) commands. Adjust positioning for clearer separation.
Adapting Command Setup for Different Maps
Erangel (open terrain, long sightlines): 3 o'clock Defend, 2 o'clock Search, 4 o'clock Hide, 8 o'clock Carry. Defend's 200-300 HP barrier critical for rotation survival. Hide prevents tracking during 200+ meter movements.
Livik (compact, aggressive pacing): 3 o'clock Search, 2 o'clock Carry, 4 o'clock Defend, 1 o'clock Attack. 15-18 minute matches versus Erangel's 25-30 require faster loot acquisition and building mobility. Recall less critical—rarely exceed 75-meter auto-trigger.
Future maps (Sanhok, Miramar): Sanhok's dense foliage benefits Hide-focused setups. Miramar's urban clusters mirror Pochinki's Search-Carry priority. Maintain 2-3 saved presets for quick switching.
Command Wheel Settings for Squad Leaders vs Members
Squad leaders: Balanced wheels emphasizing Search (3 o'clock) for loot reconnaissance and Carry (2 o'clock) for demonstrating rotation paths without voice comms.
Squad members: Aggressive wheels prioritizing Attack (3 o'clock) for immediate suppression and Defend (2 o'clock) for teammate cover.
Support players: Revive-focused setups. Position Recall at 3 o'clock to manually maintain Barkle proximity, ensuring 50-meter auto-Revive range covers full squad formation.
Performance Metrics: Measuring Communication Efficiency
Track effectiveness:
- Threat to Defend activation time (target: <0.5 seconds)
- Search commands per match (target: 8-12)
- Successful Carry escapes (target: 60%+ success rate)
- Attack damage contribution (target: 15-20% of squad total)
Pre vs. post-optimization (20-match samples):
- Hot drop survival rates: +25-35% (surviving past 1:30)
- Level 3 gear acquisition: +40-50% faster (1:30 vs. 2:00+)
- Placement rankings: +20-30% (rank 15-20 improving to 8-12)
Command activation errors >10% (1+ wrong per 10 activations) indicate suboptimal layout. Reposition problematic commands with 1-2 clock positions of separation.
Maximizing Your PUBG Mobile Experience with BitTopup
BitTopup provides fastest, most secure UC top-up for Peaky Blinders event and Primewood Genesis mode. Competitive pricing, instant delivery during January 9–February 5 event window.
Features:
- Secure payment methods (credit cards, digital wallets, regional options)
- 24/7 customer service, <5 minute response times
- 99%+ successful transaction rates
- 2-3 minute average delivery times
Exclusive offers:
- 10% bonus UC on 8100 UC packages
- Event-specific bundles combining UC with Lucky Coins at discounted rates
FAQ
What are the best command wheel settings for hot drops in PUBG Mobile 4.2? Search at 3 o'clock, Carry at 2 o'clock, Defend at 4 o'clock, Attack at 1 o'clock, Hide at 5 o'clock, Recall at 6 o'clock. This prioritizes the three most critical commands within 2-4 o'clock range for fastest activation during 0:30-1:30 hot drop window.
How do I customize command wheel for Barkle? Main Lobby > Settings > Controls > Customize > AI Ally Commands. Tap and hold icon for 0.5 seconds, drag to desired clock position. Test in Training Mode before ranked matches.
When does the Peaky Blinders event end? February 5, 2026. 28 days to accumulate 500 Lucky Coins for Thomas Shelby Mythic Outfit.
What commands should I prioritize for hot drop communication? Search (loot identification at 0:30), Carry (building rotation at 1:00), Defend (emergency cover during firefights). These directly impact survival during first 90 seconds.
How does Barkle's voice line system work? Supports voice commands in English, Arabic, Turkish, Russian. Peaky Blinders event unlocks exclusive character voice lines at 150 Lucky Coins (cosmetic, no gameplay impact).
Can command wheel setup improve hot drop survival rate? Yes. Optimized configurations reduce activation times from 0.6-0.8 to 0.2-0.4 seconds. Players report 25-35% improvements in hot drop survival rates (surviving past 1:30) after implementing hot drop-specific setups.


