

Energy Recharge Mechanics
Core ER Formula and Particle Values
Here’s something that trips up a lot of players—Energy Recharge isn’t just a flat bonus. It multiplies your energy gains: Base Energy × (1 + ER%). So at 100% ER, your active character grabs 3 energy from same-element particles but only 1 from different-element ones.
The math gets trickier when characters are off-field. In a full 4-person party, inactive characters only receive 60% of these values (so 1.8 energy from same-element particles). Orbs are basically particle jackpots—they provide triple the energy: 9/3/6 for same/different/neutral elements respectively.
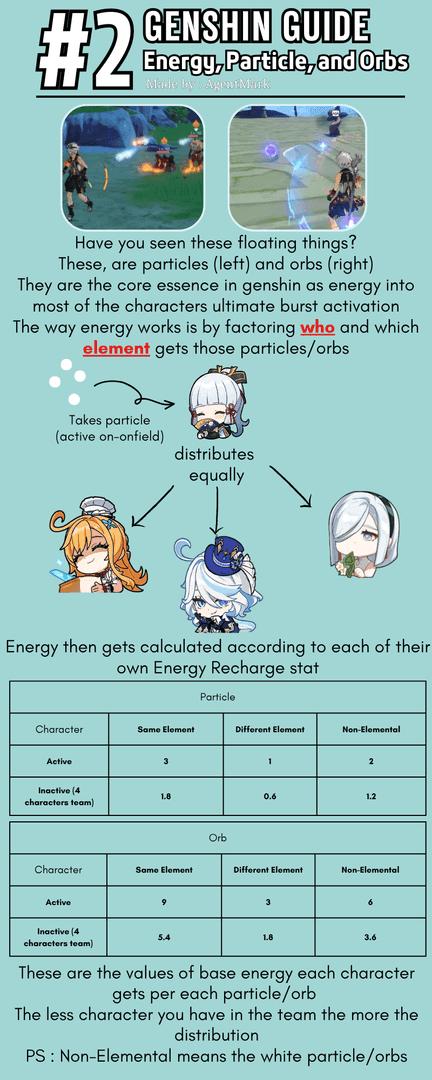
Particle generation happens through four main routes: Elemental Skills (your bread and butter), enemy HP thresholds (usually around 50%), defeating monsters, and Normal Attack RNG. That last one’s pretty unreliable though—just 1 flat energy with terrible odds.
Battery characters work by generating particles, then you swap to your target character for optimal energy transfer. It’s all about timing.
For optimal resource management during ER testing, consider ER build testing crystals top up through BitTopup’s secure platform, offering competitive rates and instant delivery.
ER Requirements by Role
Main DPS (120-140% ER)
Main DPS units have it easy—they’re on-field most of the time, naturally hoovering up particles. Characters like Neuvillette and Alhaitham (both 70-cost Bursts) can cruise at 120-130% ER with decent team support.
Eula’s a different beast entirely. Her 80-cost Burst demands 140-160% ER without a Cryo battery like Diona backing her up. The key here? Don’t sacrifice too much offensive power chasing ER. Insufficient energy kills rotations, but over-investing hurts your damage ceiling.
Sub-DPS (140-180% ER)
This role’s where things get interesting. Sub-DPS characters live in this weird limbo between on-field and off-field time, creating unique energy challenges that honestly took me way too long to figure out when I started playing.
Gaming exemplifies this perfectly—he needs 180% ER without Pyro support, but that drops to 165% with Bennett or a Favonius weapon in the mix. His C4 pushes it down further to 140%. Xingqiu and Yelan (both 80-cost Bursts) typically hover around 160-200% ER.
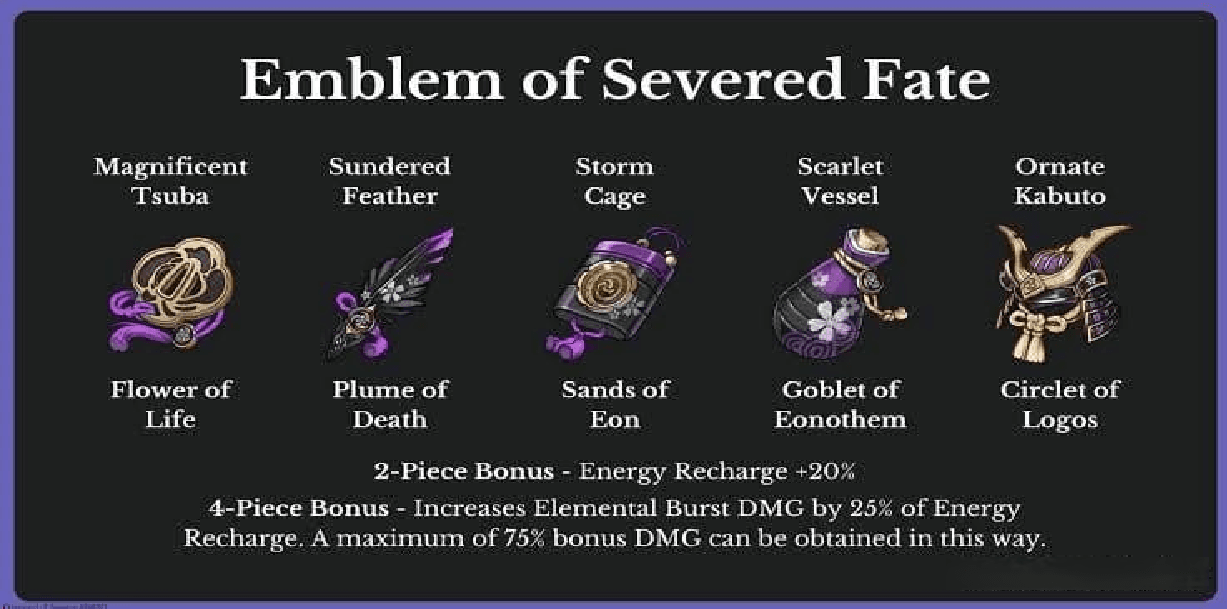
Here’s where Emblem of Severed Fate becomes absolutely crucial. It converts ER directly into Burst damage—25% of your ER translates to Burst DMG bonus, capped at 75%. Pretty sweet deal.
Support Characters (180-250% ER)
Supports get the short end of the stick energy-wise. Most need around 200% ER minimum, achieved through an ER weapon and ER Sands.
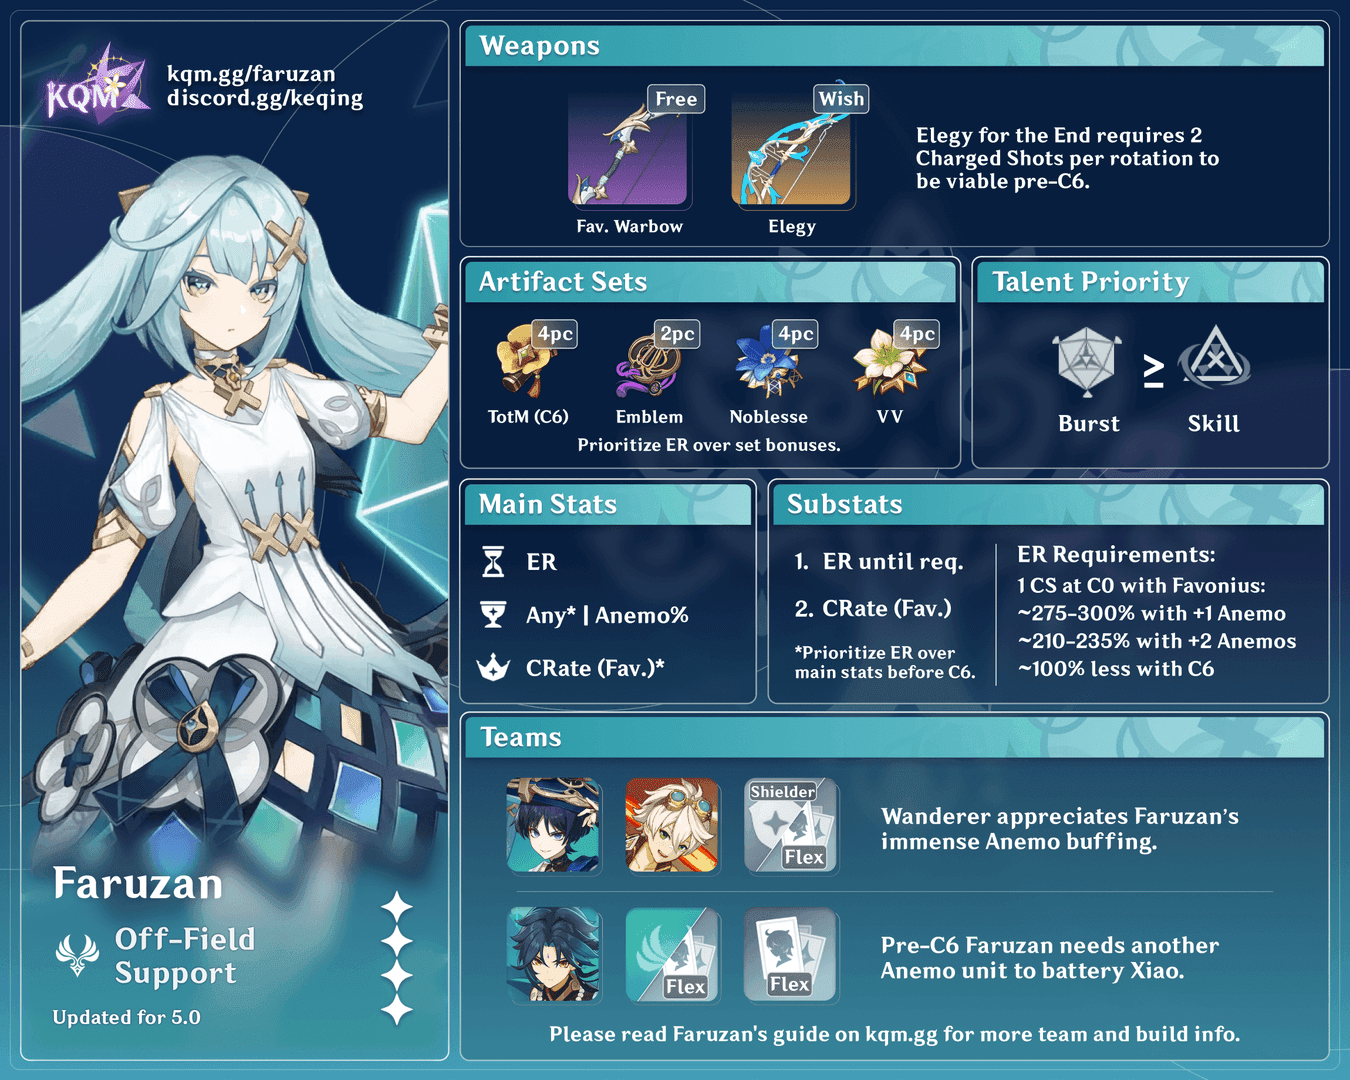
Faruzan represents the extreme end of this spectrum. Without C6, she needs a frankly ridiculous 250-300% ER, often forcing you into Favonius Warbow territory. Her C6 changes everything though—suddenly she’s generating enough energy to make Xiao and Wanderer teams actually functional.
Character-Specific Breakpoints
High-Cost Burst Characters (80 Energy)
The 80-energy club—Xingqiu, Xiangling, Eula, Beidou, Ayaka—these characters demand respect. And batteries. Lots of batteries.
Xiangling’s particularly needy since she generates almost no particles herself. Bennett becomes essential, pumping out 2.25 particles every 4 seconds (reduced to 2 seconds inside his Burst AoE). Beidou pairs beautifully with Fischl for Electro battery support.
Don’t sleep on Electro Resonance either. It generates particles during Superconduct, Overloaded, Electro-Charged, Quicken, Aggravate, or Hyperbloom reactions, though it has a 5-second cooldown.
Medium-Cost Characters (60 Energy)
Bennett, Kazuha, and Fischl sit comfortably in the 140-180% ER range depending on their role. Bennett’s particle generation is honestly broken—2.25 particles per 4-second cooldown while supporting the entire team.
Kazuha’s pretty self-sufficient. His tap skill generates 3 particles (6-second cooldown) while his hold skill pumps out 4 particles (9-second cooldown). Flexibility at its finest.
Low-Cost Characters (40 Energy)
Zhongli, Albedo, Tighnari—these guys are living the dream at 100-120% ER. Low-cost Bursts mean frequent usage with minimal ER investment. Maximum flexibility, minimum headaches.
Team Composition Impact
Same-Element Battery Synergy
Same-element batteries are pure efficiency. Bennett feeding Xiangling exemplifies perfect synergy—consistent particle generation (up to 1.0 particles per second inside Burst) combined with that sweet same-element bonus.
Diona supporting Eula demonstrates another crucial pairing. Remember, same-element particles provide 3x energy compared to different-element ones. That’s not a small difference.
Multi-Element Considerations
Multi-element teams face inherent energy challenges from reduced particle efficiency. Electro Traveler provides a universal solution with Abundance Amulets restoring 4 flat energy per pickup (up to 12 energy per 9-second cycle).
Venti’s A4 passive is another neat trick—15 flat energy to party members matching his Burst’s absorbed element. Situational, but powerful when it works.
For budget-friendly multi-element team optimization, budget-friendly Genshin recharge through BitTopup ensures adequate resources for extensive testing without overspending.
Weapons and Artifacts for ER
Premier ER Weapons
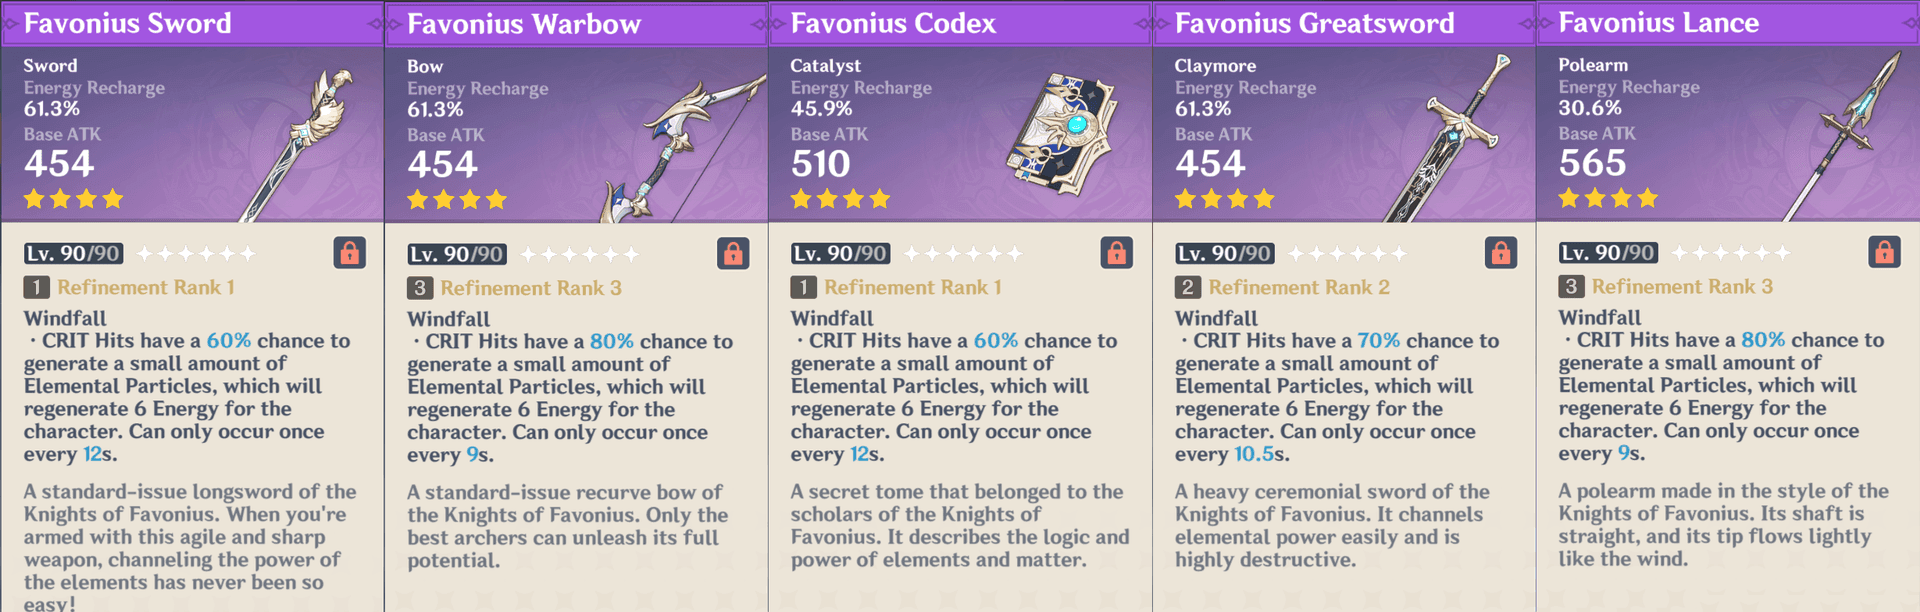
Favonius weapons are team-wide energy management gods. The ‘Windfall’ passive gives you a 60-100% chance on CRIT hits to generate particles restoring 6 energy (12-6 second cooldown). Plus 61.3% ER at level 90.
Engulfing Lightning takes a different approach—55.1% ER with a passive that increases ATK by 28-56% of ER over base 100%. You can get up to 80-120% bonus ATK. Raiden’s signature weapon for good reason.
The Catch deserves special mention. Free through fishing, it provides 45.9% ER with 16-32% Burst DMG increase and 6-12% Burst CRIT Rate. Honestly one of the best F2P weapons in the game.
Sacrificial weapons offer 40-80% chance to reset skill cooldown (30-16 second intervals). Effectively doubles your particle generation when it procs.
Artifact Optimization
4-piece Exile is underrated for support characters—regenerates 2 energy for all party members every 2 seconds for 6 seconds after using Burst. That’s 6 total energy per teammate.
Emblem of Severed Fate remains the gold standard. +20% ER from 2-piece, and the 4-piece increases Burst DMG by 25% of total ER (maximum 75% bonus at 300% ER).
ER Sands provides 51.8% ER at +20 for 5-star pieces. Sometimes you just need that raw ER boost.
F2P Options
Amenoma Kageuchi is brilliant for Electro characters. Gains Succession Seeds from Elemental Skills (up to 3 stacks), consuming them during Burst to regenerate 6-12 flat energy per seed.
Prototype Amber doubles as healer and battery—regenerates 4-6 energy every 2 seconds for 6 seconds after Burst (12-18 total) while providing team healing. Perfect for catalyst supports.
Advanced ER Calculation
Testing Procedures
Manual testing beats theorycrafting every time. Practice systematic rotations against consistent enemies, document energy levels before and after rotations. Adjust ER incrementally—10-15% increases—until you achieve consistent Burst uptime.
Account for RNG though. Particle generation and enemy behavior patterns can throw off your calculations.
Calculator Tools
The KQM Energy Recharge Calculator by Zakharov is absolutely essential. Input your team compositions, builds, and rotations for exact minimum ER requirements. Always build 10-15% buffer above calculated minimums for those unfavorable RNG scenarios that will inevitably happen.
Spiral Abyss Adjustments
Abyss is a different beast entirely. You’ll need 20-30% higher ER than overworld due to time pressure and specific enemy compositions. Chambers with fewer or spread-out enemies reduce particle generation opportunities significantly.
Meta Team Configurations
National Team Setup
The classic: Bennett 180-200%, Xiangling 160-180%, Xingqiu 180-220% ER distribution. Bennett’s particle generation supports Xiangling through proper funneling techniques. Xingqiu typically requires Sacrificial Sword for consistent Burst uptime.
Freeze Team Management
Ayaka/Ganyu freeze teams rely on Diona (Cryo battery) and Mona/Kokomi (Hydro application). Ayaka needs 120-140% ER with Diona support, while Mona requires 160-180% ER. Consistent enemy grouping provides reliable particle generation from HP thresholds.
Hypercarry Distribution
Focus energy resources on your main DPS while supports maintain utility Bursts. Raiden hypercarry teams benefit massively from her energy restoration, allowing supports to run lower ER builds. Prioritize supports whose Bursts enable your hypercarry’s damage windows.
Common Mistakes
Over-investment Issues
I see this constantly—players pumping ER way beyond functional requirements, tanking their damage output. Once you achieve consistent Burst uptime, additional ER provides diminishing returns unless your character has ER-scaling talents.
Monitor your damage comparisons when adjusting ER. Find that sweet spot.
Team Synergy Neglect
Building characters in isolation ignores team energy flow entirely. Classic example: Eula+Qiqi fails because Qiqi provides zero particles for Eula’s 80-cost Burst. Replace with Diona and suddenly your energy issues disappear while maintaining healing coverage.
Particle Mechanic Misunderstanding
Failing to switch to your target character wastes massive energy potential. Same-element particles provide 3x energy compared to different-element particles—that’s not a minor optimization, it’s fundamental.
Practice standardized rotations with consistent skill timing. Muscle memory matters here.
FAQ
What ER percentage do DPS characters need? Main DPS: 120-140% ER. Characters with 40-cost Bursts (Tighnari) function at 100-120%, while 80-cost Bursts (Eula) require 140-160% without battery support.
How much ER do supports need? Support characters require 180-250% ER, with 200% being the standard benchmark. Achieved through ER weapon and ER Sands. Extreme cases like Faruzan need 250-300% without C6.
Does ER affect damage? ER doesn’t directly increase damage but prevents rotation disruption. Some characters convert ER to damage though: Raiden gains Electro DMG from ER, Mona gains 20% of ER as Hydro DMG. Emblem set converts ER to Burst DMG (25% of ER, max 75%).
Best ER weapons? Favonius weapons excel with particle generation and 61.3% ER. The Catch provides 45.9% ER plus Burst bonuses. Engulfing Lightning offers 55.1% ER with ATK scaling. Sacrificial weapons reset cooldowns, effectively doubling particle generation.
How to calculate optimal ER? Use the KQM Calculator for precise calculations. Manual testing involves rotation practice, energy documentation, and incremental ER adjustments. Account for same-element bonuses (3 vs 1 energy) and battery relationships.
Best battery supports? Bennett: 2.25 particles per 4-second cooldown. Diona: effective Cryo battery for Eula. Electro Traveler: universal battery with 4 flat energy Amulets. Fischl: consistent Electro particle generation through Oz.


