

Understanding Hyperbloom Mechanics with Raiden Shogun
Elemental Reaction Basics
Here’s where things get interesting. Hyperbloom transforms those Dendro Cores into homing projectiles the moment Electro touches Dendro + Hydro cores. The damage formula’s pretty straightforward: Level Multiplier × 3 × (1 + EM Bonus + Reaction DMG Bonus) × Enemy Dendro RES Multiplier.
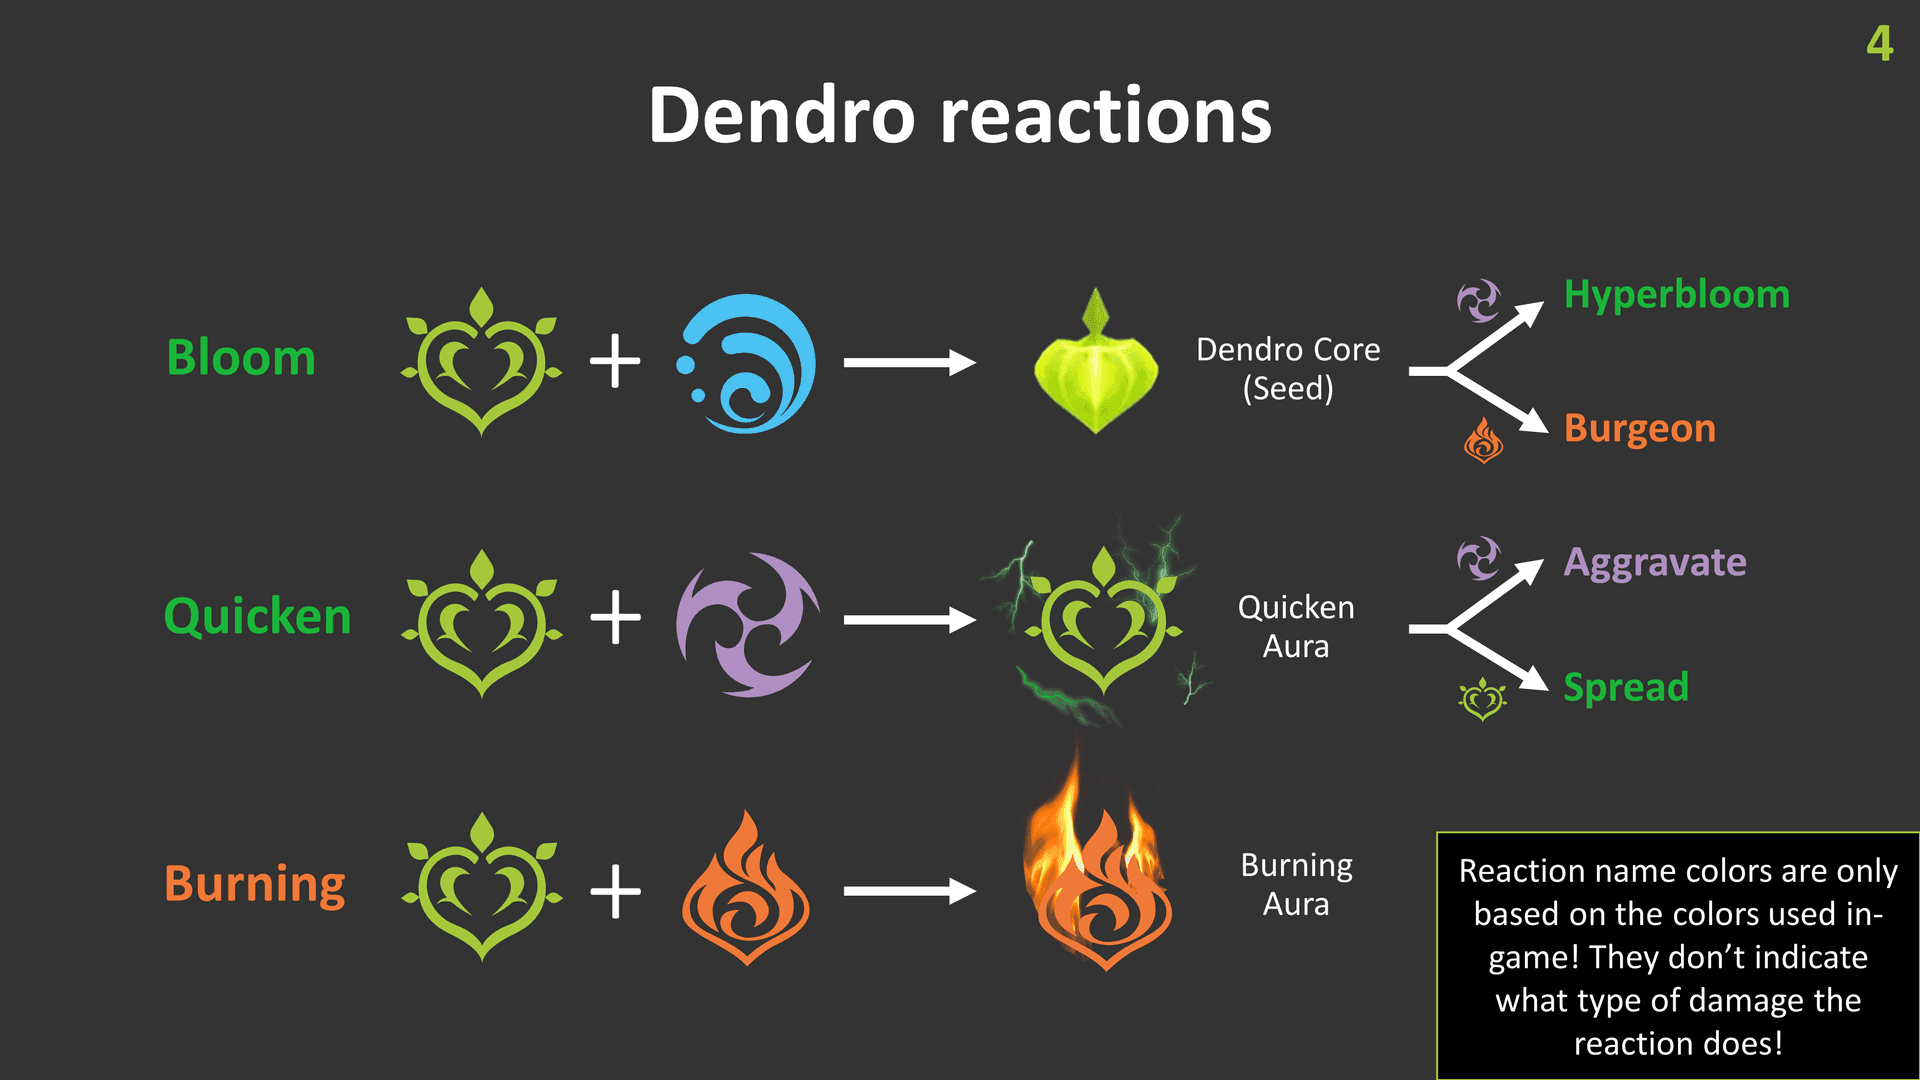
There’s a catch though—Shared Internal Cooldown limits you to 2 damage instances per 0.5 seconds per enemy. Plus, you can only have 5 Dendro Cores existing simultaneously. Create a sixth? The oldest one explodes automatically.
Raiden’s Role in Hyperbloom
This is where Raiden really shines differently than her traditional builds. Her Transcendence: Baleful Omen delivers coordinated attacks every 0.9 seconds with 100% uptime—we’re talking 25-second duration with only a 10-second cooldown. That off-field consistency? Chef’s kiss.
Unlike her traditional DPS builds where you’re living for that Burst, Hyperbloom Raiden completely ignores her Elemental Burst. I know, I know—it feels wrong at first. But ATK/CRIT scaling gives you basically nothing compared to EM-based triggers.
Damage Scaling Factors
Let me be crystal clear about this: Hyperbloom scales exclusively with your triggering character’s level and Elemental Mastery. The numbers don’t lie—Level 90 base multiplier hits 1446.85 versus Level 80’s measly 1077.44. That’s a 34% increase you can’t ignore.
The EM formula works like this: (16 × EM) / (EM + 2000). Target 900-1000+ EM after you’ve prioritized character level. Everything else? ATK, CRIT Rate, CRIT Damage, Talent levels—they provide zero benefit. Zero.
Top Raiden Hyperbloom Team Compositions 2025
Raiden + Nahida + Kokomi + Flex Core
This is your premium composition, and honestly? It’s hard to beat. Raiden, Nahida, Kokomi as your core trio. Nahida brings that wide-AoE Dendro application through her Skill marking, plus up to 250 EM buff via Burst—absolutely massive for your damage ceiling.
Kokomi drives on-field with Hydro application through her jellyfish and Normal Attacks during Burst, while keeping everyone healthy. Your fourth slot opens up some interesting options: Kazuha for EM sharing and crowd control, Zhongli if you want shield comfort, or Fischl for those sweet Electro particles.
The 20-second rotation aligns perfectly with Kokomi’s Burst cooldown. Clean, efficient, effective.
Budget F2P Alternatives
Don’t have the premium units? No problem. Your F2P team—Raiden, Dendro Traveler, Xingqiu, Yaoyao—achieves about 80-90% of premium performance. That’s honestly impressive for completely accessible characters.
Dendro Traveler handles Burst-based Dendro application, Xingqiu delivers that exceptional single-target Hydro we all know and love, and Yaoyao consolidates healing while giving you Dendro Resonance EM bonus. You could also consider Barbara as your Hydro healer, Collei for different Dendro patterns, or Kuki Shinobu if you want healing consolidation.
Advanced Optimization Teams
Want to push the envelope? Double Hydro setups—Raiden, Nahida, Xingqiu, Yelan—maximize single-target damage through overwhelming Hydro application and that Hydro Resonance HP increase.
Quickbloom variants get really spicy: Raiden, Nahida, Furina, Baizhu. You’re balancing Dendro/Hydro to maintain Quicken uptime, enabling both Hyperbloom and Aggravate reactions. Furina’s massive team DMG% buff makes this particularly attractive for experienced players.
For premium character acquisition, trusted Genshin top up site BitTopup offers reliable Genesis Crystal purchases with instant delivery and 24/7 customer support.
Energy Recharge Requirements Calculator
Base ER Calculations
Here’s something that trips up a lot of players: Hyperbloom Raiden needs minimal ER since you’re not using Burst for damage. Her natural 132% ER (including ascension) actually suffices for occasional utility usage.
Your supports? That’s where ER matters. Nahida wants 140-160% ER, Kokomi needs 160-180% ER, and Xingqiu requires 180-200% ER without Raiden’s energy generation helping him out. Pro tip—use the KQM Energy Recharge Calculator for precise team-specific requirements rather than guessing.
Team Energy Generation
Raiden’s Skill generates 0.5 Electro particles per coordinated attack throughout its duration. If you’re running Electro Resonance (Raiden + Fischl/Kuki), you’ll generate additional particles during Electro reactions.
Favonius weapons can dramatically reduce ER needs, but they require CRIT Rate investment—which feels weird on an EM build but sometimes works out mathematically. Dendro Resonance provides EM bonuses rather than energy, making energy management slightly more challenging than other reaction teams.
Weapon and Artifact Considerations
Dragon’s Bane remains optimal with 221 EM at level 90. The passive’s irrelevant, but that EM stat? Perfect.
Alternatives include Ballad of Fjords (240 EM at R5, Battle Pass weapon), Moonpiercer (110 EM plus team ATK buff, craftable), and Kitain Cross Spear (110 EM plus energy regen, also craftable).
Set priority goes: 4pc Flower of Paradise Lost (80 EM + 140% Hyperbloom damage) > 4pc Gilded Dreams (80 EM + up to 150 additional EM) > 2pc EM combinations (160 EM total). Paradise Lost’s the clear winner if you can farm it efficiently.
Optimal Rotation Sequences
Standard 20-Second Rotation
Using Raiden, Nahida, Kokomi, Kazuha—this rotation flows beautifully:
Nahida Burst → Skill (mark those enemies)
Kazuha Skill → Burst (EM sharing, crowd control)
Raiden Skill (establish your Electro trigger)
Kokomi Skill → Burst
Kokomi on-field Normal Attacks for 14 seconds
Refresh abilities as cooldowns expire
The timing works out almost perfectly with ability cooldowns.
Quickswap Variations
Double Hydro rotation gets more complex but offers higher damage ceiling. With Raiden, Baizhu, Xingqiu, Yelan:
Baizhu Normal → Skill → Burst → Normal
Xingqiu Burst → 2 Normal Attacks
Raiden Skill → Normal
Yelan Skill → Normal → Burst → Normal
Baizhu on-field Normal Attacks with dash cancels
Animation Cancel Techniques
Dash canceling after Normal Attacks reduces field time while maintaining triggers—essential for optimizing DPS windows. Swap canceling enables immediate switching after ability activation, potentially reducing your rotation by 1-2 seconds.
In Spiral Abyss, pre-casting abilities before enemy spawn extends buff duration. Small optimization, but every second counts in those tight clears.
Character Analysis and Synergies
Dendro Supports Comparison
Nahida remains premium despite Version 6.0’s Lauma introduction—and honestly, I don’t see that changing anytime soon. Her unmatched AoE Dendro through marking, 250 EM Burst buff, and reaction damage bonuses create a perfect storm for Hyperbloom teams.
Baizhu excels defensively with healing, shields, HP-based reaction buffs, and his A4 passive that increases Dendro reaction damage for healed characters. Different strengths, both viable.
For F2P players, Dendro Traveler offers solid Burst-based application, while Yaoyao provides healing consolidation. They work—just with reduced performance compared to the premium options.
Hydro Applicators Ranking
Kokomi leads through on-field driving capability, healing, and consistent application via jellyfish plus Burst Normal Attacks. She’s the complete package for this team archetype.
Xingqiu delivers exceptional single-target through his Burst, damage reduction, and minor healing. Yelan offers similar application patterns with higher personal damage and team DMG% buffs. Barbara serves the budget role adequately with healing and Skill-based application.
Flex Slot Options
Your flex slot really depends on what your account needs. Kazuha brings 150-200 EM sharing, crowd control, and Elemental DMG% buffs—probably the most universally useful option.
Zhongli offers shield comfort, 20% Universal RES Shred, and interruption resistance. Great for players who struggle with dodging or want comfy gameplay.
Fischl provides Electro particles, personal damage through Oz, and A4 passive synergy. Kuki Shinobu can actually replace Raiden as the trigger while providing healing—interesting for specific scenarios.
Artifact and Weapon Optimization
Raiden Artifact Priority
Main stats are non-negotiable: EM/EM/EM across Sands/Goblet/Circlet. Substats? EM priority, with minor ER for utility.
4pc Flower of Paradise Lost gives 80 EM plus 140% Hyperbloom damage (40% base + 100% from stacks). That’s your Best-in-Slot if you can farm it efficiently.
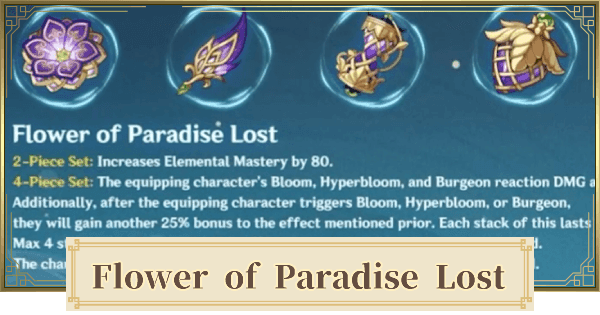
4pc Gilded Dreams provides 80 EM plus up to 150 additional EM. I often recommend this for domain efficiency—you can farm it alongside other useful sets.
2pc EM combinations provide 160 EM total as transitional sets while you farm better options.
Support Character Builds
Nahida wants 4pc Deepwood Memories for that 30% Dendro RES Shred, EM priority, and 140-160% ER. Pretty straightforward build path.
Kokomi can use 4pc Ocean-Hued Clam or Tenacity of Millelith, HP% focus, 160-180% ER. Both sets work well depending on whether you want more personal damage or team support.
Xingqiu and Yelan stick with traditional DPS builds using 4pc Emblem of Severed Fate. No need to reinvent the wheel here.
Weapon Tier List
Raiden Hyperbloom Weapons:
Dragon’s Bane (221 EM) - Clear winner
Ballad of Fjords R5 (240 EM, Battle Pass) - Slightly higher EM
Moonpiercer (110 EM + team ATK) - Decent craftable option
Kitain Cross Spear (110 EM + energy) - Another craftable
Favonius Lance (team energy, needs CRIT Rate) - Situational
Support weapons follow standard recommendations: Nahida with Sacrificial Fragments or A Thousand Floating Dreams, Kokomi with Prototype Amber or Thrilling Tales, Xingqiu with Sacrificial or Favonius Sword.
Advanced Optimization Techniques
Elemental Gauge Management
Understanding gauge theory helps optimize your rotations. Dendro Cores require 1U Dendro + 1U Hydro. Raiden’s Skill applies 1U Electro every 0.9 seconds, which prevents aura overconsumption—perfect for consistent triggering.
Quickbloom requires more careful Hydro timing to preserve Quicken aura. Furina excels here with her moderate application rates that don’t overwhelm the system.
Hyper-Fridge Advanced Technique
This incorporates Cryo for enhanced Core production through Frozen manipulation. Frozen enemies maintain both auras, allowing additional Bloom reactions from the same Hydro application.
Layla provides Cryo plus shields, Rosaria offers Cryo plus CRIT sharing. The technique requires managing three elements plus Electro—definitely advanced territory, but the damage ceiling’s impressive.
Damage Per Screenshot Optimization
Want those big numbers for social media? Stack EM buffs: Nahida Burst (250 EM), Kazuha A4 (150-200 EM), Dendro Resonance (50 EM), Instructor set (120 EM).
Sucrose can actually provide higher EM sharing than Kazuha in specific scenarios. Just remember—this sacrifices practical performance for maximum single-hit damage. Fun for screenshots, not optimal for actual gameplay.
Common Mistakes and Troubleshooting
Energy Recharge Miscalculations
I see this constantly: players over-investing ER on Hyperbloom Raiden. Her natural 132% suffices—anything more wastes optimization potential.
Conversely, under-investing support ER creates rotation failures. Use calculators for precise requirements rather than guessing. And remember: Raiden’s Skill generates particles throughout its duration, not just on activation.
Rotation Timing Errors
Using Raiden’s Burst in Hyperbloom teams wastes damage and disrupts auras through rapid Electro application. I get it—the animation’s cool, but resist the temptation.
Incorrect sequencing reduces reactions. Establish Dendro before Hydro, then add Electro. Poor driver selection limits performance—choose characters who maintain consistent application like Kokomi’s Hydro-infused Normal Attacks.
Team Synergy Issues
Mixing incompatible reactions (Hyperbloom + Vaporize/Melt) interferes with auras. Pick one reaction type and optimize around it.
Don’t overlook defense—ensure you have healing or shielding options. And consider enemy types: Hyperbloom excels versus single high-HP targets but struggles against spread enemy formations.
For optimizing builds efficiently, Genshin Impact secure checkout top up through BitTopup ensures fast Genesis Crystal delivery with competitive pricing and secure transactions.
FAQ
What’s the best Raiden Hyperbloom team in 2025? Raiden, Nahida, Kokomi, Kazuha provides optimal performance through consistent triggers, reliable application, on-field driving, and EM sharing. For maximum single-target damage, consider Double Hydro with Xingqiu/Yelan instead.
How much Energy Recharge does Raiden need for Hyperbloom? Minimal ER required—her natural 132% suffices since you’re not using Burst. Focus entirely on reaching 900-1000+ EM. Your supports need more: Nahida 140-160%, Kokomi 160-180%, Xingqiu 180-200%.
What’s the optimal Raiden Hyperbloom rotation? 20-second cycle works best: Nahida Burst → Skill → Kazuha Skill → Burst → Raiden Skill → Kokomi Skill → Burst → Kokomi on-field for 14 seconds. Maintaining Raiden’s Skill uptime should be your highest priority.
Is Raiden Hyperbloom better than Rational team? The community strongly favors Hyperbloom over Rational in 2025. It offers comparable damage with less risk, better F2P accessibility, and simpler execution requiring only level and EM investment. Much more forgiving to play.
Which Dendro character works best with Raiden Hyperbloom? Nahida remains premium despite Version 6.0’s Lauma introduction. She provides unmatched AoE application through marking and that crucial 250 EM Burst buff. Baizhu’s an excellent alternative with healing and shields. For F2P: Dendro Traveler or Yaoyao work effectively but with reduced performance.
What artifacts should Raiden use in Hyperbloom teams? EM/EM/EM main stats exclusively—no exceptions. 4pc Flower of Paradise Lost is Best-in-Slot (80 EM + 140% Hyperbloom damage) or 4pc Gilded Dreams (80 EM + up to 150 additional EM, more farmable). Prioritize EM substats only—ATK and CRIT provide zero benefit for this build.


