

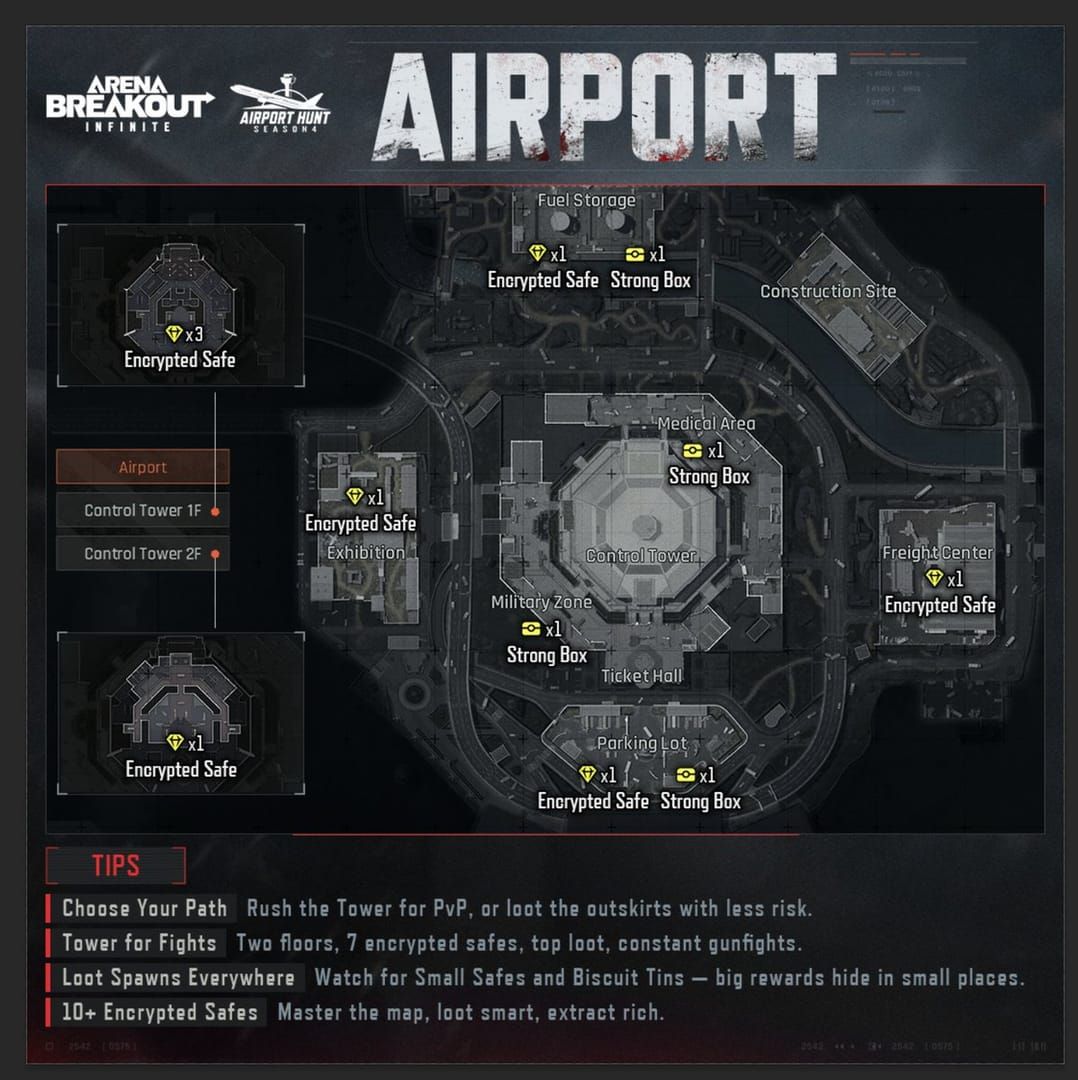
Understanding Season 4 Extraction Mechanics
Arena Breakout Airport extraction routes determine whether you escape with loot or lose everything. Season 4 changed extraction dynamics with 35-minute timers and 12 concurrent players, creating higher competition for six primary extractions: Drainage Pipe, Northern Outpost, Access Bridge, Southern Blockade, Hunter's Path, and Valley Helipad.
For consistent gear upgrades, Arena Breakout bonds top up through BitTopup provides competitive pricing and instant delivery.
Conditional Extraction Mechanics
Drainage Pipe operates 0-10 minutes post-raid, prohibits backpacks. Northern Outpost requires one enemy kill within 10-20 minutes, max two players. Access Bridge activates at 25 minutes for late-game extraction. Southern Blockade demands 2,000 Koens payment. Hunter's Path requires backpack discard. Valley Helipad needs two dogtags from eliminated operators.
The 15-minute cluster—Destination Extract, Recycling Station Truck, Road Meet-Up Point, Road to the Port, Western Path—features 20-second extraction timers versus standard 30-45 seconds. Fixed extracts Outpost and Boulder Wall activate 10-15 minutes, remaining available through raid completion.
Season 4 Key Changes
Server tick rate increased to 72, improving hit registration. AI patrol cycles now run 3-5 minute intervals, extraction point reinforcement follows 4-6 minute patterns. Normal mode conditional extracts activate after 10 minutes, eliminating immediate availability that encouraged sprint-to-exit strategies.
Risk-Reward Framework
Optimal route selection balances loot value, travel distance, and PvP probability. Crouch-walking reduces footstep noise 60%, essential when approaching contested extractions during 10-15 minute activation windows. Weapon crate looting requires 8-15 seconds each.
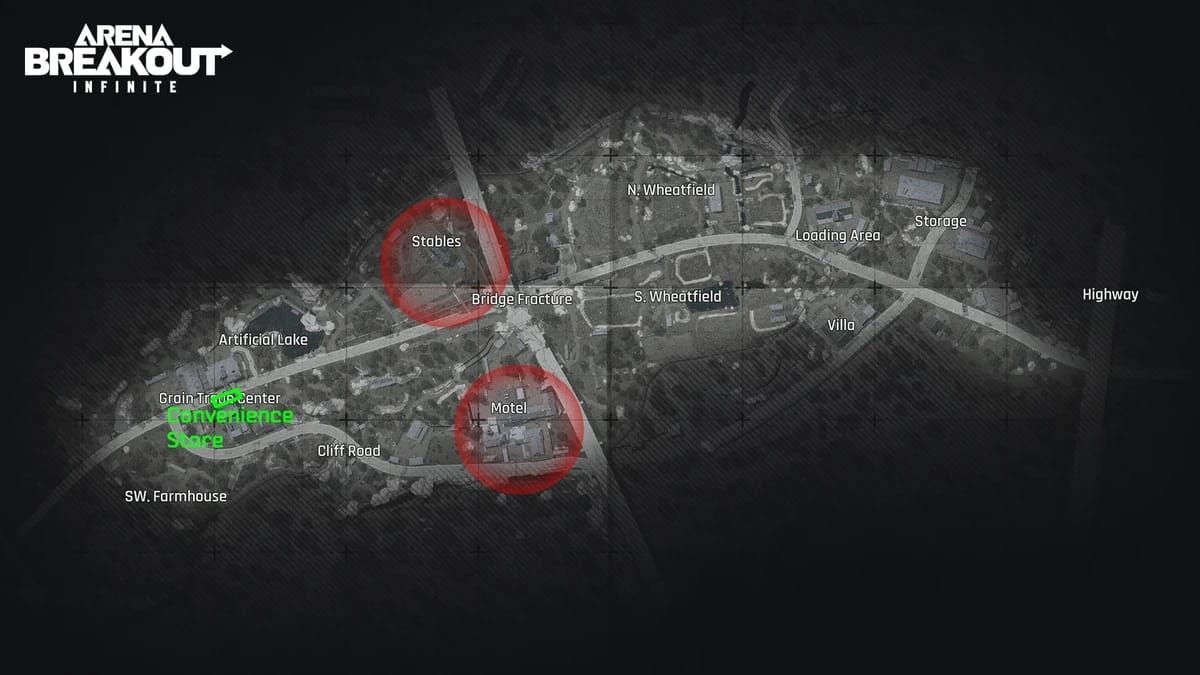
The Grain Trade Center-Stables-Motel route covers 200 meters in 10-15 minutes, positioning as premier high-value extraction path.
Complete Extraction Point Overview
Primary Extractions
Drainage Pipe: 0-10 minutes, northwestern sector, no backpacks. Reach in 3-5 minutes from southern spawns. Ideal for quick-loot-extract with high-value small items.
Northern Outpost: 10-20 minutes, requires one kill, two-player max. Located 200 meters from Motel. Optimal endpoint for Grain Trade Center-Stables-Motel route yielding 200-400k Koens in 12-15 minutes.
Access Bridge: 25+ minutes, primary late-game extraction. Lower player competition, intensified AI patrols. Suits extended Northridge Hotel runs (8 safes) or Campus Services (2 safes).
Southern Blockade: 2,000 Koens payment, guaranteed extraction. Emergency exit when primary routes compromised. Worth using when carrying 200k+ Koens.
Hunter's Path: Backpack discard required. Suits players with rig-loaded compact valuables exceeding 150k Koens.
Valley Helipad: Two dogtags required. High-risk PvP extraction near Valley Beach Villa (2 safes, 10 weapon crates) and Valley Port (1 safe, 7 weapon boxes).
15-Minute Cluster Zone
Five extractions activate simultaneously at 15 minutes with 20-second timers. Average 2-4 minutes travel from most spawns. Ideal for mid-game exits after Campus Services (2 safes) or Sewage Plant (3 safes) runs.
Predictability creates risks—experienced players anticipate 15-minute traffic, positioning to intercept loaded operators. Use crouch-walk during final 100 meters.
Fixed Extractions
Outpost and Boulder Wall activate 10-15 minutes, remaining available through raid end. Outpost's 200-meter positioning from Motel makes it cornerstone of optimal strategies.
Grain Trade Center-Stables-Motel-Outpost route: Southern spawns crouch-walk northwest 150 meters to Grain Trade Center (90-120 seconds), loot 2 ammo boxes (20-30 seconds), proceed to Stables upstairs safe with 2011 key (50-80k Koens), hit Motel's 3 safes with 2011 keys (150-250k Koens in 3-4 minutes), extract at Outpost during 10-15 minute window.
Route #1: Grain Trade Center-Stables-Motel to Outpost (Optimal)
Most efficient high-value path delivering 200-400k Koens in 12-15 minutes with 30%+ solo survival using budget loadouts.
Execution Steps
- Southern spawn: crouch-walk northwest 150 meters to Grain Trade Center (90-120 seconds)
- Loot 2 ammo boxes (20-30 seconds) for 9x19mm AP6.3 T3 (679.68 damage, 424.8 penetration) or 5.45x39mm Level 5 BP
- Stables upstairs safe with 2011 key: 50-80k Koens
- Motel 3 safes with 2011 keys: 150-250k Koens (3-4 minutes). Prioritize currency, medical items, compact attachments
- Outpost extraction 200 meters from Motel (2-3 minutes travel)
Timing and Approach
Complete sequence in 12-15 minutes, perfect for Outpost's 10-15 minute window. Crouch-walk final 100 meters, scan for campers. AI patrol cycles run 3-5 minutes; time approach between patrols.
Loadout Optimization
Budget setup achieves 30%+ survival:
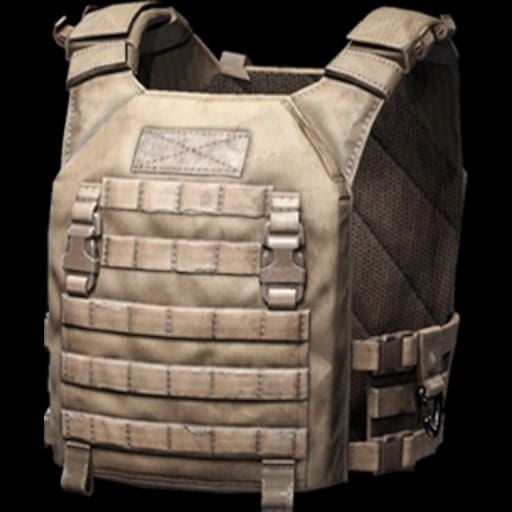
- SEK Composite Body Armor: 70 durability, 5% movement penalty
- Sentry 308 Armored Rig: 60 durability, 20 storage slots, 6% movement penalty
- MPX (850 RPM, 9x19mm AP6.3 T3) or AK-74N (630 RPM, 5.45x39mm Level 5 BP, 60-round mags)
Pre-raid checklist:
- 60+ total armor durability (SEK + Sentry = 130)
- 120+ rounds (two 60-round AK-74N mags or four 30-round MPX mags)
- 4+ medical items
- 1+ smoke throwable
For optimal gear maintenance, buy Arena Breakout bonds online through BitTopup for fast delivery and secure transactions.
Risk Mitigation
Motel's 3 safes attract experienced players. If encountering opposition, abort after first floor safe, proceed to Outpost with accumulated loot. 50-80k Koens from Stables plus ammo still represents profit.
Backup options: 15-minute cluster if completing before 10 minutes, Southern Blockade using 2,000 Koens from Stables, Boulder Wall if Outpost shows camping activity.
Route #2: Sewage Plant to Hunter's Path (Low-Risk)
Hunter's Path provides low-risk exit prioritizing survival over max loot. Focus on Sewage Plant's 3 safes, fill rig with compact valuables, discard backpack at extraction.
Sewage Plant Efficiency
Southwestern sector isolation reduces player traffic versus Motel/Northridge. 3 safes generate 100-180k Koens. Access from western spawns via southern perimeter (adds 1-2 minutes but reduces PvP encounters 40-50%).
Prioritize rig storage over backpack—Hunter's Path discards backpacks. Focus on currency, medical supplies, ammo, compact attachments fitting Sentry 308's 20 slots.
Hunter's Path Mechanics
Requires backpack discard before extraction timer initiates. Rig containing 150k Koens represents secure profit via Hunter's Path versus risking 3-5 minutes to Outpost for 50k backpack items.
Positioning near map edges provides natural cover. Unlike central extractions requiring 360-degree awareness, Hunter's Path allows map boundary at back, reducing threats to 180-degree frontal arc.
Solo Advantages
Solo players achieve 40-50% survival with budget loadouts versus 25-35% on contested central routes. Ten Sewage Plant runs averaging 120k profit at 45% survival generate more cumulative Koens than ten Motel runs averaging 250k at 28% survival.
SEK Composite Body Armor (70 durability) provides sufficient protection. MPX with 9x19mm AP6.3 T3 handles AI encounters while maintaining budget efficiency.
Route #3: Valley Beach Villa-Valley Port to Valley Helipad (High-Risk PvP)
Valley Helipad rewards aggressive PvP for dogtag collection. Combines Valley Beach Villa (2 safes, 10 weapon crates) and Valley Port (1 safe, 7 weapon boxes).
Villa Loot Maximization
Highest loot density: 2 safes, 10 weapon crates in compact footprint. Systematic looting requires 5-7 minutes (weapon crates 8-15 seconds each). Total yield: 180-320k Koens.
Villa's 10 weapon crates vary significantly—some 5k Koens basic attachments, others 40k+ complete weapons. Take only items exceeding 8k Koens for value-per-slot efficiency.
Southeastern positioning means 4-6 minutes from northern spawns, 2-3 minutes from southern spawns.
Valley Port Integration
150-200 meters from Villa. 1 safe, 7 weapon boxes. Combined Villa-Port looting: 250-450k Koens in 8-12 minutes. Attracts experienced players and squads.
Route using coastal terrain for cover. Avoid open beach areas with long sightlines favoring snipers.
Dogtag Collection
Valley Helipad requires 2 dogtags from eliminated operators. Strategies:
- Aggressive Villa/Port defense: position in loot locations, eliminate approaching players
- Patrol interception: move between Villa and Port, engage transitioning players
- Extraction camping counter: eliminate players camping Valley Helipad
Squad Coordination
Three-player squads assign roles: one Villa looting, second Port, third overwatch/PvP. Reduces route time to 6-8 minutes.
Squad dogtag pooling: six dogtags among three players means each needs zero personal kills if teammates secure eliminations. Enables specialized loadouts—one budget for looting, two premium for combat.
Route #4: Campus Services-Northridge Hotel to Access Bridge (Late-Game Max Loot)
Access Bridge's 25-minute activation enables extended accumulation. Combines Campus Services (2 safes) and Northridge Hotel (8 safes) for max profit.
Campus Services Start
2 safes in 60-90 seconds, generating 40-70k Koens. Central positioning means 2-3 minutes from most spawns. Use as anchor—successful looting confirms sector security, heavy opposition indicates route adjustment.
Northridge Hotel: Eight Safes
8 safes represent highest single-location concentration: 280-520k Koens in 8-12 minutes. Multi-floor layout: ground floor 2 safes, second floor 3 safes, third floor 2 safes, rooftop 1 safe.
Attracts experienced players. Safe looting produces sounds audible throughout building. Players hearing audio often position at stairwells/exits for ambushes. Counter by varying patterns, maintaining exit awareness.
Access Bridge Late-Game
Activates 25 minutes. By then, player population decreases 40-60% through extractions/eliminations. However, late-game AI patrol intensity increases with better equipment.
Travel from Northridge to Access Bridge: 3-4 minutes via northeastern route avoiding central areas. Crouch-walk final 150 meters.
Risk-Reward Analysis
Potential 350-600k Koens profit exceeds all routes, but 20-25 minute execution creates extensive exposure. Experienced players with premium loadouts achieve 35-45% survival; intermediate with budget gear see 20-30%.
Premium loadouts (Level 4-5 armor, 5.45x39mm BP, 60-round mags) justify cost through improved survival on high-value runs.
Route #5: Grain Trade Center to Drainage Pipe (Speed)
Drainage Pipe's 0-10 minute window enables ultra-fast extraction prioritizing survival. Focus on Grain Trade Center's ammo boxes before immediate extraction.
Speed Execution
Southern spawns reach Grain Trade Center in 90-120 seconds, loot 2 ammo boxes in 20-30 seconds, proceed to Drainage Pipe in 3-5 minutes. Total: 5-7 minutes.
High-tier rounds (9x19mm AP6.3 T3, 5.45x39mm Level 5 BP) sell 800-1,200 Koens per 30-round stack. Two ammo boxes yielding 120-180 rounds generate 3,200-7,200 Koens—modest but guaranteed.
Gear Preservation
Excels for unfavorable conditions. If spawning in contested positions with immediate contact, quick Grain Trade-Drainage Pipe preserves loadout versus risking total loss.
New players should practice this route repeatedly. 5-7 minute execution builds map knowledge without extended risk. Success rate exceeds 60% even for inexperienced players.
Limitations
3,200-7,200 Koens barely covers budget loadout costs (8,000-12,000 Koens). Functions as insurance rather than profit generation.
Applications: gear fear mitigation, injury recovery, time constraints, learning exercises.
Advanced Optimization Strategies
Reading Player Patterns
Southern spawns route toward Grain Trade Center, Stables, Motel. Northern spawns favor Campus Services, Northridge, Valley locations.
Gunfire indicates positions—sustained automatic suggests squad engagements, single shots indicate AI elimination or snipers. Distant gunfire (200+ meters) offers safe intel; close (50-100 meters) demands tactical response.
Extraction traffic patterns: 10-15 minutes peak Outpost/Boulder Wall activity, 15 minutes cluster surge, 25 minutes Access Bridge attracts late-game players.
Backup Planning
Every primary route needs backups:
- Primary: Grain Trade-Stables-Motel to Outpost (10-15 min)
- Secondary: Abort Motel, 15-minute cluster
- Tertiary: Southern Blockade with 2,000 Koens
- Emergency: Hunter's Path with backpack discard
If looting Stables and hearing combat at Motel, skip Motel, proceed to Outpost with Stables profit. 50-80k Koens from single safe beats potential total loss.
Loot Value Per Minute
Grain Trade-Stables-Motel: 200-400k in 12-15 min = 16,000-33,000 Koens/min. Campus-Northridge: 350-600k in 20-25 min = 14,000-30,000 Koens/min.
Two successful 15-min Motel runs (400k total, 30 min) exceed one 25-min Northridge run (500k) when factoring failed attempt costs.
Spending 45 seconds looting weapon crate with 6k Koens generates 480 Koens/min—inefficient versus safe looting averaging 2,500-4,000 Koens/min.
Common Mistakes
Overcommitting to compromised extractions loses entire profit plus gear. 2,000 Koens Southern Blockade cost or 3-minute backup detour beats total loss.
Consolidate valuables into rig before final approach. Even if backpack drops during combat, core profit in Sentry 308's 20 slots (120-180k Koens) remains protected.
Premature extraction represents opportunity cost. Extracting at 8 minutes via Drainage Pipe with 15k Koens misses potential 200k+ from available routes.
Audio discipline failures alert opponents. Sprinting, unnecessary gunfire, careless safe looting generates signatures experienced players exploit. 60% footstep reduction from crouch-walking dramatically improves stealth survival.
Gear Investment and Preparation
Essential Equipment
Pre-raid checklist minimums:
Armor: 60+ total durability. SEK Composite (70 durability, 5% movement penalty) + Sentry 308 (60 durability, 20 slots, 6% movement penalty) = 130 durability, 11% total penalty.
Ammo: 120+ rounds. AK-74N's 60-round mags enable two-mag loadout. MPX requires four 30-round mags. Use 5.45x39mm Level 5 BP or 9x19mm AP6.3 T3 (both 424.8 penetration).
Medical: 4+ items covering bleeding, health, pain. Minimum: 2 bandages, 1 medkit, 1 painkiller. Extended routes benefit from 6-8 items.
Tactical: 1+ smoke for emergency extraction cover. Experienced players carry 2-3.
Budget vs Premium Performance
Budget (8,000-12,000 Koens):
- SEK + Sentry 308
- MPX with 9x19mm AP6.3 T3
- 120 rounds, 4 medical, 1 smoke
- 30-35% survival on Motel route
- 60-140k average profit per success
Premium (25,000-35,000 Koens):
- Level 4-5 armor (90-110 durability)
- Advanced rig (80+ durability, 24+ slots)
- AK-74N with 5.45x39mm Level 5 BP
- 180+ rounds, 8 medical, 3 smokes
- 45-55% survival on Northridge route
- 150-330k average profit per success
Performance gap justifies premium for experienced players. Intermediate players often achieve better cumulative profits using budget with higher raid frequency.
Resource Management
BitTopup provides gear maintenance solution through competitive bonds pricing and instant delivery. Rather than grinding low-profit raids with inadequate gear, efficiently top up bonds, purchase equipment, return to optimal-profit routes immediately.
Strategic bond usage focuses on force multipliers—premium ammo, advanced medical, tactical equipment improving survival 5-8%, generating 10,000-30,000 additional Koens in preserved loot.
ROI Analysis
Budget (10,000 Koens) on Motel (250k avg, 32% survival):
- Expected value: 250,000 × 0.32 = 80,000
- Gear cost amortized: 10,000 × 0.68 = 6,800
- Net profit: 73,200 per raid
Premium (30,000 Koens) on Northridge (475k avg, 50% survival):
- Expected value: 475,000 × 0.50 = 237,500
- Gear cost amortized: 30,000 × 0.50 = 15,000
- Net profit: 222,500 per raid
Premium shows superior per-raid profit, but budget enables higher frequency due to lower replacement costs. Optimal strategy balances gear quality with skill level and available capital.
FAQ
What are the safest extraction routes at Guoyapos Airport in Season 4?
Sewage Plant to Hunter's Path offers lowest risk with 40-50% solo survival using budget loadouts. Avoids central areas, uses perimeter movement, features backpack-discard extraction reducing PvP encounters. Drainage Pipe (0-10 min) provides alternative safe extraction for speed runs.
How many extraction points does Guoyapos Airport have?
Six primary (Drainage Pipe, Northern Outpost, Access Bridge, Southern Blockade, Hunter's Path, Valley Helipad), five 15-minute cluster (Destination Extract, Recycling Station Truck, Road Meet-Up Point, Road to the Port, Western Path), two fixed (Outpost, Boulder Wall) = 13 total with varying activation requirements.
Which Airport extraction route is fastest for loot runs?
Grain Trade Center-Stables-Motel to Outpost completes in 12-15 minutes, yielding 200-400k Koens with 16,000-33,000 Koens/min efficiency. Southern spawns reach Grain Trade in 90-120 seconds, loot Stables (50-80k) and Motel (150-250k) with 2011 keys, extract at Outpost 200 meters away during 10-15 min window.
When is the best time to extract from Guoyapos Airport?
Depends on route: Drainage Pipe 0-10 min, Outpost/Boulder Wall 10-15 min (ideal for Motel), 15-min cluster for mid-game, Access Bridge 25 min for extended Northridge runs. Avoid peak traffic (10-12 min for Outpost, exactly 15 min for cluster) by timing approaches 2-3 min after activation.
How does inventory weight affect extraction routes?
Heavy inventory reduces movement speed 15-25% when carrying full backpack plus loaded rig. SEK's 5% penalty + Sentry 308's 6% + loot weight compound. Routes requiring extended travel (Valley Villa to Access Bridge: 5-7 min) become vulnerable when overloaded, favoring closer extractions like Outpost (2-3 min from Motel).
What should I do if my primary extraction is camped?
Immediately abort and execute backup: switch to 15-min cluster if available, use Southern Blockade with 2,000 Koens, or route to Hunter's Path with backpack discard if rig contains majority value. Never force compromised extractions—2,000 Koens cost or 3-5 min detour beats total loot and gear loss.


