The Meta Just Got Flipped on Its Head
So here's the thing about Version 6.1 – it dropped on October 22, 2025, and honestly? It's changed everything we thought we knew about Spiral Abyss. Gone are the days when you could just slap together a hypercarry team and call it good. Luna II mechanics are all about balanced damage distribution now, which means your entire team needs to pull their weight.
The November 2025 rotation is particularly brutal (in the best way). We're looking at 200% Bloom and Electro-Charged bonuses on Floor 12, but here's the kicker – the Lunar reaction system scales based on how evenly your damage is spread. Your top DPS gets 100% scaling, second highest gets 50%, and everyone else? A measly 1/12.

And don't even get me started on the HP inflation. Enemy health has jumped 375% across all 6.x content. Floor 12 bosses are sitting pretty at over 4 million HP each. Yeah, you read that right.
For optimal team builds, Genshin Impact Genesis Crystals recharge online through BitTopup provides instant access to wish resources with competitive pricing and secure transactions.
The Abyssal Moon Spire Blessing Actually Matters Now
This blessing isn't just window dressing anymore. Every 3 seconds, Dendro reactions trigger True Damage shockwaves with zero cooldown – and trust me, you'll feel the difference.
First half gives you that sweet 200% Bloom damage boost plus 75% Lunar-Bloom damage. Second half? Normal Attack Pyro damage gets a 75% bump. Floor 11 throws in a 60% Electro/Dendro bonus for Quicken and Aggravate teams, which is honestly a godsend for those builds.
Natlan Characters Are Breaking the Game (Again)
Look, I've been covering Genshin meta shifts for years, and Natlan's influence here is something else entirely. The Moonsign mechanics alone provide 20-30% damage boosts when you run 2+ Nod-Krai members. But Nefer? She's completely revolutionized Lunar-Bloom with shadow attacks that consume Dendro cores without detonation – it's wild.
Mavuika's still holding her SS-tier crown with enhanced Vaporize/Melt scaling, which honestly doesn't surprise me at this point. Current hierarchy looks like this:
SS-Tier: Mavuika (Vaporize/Melt), Nefer (Lunar-Bloom), Flins (Lunar-Charged) S-Tier: Neuvillette, Arlecchino
Luna II: The Cryo Queen We Never Saw Coming
Nefer's emergence as the premier Lunar-Bloom specialist caught everyone off guard – myself included. Her shadow attacks consume Dendro cores for absolutely massive multipliers, and her kit synergy is just chef's kiss.

Her Elemental Skill creates Dendro zones and cores through Hydro application. Charged Attacks consume Seeds for scaling damage. The Burst provides team-wide EM buffs and extends Lunar-Bloom duration. Simple on paper, devastating in practice.
Why She's Dominating 6.1 Abyss
Against the Battle-Scarred Rock Crab (sitting at a hefty 4,409,072 HP), converting 6 Hermit Seeds via Bloom deals 500% damage with a 1.5M cap plus 40% RES reduction. The math is honestly absurd.
Build-wise, you want Reliquary of Truth + Night of Sky's Unveiling 4pc, EM/EM/CRIT with 1000+ EM, Nightweaver's Looking Glass or Iron Sting. Nothing too fancy, but the execution? That's where things get spicy.
The Mechanics That Make It Work
Here's what makes Lunar-Bloom different from your standard Bloom reactions – and why it's so much better. CRIT scaling capability, 1.2s detonation versus the usual 2s, 3.5m radius instead of 2m, and it completely bypasses enemy DEF calculations.
Your team needs Lauma for 100% Dendro uptime and 25% RES shred, Aino for consistent Hydro application, and Nahida with her 25s Skill duration plus that juicy +250 EM Burst buff. It's a tight rotation, but when it clicks? Pure magic.
Floor 12: Where Dreams Go to Die (But Don't Have To)
Chamber 1: The Grouping Nightmare
First half throws a Tainted Water-Splitting Phantasm (851,787 HP) and Primordial Bathysmal Vishap (2,085,774 HP) at you. That Vishap's 16U Hydro Armor is particularly nasty – it drains 10 Energy every 0.5 seconds. You need 16U Dendro applications through Bloom/Hyperbloom to strip that armor within 30 seconds, or you're toast.
Second half features Coppelius at 2.55M HP with 70% Ice/Wind RES. Use Ousia attacks – Furina's Normal Attacks or Lynette's Skill work perfectly – to disable those shields. Pneuma or Pyro breaks Ice Shields if you're running different comps.
Chamber 2: Boss Mechanics That Actually Matter
The Battle-Hardened Fireblade Shock Trooper (4,765,990 HP) is where things get interesting. Three shield layers at 285,959 HP each, with +200% resistance to everything except Electro-Charged. Break all three shields within 30 seconds using 600% Electro-Charged damage for a -50% resistance debuff. Miss that window? You're in for a long fight.
Radiant Antelope (1,873,932 HP) has this quirky mechanic where healing it to full gives you +15% CRIT Rate and +50% DMG for 15 seconds. Worth keeping in mind if you're running healers.
Chamber 3: The Real DPS Check
Frostnight Herra enters Gloomveiled state with +120% all RES, only exiting after 50 DMG instances. Here's the trick – Lunar Reactions count as 6 instances each. The boss absorbs your most-damaging element on exit for immunity, so plan accordingly.
Gluttonous Yumkasaur Mountain King sits at 5.21M HP and creates Flamegranates. Ignite 3 with Pyro for -5% Max HP each – that's roughly 300k damage for free. Don't sleep on these mechanics.
The Luna II Perma-Freeze Revolution
Core Team: Nefer/Lauma/Aino/Baizhu

This is your bread and butter Lunar-Bloom team. Nefer handles main DPS duties, Lauma provides Dendro application with 25% RES shred via Deepwood 4pc, Aino enables with Hydro, and Baizhu brings healing plus Dendro resonance.
Premium alternative? Nefer/Lauma/Furina/Ineffa for pure damage optimization – though honestly, the investment requirements are steep.
For consistent progression, fast Genshin Impact top up service from BitTopup ensures immediate Primogem access with 24/7 support and secure payments.
The Rotation That Actually Works
Standard 20-second cycle: Lauma Skill → Aino Burst (15s Hydro) → Nefer Skill + 2 Charged Attacks → Core consumption with shadow attacks → Nefer Burst for EM buff.
Energy management is crucial here. Lauma needs 160-180% ER, Aino requires 140-160% ER with Hydro resonance. Miss these benchmarks and your rotation falls apart.
Artifacts & Weapons (The Real Investment)
Nefer: Reliquary of Truth 4pc (EM/EM/CRIT), 1000+ EM, 60-70% CRIT Rate, 150-180% CRIT DMG. Weapon-wise, Nightweaver's Looking Glass or Iron Sting R5. Talents at 8/8/8 minimum – don't cheap out here.
Supports: Lauma (Deepwood 4pc, 180%+ ER), Aino (Tenacity 4pc), Baizhu (Deepwood 2pc + Tenacity 2pc, 200%+ ER). The ER requirements are non-negotiable.
Mavuika's Vaporize Engine Still Slaps
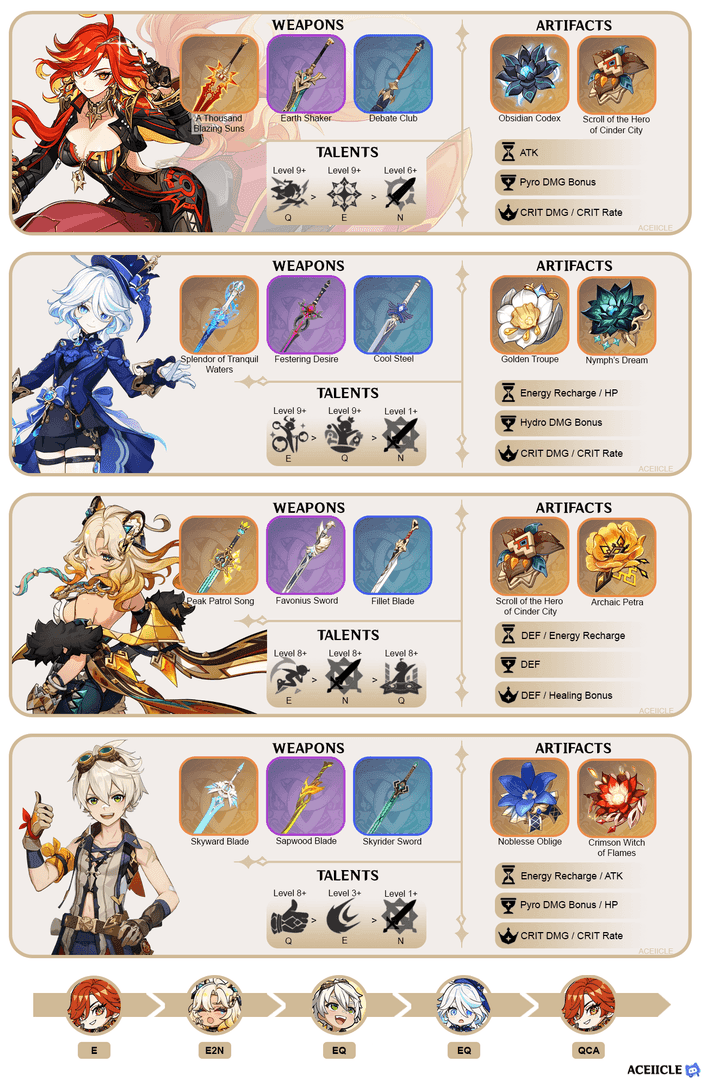
Core Team: Mavuika/Bennett/Furina/Xilonen

Sometimes the classics just work, you know? Mavuika with Obsidian Codex 4pc, Bennett with Noblesse 4pc for ATK buffs, Furina running Golden Troupe 4pc for off-field Hydro, and Xilonen providing universal RES shred.
Alternative comp: Arlecchino/Yelan/Bennett/Zhongli for single-target optimization – particularly nasty against those chunky Floor 12 bosses.
The 18-Second Vape Cycle
Bennett Burst + Skill → Xilonen Skill → Furina Burst + Skill → Mavuika Skill + Normal Attack combo → Mavuika Burst during Bennett field.
Key point: ensure Hydro aura before Mavuika's Pyro application. Furina's 15-second Hydro duration allows multiple Vaporize procs, which is where the real damage comes from.
Energy Management (The Eternal Struggle)
Mavuika needs 140-160% ER with Bennett battery. Xilonen requires 180%+ ER for consistent Burst uptime. Pro tip: use Bennett's Skill after Burst for particle generation, then swap to Mavuika during particle travel for optimal absorption.
Dendro Teams: Reports of Their Death Were Greatly Exaggerated
Hyperbloom Adaptation for 6.1
Premium Hyperbloom: Nahida/Raiden Shogun/Yelan/Kazuha
Nahida brings that 25s Skill duration and +250 EM Burst, Raiden triggers with 800+ EM using Flower of Paradise Lost 4pc, Yelan provides damage buffs, Kazuha handles VV shred and EM sharing.
Rotation: Nahida Burst/Skill → Yelan Burst → Raiden Skill → Kazuha Burst/Skill. Clean, efficient, effective.
Budget Dendro That Actually Works
Budget Hyperbloom: Dendro Traveler/Xingqiu/Kuki Shinobu/Fischl
Requirements are steep but achievable: Level 90/90 across the board, 800+ EM on Kuki, 180%+ ER team-wide, R5 4-star weapons. Clear times sit around 8:30-10:00 minutes for Floor 12, which is honestly respectable for a budget comp.
Nilou Bloom Alternative: Nilou/Lauma/Nahida/Kokomi with 40,000+ HP and 200+ EM on Nilou. Still viable, though the investment curve is brutal.
F2P Teams That Don't Suck
National Variations (Because They Never Die)
Classic National: Xiangling/Xingqiu/Bennett/Sucrose

Investment priorities: Xiangling 8/8/8 talents, 180%+ ER, Emblem 4pc. Rotation: Bennett Burst → Sucrose Skill/Burst → Xingqiu Burst → Xiangling Burst + Skill.
Electro-Charged National: Ororon/Xingqiu/Fischl/Sucrose for those 200% Electro-Charged bonuses. Surprisingly effective given the current Ley Line buffs.
Low-Investment Luna II (Yes, It Exists)
F2P Nefer: Nefer/Sucrose/Yaoyao/Aino
Sucrose provides EM sharing (800+) and VV shred. Yaoyao offers budget Dendro application and healing. Not optimal, but it gets the job done.
Hyperbloom Budget: Collei/Yaoyao/Barbara/Aino with 400+ EM and 180% ER priorities. Level 90/90 for triggers is non-negotiable – trust me on this one.
Where Everyone's Going Wrong
The Luna II Learning Curve
Energy Issues: Early Burst usage causes starvation. Maintain 180%+ ER on Burst-dependent characters and use battery characters like Fischl. I see this mistake constantly in co-op.
Application Errors: Applying Electro before Dendro blocks Quicken. Maintain order: Dendro → Hydro → Electro. Seems obvious, but you'd be surprised how often this trips people up.
Timing Is Everything
Shield Break Timing: Break Fireblade shields immediately to prevent 30-second regeneration. Use 600% Electro-Charged damage for efficient removal – anything less and you're wasting time.
Vulnerability Windows: Burst during Vishap's post-30s phase to avoid energy drain. Positioning matters too – maintain 2m proximity for core reactions, use Anemo for grouping.
The Bottom Line on 6.1 Power Levels
Version 6.1 has established Lunar reactions as the dominant meta through Ley Line buffs, and honestly? It's refreshing to see something new take the crown. Nefer's Lunar-Bloom and Mavuika's Vaporize provide the highest DPS potential we've seen in months.
Investment Priorities:
- DPS: Level 80/90, 8/8/8 talents
- Support: Level 70/80, 1/6/8 talents, ER focus
- Reaction Triggers: Level 90/90, 800+ EM
36-star clear requires 420+ seconds remaining on Floor 12. Tight, but absolutely doable with proper investment and execution.
FAQ
Q: What is the best team for Luna II in Genshin Impact 6.1? Nefer/Lauma/Aino/Baizhu provides optimal Lunar-Bloom synergy with 100% Dendro uptime and consistent Hydro application.
Q: How do you beat Floor 12 in version 6.1? Focus Lunar reactions for first half (200% Bloom bonus) and Pyro/Electro-Charged for second half. Break shields within 30 seconds – this timing is crucial.
Q: Is Luna II better than traditional Cryo DPS like Ayaka? Nefer's Lunar-Bloom provides superior damage scaling and AoE potential compared to Ayaka's Burst-dependent gameplay. The consistency alone makes her worth the investment.
Q: What are the ER requirements for 6.1 meta teams? DPS characters need 160-180% ER, supports require 180%+ ER, reaction triggers prioritize 800+ EM over ER. These aren't suggestions – they're requirements.
Q: Can F2P players achieve 36 stars in 6.1 Abyss? Absolutely. Dendro Traveler/Xingqiu/Kuki Shinobu/Fischl works with level 90 characters, 800+ EM on triggers, 180%+ ER across the board.
Q: What artifacts does Nefer need for optimal performance? Reliquary of Truth 4pc with EM/EM/CRIT, targeting 1000+ EM, 60-70% CRIT Rate, 150-180% CRIT DMG. The EM threshold is make-or-break for her damage output.


