

Understanding Arena Breakout Stash Management in Season 6
Stash space becomes your primary bottleneck once you progress beyond early-game scavenging. Every successful raid brings weapons, armor, ammunition, and materials that quickly consume your limited inventory grid.
Season 6 maintains core storage mechanics while introducing new high-value items demanding efficient space allocation. The 1.5 million Koen mission remains the primary method for permanent stash expansion, but completing this requires substantial time investment. The Medic girl provides stash expansion boxes through her progression system.
Players looking to accelerate progression can arena breakout bonds recharge through BitTopup's secure platform, enabling faster access to storage solutions without grinding limitations.
Hideout upgrades cost hundreds of thousands of Koen, while acquiring net-positive rigs through market purchases or raid extractions provides immediate, scalable storage expansion at a fraction of the cost.
Why Stash Space Becomes Critical in Mid-Game
Mid-game players accumulate specialized equipment for different map strategies—close-quarters loadouts for Farm, long-range configurations for Armory, budget kits for experimental runs. Each weapon configuration requires dedicated storage.
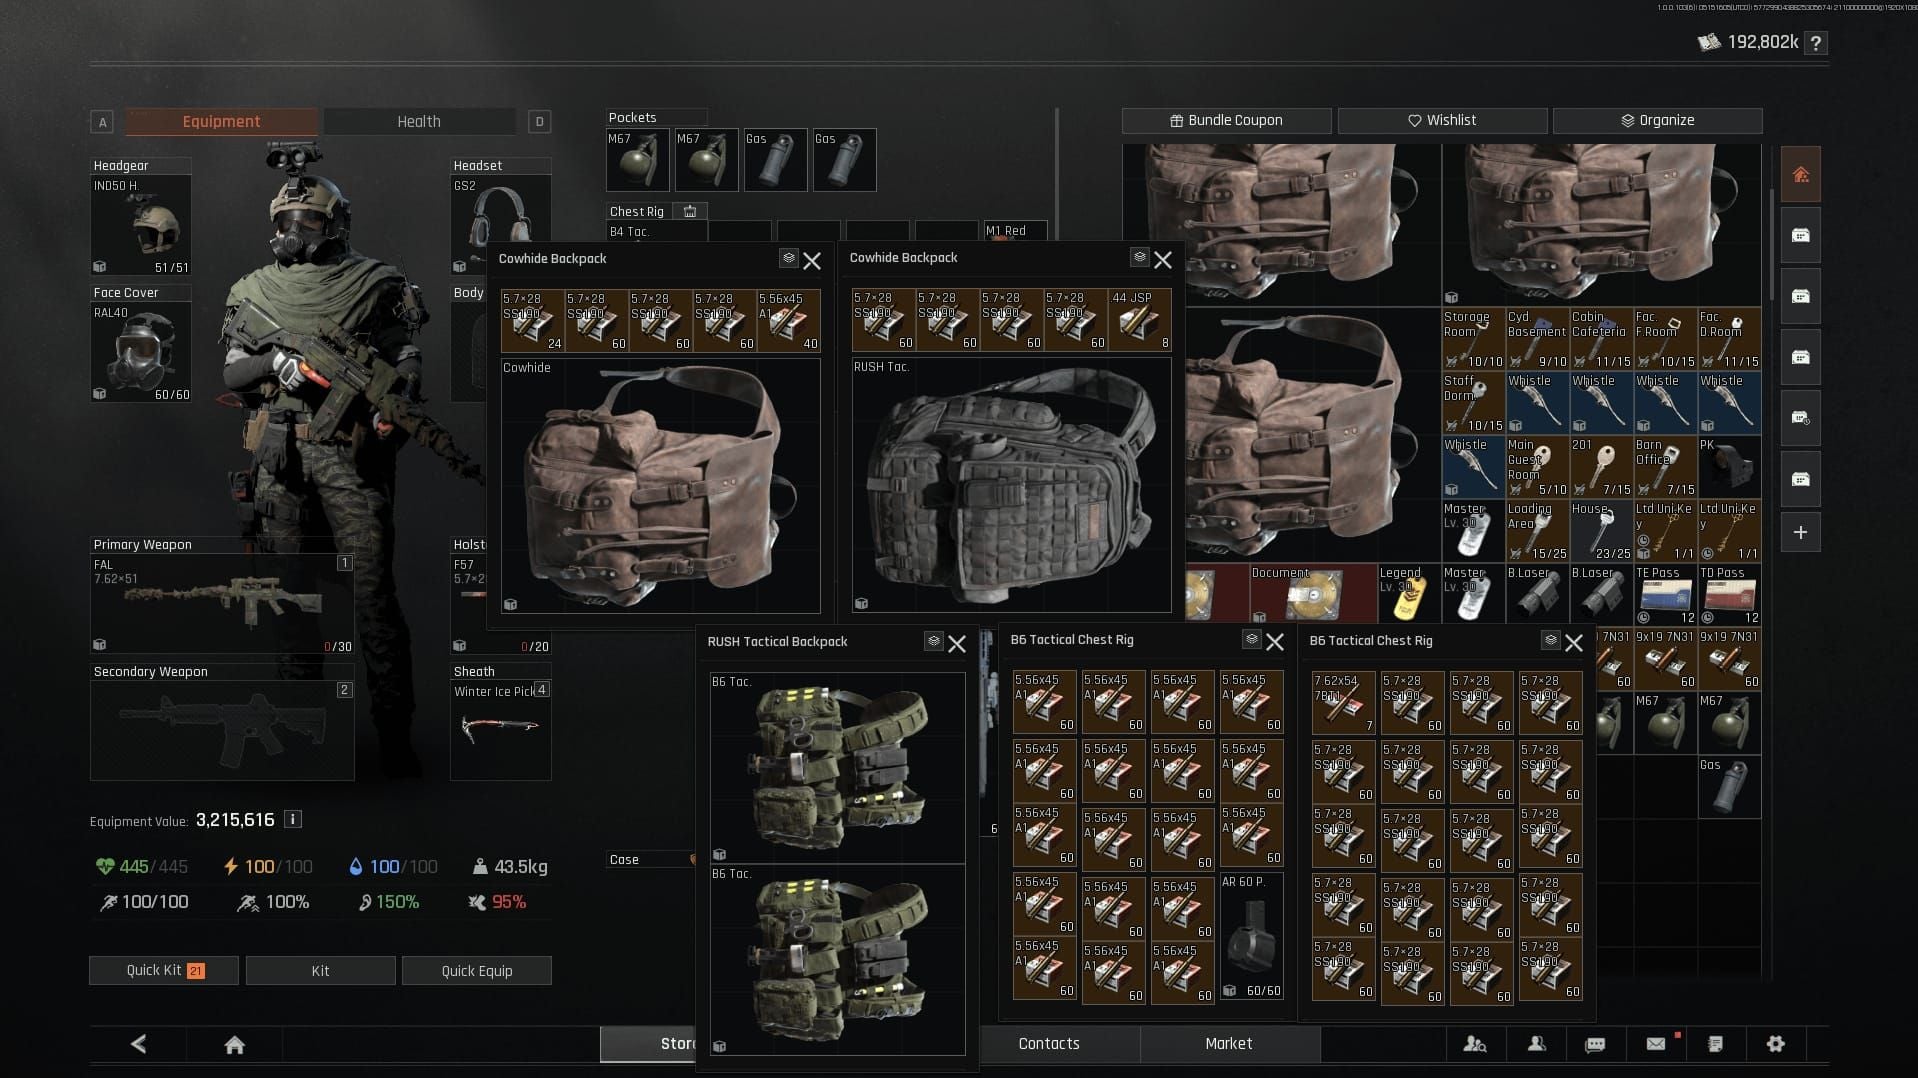
The hoarding imperative intensifies when you recognize high-value density items. T6 ammo racks holding 60 M61 rounds represent concentrated firepower that shouldn't be sold casually. Materials for hideout crafting, TMK with its 8 uses, and various cases all compete for precious stash slots.
Season 6 Storage Changes
Season 6 preserved fundamental container nesting mechanics that enable rig-in-rig stacking, ensuring veteran strategies remain viable. The market continues offering backpacks with 20-24+ slots, providing alternative storage vectors.
The stash density threshold of 5,000 Koen per slot has become the practical benchmark for retention decisions. Items exceeding this value—particularly RED and GOLD tier equipment, high-tier suppressors, and T4+ components—deserve permanent stash allocation, while lower-density items should flow to flea market sales.
Cost of Stash Upgrades vs. Optimization
Direct stash expansion through hideout upgrades delivers permanent capacity increases but requires exponentially growing Koen investments. Optimization using rig-in-rig stacking provides immediate returns with minimal upfront costs.
Completing the 3x3 Koen Chest tasks provides additional storage containers as mission rewards, creating a progression path that rewards active gameplay. These containers integrate seamlessly into rig-stacking systems, multiplying their effective value.
What Is Rig-in-Rig Stacking?
Rig-in-rig stacking exploits Arena Breakout's container nesting mechanics to create storage multiplication effects. Certain tactical rigs provide more internal storage slots than they consume in your stash grid, creating net-positive containers that generate free space.
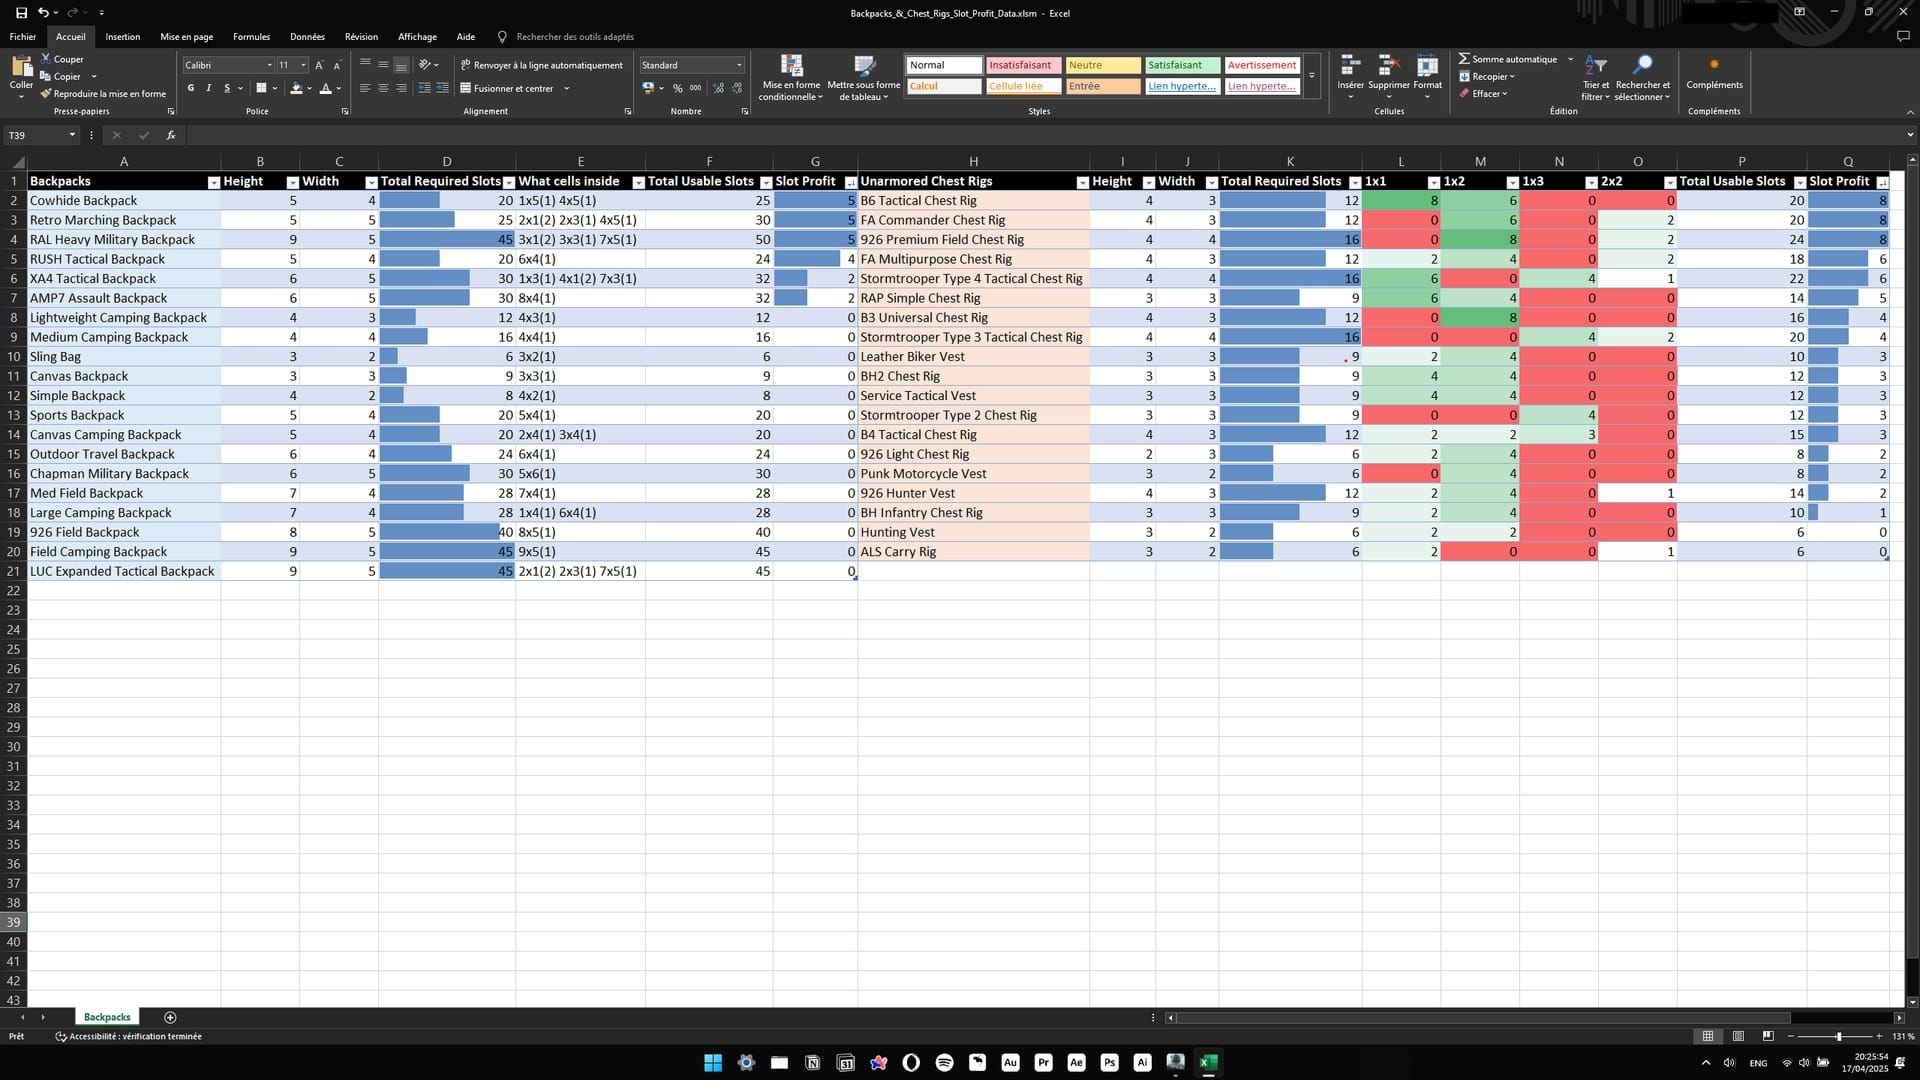
The B3 Universal Chest Rig exemplifies this: it occupies 12 external stash slots but provides 16 internal slots, yielding a net gain of +4 slots per rig. When you place a second B3 Rig inside the first one's 16 internal slots, that nested rig also provides its full 16-slot capacity, creating a daisy-chain effect that exponentially multiplies available storage.
Core Mechanics of Container Nesting
Container nesting in Arena Breakout follows specific rules. Tactical rigs accept most item types in their internal grids, including other rigs, backpacks, weapons, and cases.
The Cowhide rig demonstrates superior net-positive characteristics by consuming only 20 stash spaces while providing 25 internal slots—a +5 slot advantage. The FA commander rig offers even more dramatic efficiency, using just 12 stash spaces to deliver 20 internal slots for a +8 net gain.
Backpack nesting operates on identical principles, with large backpacks containing medium backpacks, which contain small backpacks. Combining rig stacking with bag nesting produces hybrid systems that maximize every square of stash space.
How Rig-in-Rig Differs from Standard Storage
Standard storage treats each item as an independent entity consuming its full grid footprint. This approach wastes substantial capacity through fragmentation and inefficient packing.
Rig-in-rig stacking transforms your stash into a three-dimensional storage system where containers create internal dimensions beyond their external footprint. A single stash column might contain five nested B3 Rigs, each providing full internal capacity, effectively quintupling that column's storage potential.
Space Efficiency Calculations
Starting with a basic 12-slot stash column, placing one B3 Rig (+4 net slots) increases effective capacity to 16 slots—a 33% improvement. Adding a second B3 Rig inside the first creates 20 total slots, a 67% gain. Three nested rigs reach 24 slots, doubling your original capacity.
The Large Misc Case provides 7x12 slots (84 total spaces) in a compact footprint, ideal for storing stripped weapons. The 9-slot Titanium Case perfectly accommodates MCX and AK-12 rifles after proper weapon stripping.
For players seeking to optimize their Arena Breakout experience, top up arena breakout cheap options through BitTopup provide cost-effective access to in-game currency for acquiring essential storage containers.
Step-by-Step Rig-in-Rig Stacking Tutorial
Selecting Compatible Tactical Rigs
The B3 Universal Chest Rig serves as the foundational stacking unit due to its consistent +4 slot advantage and widespread availability. Acquire multiple B3 Rigs through raid extractions, market purchases, or contact vendor trades.
The FA commander rig's exceptional +8 slot efficiency makes it the premium choice for advanced stacking systems, though its higher acquisition cost requires careful economic planning. The Cowhide rig's +5 slot advantage positions it as the middle-tier option.
Prioritize rigs with rectangular internal grids rather than irregular shapes, as uniform dimensions simplify item placement and maximize packing efficiency. Avoid rigs with negative slot ratios.
The Proper Sequence
Begin by placing your first net-positive rig in your stash grid. Open the rig's internal storage interface to access its 16-slot capacity (for B3 Rigs).
Place a second identical rig inside the first rig's internal grid. This nested rig retains its full internal capacity, creating the first multiplication effect. Open the second rig's interface and place a third rig inside it, continuing the daisy-chain pattern.
Continue nesting rigs until you've exhausted your available supply or reached practical accessibility limits. Five to seven nested rigs typically represent the optimal balance between storage multiplication and retrieval convenience.
Visual Grid Placement
Organize your stash using vertical columns dedicated to specific item categories. Designate one column for rig-stacking chains containing weapons, another for ammunition and consumables, a third for armor and equipment.
Position your most frequently accessed rig-stacking chains in the upper-left quadrant of your stash, minimizing mouse movement. Reserve lower and right-side positions for long-term storage chains containing hoarded materials, cases, and seasonal items.
Leave strategic gaps between rig-stacking columns to accommodate oversized items like sniper rifles or large backpacks that don't fit efficiently inside containers.
Filling Stacked Rigs
Populate the deepest nested rigs first with items you access least frequently—hoarded T6 ammo racks, spare cases, and materials for future hideout upgrades. The innermost containers become long-term storage vaults.
Middle-layer rigs should contain weapons and equipment for alternate playstyles or map-specific loadouts. Strip these weapons: detach magazines first, then remove pistol grips to cut storage footprint in half. This weapon stripping technique doubles your effective weapon storage capacity.
Reserve the outermost rig layers for active-rotation items—ammunition for current loadouts, medical supplies, and consumables you'll need for upcoming raids.
Best Tactical Rigs for Stacking in Season 6
Top Net-Positive Rigs Ranked
Tier 1: FA Commander Rig - +8 net slots (12 external, 20 internal). Highest storage multiplication factor. Premium market price reflects this efficiency.
Tier 2: Cowhide Rig - +5 net slots (20 external, 25 internal). Balances efficiency with moderate acquisition costs.
Tier 3: B3 Universal Chest Rig - +4 net slots (12 external, 16 internal). Widespread availability and compact footprint make it the foundation of most stacking systems.
Tier 4: Specialized Storage Rigs - Various faction-specific and map-reward rigs offer +2 to +3 net slots.
Budget-Friendly Options
New players should focus exclusively on B3 Universal Chest Rigs during their first 20-30 raids. These rigs appear frequently in mid-tier loot spawns and can be purchased from contacts at reasonable prices.
Avoid purchasing rigs with negative or neutral slot ratios, regardless of their combat effectiveness. Storage optimization requires strict adherence to net-positive mathematics.
Prioritize extracting enemy rigs during successful raids rather than selling them immediately. Even damaged rigs retain full storage capacity.
High-End Rigs: When to Invest
Transition to FA commander rigs once your liquid Koen reserves exceed 500,000 and you've completed initial hideout upgrades. The +8 slot efficiency justifies the premium price when managing diverse weapon collections.
Cowhide rigs represent the optimal mid-game investment around the 200,000-300,000 Koen threshold. Their +5 efficiency provides noticeable improvements over B3 Rigs.
Calculate your storage investment return by dividing rig cost by net slots gained. FA commander rigs might cost 40,000 Koen but provide 8 slots (5,000 Koen per slot), while hideout stash upgrades often exceed 10,000 Koen per slot.
Rig Acquisition Strategies
Farm map raids consistently yield B3 Rigs in military tent spawns and guard body armor. Prioritize these locations during budget runs.
The flea market offers competitive rig pricing during off-peak hours. Set price alerts for FA commander and Cowhide rigs at 10-15% below average market rates.
Contact vendor progression unlocks direct rig purchases at fixed prices, eliminating market volatility. Complete vendor tasks systematically to access these stable acquisition channels.
Advanced Rig Stacking Techniques
Multi-Layer Stacking
Seven-layer rig stacking represents the practical maximum for B3 Rig chains, creating 40 effective slots from a 12-slot stash footprint—more than tripling storage capacity.
Hybrid stacking combines different rig types within single chains, placing compact high-efficiency rigs like FA commanders at the base and larger-footprint Cowhide rigs in middle layers.
Parallel stacking creates multiple independent rig chains organized by item category—one chain for primary weapons, another for secondary weapons, a third for armor sets.
Combining Rig Stacking with Weapon Case Storage
The Large Misc Case's 7x12 grid (84 slots) serves as a specialized weapon repository when combined with proper stripping protocols. Detach magazines from stored guns first, reducing their grid footprint by 1-2 slots per weapon. Remove pistol grips next, cutting remaining space requirements in half.
The 9-slot Titanium Case perfectly accommodates stripped MCX and AK-12 rifles. Place these cases inside rig-stacking chains to multiply their effective capacity.
The Koen Chest's 7x3 slot configuration works ideally for storing high-density small items like suppressors, optics, and ammunition boxes.
Dynamic Stacking: Pre-Raid Loadout Preparation
Designate one rig-stacking chain as your active loadout staging area containing weapons, armor, and equipment for your next 3-5 raids. Populate this chain after each successful extraction.
Create map-specific loadout chains for Farm, Armory, and other frequently played locations. Each chain contains optimized gear for that environment.
Implement a rotation system where depleted loadout chains move to the back of your stacking sequence while restocked chains advance to accessible positions.
Organization Strategies
While Arena Breakout doesn't support visual color-coding, implement positional color-coding by dedicating specific stash regions to item categories. Upper-left for active loadouts, upper-right for weapons, lower-left for materials, lower-right for cases and long-term storage.
Use rig type as a visual indicator—B3 Rigs for weapon storage, Cowhide rigs for armor and equipment, FA commander rigs for high-value hoarded items.
Maintain consistent nesting depth across parallel chains—all weapon chains at 5 layers deep, all material chains at 7 layers deep.
Common Rig Stacking Mistakes
Incompatible Rig Combinations
Mixing negative-slot rigs into stacking chains destroys the multiplication effect. A rig that consumes 20 slots but provides only 16 internal slots creates a -4 deficit that cancels the benefits of surrounding net-positive containers.
Attempting to stack rigs with irregular internal grids creates packing inefficiencies. Prioritize rigs with rectangular grids that accommodate standard weapon and equipment dimensions.
Nesting oversized items like large backpacks inside compact rigs wastes the rig's internal capacity by filling it with a single item.
Over-Stacking
Extending rig chains beyond 7-8 layers creates diminishing returns as accessibility time increases exponentially. Each additional layer requires another container opening.
Filling every available stash slot with rig-stacking chains eliminates flexibility for temporary item storage during post-raid sorting. Reserve 15-20% of your stash as working space.
Stacking rigs you might need for actual raids locks them into storage chains. Maintain 2-3 spare net-positive rigs outside your stacking system for active loadout use.
Forgetting Accessibility
Placing frequently accessed items in the deepest nested layers creates frustration when you need rapid access. Ammunition for current loadouts, medical supplies, and consumables should remain in outer rig layers.
Organizing items purely by type without considering usage frequency forces unnecessary navigation through multiple container layers.
Failing to maintain clear mental maps of your stacking architecture leads to lost items and duplicate purchases. Document your organization system with simple notes.
Misconceptions About Container Nesting
Some players believe nested containers lose capacity or suffer penalties, but Arena Breakout applies no such restrictions. A rig inside another rig provides identical internal storage to that same rig placed directly in your stash.
The misconception that you can't nest identical rig types prevents players from implementing effective daisy-chaining. You can absolutely place B3 Rigs inside other B3 Rigs.
Assuming all tactical rigs provide net-positive storage leads to inefficient acquisitions. Always verify the external-to-internal slot ratio before purchasing or retaining rigs.
Rig-in-Rig Stacking vs. Other Storage Methods
Comparison with Standard Stash Organization
Standard organization treats stash space as a flat grid where items occupy their full footprint without multiplication effects. This approach works adequately for players with upgraded hideout stash sizes but becomes untenable once you accumulate diverse loadouts.
Rig-in-rig stacking transforms that flat grid into a three-dimensional storage system. A standard stash might hold 15-20 weapons using flat organization, while the same space with rig stacking accommodates 40-50 stripped weapons.
The accessibility trade-off favors standard organization for items you access constantly—current loadout weapons, active ammunition stocks, and frequently used consumables.
Backpack Nesting vs. Rig Stacking
Backpack nesting operates on identical principles to rig stacking, with large backpacks containing medium backpacks containing small backpacks. The market's 20-24+ slot backpacks provide substantial storage multiplication.
Backpacks generally offer superior raw capacity compared to rigs of equivalent external footprint, but their irregular shapes create packing inefficiencies for weapons and equipment. Use backpack nesting for materials, consumables, and small items while reserving rig stacking for weapons and armor.
Hybrid systems combining both methods maximize overall efficiency—rig chains for organized weapon storage, backpack chains for bulk material hoarding.
Weapon Cases and Item Cases
The Large Misc Case's 84-slot capacity makes it superior to rig stacking for pure weapon storage density, particularly when combined with weapon stripping protocols. However, cases require significant Koen investment and can't be nested inside each other.
The 9-slot Titanium Case provides specialized storage for specific weapon platforms. Place these cases inside rig-stacking chains to eliminate their stash footprint while retaining their organizational benefits.
The Koen Chest's compact 7x3 configuration works ideally for high-value small items that exceed the 5,000 Koen per slot density threshold.
Hybrid Approaches
The optimal storage architecture combines rig stacking for weapons and equipment, backpack nesting for materials and consumables, and strategic case placement for specialized items. This hybrid approach delivers 200-300% effective stash capacity compared to standard organization.
Implement a three-tier system: Tier 1 (flat stash) for active loadouts and high-rotation items, Tier 2 (rig stacking) for weapon reserves and alternate loadouts, Tier 3 (backpack nesting) for materials and long-term hoarding.
Position cases strategically within rig-stacking chains to leverage both systems simultaneously. A Large Misc Case inside a 5-layer B3 Rig chain effectively costs zero net stash space while providing 84 slots of organized weapon storage.
Calculating Your Storage Efficiency Gains
Measuring Space-to-Value Ratios
The 5,000 Koen per slot threshold serves as the fundamental retention benchmark. Items exceeding this density—T6 ammo racks, premium suppressors, RED and GOLD tier equipment, T4+ components—deserve permanent stash allocation.
Calculate individual item density by dividing flea market value by slot consumption. A suppressor worth 30,000 Koen occupying 4 slots yields 7,500 Koen per slot density, clearly exceeding the retention threshold. A food item worth 3,000 Koen in 2 slots produces only 1,500 Koen per slot—immediate vendor sale material.
Track your overall stash density by estimating total stored item value divided by occupied slots. Healthy stash density exceeds 8,000 Koen per slot.
Real Examples: Before and After
A standard 200-slot stash using flat organization typically accommodates 12-15 complete weapon loadouts with associated ammunition and equipment. The same 200-slot stash implementing comprehensive rig-in-rig stacking expands to 400-500 effective slots, holding 30-40 loadouts plus substantial material reserves.
Before rig stacking, players constantly face retention decisions—sell this weapon to make room for that armor, discard these materials to store this ammunition. After implementing rig stacking, retention decisions shift to value-based criteria rather than space constraints.
The economic impact manifests in reduced flea market dependency. Players with optimized storage maintain diverse loadout reserves, eliminating the need to purchase replacement equipment after unsuccessful raids.
Tools for Planning
Mental mapping remains the primary planning tool—visualize your stash as distinct regions dedicated to specific item categories. Sketch simple diagrams showing rig-stacking chain positions, case locations, and flat storage areas.
Spreadsheet tracking helps manage complex inventories, particularly for players hoarding T6 ammo racks, materials, and TMK. Document quantities, locations, and estimated values.
Regular audits every 10-15 raids prevent organizational decay. Review each rig-stacking chain, verify items still meet retention thresholds, and consolidate partially filled containers.
Tracking Storage Metrics Across Seasons
Season transitions often reset progression systems but preserve storage optimization knowledge. Document your organizational architecture before wipes to accelerate post-wipe reconstruction.
Track your storage efficiency improvement over time—effective slot count, average item density, loadout diversity. These metrics demonstrate mastery progression.
Compare your storage metrics against community benchmarks. Players achieving 500+ effective slots from 200 base slots demonstrate advanced technique implementation.
Complete Stash Management System for Season 6
Integrating Rig Stacking
Dedicate 60-70% of your stash to rig-stacking chains organized by item category—weapons, armor, equipment, consumables. This allocation maximizes storage multiplication while preserving sufficient flat space.
Position your rig-stacking chains along the left and bottom edges of your stash, creating an L-shaped storage infrastructure. Reserve the upper-right quadrant for flat storage of active loadouts.
Implement strict categorization rules—each rig chain serves a single purpose without mixing item types. Weapon chains contain only weapons and attachments, armor chains hold only protective equipment.
Item Prioritization
Retain all items exceeding 5,000 Koen per slot density, particularly RED and GOLD tier equipment, high-end suppressors, and T4+ weapon components.
Hoard T6 ammo racks holding 60 M61 rounds. TMK with its 8 uses deserves permanent storage despite moderate per-unit value. Materials for hideout upgrades should be hoarded until you've completed relevant construction projects.
Sell items below 4,000 Koen after flea market fees to contacts immediately—trash items, T3 armor, and food generate minimal market value while consuming valuable stash space.
Preparing for Future Hideout Upgrades
Lock keys and items exceeding 5,000 Koen density in your secure container during raids to prevent loss.
Complete the 3x3 Koen Chest tasks systematically for their container rewards, which integrate seamlessly into rig-stacking systems.
Prioritize the 1.5 million Koen mission for permanent stash expansion once you've implemented comprehensive rig stacking.
Maintaining Your System
Document your organizational architecture with simple notes or screenshots before season wipes. This documentation enables rapid post-wipe reconstruction.
Adapt your rig-stacking priorities based on early-season rig availability. B3 Rigs typically become accessible within the first 10-15 raids. FA commander rigs require mid-season economic development.
Monitor patch notes for container mechanic changes that might affect rig-stacking viability.
Funding Your Arena Breakout Storage Optimization
Acquiring In-Game Currency
Focus early-game raids on high-value loot density locations rather than container farming. Extract with items exceeding 5,000 Koen per slot to maximize per-raid earnings, then allocate 10-15% of proceeds to rig acquisitions.
Complete contact tasks systematically to unlock vendor rig purchases at fixed prices, eliminating market volatility.
Sell items below the retention threshold immediately rather than hoarding marginal-value equipment.
Cost-Effective Strategies
Prioritize B3 Rig accumulation during your first 50 raids, targeting 10-15 units before investing in premium alternatives.
Extract enemy rigs during successful raids rather than leaving them behind. Even damaged rigs retain full storage capacity.
Time your premium rig purchases during market downturns when player activity decreases and prices drop. FA commander and Cowhide rigs often see 20-30% price reductions during off-peak hours.
How BitTopup Supports Your Progression
BitTopup provides secure, fast, and cost-effective Arena Breakout bonds recharge services that accelerate your storage optimization timeline. The platform's competitive pricing ensures you receive maximum in-game currency value for your investment.
The platform's excellent customer service and high user ratings demonstrate its reliability for Arena Breakout players seeking efficient resource acquisition. Fast delivery ensures you can implement storage strategies immediately.
BitTopup's wide game coverage and secure transaction infrastructure make it the trusted choice for players optimizing their Arena Breakout progression.
Frequently Asked Questions
How does rig-in-rig stacking work in Arena Breakout? Rig-in-rig stacking places net-positive tactical rigs (which provide more internal slots than they consume externally) inside each other to create storage multiplication. The B3 Universal Chest Rig occupies 12 stash slots but provides 16 internal slots for a +4 net gain. Placing a second B3 Rig inside the first creates 20 total effective slots from 12 stash slots.
Which rigs are best for stacking in Arena Breakout Season 6? The FA commander rig offers the highest efficiency with +8 net slots (12 external, 20 internal). The Cowhide rig provides +5 net slots (20 external, 25 internal) as a mid-tier option. The B3 Universal Chest Rig delivers +4 net slots (12 external, 16 internal) and serves as the accessible foundation for most stacking systems.
Can you stack tactical rigs inside each other in Arena Breakout? Yes, Arena Breakout's container nesting mechanics allow tactical rigs to be placed inside other rigs without capacity penalties. Nested rigs retain their full internal storage capacity, enabling daisy-chain configurations where 5-7 rigs stack inside each other.
How much space can rig-in-rig stacking save in Arena Breakout? Comprehensive rig-in-rig stacking typically doubles or triples effective stash capacity. A 200-slot base stash expands to 400-500 effective slots through systematic rig stacking combined with weapon stripping protocols. Seven nested B3 Rigs create 40 effective slots from a 12-slot footprint.
What is the most efficient stash organization method in Arena Breakout? Hybrid organization combining rig-in-rig stacking for weapons and equipment, backpack nesting for materials and consumables, and strategic case placement for specialized items delivers optimal efficiency. This approach maintains flat stash space for active loadouts while using container multiplication for reserves.
How do I maximize my stash space without upgrading in Arena Breakout? Implement rig-in-rig stacking with B3 Universal Chest Rigs as your foundation, strip weapons by detaching magazines and removing pistol grips to halve their footprint, and apply the 5,000 Koen per slot retention threshold to sell low-density items. Combine rig stacking with backpack nesting to achieve 200-300% capacity gains without hideout upgrades.


